Product attributes are basically characteristics of your products, such as size, color, material, weight, etc. WooCommerce Attributes let you build variations, create useful filters, and show the right details to shoppers.
In this guide, we will guide you on how to add product attributes in WooCommerce in detail. You will learn when to use global WooCommerce attributes (values you reuse across many products) and when to use custom, per-product attributes.
You will also get step-by-step instructions for creating attributes, adding terms (for example, Small / Medium / Large), assigning them to products, and turning them into variable product options like size or color swatches.
By the end, you will be able to set up attributes so customers can find products fast, pick the exact variation they want, and you can manage product data without wasting time.
Without any further ado, let’s begin our WooCommerce tutorial on adding product attributes.
Table of Contents
Understanding Global vs. Custom Attributes in WooCommerce
Before we walk you through how to add product attributes in WooCommerce, we need to explain the following terms for your clear understanding.
What are Global Attributes?
Global attributes are reusable characteristics you create once in the WooCommerce admin and then apply to many products.
Think of names like Color, Size, or Material. You create the attribute under Products > Attributes, then add the possible values (terms) such as Red, Blue, Green, or S, M, L.
Global attributes are stored centrally, so the same set of values can be reused across your catalog. They are very handy when many products share the same options and you want consistent filtering, variations, or product archives for that attribute.
When to Use Global Attributes
- You sell many items that share the same options (for example, shoes in sizes S–XL).
- You want customers to filter the shop by the same terms (e.g., all products that are black).
- You plan to create variable products from a common set of values.
What are Custom Product Attributes?
Custom attributes are defined directly inside an individual product’s edit screen (Product data > Attributes).
They are specific to that product and are ideal for details that don’t repeat across many items. For example, Engraving Text, Edition Number, or a one-off specification.
Custom attributes let you quickly add product-specific data without touching the global attribute list. They can also be marked “Visible on the product page” or “Used for variations” when needed.
When to Use Custom Attributes
- The attribute applies only to a single item or a very small set of products.
- You need a quick, product-level field and don’t want to clutter the global attribute list.
- You want a value shown on the product page but not used for global filtering.
Attributes vs. Tags vs. Categories — A Quick Distinction
These three tools overlap but serve different catalog-organizing roles:
- Categories are broad, hierarchical groups (for example, Clothing → T-shirts). Use categories for major site sections and navigation.
- Tags are non-hierarchical labels for micro-descriptors (for example, organic, limited edition). Tags are flexible and useful for small shared characteristics that don’t need hierarchy.
- Attributes are structured product properties used for variations and filtering (for example, Size, Color, Material). Attributes are product-focused and can be global (reusable) or custom (product-specific).
Practical guidance
- Use categories to group similar product families.
- Use attributes when customers need to choose options (variations) or filter the catalog.
- Use tags for loose, searchable labels that cut across categories.
Mini comparison table
| Feature / Use | Global Attributes | Custom Attributes | Categories | Tags |
| Created at | Products → Attributes (central) | Product edit screen (per product) | Products → Categories | Products → Tags |
| Reusable across products | ✅ | ❌ (usually single product) | ✅ | ✅ |
| Good for filtering/variations | ✅ | Limited (can be) | No (broad grouping) | No (not for variations) |
| Best for | Consistent option sets (Size, Color) | One-off product details | Main product groups | Micro descriptors / quick labels |
| Example | Color: Red, Blue, Green | Engraving: “Custom text” | Clothing → T-shirts | organic, sale, handmade |
How to Add Product Attributes in WooCommerce: Adding Global Attributes
Let’s find out how to add global attributes in WooCommerce step-by-step.
Step 1: Navigate to The Attributes Section
- Log in to your WordPress back panel.
- Navigate to Products > Attributes.
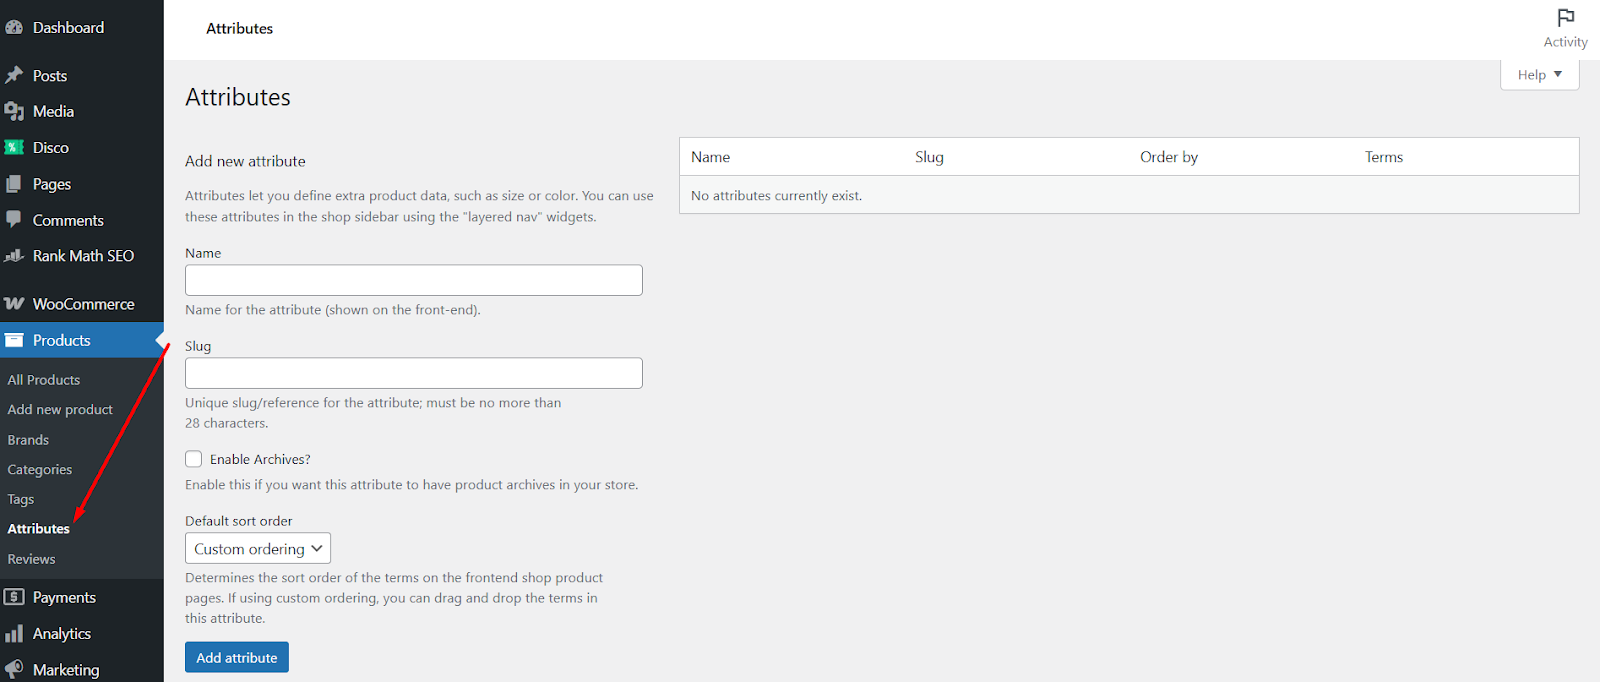
- This page shows the list of existing global attributes on the right and a simple form to add a new attribute on the left.
- If you do not see this option, check that WooCommerce is active and you have the proper user role (Shop Manager or Administrator).
Step 2: Create Your New Global Attribute
- On the Products > Attributes page, use the fields on the left.
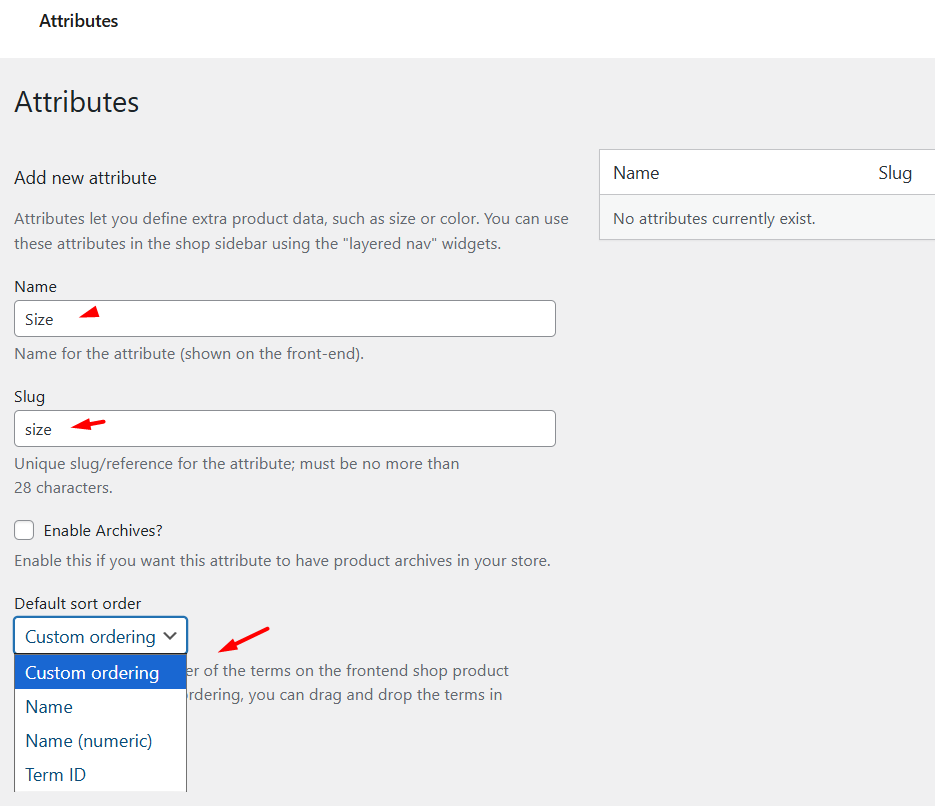
- Name — input a name that clearly states the purpose, such as Size or Color. This is what customers and filters will show.
- Slug (optional) — a short, URL-friendly version (lowercase, hyphens instead of spaces) like size or color. If you don’t write anything here, WooCommerce will automatically generate one for you.
- Default sort order — choose how terms appear by default. Options include:
- Name (alphabetical)
- Name (numeric) (for numeric values such as sizes)
- Term ID
- Custom ordering (you can drag and drop terms later).
- Click Add attribute to add the new global attribute. After you create, it will appear in the list on the right.
Tip: Use short, clear names for attributes. Keep slugs simple (lowercase and hyphens) to avoid URL and import issues.
Step 3: Configure Attribute Terms (Add Values Like Small, Medium, Large)
- Hover over the new attribute you created on the right panel. The available settings will pop up.
- Click Configure terms (or click Edit, then the link to terms).

- On the Configure Terms page, add individual values one at a time:
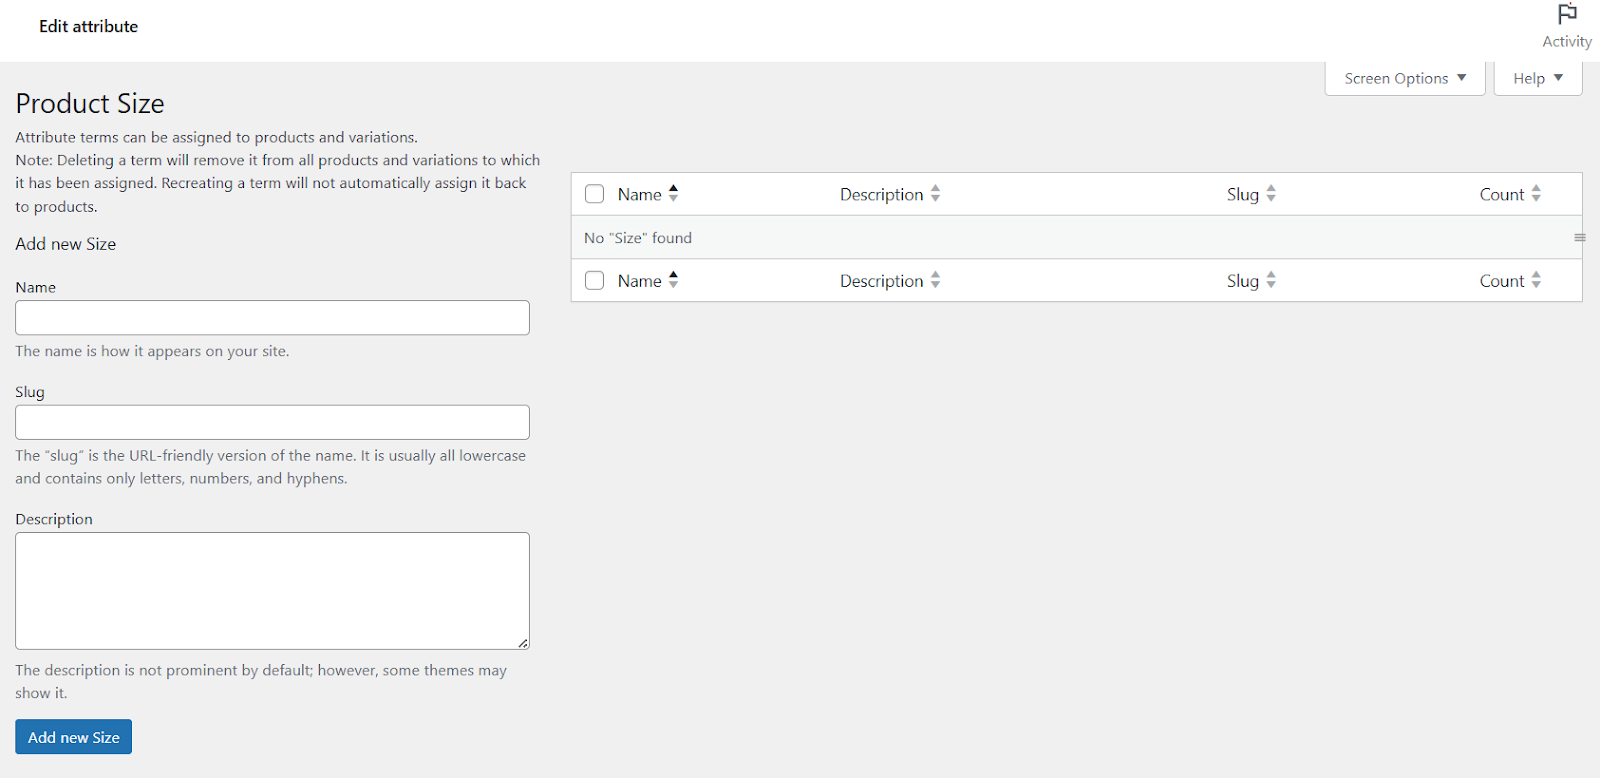
- Name — e.g., Small
- Slug (optional) — e.g., small
- Description (optional) — used by some themes or plugins (not always shown to customers).
- Click Add new [Attribute Name] for each value.
- Repeat until you’ve added all the values you need (for example, Small, Medium, Large).
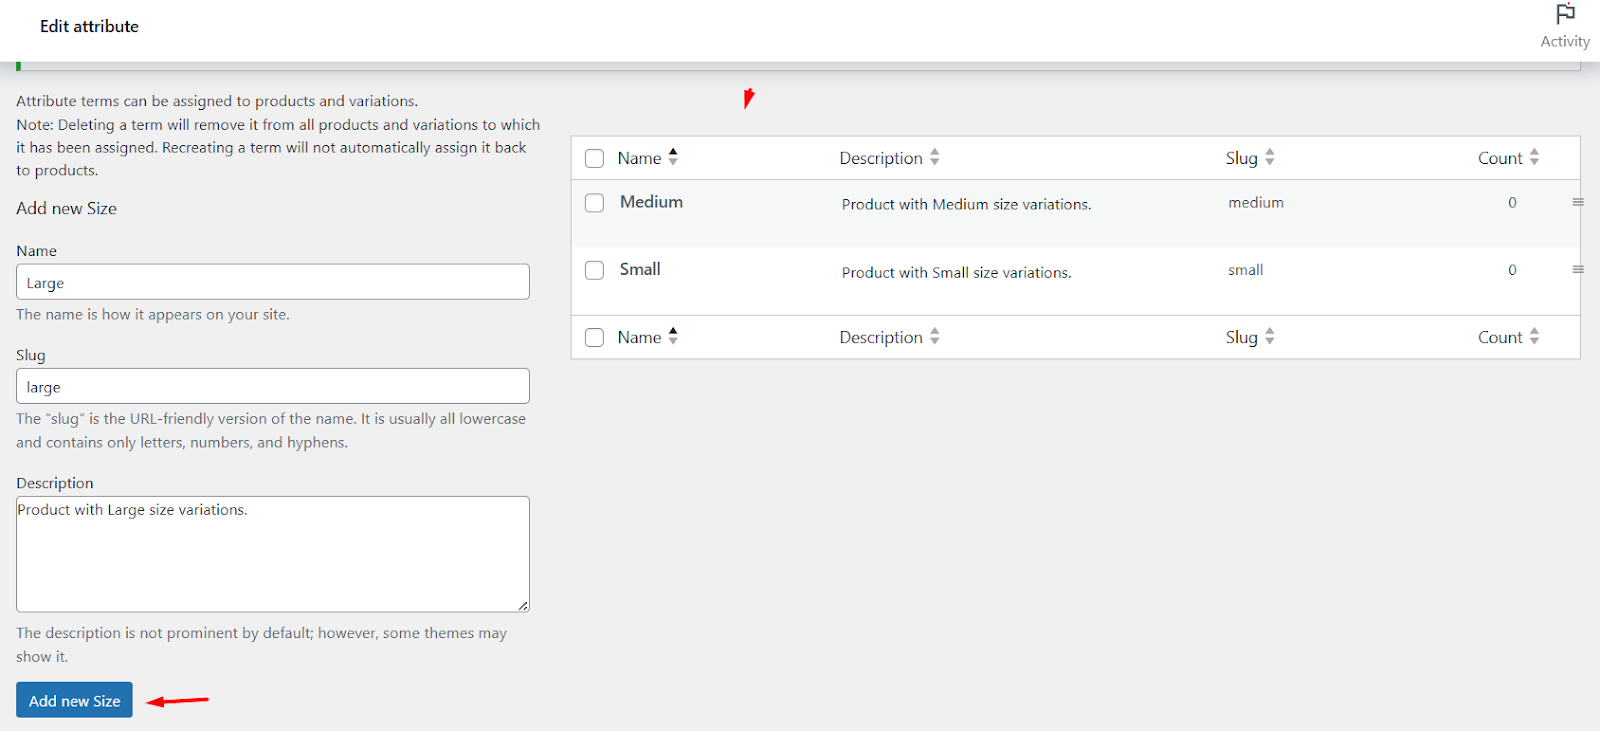
- If you chose Custom ordering earlier, you can drag and drop these terms to set their display order.
Step 4: Assign Global Attributes to a Product
- Visit a product page and scroll to the Product Data section.
- Click the Attributes tab and click the Add Existing dropdown.
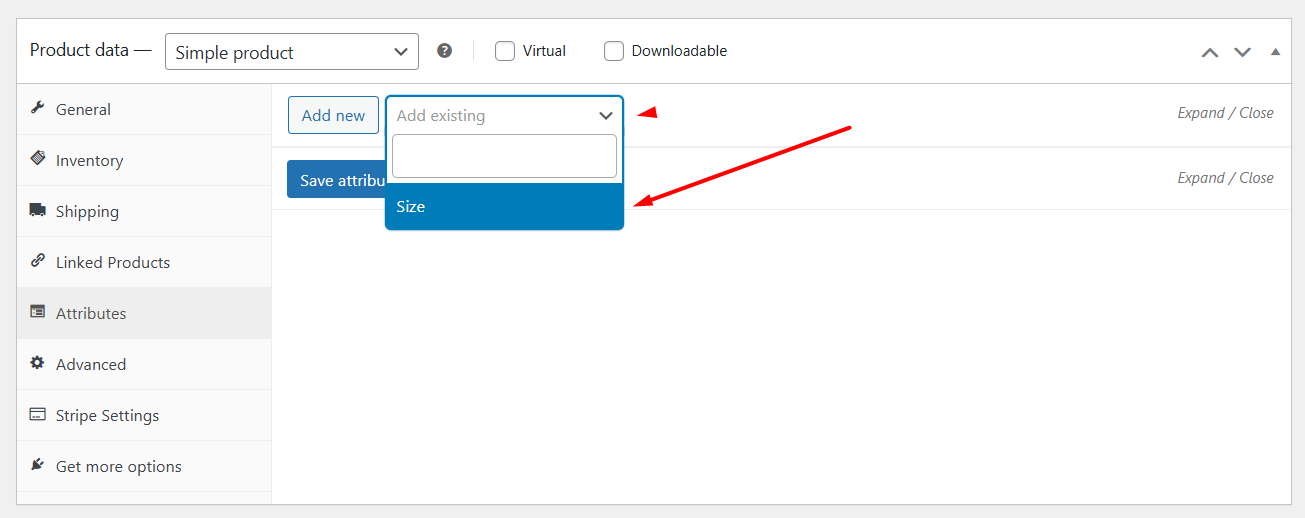
- Your newly created item should appear in the dropdown list. Click to select it.
- Click Select All to insert all the values for this attribute automatically.
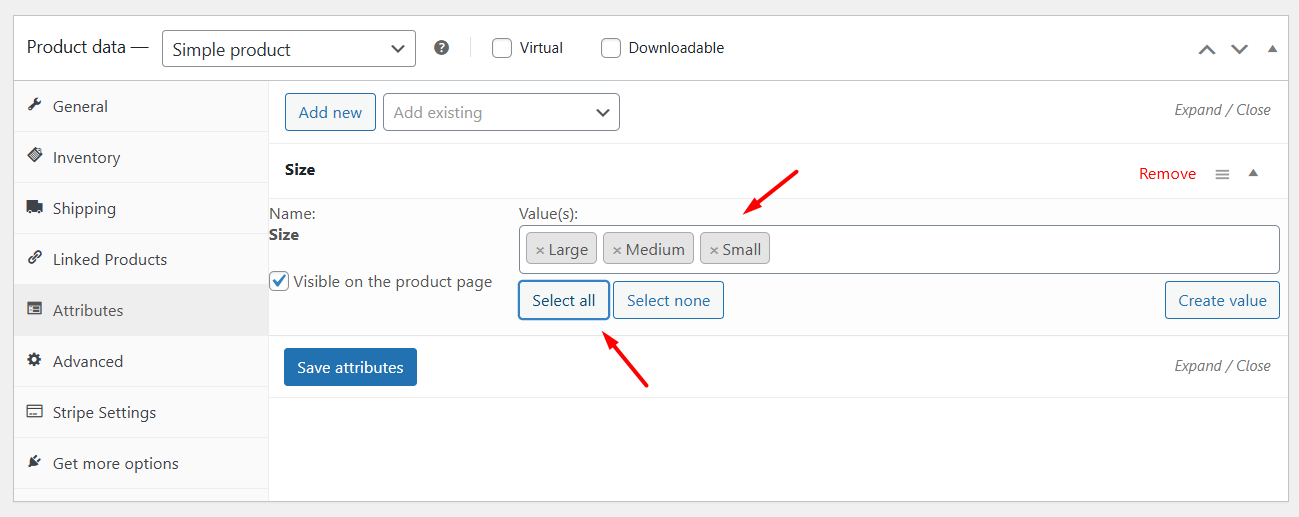
- If terms do not appear on the product editor, clear any object cache and reload the admin. For imports and programmatic adds, see import docs or developer notes.
This is how to add product attributes in WooCommerce using global Attributes settings.
Short FAQ / Common notes
- Can I add values in bulk? Not in the core UI for global attributes; you add terms one by one. For bulk changes, use CSV import plugins or a taxonomy editor plugin.
- What’s the difference between adding terms here vs on the product page? Terms you add here are global and reusable. On a product page, you can add custom (local) attributes or reference a global attribute’s terms. Use the global list when many products share the same options.
How to Add Product Attributes in WooCommerce: Adding Custom Attributes to a Single Product
If you need to add specific attributes to an individual product, you can do so from that product page’s attribute tab. Here are the steps.
Step 1: Go to The Product’s Attributes Tab
- From Products > All Products, find the product you want to modify and click Edit.
- Scroll down to the Product Data section.
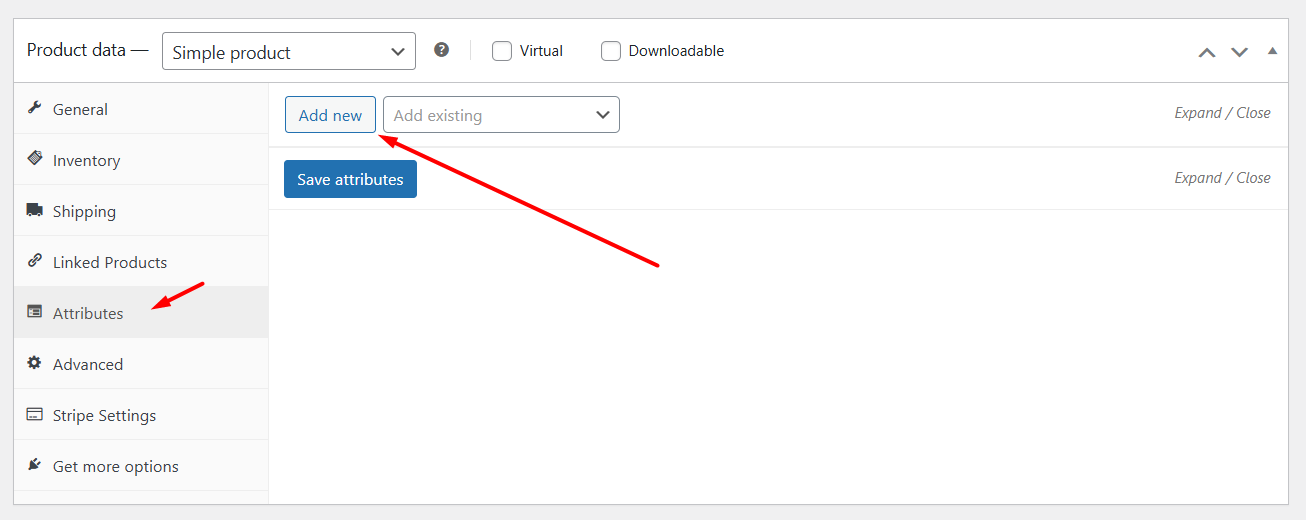
- Click the Attributes tab. This tab allows you to add both global and custom product attributes.
Step 2: Add a Custom Product Attribute
- In the Attributes tab, click Add New.
- An empty panel will appear.
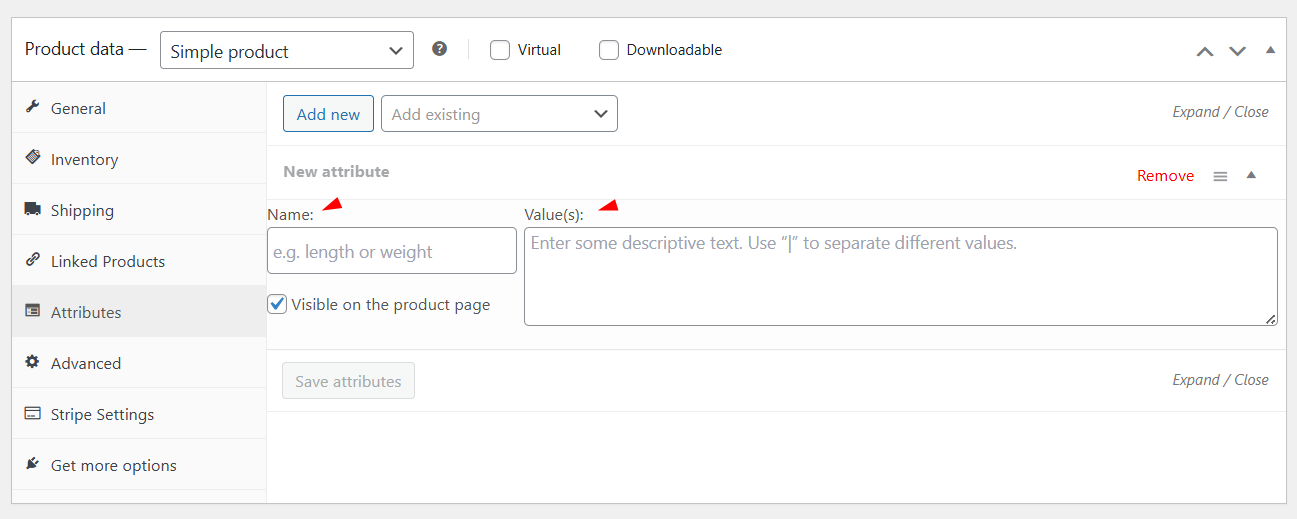
- In the new panel, enter the Name for the attribute. Use a short, clear name such as Special Engraving or Edition Number.
- In the Value(s) box, type the value or values for this product. If you need multiple values, separate them with a pipe | character. Using the pipe is the standard way WooCommerce parses multiple values entered on the product screen.
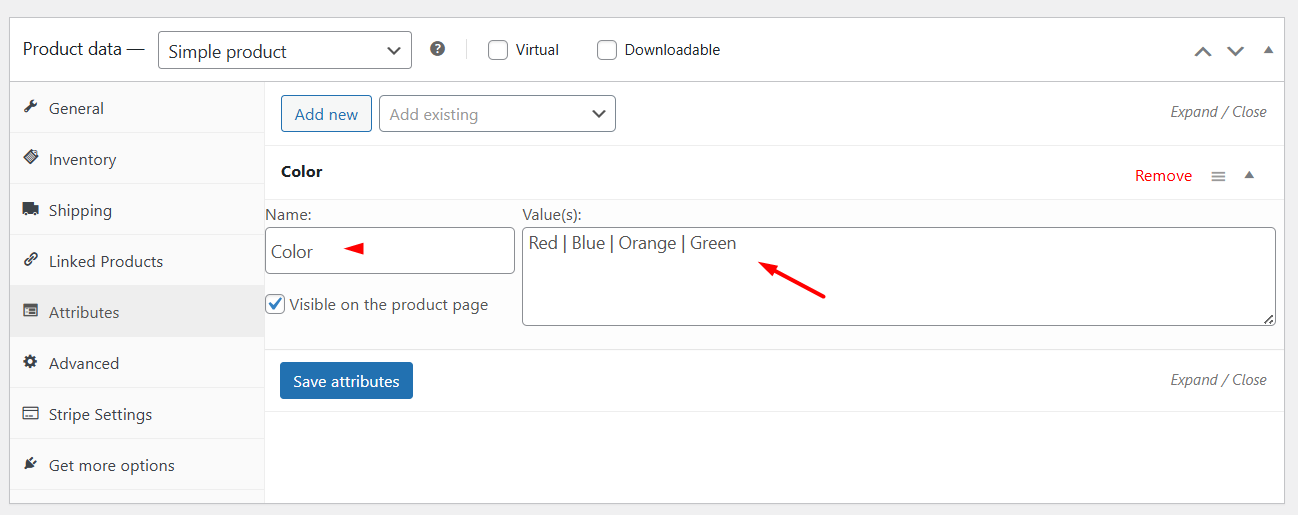
- Click Save attributes (button inside the Product data box) and then update or publish the product to store your changes.
Quick notes and best practices
- Custom = product-specific. Attributes added this way are stored only for that product. They are not added to the global attributes list and cannot be reused by other products unless you recreate them.
- Use the pipe | to separate multiple values. For example, Small | Medium | Large. This is required for WooCommerce to interpret the values as separate terms on the product screen.
- Keep names and values simple. Short, clear names and simple slugs help when you later export, filter, or convert custom attributes to global attributes.
Using Attributes to Create Variable Products and Variations
The primary purpose of WooCommerce attributes is to be used in a variable product so that customers can pick their preferred product version. If you have a product that comes in different variations and need to charge different rates for each variation, you must start by configuring attributes.
Therefore, you create a Variable product when one product has multiple purchasable options that change price, SKU, stock, or image. For example, a T-shirt with different sizes and colors.
Let’s create one such variable product by setting attributes.
How to Create a Variable Product in WooCommerce?
We have already covered this topic in detail here. However, we will quickly cover the necessary steps for you to understand the process.
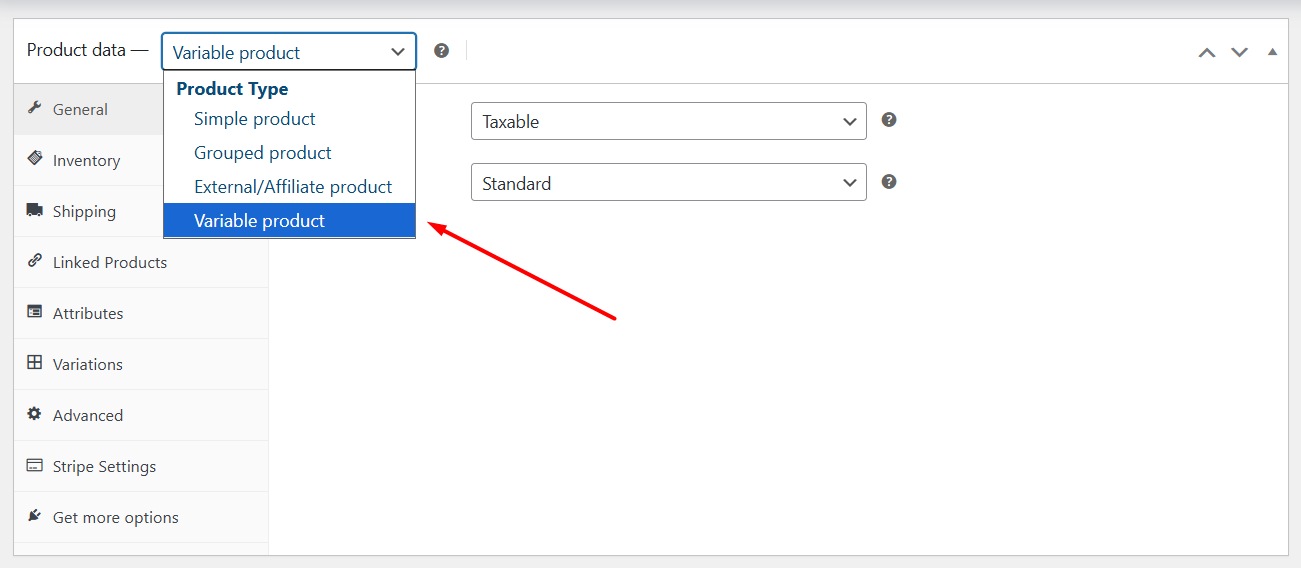
- Create/Edit a product and scroll down to the Product Data section
- From the Product Type dropdown, select the Variable Product option.
- Click the Attributes tab.
- Create the necessary attributes or fetch existing global ones.
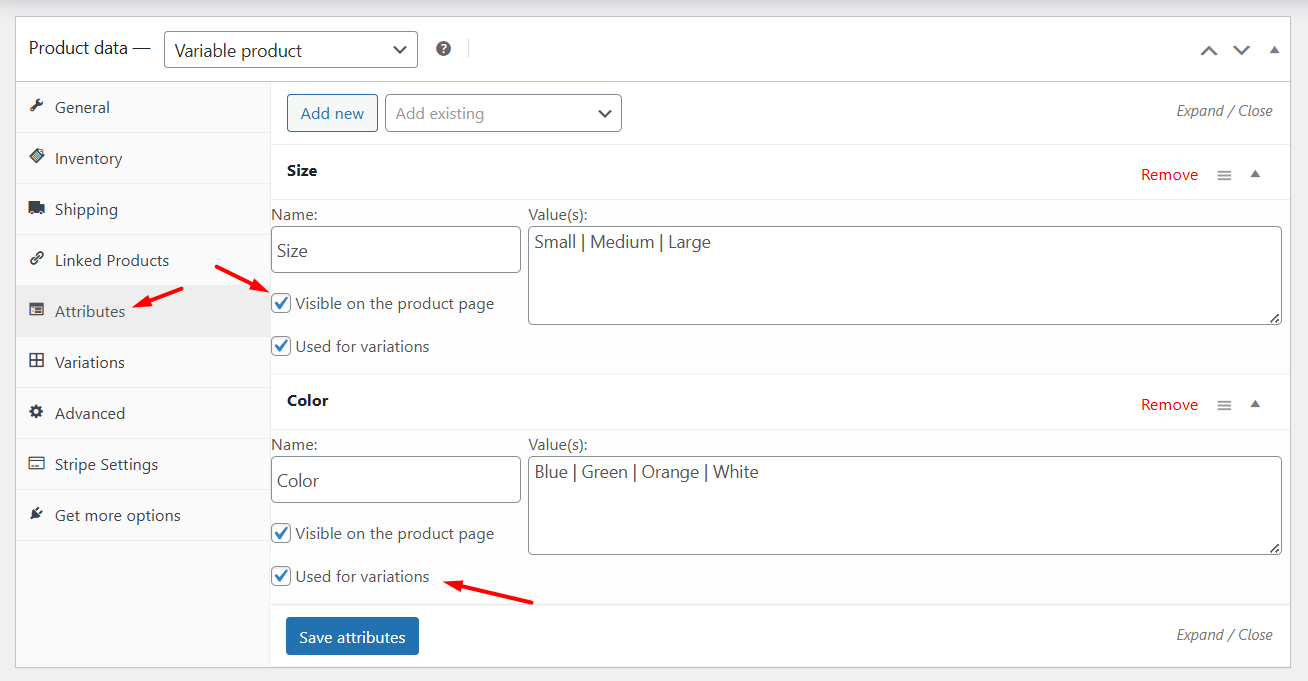
- You must ensure the following check boxes are enabled/marked.
- Visible on the product page
- Used for variations
- Jump to the Variations tab and click Generate Variations.
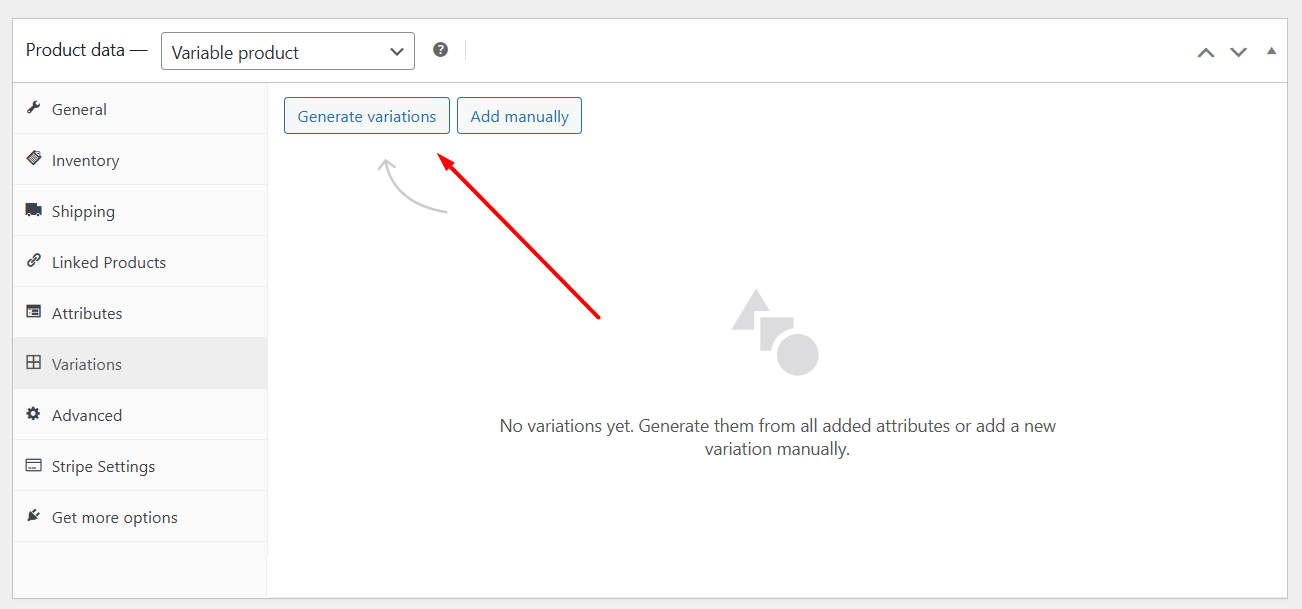
- This will create all possible variations based on the attributes and their values. This means WooCommerce will create one variation for every combination of selected terms (for example, Small+Red, Small+Blue, Medium+Red, etc.).
- If you prefer, choose Add Manually to create each variation manually. Manual is useful when only a few combinations are sold.
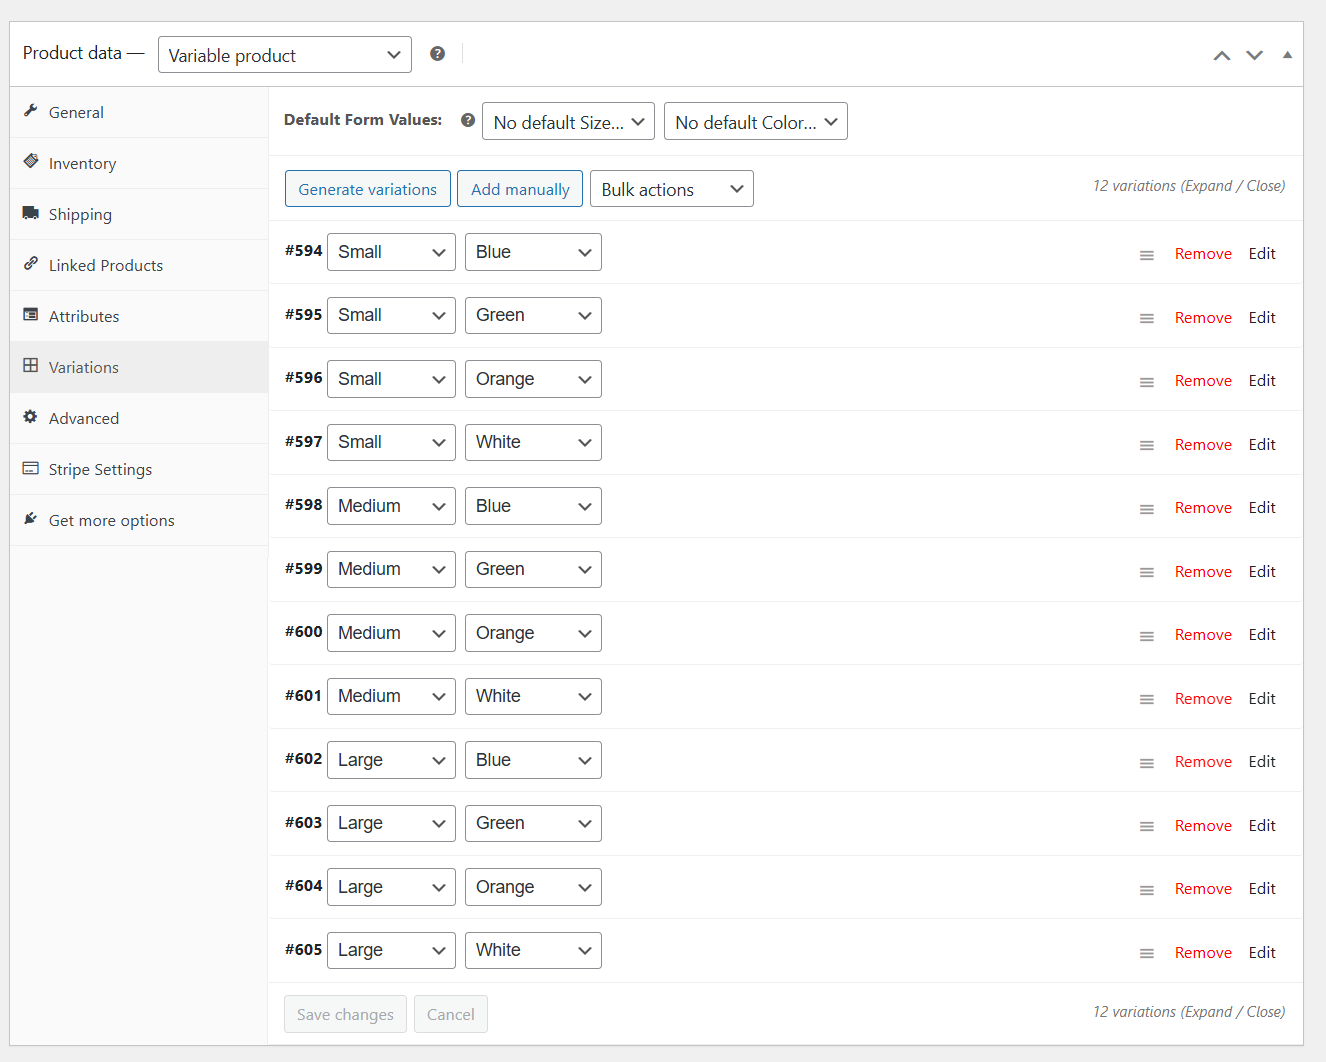
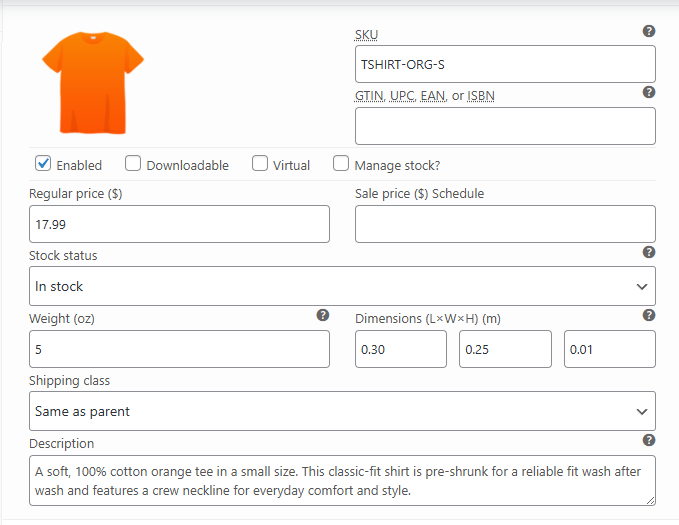
- You can now expand each variation and add a price per variation, SKU, Stock status, Weight/dimensions (if different), and Image.
- Save changes and Publish/Update the product.
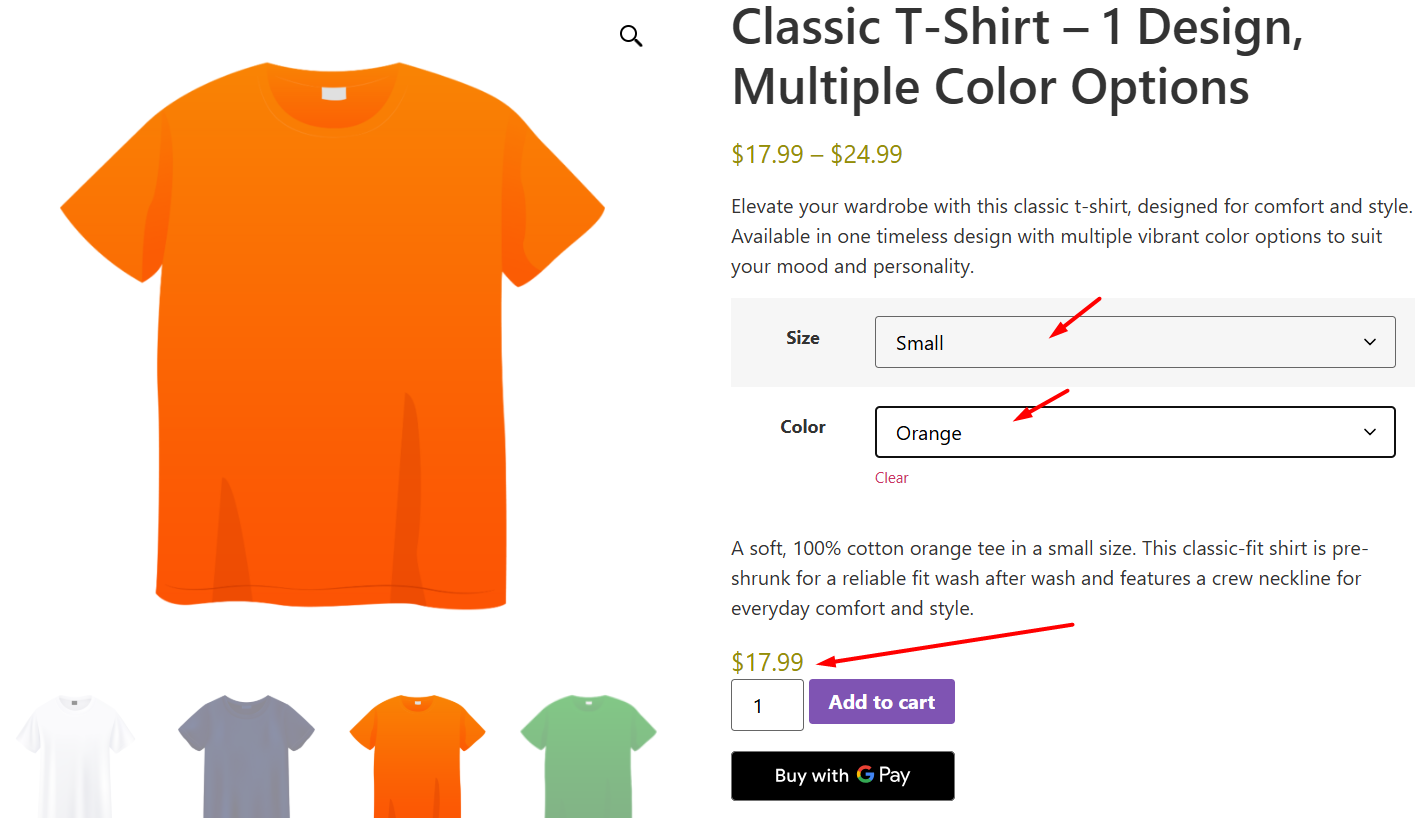
- Customers can now view the attributes at the storefront and purchase their preferred variation.
Displaying and Filtering Products by Attributes
As we have already learned how to add product attributes in WooCommerce, it’s equally crucial for us to know how to display and filter products by attributes correctly. Here’s what you need to know.
How Attributes Enhance Product Pages
Attributes make product pages clearer and faster to understand. When you show values such as Size, Color, or Material on the product page, customers see the important facts at a glance.
By default, WooCommerce shows attributes in the Additional information tab on the single product page.
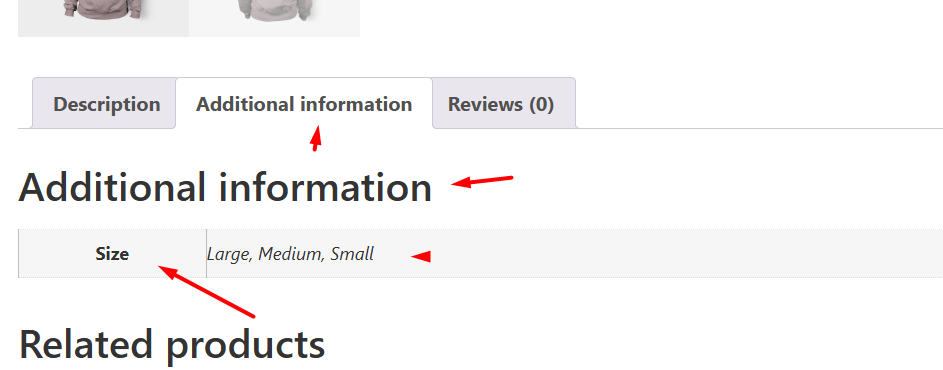
You can also show specific attributes elsewhere with a small template change or a page-builder block if you want them closer to the add-to-cart area.
Quick, Practical Benefits:
- Shoppers compare options quickly and pick the right variant.
- Attributes let you attach product facts to structured data and improve search visibility for attribute-driven queries.
- Keeping attribute names and values consistent (use global attributes when possible) makes filtering and reporting reliable.
Utilizing Attribute Filters in Your Shop
WooCommerce makes it easy for shoppers to find what they need by using filter blocks. The main option is the Product Filters block, which lets customers narrow down products based on attributes such as size, color, or material.
- To add filters, go to Pages > Edit your Shop page (or any custom product archive) and insert the Product Filters block where you want it to appear.
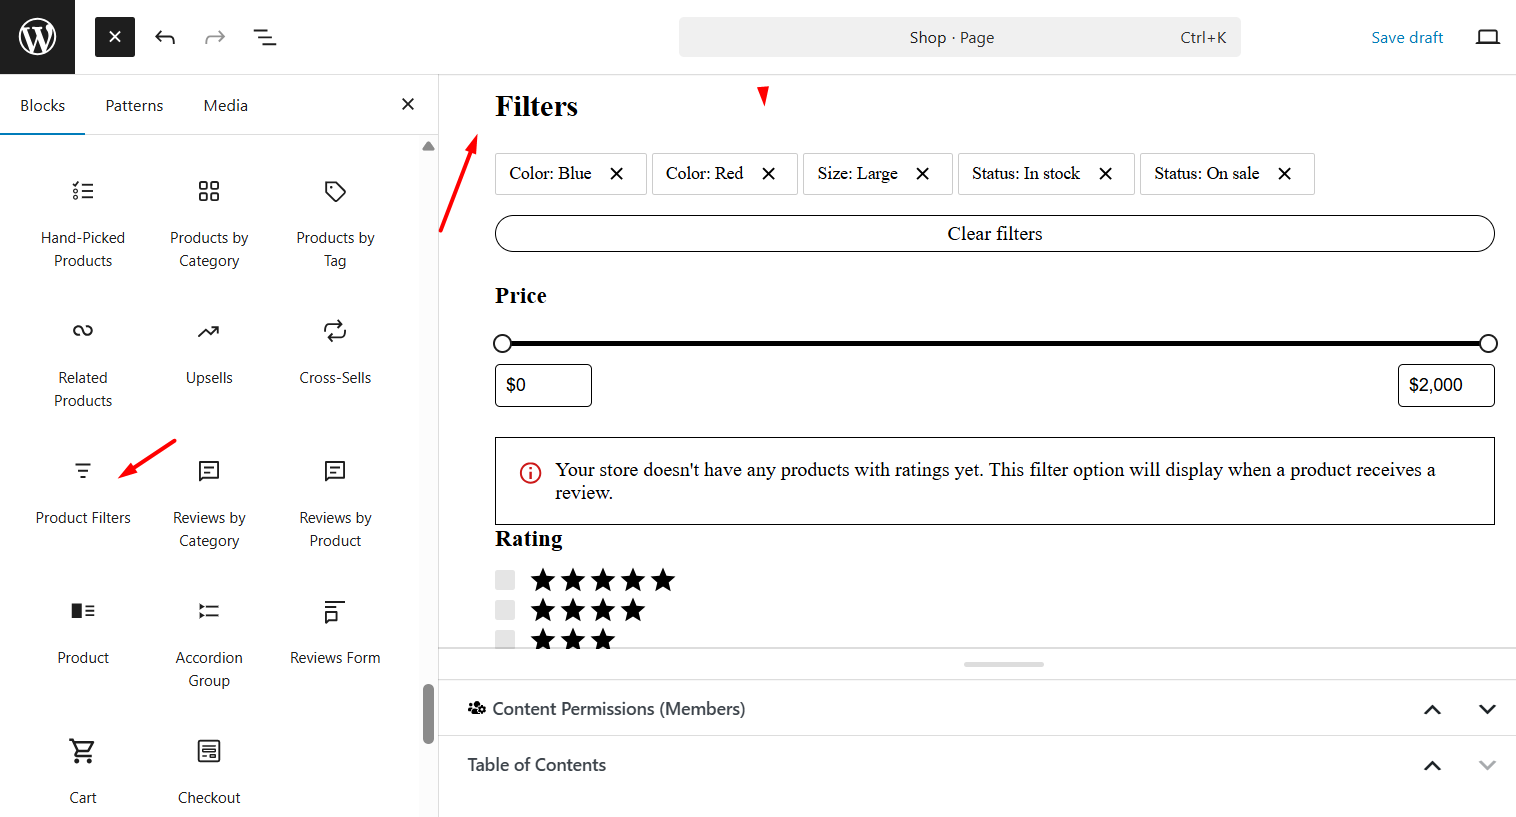
You can place it in a sidebar, at the top of the product list, or in another area IF supported by your theme.
Important notes on using filters:
- Works with global attributes only – make sure you’ve created attribute terms under Products > Attributes > Configure terms before using filters.
- Basic vs. advanced filtering – the built-in Product Filters block works well for standard shops, but if you want AJAX live filtering, swatches, images, or multi-select options, you may need a premium plugin like WooCommerce Product Filters or a third-party extension.
- Theme integration – some themes provide extra styling or dedicated areas for filters, so the placement and layout may vary depending on your theme.
When done right, attribute filters improve the shopping experience and help customers quickly find products that match their preferences.
Where to Place Filters (Typical Locations)
- Sidebar (classic): Most shops put attribute filters in the left or right sidebar so customers can combine options while browsing. This is the most common and expected location.
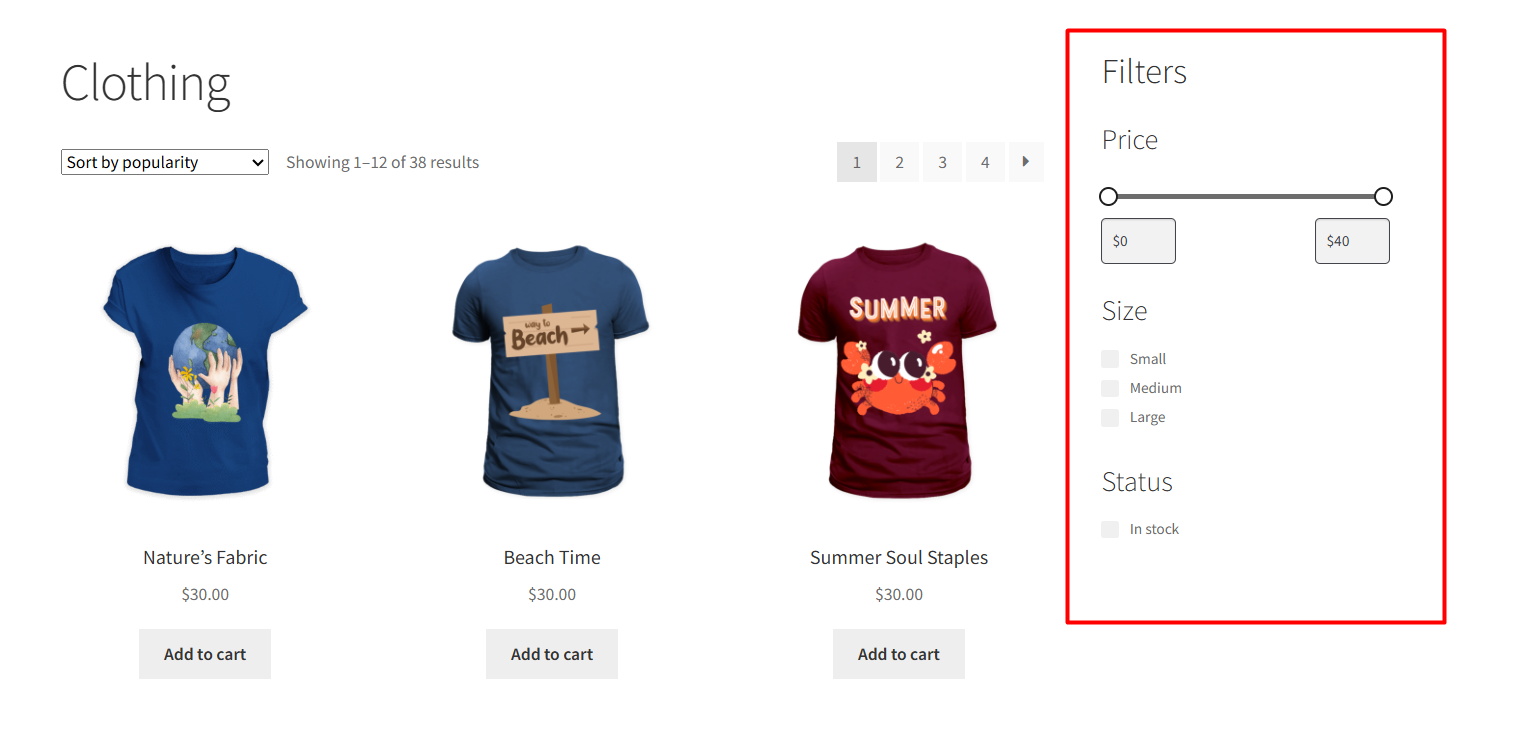
- Top of the shop / above listings: Some plugins let you show compact filter bars above the product grid—good for mobile and modern layouts.
- Off-canvas / drawer: On smaller screens, you can hide filters behind a “Filter” button that opens a panel. Many filter plugins support this responsive pattern.
UX Tips and Common Issues
- Start simple. Add only the most useful filters first (size, color, price). Too many filters overwhelm customers.
- Mind combinations. Allow customers to select multiple terms (e.g., Red + Blue) when it makes sense. Some older layered-nav widgets are limited here; premium filter plugins handle multi-select reliably.
- Watch performance. Large catalogs, combined with complex queries, can slow down the shop. Use a caching strategy and test filter performance when adding many filters or using AJAX.
- Test on mobile. Filters should be easy to use on phones. Off-canvas drawers or top bars often work better than long sidebars for mobile users.
Wrap Up
This was our guide on how to add product attributes in WooCommerce.
Attributes may look simple, but they play a big role in making your store more user-friendly. They help you create product variations, show extra details on product pages, and give shoppers better filtering options when browsing your catalog.
If you’re just starting out, begin with the basics – add a few global attributes like size or color, and display them on your product pages. As your store grows, you can explore filters and variations to give your customers more control and a smoother shopping experience.
