Did you know, products with variations can increase conversion rate by 20%, organic traffic by 25% and decrease bounce rate by 25%?
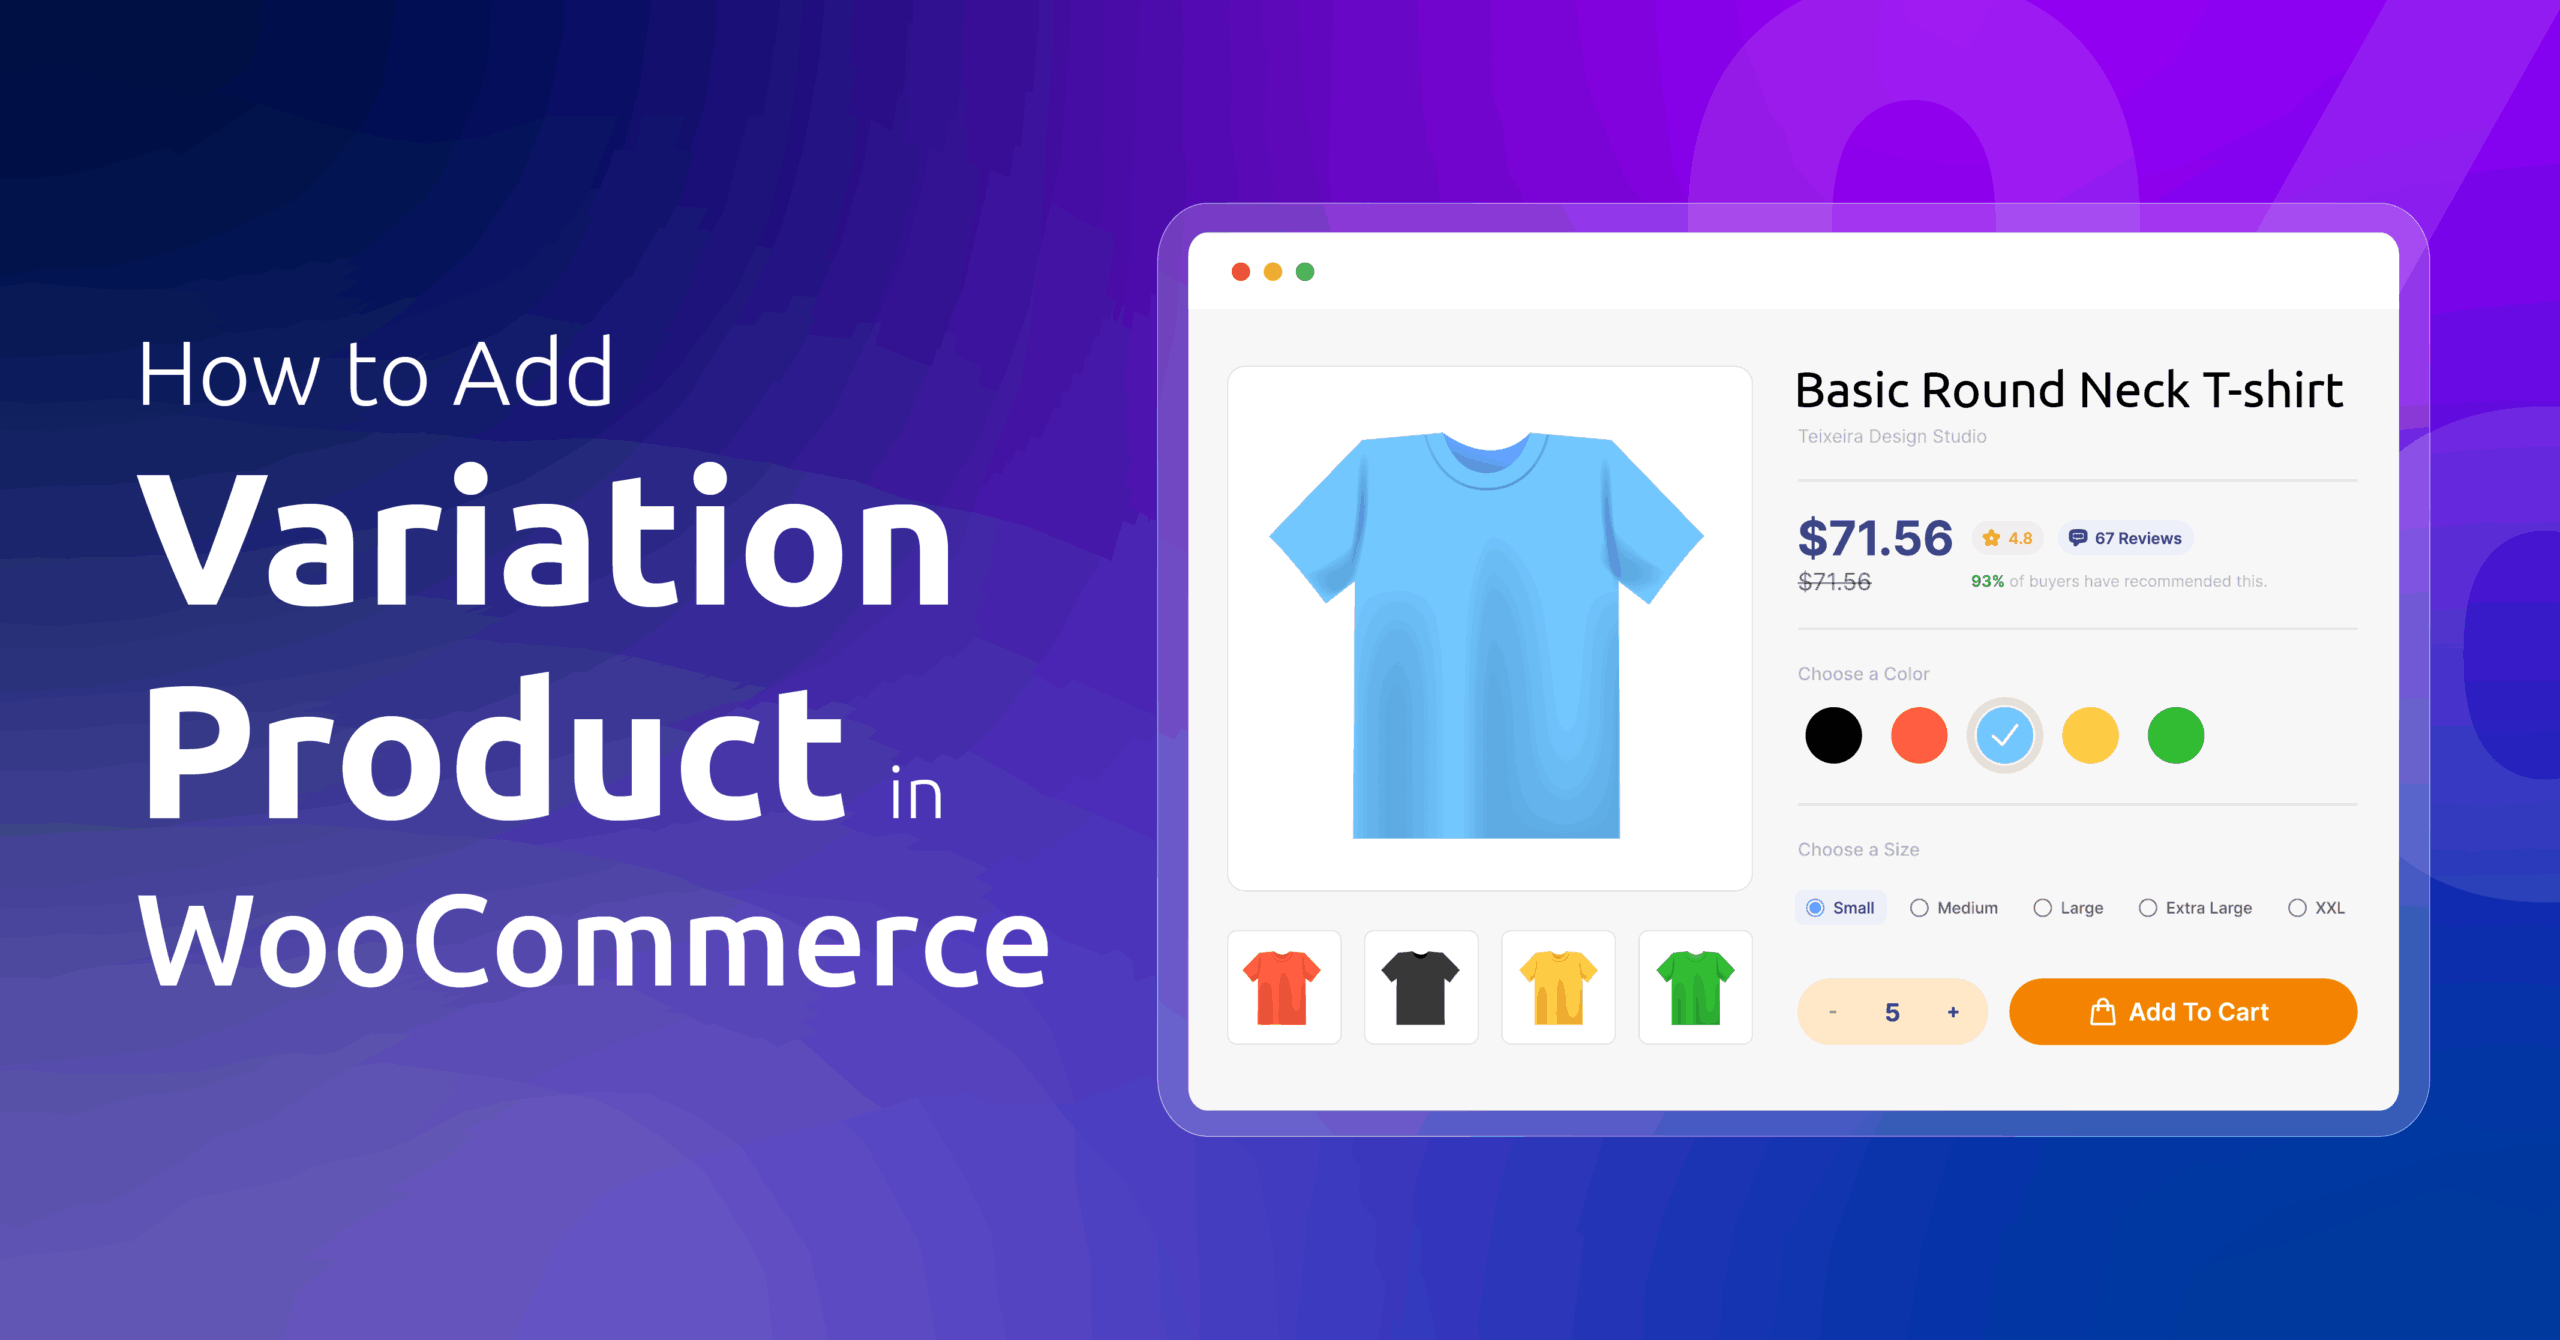
You may have products that come in different colors, sizes, or styles. Maybe T-shirts where customers pick their size and color combo. Or phone cases that fit various models.
Instead of creating 10 separate listings (what a headache!), WooCommerce lets you bundle everything into one smart product with variations.
If you’re tired of inventory nightmares or missing sales because customers can’t find the blue size-M version, you’re in the right place. By the end of this guide, you will learn how to add variation product in WooCommerce like a pro – no tech headaches, I promise.
Let’s get your products working smarter, not harder!
Table of Contents
What is a WooCommerce Variable Product?
A variable product in WooCommerce lets you offer a single listing with multiple options—such as sizes, colors, or materials, so customers can choose exactly what they want on one page. Each variation can have its own price, SKU, stock level, and image.
This flexibility helps store owners manage complex inventories and gives shoppers a smooth, consolidated experience.
Core Benefits
- Simplified Catalog: One product page handles all options, reducing clutter.
- Better UX: Customers see every choice in dropdowns or swatches, cutting down on extra clicks.
- Precise Management: Track stock, pricing, and images per variation.
Simple vs. Variable Products
- Simple Products consist of one fixed item with a single price and no options—ideal for standalone items like books or electronics.
- Variable Products group related options (e.g., T-shirt in sizes S, M, L) under one parent product. Use variables when items share core details but differ in attributes like size or color.
When to Use Variations vs. Separate Listings
- Use Variations when options share the same description, shipping class, and core imagery, but differ in attributes (size, color, material).
- Separate Listings work best if each option is a distinct product—say, different models with vastly different features or prices that confuse customers when lumped together.
Understanding the Fundamentals: Attributes vs. Variations
Before showing how to add variation product in WooCommerce, we should discuss two of the most important terms that help add variations to a product in WooCommerce.
What Are Product Attributes in WooCommerce?
Attributes are the building blocks of your variations. They define characteristics such as size, color, or material.
- Global Attributes
- Created once under Products > Attributes.
- Reusable across any product.
- Easy to edit centrally (e.g., rename “Blue” to “Navy” store-wide).
- Custom (Product-Specific) Attributes
- Defined per product on its edit page.
- Useful for one-off options that won’t repeat elsewhere.
What Are Product Variations in WooCommerce?
Variations are the actual combinations of attributes your customers select.
For example, if you have a “Color” attribute (Red, Blue) and a “Size” attribute (S, M, L), WooCommerce can generate six variations: Red-S, Red-M, Red-L, Blue-S, Blue-M, Blue-L. Each variation is treated like a mini-product with its own stock, price, and image.
The Relationship Between Attributes and Variations
- Define Attributes: Create global or custom attributes and assign values.
- Enable for Variations: On the product edit page, mark attributes as “Used for variations.”
- Generate Variations: Auto-create all possible combinations or add them manually.
- Configure Each Variation: Set price, SKU, inventory, image, and any downloadable or virtual flags.
By mastering attributes first, you ensure your variations build correctly and you unlock the full power of WooCommerce’s variable product system. Now, let’s learn how to add variation product in WooCommerce.
How to Add Variation Product in WooCommerce – Step by Step
We already know the terms, let’s see them in action. Here’s how to add variation product in WooCommerce step by step.
Step 1: Create a WooCommerce Variable Product
Log in to your WordPress WooCommerce site admin panel. Then,
- Navigate to Products > Add New Product.
- Enter basic details such as title, description, images, etc.
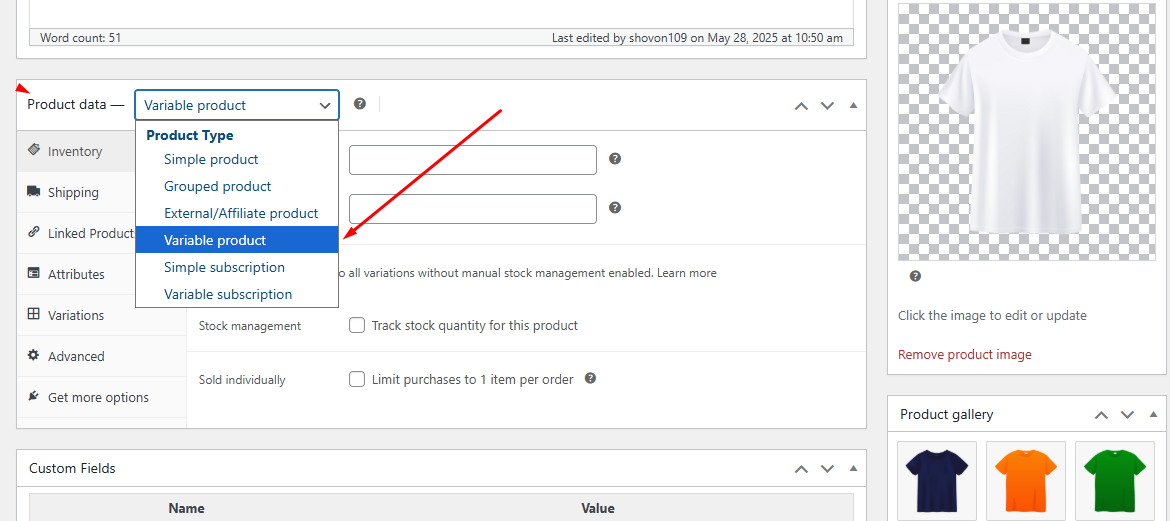
- Scroll down to the Product Data section, select Variable Product from the dropdown.
- Save a draft of your progress.
Step 2: Add Product Attributes
- Click to jump to the Attribute tab.
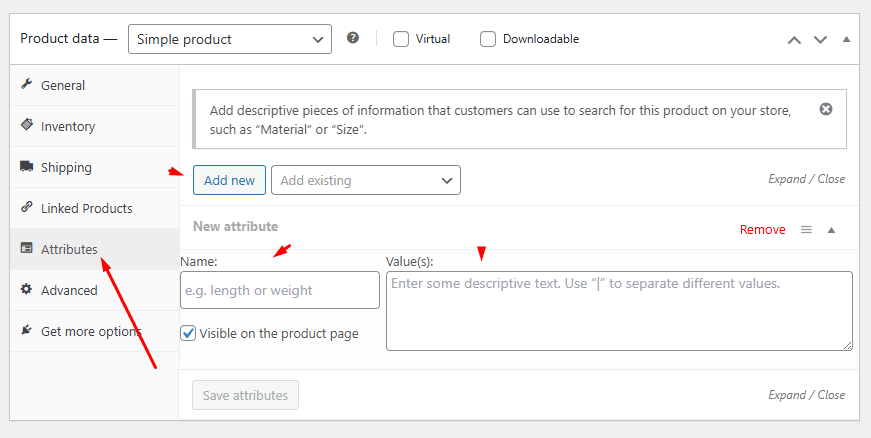
- We will add 2 attributes: Size and Color. First, input the Size in the name box.
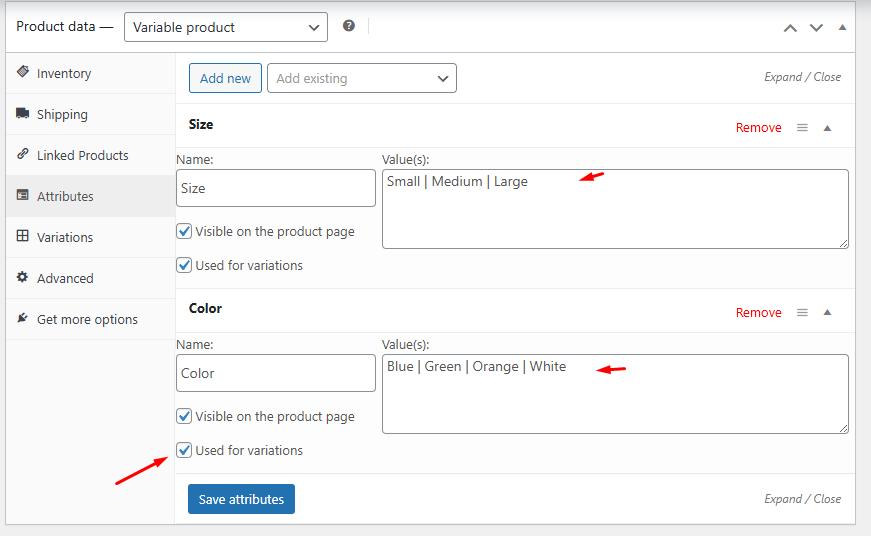
- Add values separated by a “|” – for this example: Small | Medium | Large.
- Click Add New to insert a new attribute row and add Color with values.
- Make sure you check the “Used for variations” box.
Step 3: Generate Variations
- Navigate to the Variations tab.
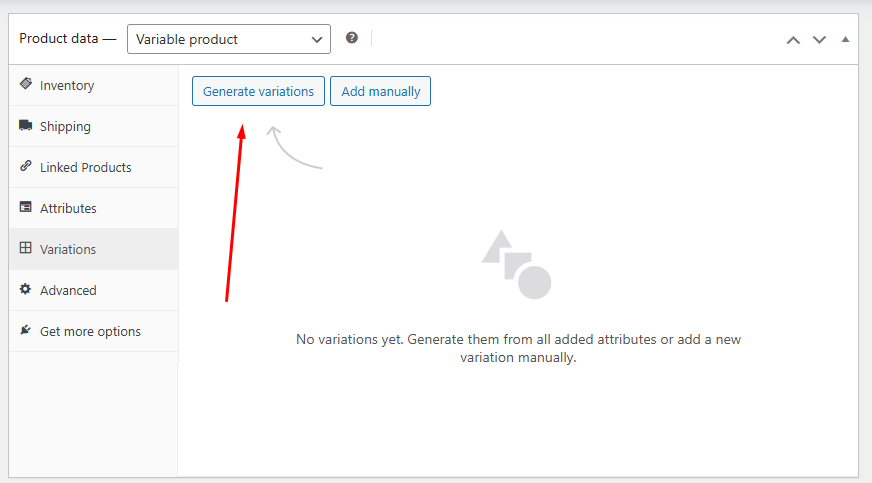
- Click the Generate Variations to let WooCommerce automatically create all possible variations for the created attributes.
- WooCommerce will create all possible variations according to your created attributes.
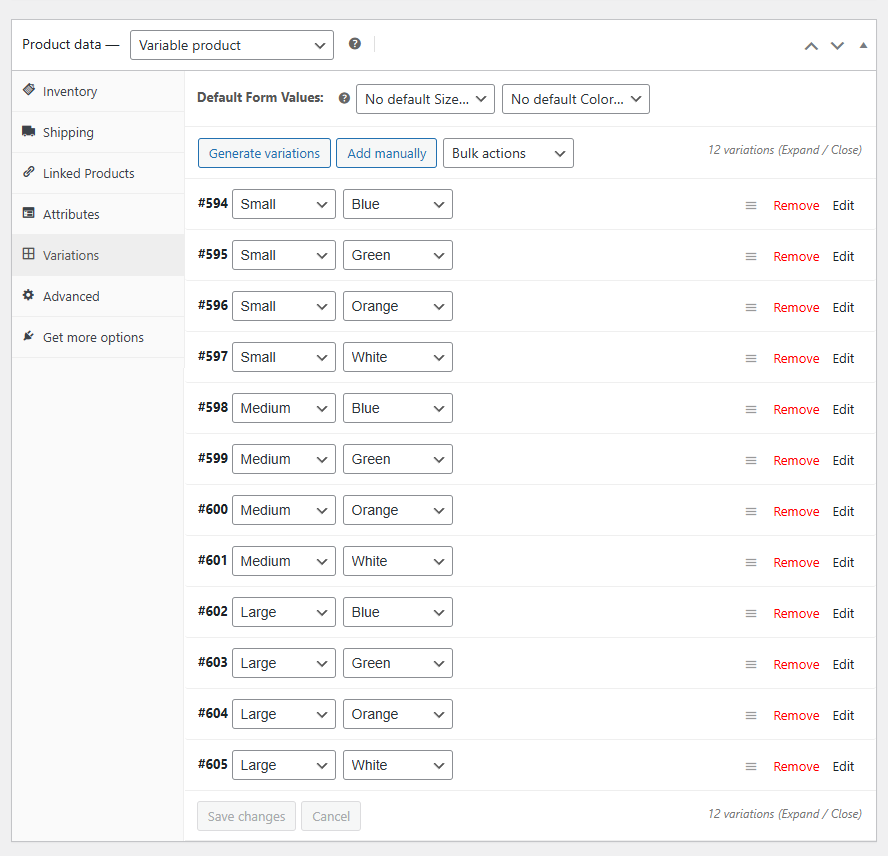
- Next, edit each variation to add individual price, image, SKU, description, length, width, height, etc.
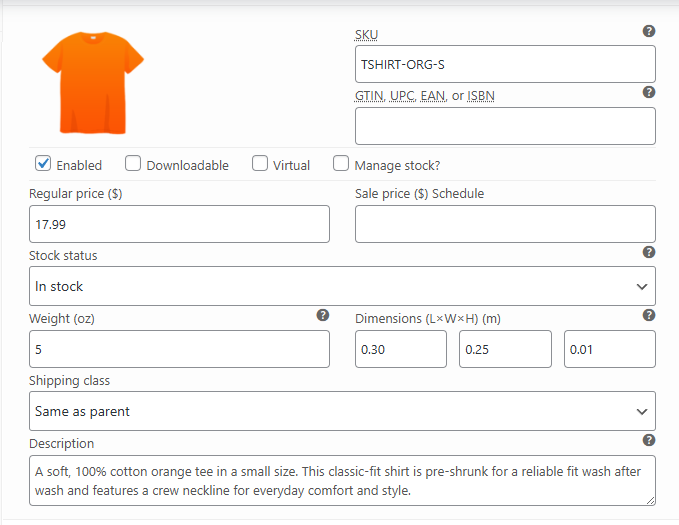
- Click Save Changes to update.
Step 4: Save and Test
- Click Publish to launch the WooCommerce variable product.
- Visit the front end to check the variable product.
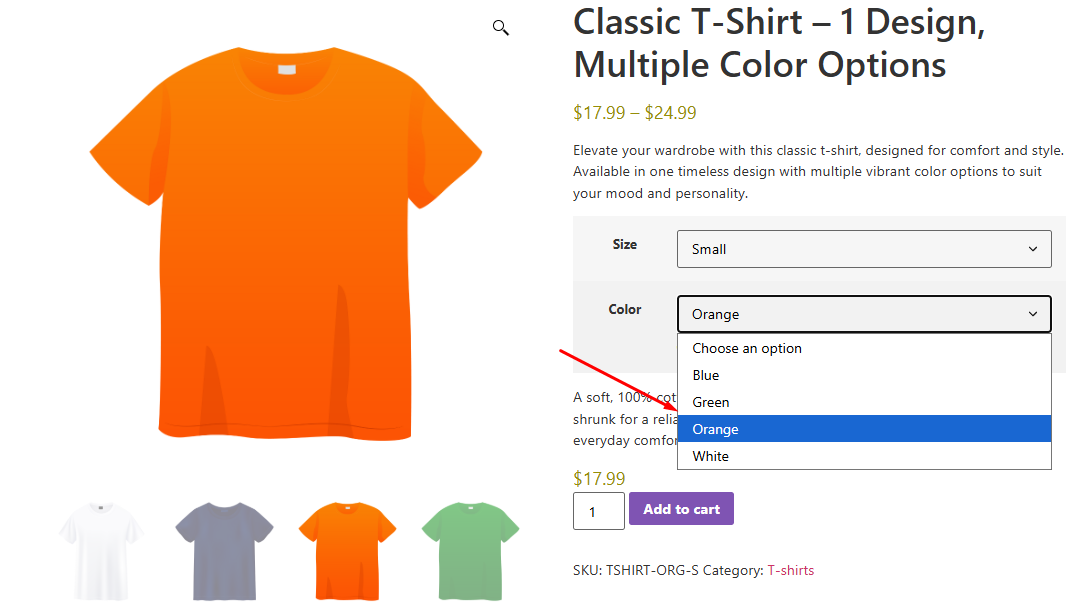
- WooCommerce will automatically display the correct price and image upon your selection.
Customers can now pick their favorite and required variation, like color and size, and make the purchase. This is how to add variation product in WooCommerce with easy steps.
Advanced Technical Actions for Enhanced Control
Now that we have learned the basics of how to add variation product in WooCommerce, let’s explore some advanced options.
1. Set a Default Variation for a Product
By choosing a default variation, your customers see a pre-selected option and can add it to the cart immediately without having to make a selection.
- Open your variable product in the WordPress admin (Products > All Products > Edit).
- Go to the Variations tab in the Product Data panel.
- At the top of the variations list, you’ll see “Default Form Values.”
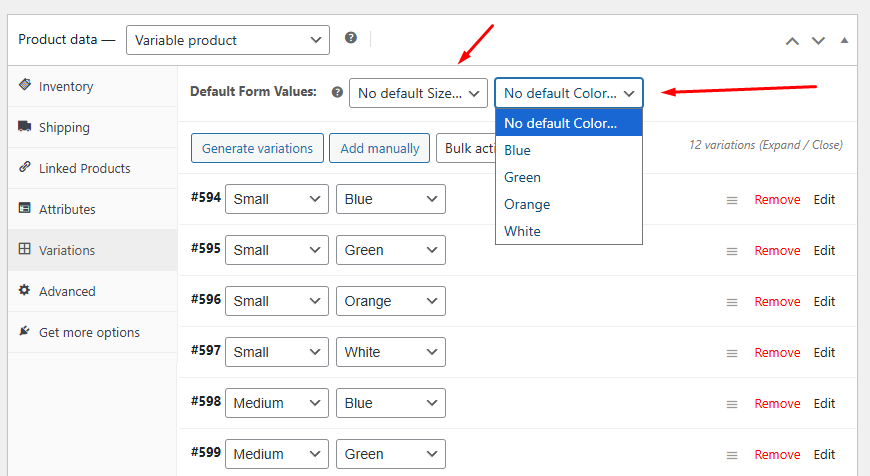
- Use each dropdown to pick the attribute you want pre-selected (e.g., Color: Orange; Size: Small).
- Save changes at the bottom of the Variations panel, then Update your product.
With these defaults set, the variation you chose appears selected when shoppers land on the product page.
2. Reorder Attribute Values for Customer Display
You control the order in which attribute options (e.g., Small, Medium, Large) appear in dropdowns or swatches.
- In the Product Data panel, click the Attributes tab.
- Find the attribute you want to reorder (global or custom) and click Edit to expand it.
- Drag and drop the values into the desired sequence (use the “handle” on the left of each term).
- Click Save Attributes, then Update the product.
Global Attributes:
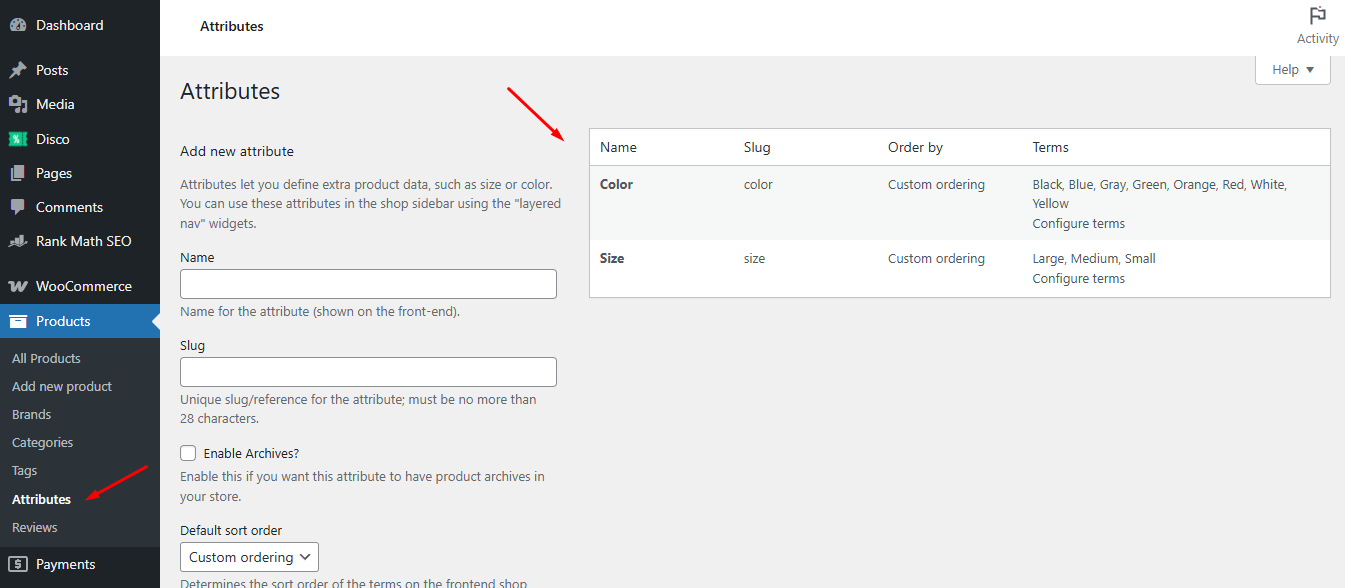
- Go to Products > Attributes, click Edit for your attribute, then Configure Terms.
- Drag terms into order; changes save automatically.
3. Import Variation CSV (Bulk Creation & Updates)
Preparing Your CSV File
- Parent rows define your variable products (type = “variable”) with columns for SKU, name, and attribute fields (e.g., attribute:pa_color, attribute:pa_size).
- Child rows follow, each with parent_sku matching the parent’s SKU, type = “variation,” plus columns for price, stock, weight, etc.
- Save as UTF-8 encoded CSV.
Using WooCommerce’s Built-In Importer
- In the WP admin, go to Products > All Products.
- Click Import at the top.
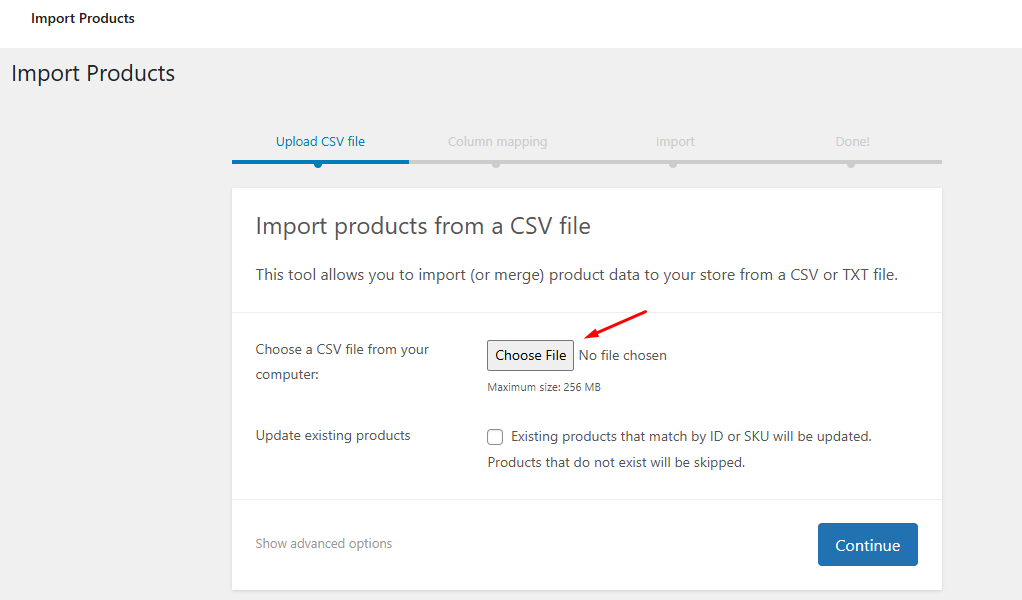
- Upload your CSV, map columns if prompted, and run the importer.
- First, import the parent variable products, then re-run the process for the variation rows.
Tip: If you use the Product CSV Import Suite extension, you must import parents and variations in two separate files and actions -parent products first, then child variations.
4. Add Downloadable Variations (Digital Products)
When a variation delivers a file (e-book, software), mark it as downloadable:
- Under Product Data > Variations, expand the variation you want to make downloadable.
- Tick the Downloadable checkbox.
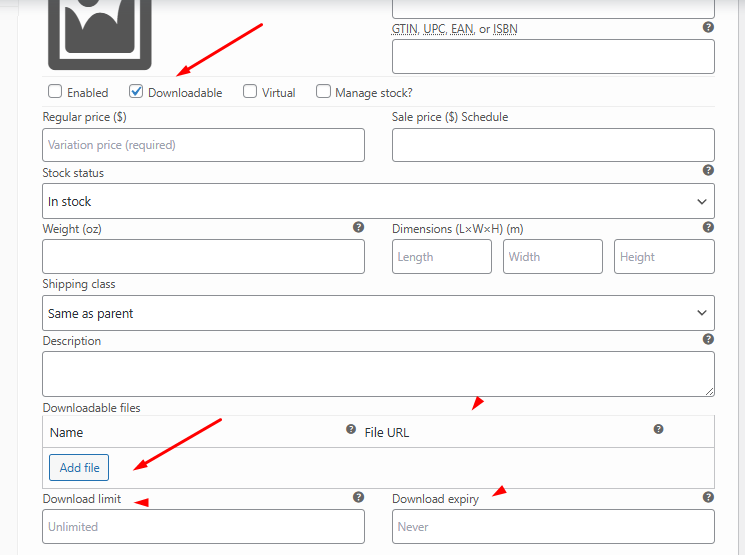
- New fields appear:
- Downloadable Files: Upload or link to each file.
- Download Limit: Max times a customer can download (leave blank for unlimited).
- Download Expiry: Days before links expire after purchase.
- Save changes and update your product.
5. Enable Virtual Variations (Non-Shippable Items)
For services or items without shipping, mark variations as virtual:
- In Product Data > Variations, expand your chosen variation.
- Tick the Virtual checkbox.
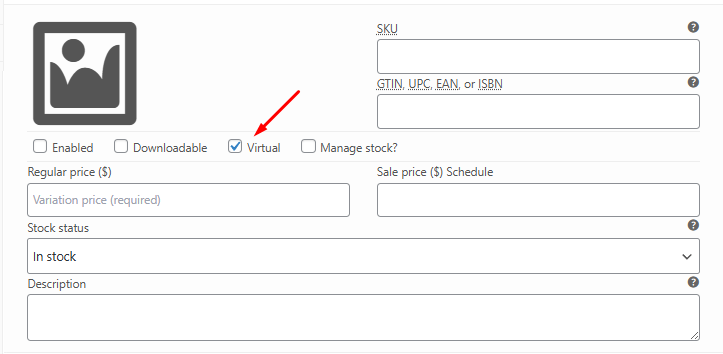
- Shipping fields (weight, dimensions, class) will disappear for that variation.
- Save changes and Update your product.
By mastering these advanced controls, you’ll streamline your workflow, offer richer product options, and give customers exactly what they need faster.
Enhancing User Experience and Sales with Plugins
Here’s how you can supercharge your variable products with carefully chosen plugins, improving UX, boosting conversions, and giving your store powerful admin controls.
Implementing Variation Swatches (Color, Image, Buttons)
Why Visual Swatches Win over Dropdowns
- Faster Selection: Shoppers scan colored or image-based swatches more quickly than nested dropdowns, reducing friction.
- Lower Cart Abandonment: Clear, clickable options cut confusion and cart drop-offs caused by missed or mis-clicked dropdown items.
- Professional Look: Swatches modernize your product pages, aligning with customer expectations for a polished storefront.
Top Recommended Swatches Plugins
- Variation Swatches for WooCommerce (CartFlows)
- Auto-converts all variation selects to swatches on install.
- Supports color, image, label, or button types with global styling options (size, border, tooltip).
- WCBoost – Variation Swatches (Free & Pro)
- Adds color, image, label, and radio-button swatches with simple setup.
- Handles custom attributes and catalog-mode display.
- Smart Swatches for WooCommerce (ShapedPlugin)
- Beautiful tooltips, patterns, and archive-page swatches.
- Designed for high compatibility with popular themes.
Adding Additional Variation Images (Gallery Per Variation)
Why You Need Multiple Images
- Rich Detail: Show back-of-product views, fabric close-ups, or feature callouts per variation.
- Reduced Returns: More visual context means fewer surprises and fewer post-purchase regrets.
Key Plugins for Multi-Image Variations
- WooCommerce Additional Variation Images Gallery (Emran Ahmed)
- Free plugin—lets you upload unlimited images per variation.
- Mobile-responsive galleries switch images instantly when a variation is selected.
- WooThumbs for WooCommerce (Iconic)
- Premium gallery tool with video support, carousel layouts, and image zoom.
- Assign multiple images per variation, plus advanced lightbox and thumbnail controls.
Utilizing a Bulk Variation Grid/Table
Why Grids Matter for Wholesale & Large Catalogs
- Enable customers (especially B2B or wholesale buyers) to view and order multiple variations at once, rather than clicking through individual pages.
- Speeds up bulk orders, improving average order values and satisfaction.
Top Grid/Table Plugins
- WooCommerce Bulk Variations (Barn2)
- Displays variations in a price-matrix grid with quantity inputs.
- Optionally add extra product options beneath each row.
- Smart Bulk Variations (HighAddons)
- Offers list, grid, table, or attribute-view templates.
- Customers can add single or bulk variations to the cart in one click.
- WPC Variations Table for WooCommerce
- Lightweight free plugin—replaces dropdowns with a simple, scrollable table for any variable product.
Setting Up Dynamic Pricing for Variations
Why Dynamic Pricing?
- Quantity discounts and tiered pricing drive larger orders.
- Role-based prices let you cater to retail vs. wholesale customers on the same site.
Leading Dynamic Pricing Plugins
- WooCommerce Dynamic Pricing (official extension)
- Create bulk, percentage, or fixed discounts by quantity, category, or user role.
- YITH WooCommerce Dynamic Pricing & Discounts
- Rule builder for cart-level, product-level, and role-based promotions (BOGO, tiered discounts, free gifts).
- ELEX WooCommerce Dynamic Pricing & Discounts
- Flexible rule sets at product, category, combination, or cart level—with max discount limits and coupon integration.
Exploring Other Useful Plugins (Custom Variation Fields)
When you need to display extra information for each variation—like fabric composition, care instructions, or special certifications—custom fields are the answer.
- WooCommerce Custom Fields for Variations (Iconic)
- Add unlimited, admin-only fields (text, textarea, select, checkboxes) to every variation.
- Fields appear on the front end only when that variation is selected.
- Advanced Custom Fields (ACF)
- For developers: attach ACF fields to the product_variation post type for fully bespoke variation data.
Discounting Variable Products with the Disco Plugin
Why Offer Discounts on Variations?
Applying tailored discounts to specific variations—rather than the entire product—lets you move slow-selling options, reward high-value customers, or run limited-time offers on premium variants. This granularity drives higher average order values and gives you fine-tuned promotions.
Introducing Disco: Dynamic Discounts for WooCommerce
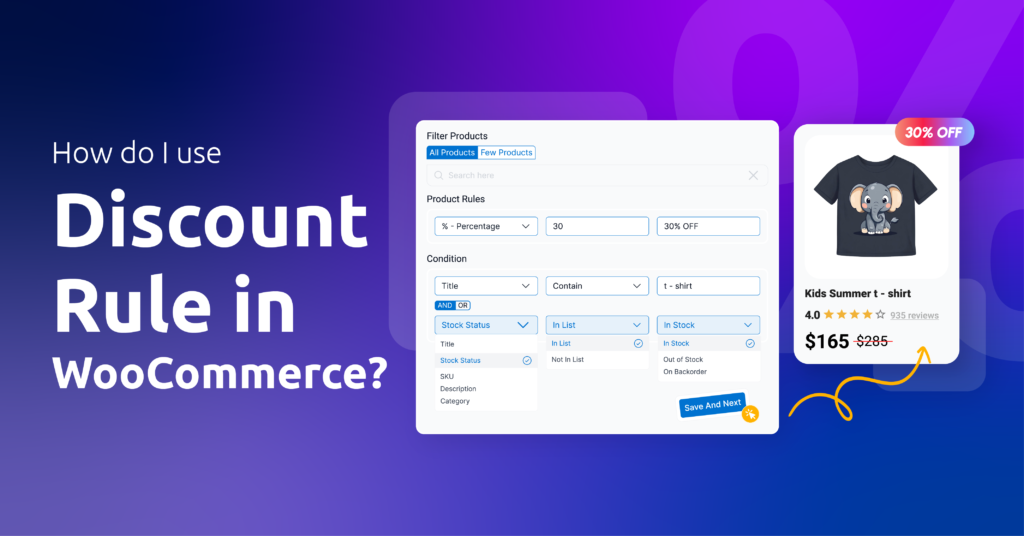
Disco is an all-in-one WooCommerce discount manager that lets you create advanced, condition-based discount rules—at the product, cart, or variation level—from a single interface. Whether you need quantity-based tiered pricing or “buy-one-get-one” deals on a specific color/size combination, Disco handles it with AND/OR logic and auto-expire scheduling.
Key Discount Types You Can Apply to Variations
- Variation-Specific Percentage or Fixed Discounts
- Example: “10% off all Large sizes in Red.”
- Tiered Quantity Discounts
- Example: “Buy 3 or more Small shirts, get 15% off each.”
- BOGO Deals on Chosen Variations
- Example: “Buy one Medium in Blue, get one free.”
- Time-Limited Variation Campaigns
- Auto-expire promotions on particular variations (e.g., seasonal colors).
Benefits of Using Disco for Variation Discounts
- Precision Targeting: Only the intended variations receive the discount—no site-wide overrides.
- Automation & Scheduling: Plan your variation-level promotions in advance and let Disco handle activation and expiry.
- Scalability: Leverage AND/OR conditions to combine attributes (size, color, customer role) for ultra-specific deals
By layering these plugins—visual swatches, multi-image galleries, bulk grids, dynamic pricing, and custom variation fields—you’ll transform your WooCommerce variable products into a high-performing, user-friendly catalog that drives both conversion and average order value.
Wrap Up
In summary, mastering how to add variation product in WooCommerce empowers you to showcase every color, size, or custom option—all from a single, streamlined listing.
By defining attributes, generating and configuring variations, and enhancing them with swatches, bulk grids, and dynamic pricing, you’ll deliver a smoother shopping experience and drive higher sales.
Now that you know the step-by-step process and the best plugins to extend your control, you’re ready to add a variation product in WooCommerce and watch your store flourish.
