Ever feel like WooCommerce’s order statuses just… don’t fit? Trying to label orders as ‘Shipped’ or ‘Quality Check’ using generic boxes like ‘Processing’ is like forcing a square peg into a round hole. It works, kinda – but it’s messy, confusing, and definitely not what you need.
Default WooCommerce statuses often don’t match real-world workflows. This forces store managers to use confusing workarounds, leaves customers in the dark about special order stages, and creates reporting headaches when custom steps like pre-shipment verification or local pickup need tracking.
This is where you need custom order statuses. So, how to add custom order status in WooCommerce?
To add custom order statuses in WooCommerce, register new statuses programmatically using the register_post_status function in your theme’s functions.php file. Then, integrate them into the admin interface via the wc_order_statuses filter. Alternatively, use dedicated plugins like the custom order status manager for WooCommerce for codeless implementation.
In this guide, we’ll unpack both methods in plain English – no jargon overdose. You’ll get actionable code snippets for developers, plus simpler plugin options for those who’d rather not wrestle with PHP. We’ll even cover email alerts and fix common hiccups.
Let’s start with the basics.
Table of Contents
What is a Custom Order Status, and Why Do You Need Them?
First, let’s talk about the default WooCommerce order statuses. After a customer places an order, on the order page, core Woo provides the following order status options –
- Pending payment
- Failed
- Processing
- Completed
- On hold
- Cancelled
- Refunded
- Draft
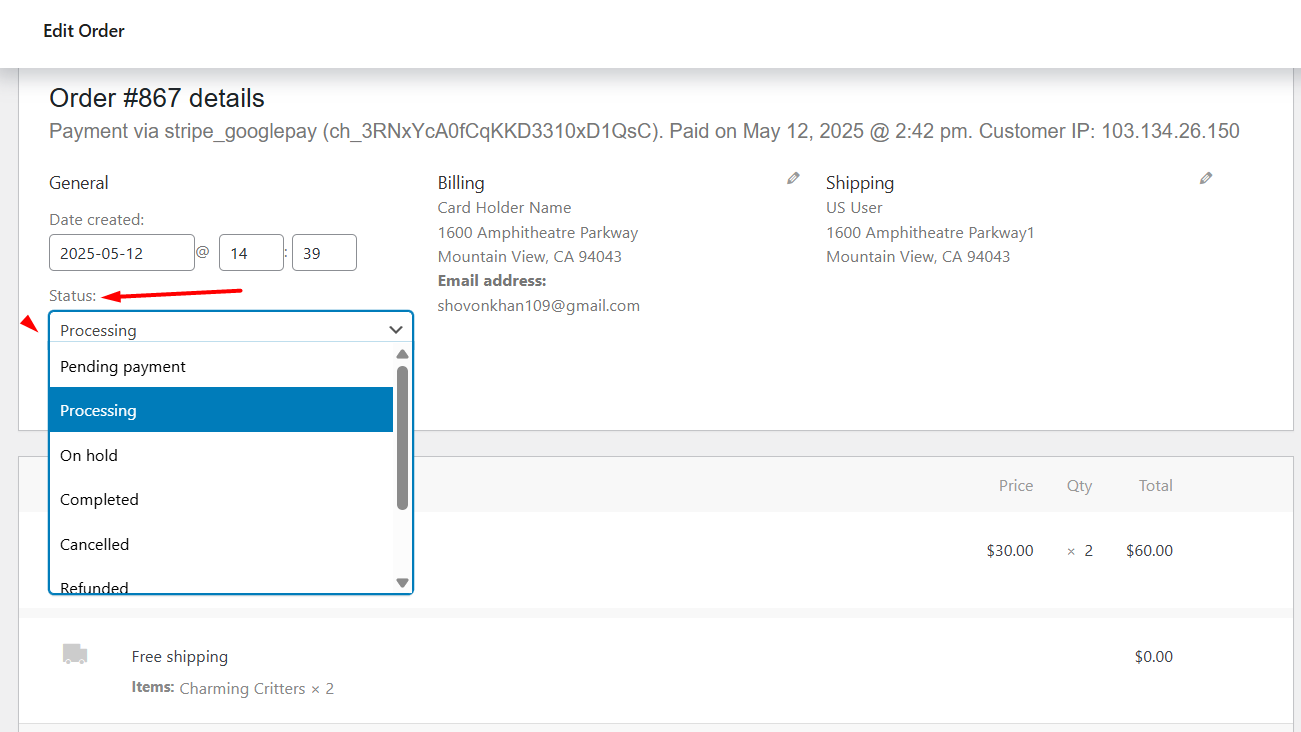
How to change order status in WooCommerce? Simply navigate to WooCommerce >> Orders and change in bulk or individually.
Coming back to custom order statuses, imagine your orders are packages moving through a factory. WooCommerce’s default statuses (Processing, Completed) are like basic labels: “Started” and “Done.”
Custom order statuses are your own labels for steps in between – like “Quality Check,” “Awaiting Shipment,” or “Ready for Pickup.” They’re tags you create to track exactly where an order is in your business flow.
Why You Need a Custom Order Status
1. Stop Confusing Customers
- Default: An order marked “Processing” for 5 days while it’s actually shipped.
- Custom: Show “Shipped ✅ + Tracking Link” – no more “Where’s my order?” emails.
2. Prevent Team Mistakes
- Default: Your warehouse thinks “Processing” means “Pack, don’t ship yet.” Sales thinks it means “Ready to ship.”
- Custom: Assign “Packaged 📦” or “Hold for Approval ⚠️” – no more crossed wires.
3. Fix Reporting Blind Spots
- Default: All orders are either “Processing” or “Completed.” How many failed quality checks? How many are stuck at customs? You can’t tell.
- Custom: Tag orders as “Rejected 🚫” or “Customs Hold 🛑” – track problems in reports.
4. Automate Workflows
- Trigger actions when status changes:
- Auto-email customers at “Shipped 🚚” stage.
- Alert managers if an order sits at “Payment Review 💰” for 48+ hours.
Real Examples Where Default Statuses Fail
| Your Workflow | Default WooCommerce | Custom Status Solution |
| Handmade jewelry store | “Processing” = Designing, casting, polishing, shipping | Add “Design Approved ✏️,” “Casting Done ♻️,” “Polishing ✨,” “Shipped 📬” |
| Local grocery pickup | “Completed” when paid, but order isn’t picked up yet | Add “Preparing 🧺,” “Ready for Pickup 🚙,” “Picked Up ✅” |
| B2B orders with approvals | “Processing” hides orders needing manager sign-off | Add “Manager Approval ⏳,” “Approved ✔️,” “Rejected ❌” |
Key Takeaway
Custom statuses turn WooCommerce from a rigid system into a flexible workflow map. They replace vague, overloaded labels like “Processing” with clear, step-by-step milestones that match how you actually work. Without them, you’re forcing your unique business into a box that doesn’t fit – costing you time, trust, and transparency.
How to Add Custom Order Status in WooCommerce?
You can create custom order statuses in two ways –
- Using custom codes to add WooCommerce custom order status programmatically
- Using an advanced custom order status for WooCommerce plugin
How to Add Custom Order Status in WooCommerce Using Code?
Let’s create a “Shipped” order status and integrate it into your admin, filters, and emails.
Step 1 — Register the Custom Order Status
Add custom order status WooCommerce PHP code to your theme’s functions.php (Appearance >> Theme File Editor) file:
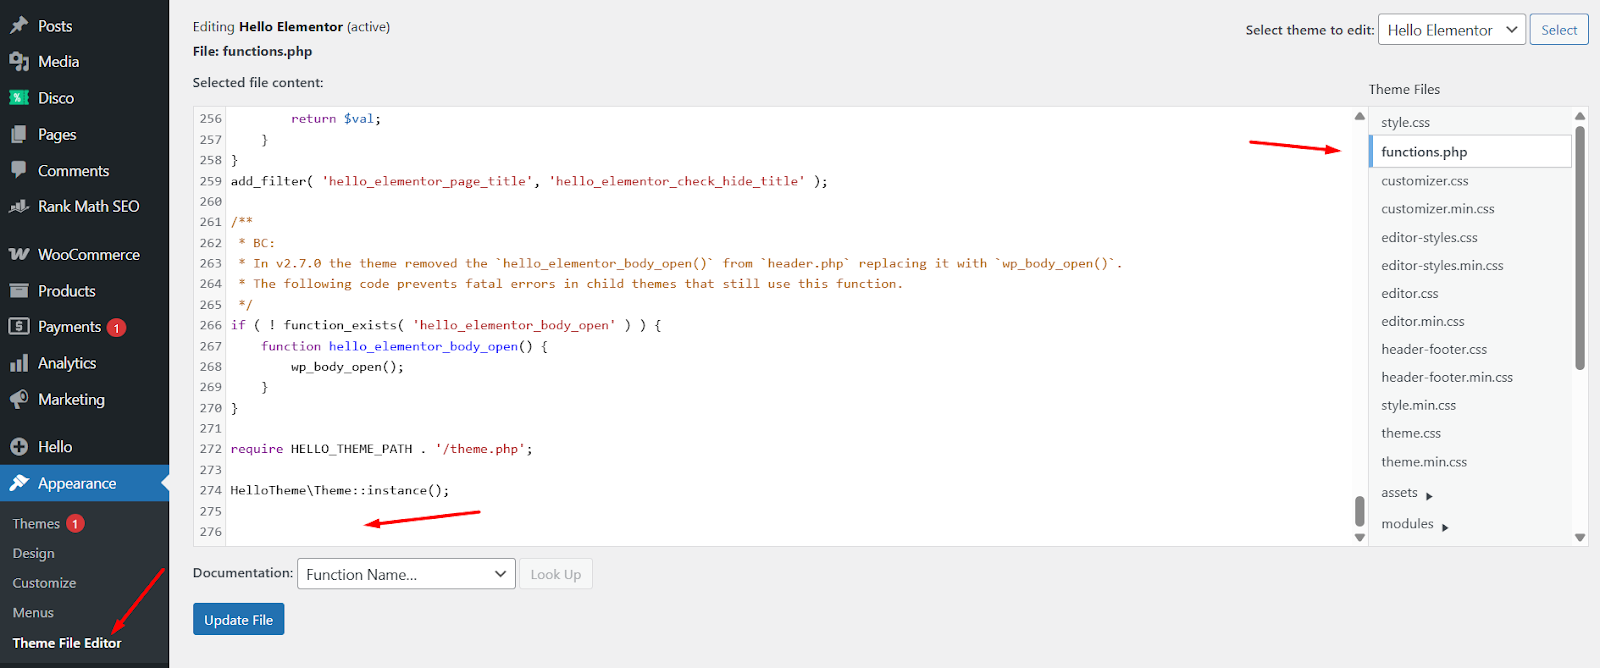
// Register a new custom order status

add_action( 'init', function() {

register_post_status( 'wc-shipped', array(

     'label'                 => 'Shipped',

     'public'                => true,

     'exclude_from_search'   => false,

     'show_in_admin_all_list' => true,

     'show_in_admin_status_list' => true,

     'label_count'           => _n_noop( 'Shipped <span class="count">(%s)</span>',
                                                    'Shipped <span class="count">(%s)</span>' )

));

});Note: This registers the new status with WooCommerce so it’s recognized across the system.
Step 2 — Add to Order Status Dropdown
Let’s make the new status show up in the admin order status dropdown:
// Add custom status to the list of WooCommerce statuses

add_filter( 'wc_order_statuses', function( $order_statuses ) {

$order_statuses['wc-shipped'] = _x( 'Shipped', 'Order status', 'your-text-domain' );

return $order_statuses;

});- Now “Shipped” will appear in the order edit screen, bulk actions, and filters.
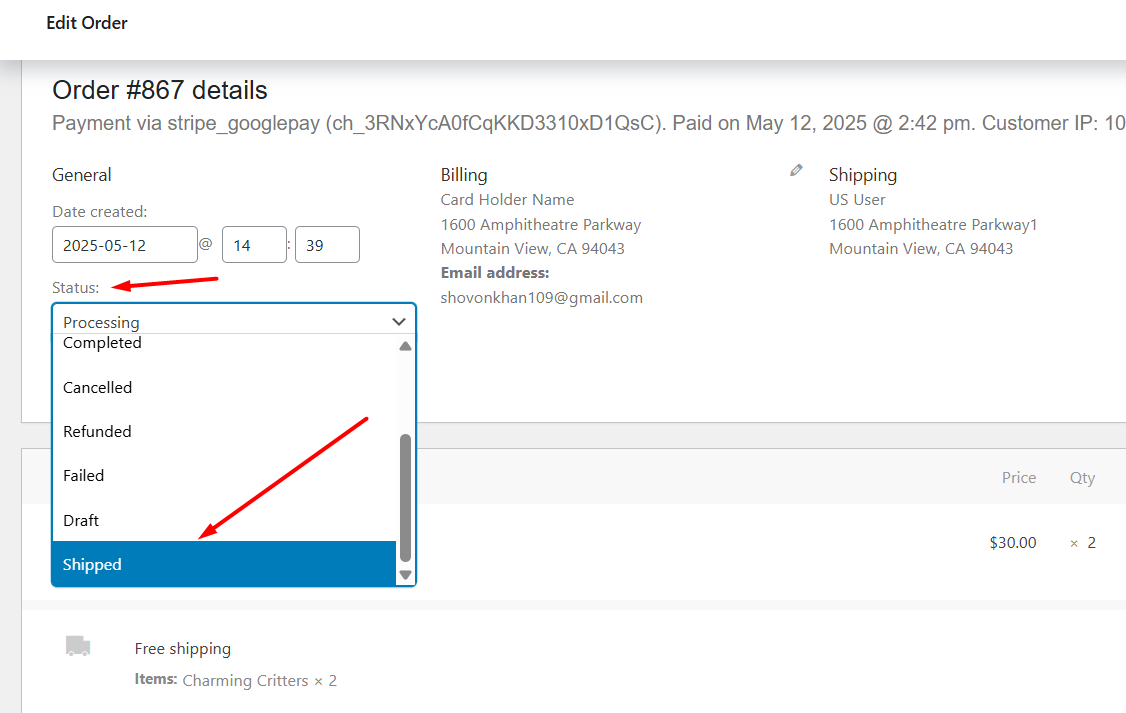
Step 3 — Add Admin Icon / Style (Optional, for better UI)
Add this CSS to your admin using admin_head:
// Add icon style for the custom status

add_action( 'admin_head', function() {

echo '<style>

.order-status.status-shipped {

     background: #007cba; /* WooCommerce blue */

     color: #fff;

}

</style>';

});- This will display a blue background with white text in the order list for “Shipped”.
You can enhance it with a truck emoji if desired:
// Example: add truck emoji to label

add_filter( 'wc_order_statuses', function( $order_statuses ) {

$order_statuses['wc-shipped'] = '🚚 Shipped';

return $order_statuses;

});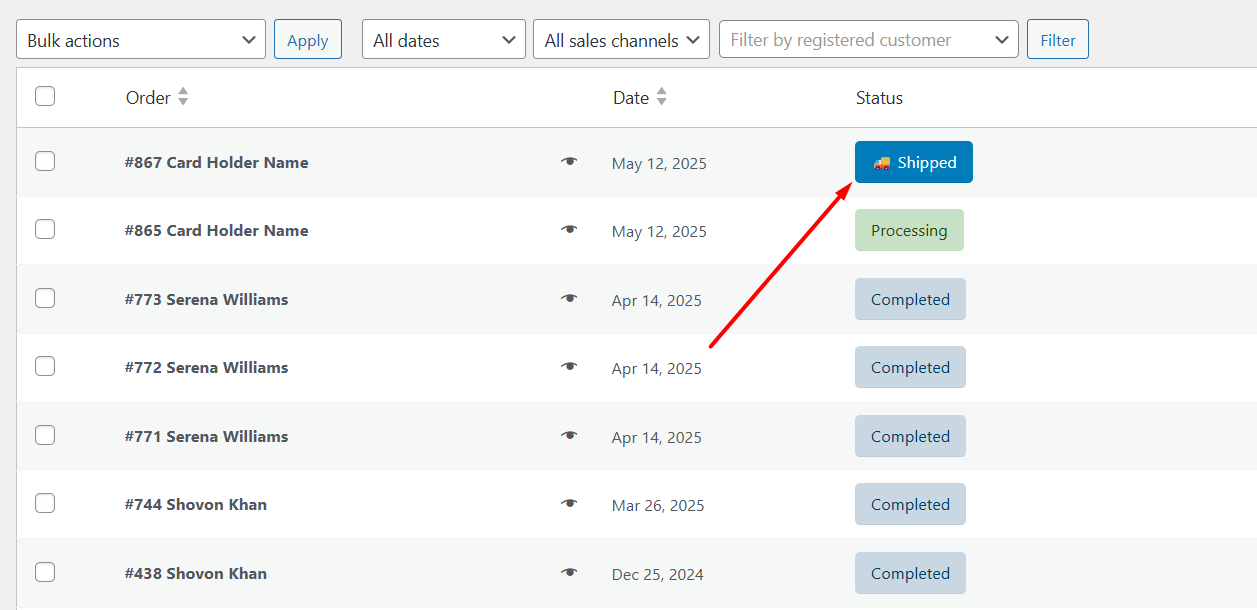
This is how to add a shipped order status in WooCommerce.
Create a WooCommerce Custom Order Status Email Notification for the Shipped Status
To create a custom email, you must access your webhosting file server and create some PHP files. In the following sections, we’ll:
- Define a custom email class
- Load a template file
- Trigger the email on the Shipped status
1. Create the Email Class File
- Create a new PHP file called:
➡ class-wc-email-customer-shipped-order.php
- Inside it, paste this:
<?php

if ( ! defined( 'ABSPATH' ) ) {

exit;

}

class WC_Email_Customer_Shipped_Order extends WC_Email {

public function __construct() {

     $this->id         = 'customer_shipped_order';

     $this->title      = 'Customer Shipped Order';

     $this->description = 'This email is sent to the customer.';

     $this->customer_email = true;

     $this->template_html  = 'emails/customer-shipped-order.php';

     $this->template_plain = 'emails/plain/customer-shipped-order.php';

     $this->subject    = 'Your order has been shipped!';

     $this->heading    = 'Good news! Your order is on the way.';

     add_action( 'woocommerce_order_status_shipped_notification',
               array( $this, 'trigger' ), 10, 2 );

     parent::__construct();

}

public function trigger( $order_id, $order = false ) {

     if ( $order_id ) {

         $this->object = wc_get_order( $order_id );

         $this->recipient = $this->object->get_billing_email();

     }

     if ( ! $this->is_enabled() || ! $this->get_recipient() ) {

         return;

     }

     $this->send( $this->get_recipient(),
     $this->get_subject(),
     $this->get_content(),
     $this->get_headers(),
     $this->get_attachments() );

}

public function get_content_html() {

     return wc_get_template_html( $this->template_html, array(

         'order'     => $this->object,

         'email_heading' => $this->get_heading(),

         'sent_to_admin' => false,

         'plain_text' => false,

         'email'     => $this,

     ));

}

public function get_content_plain() {

     return wc_get_template_html( $this->template_plain, array(

         'order'     => $this->object,

         'email_heading' => $this->get_heading(),

         'sent_to_admin' => false,

         'plain_text' => true,

         'email'     => $this,

     ));

}

}- Log in to your hosting panel and navigate to your WordPress installation. After that, go to /wp-content/themes/your-active-theme/ and create a folder called inc.
- Upload the class-wc-email-customer-shipped-order.php file here.
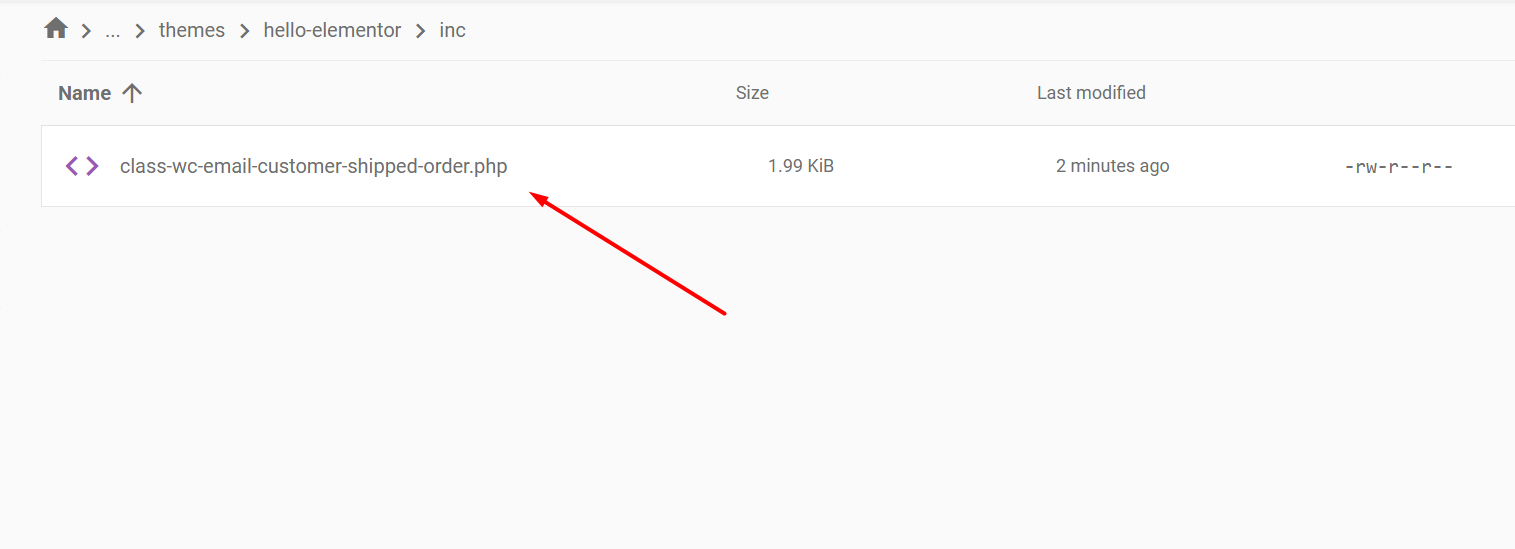
Note: You can paste the code into a notepad, save it as a .php file, and upload it to your server.
2. Add the Email Template Files
Create a folder inside your theme folder called ‘WooCommerce’ and under that create another folder inside WooCommerce called ‘emails’. So the path is as follows – /wp-content/themes/your-active-theme/WooCommerce/emails.
- Create another PHP file named customer-shipped-order.php and add the following code inside it.
<?php

if ( ! defined( 'ABSPATH' ) ) {

exit;

}

do_action( 'woocommerce_email_header', $email_heading, $email );

echo '<p>Hi ' . esc_html( $order->get_billing_first_name() ) . ',</p>';

echo '<p>Your order #' . esc_html( $order->get_order_number() ) .
' has been shipped and is on its way!</p>';

do_action( 'woocommerce_email_order_details', $order, $sent_to_admin, $plain_text, $email );

do_action( 'woocommerce_email_customer_details', $order, $sent_to_admin, $plain_text, $email );

do_action( 'woocommerce_email_footer', $email );- We will create another file with the same name and details as ➡ customer-shipped-order.php.
- But, this time we will upload to /wp-content/themes/your-active-theme/WooCommerce/emails/plain folder. Create a folder named ‘plain’ if it doesn’t exist.
<?php

if ( ! defined( 'ABSPATH' ) ) {

exit;

}

echo "Hi " . $order->get_billing_first_name() . ",\n";

echo "Your order #" . $order->get_order_number() . " has been shipped and is on its way!\n";

do_action( 'woocommerce_email_order_details', $order, $sent_to_admin, $plain_text, $email );

do_action( 'woocommerce_email_customer_details', $order, $sent_to_admin, $plain_text, $email );
3. Register Your Custom Email Class
Add this to your functions.php:
<?php

if ( ! defined( 'ABSPATH' ) ) {

exit;

}

class WC_Email_Customer_Shipped_Order extends WC_Email {

// your class code here

}
4. Trigger Your Email
Add this:
// Fire the email on shipped status

add_action( 'woocommerce_order_status_shipped', function( $order_id ) {

do_action( 'woocommerce_order_status_shipped_notification',
$order_id, wc_get_order( $order_id ) );

});
Summary of This Email Setup
✅ Adds a dedicated shipped email
✅ Appears in WooCommerce >> Settings >> Emails for enable/disable + customization
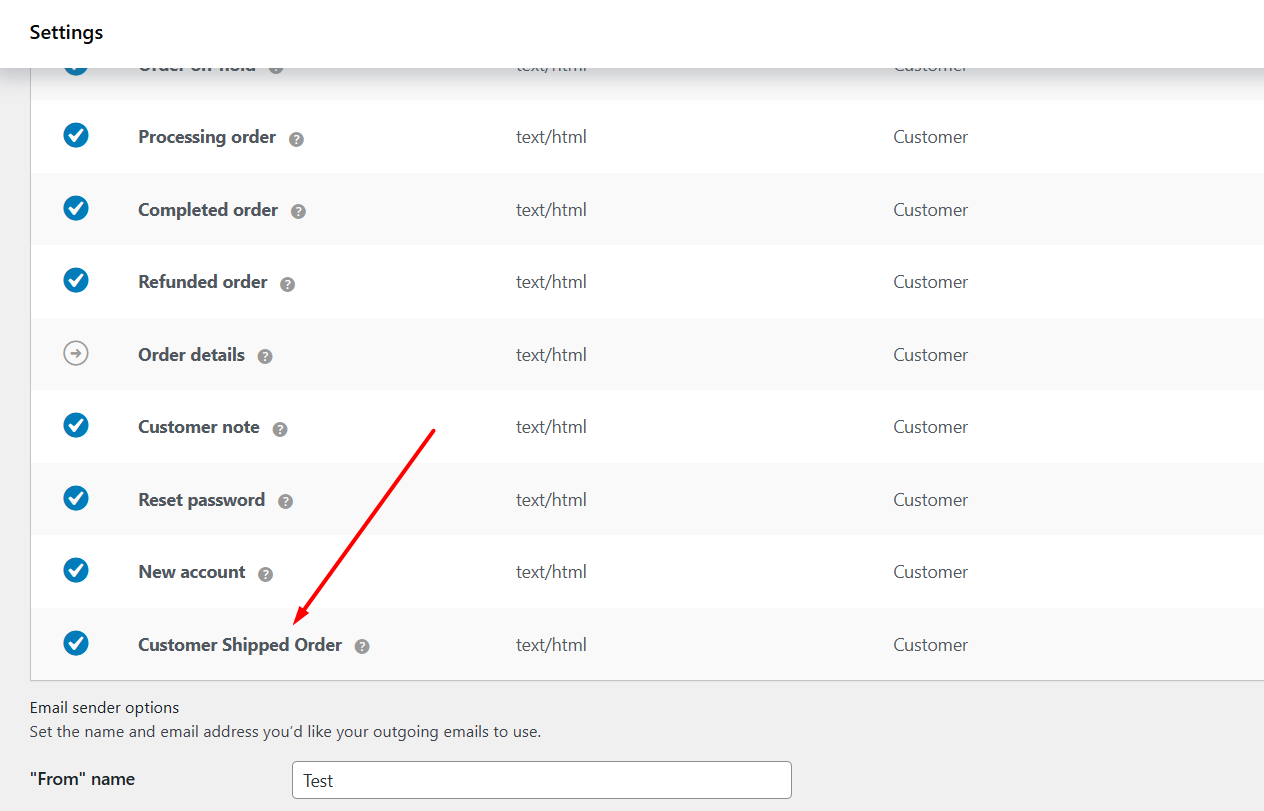
✅ Uses WooCommerce templating (so it’s editable like other emails)
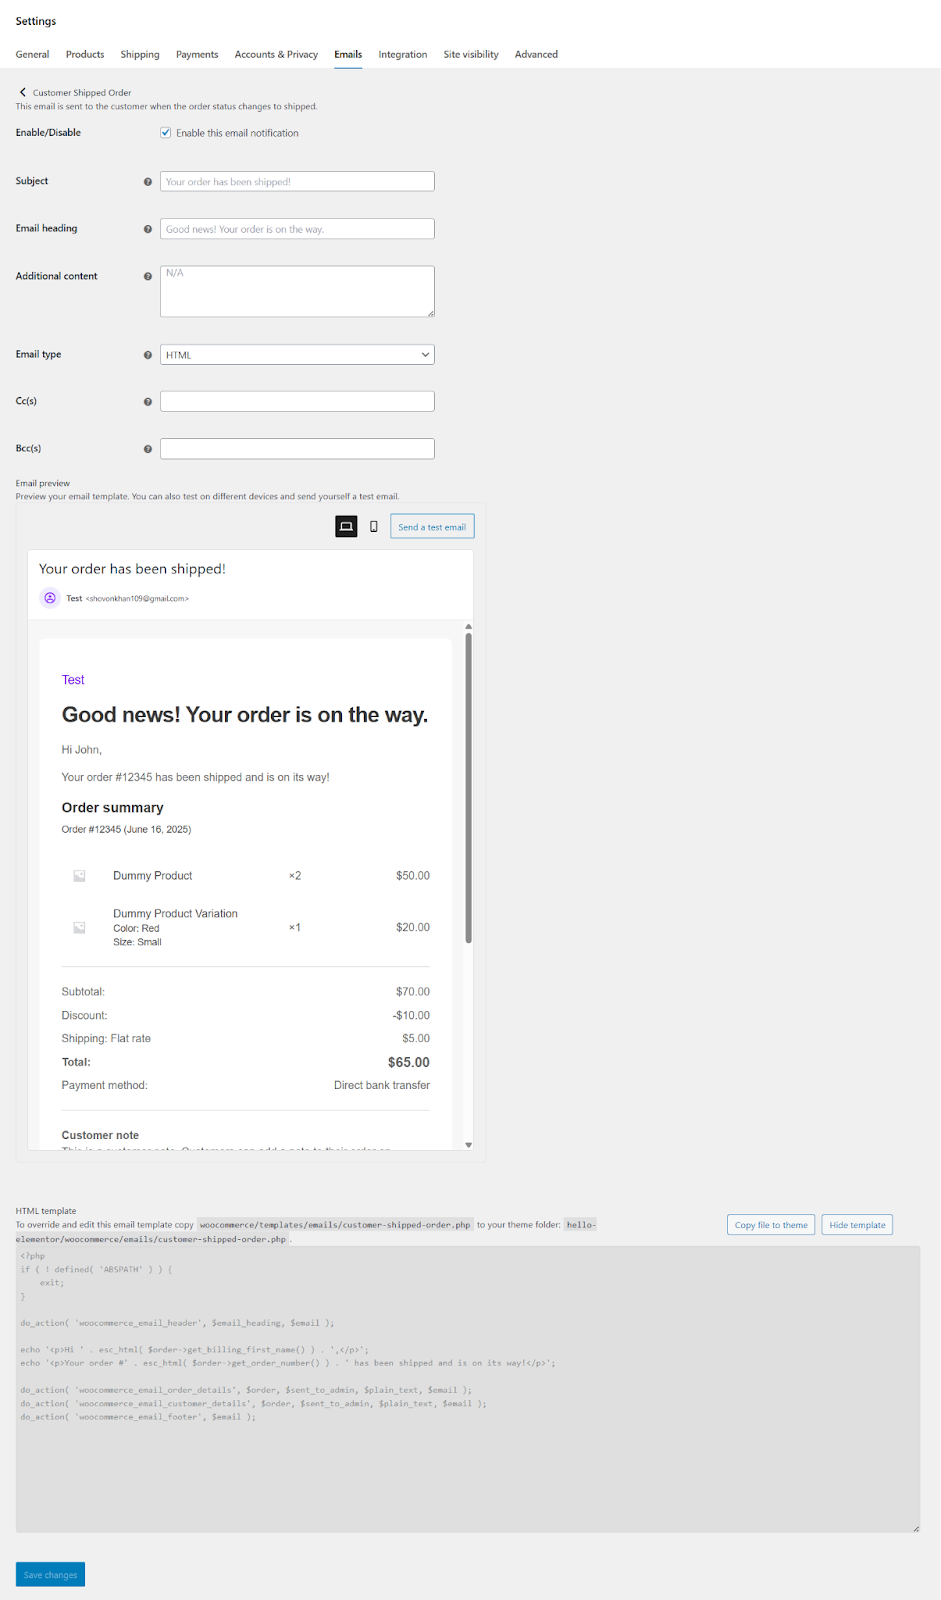
✅ Sends on status change to Shipped
So overall, these are the steps for WooCommerce create custom order status using codes and create custom email notifications.
How to Add Custom Order Status in WooCommerce Using a Plugin?
Coding requires understanding and a certain level of expertise. Also, they come with notable risks:
❌ One misplaced character can crash your entire store
❌ Theme updates overwrite your customizations
❌ Email triggers require complex hooks
❌ Status icons need constant CSS maintenance
Custom order status WooCommerce plugins, on the other hand, save you from the hassles of manual coding and updating and make managing custom statuses a breeze.
Here’s how to add custom order status in WooCommerce using a plugin:
Step 1: Install a Custom Oder Status Plugin
For this article, we will use the free plugin called Custom Order Status Manager for WooCommerce.
- Navigate to Plugins >> Add Plugin.
- Search for the plugin.
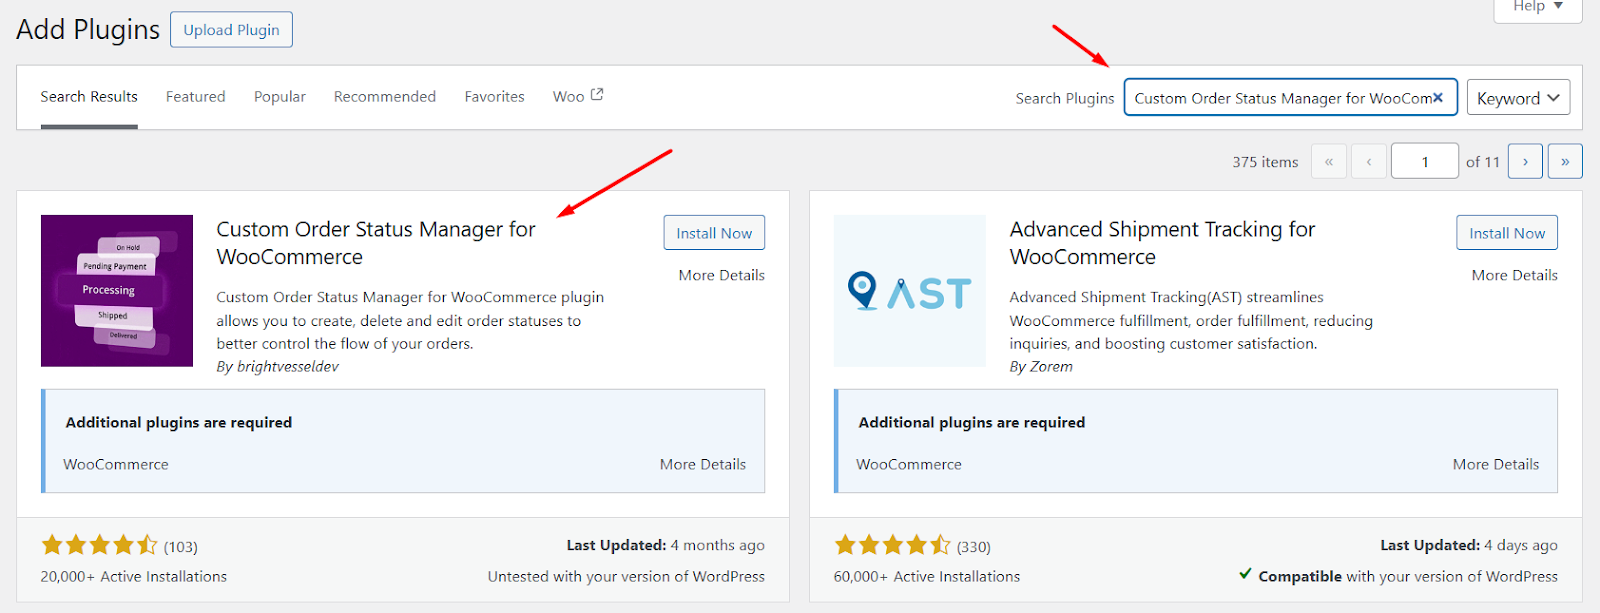
- Install and then activate it.
Step 2: Create a Custom Order Status in WooCommerce
Let’s say you want to add a new custom order status – “At Pick Up Point”
- Go to WooCommerce >> Order Status.
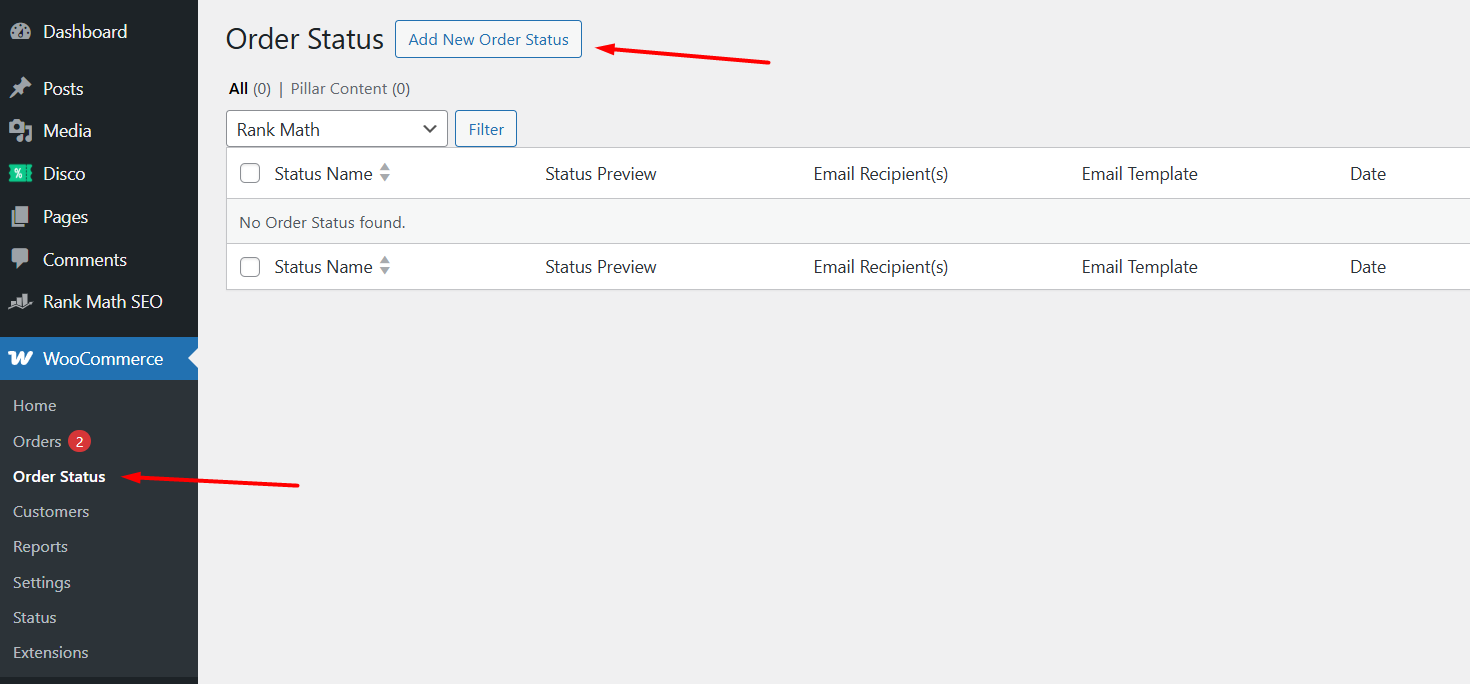
- Click the Add New Order Status button.
- Enter your new status name and slug.
- Select and add an icon.
- Additionally, you can pick colors, enable email-related options, and choose where this status will be displayed on the order pages.
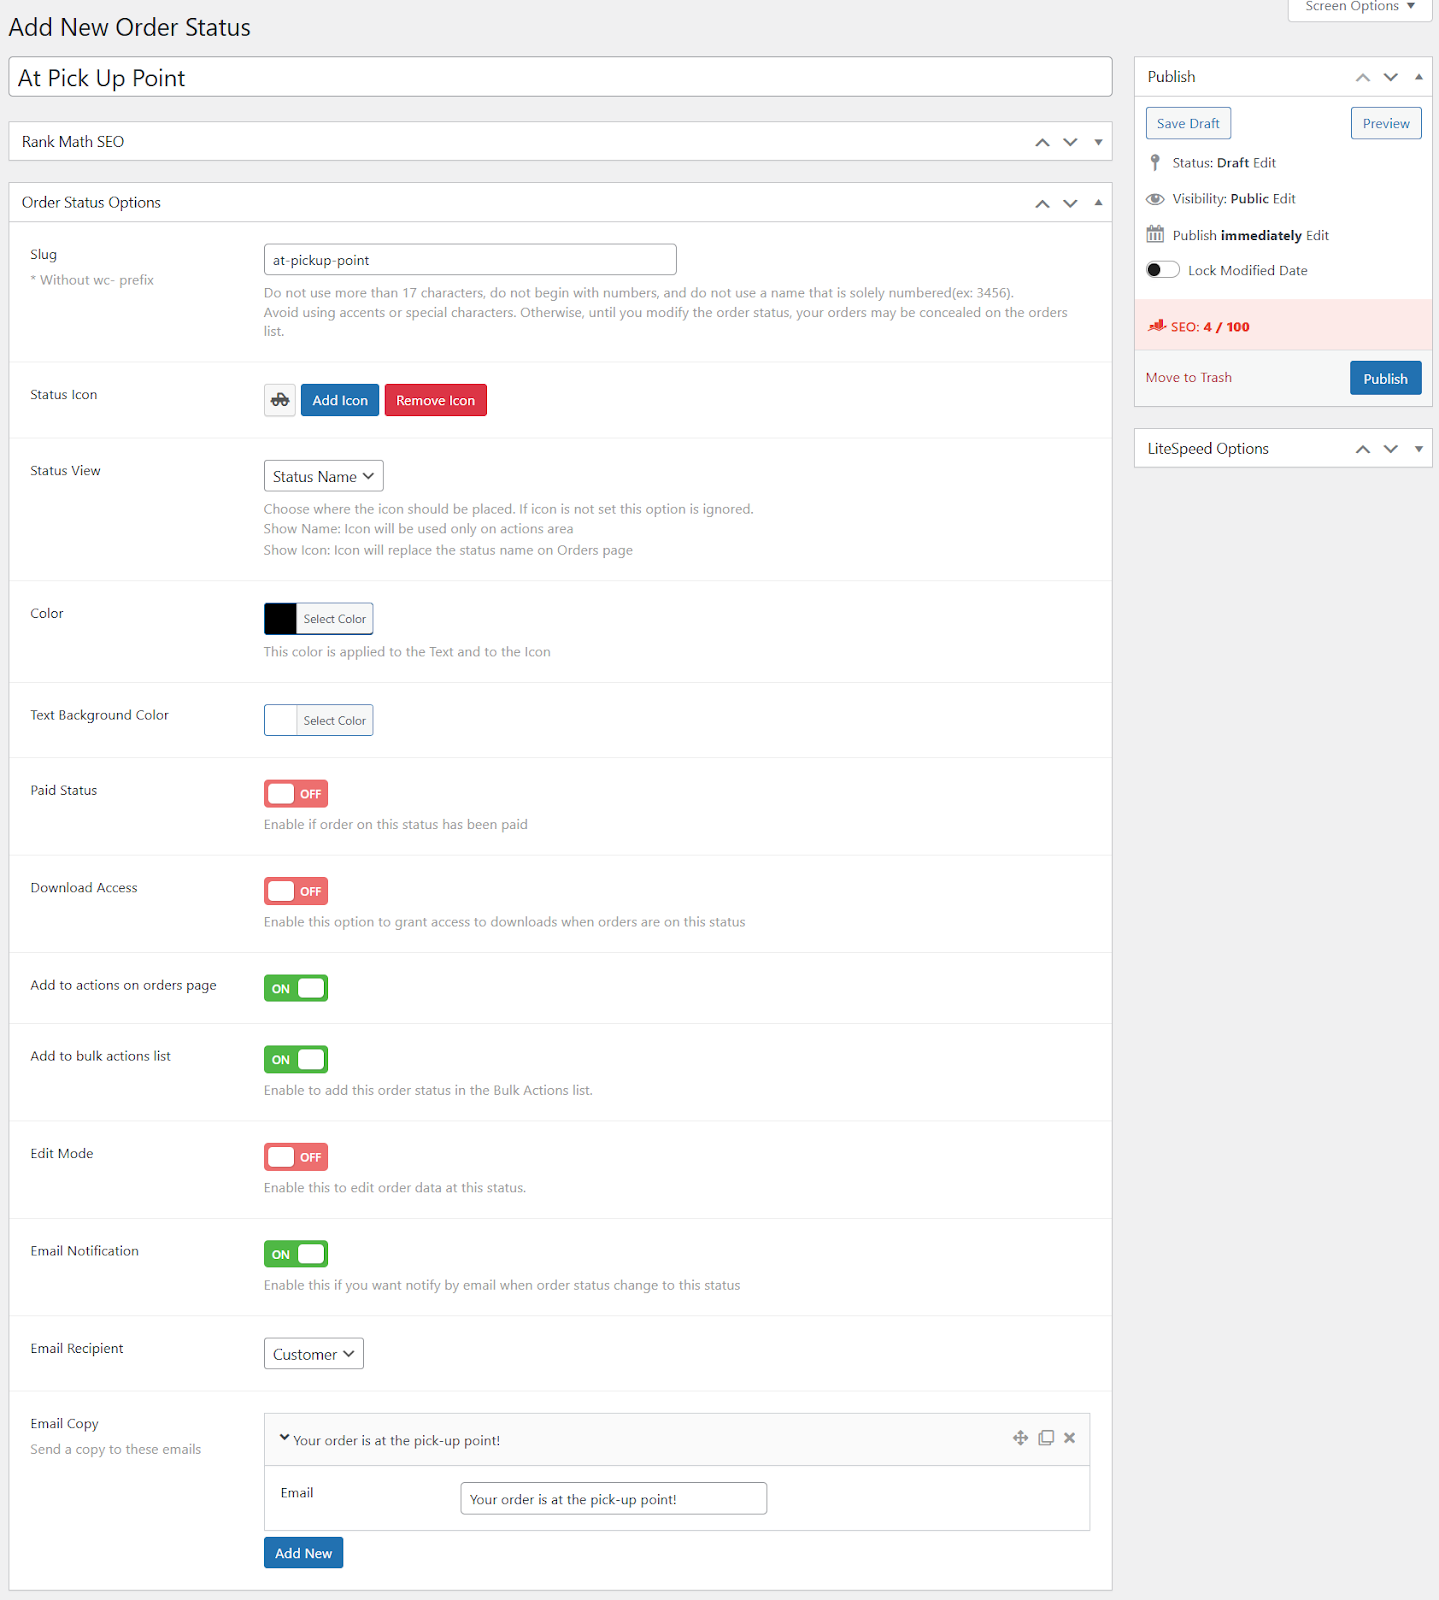
Step 3: Publish and Test
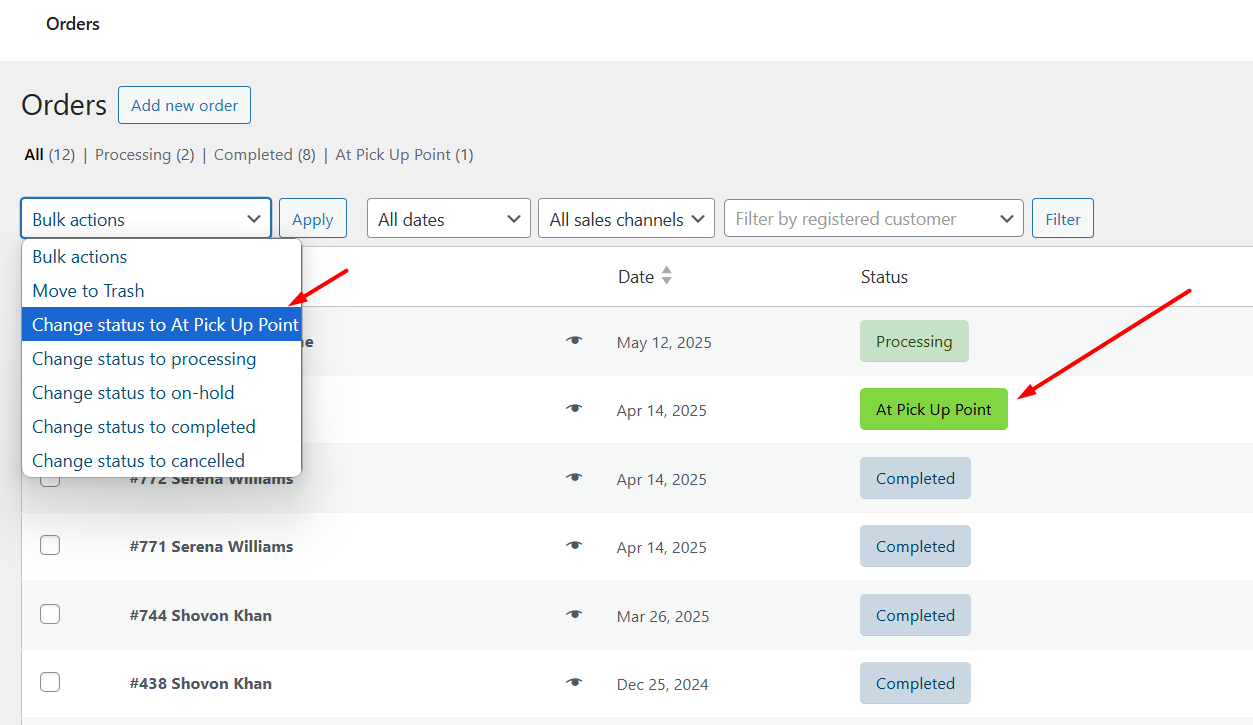
- Click Publish to enable the custom order status.
- Check the Order Status page as well as individual order pages.
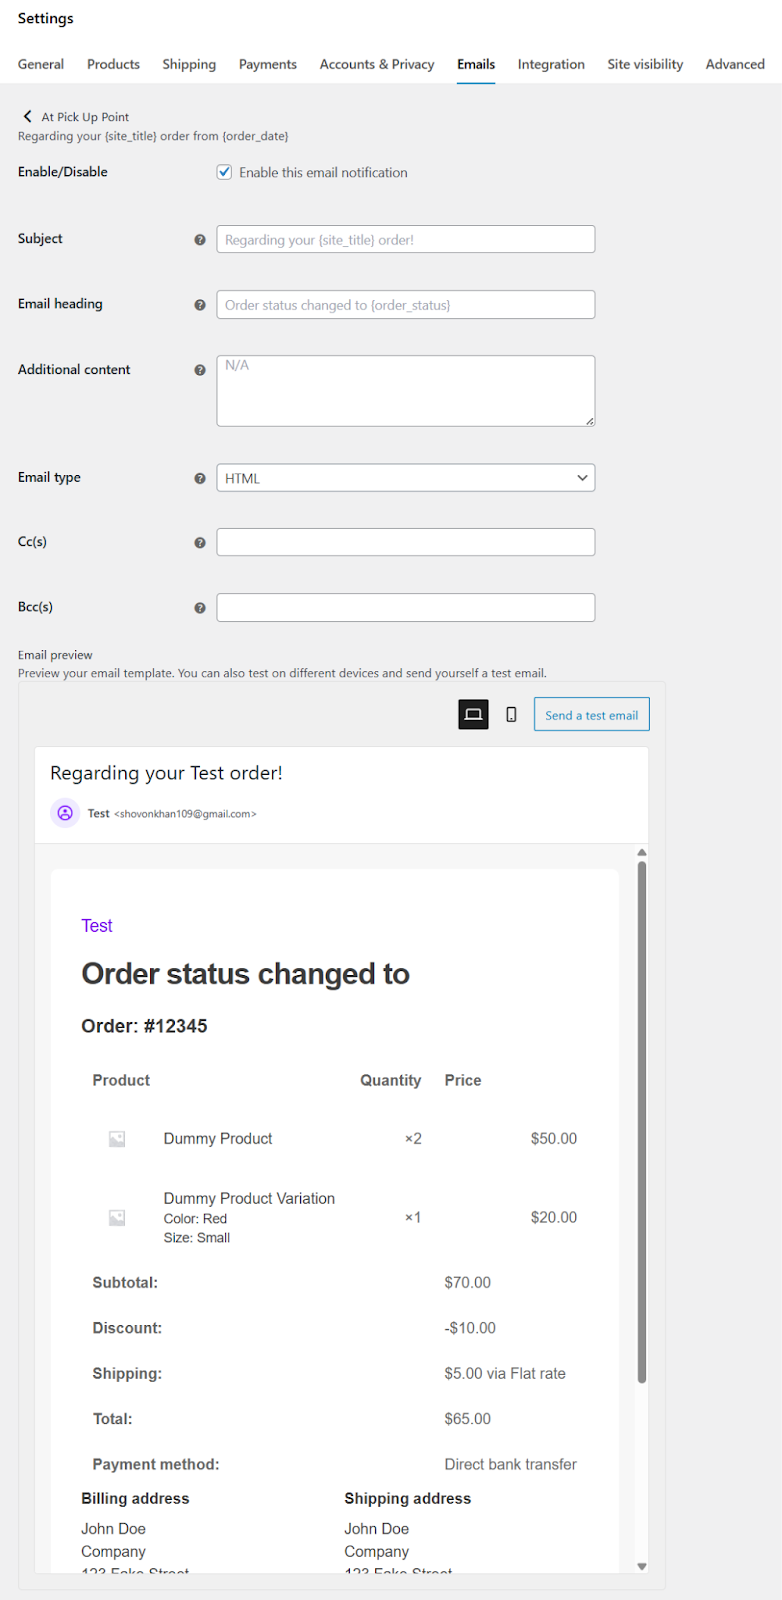
- To check and edit email for the new custom order status, go to WooCommerce >> Settings >> Emails and click the Manage button beside the At Pick Up Point option.
This is how to add custom order status in WooCommerce using a plugin. Pretty straightforward, right?
Beyond Basic Statuses: Advanced Tips & Best Practices
Where Your Custom Statuses Fit In?
Picture WooCommerce’s order journey like a subway map. Default stops:
- Pending Payment (waiting for cash)
- Processing (preparing your order)
- Completed (delivered, case closed)
- Cancelled/Refunded (self-explanatory)
Your custom statuses are new stations between these stops.
Example: “Processing” → “Quality Check” → “Packaged” → Your new “Shipped” status → “Completed”.
They extend the journey – never replace core stops.
Automate Your Workflow Like a Pro
Use these triggers to auto-activate tasks:
// Auto-add tracking when status hits "Shipped"

add_action('woocommerce_order_status_shipped', 'add_tracking_automatically');

function add_tracking_automatically($order_id) {

$order = wc_get_order($order_id);

$shipping_method = $order->get_shipping_method();

// Pull tracking from FedEx API, for example

update_post_meta($order_id, '_tracking_number', $fedex_tracking);

}
Changing Order Status in WooCommerce
Manual change in the admin panel:
- Open order >> click Status dropdown
- Select your custom status (e.g., “Awaiting Art Approval”)
- Critical: Add private note (“Client requested color revision”)
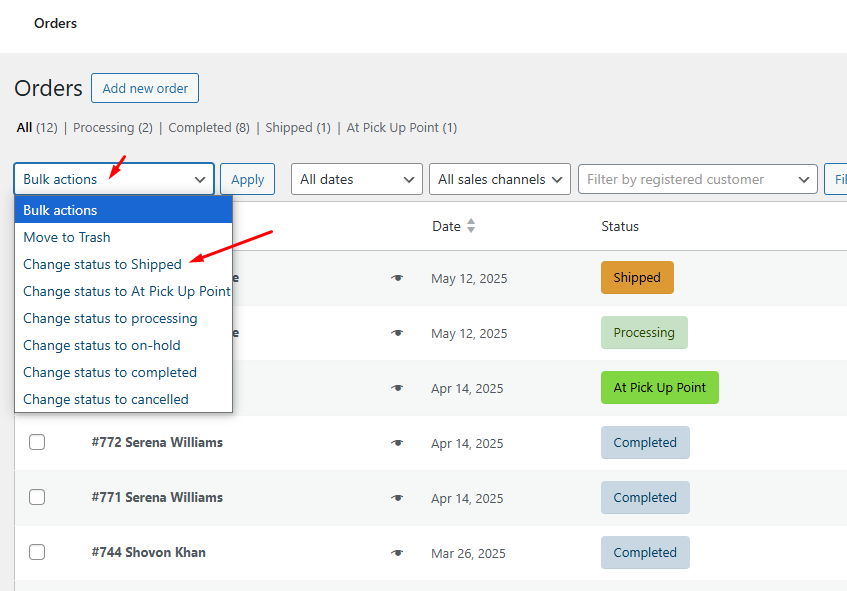
Bulk actions (50+ orders):
- Select orders → “Bulk actions” >> “Change status to Shipped”
Integrating with Other WooCommerce Features
Reporting
- Default reports ignore custom statuses.
- Fix: Use plugins OR add filters:
SELECT * FROM wp_posts

WHERE post_status = 'wc-shipped' /* Your status slug */- Track metrics: “Avg. time in ‘Quality Check’ status”
Customer Communication
- Ensure the status name is visible in My Account → Orders
- Do: Use clear names – “Shipped”, not “In Transit Phase 3”
- Don’t: Let internal codes leak (*customers see ‘wc-hold-876’*)
Troubleshooting Common Issues
❌ Status missing in dropdown?
- Coded method:
- Check functions.php for typos in wc_order_statuses filter
- Clear WooCommerce cache (WooCommerce → Status → Tools)
- Plugin method:
- Re-save permalinks (Settings → Permalinks → “Save”)
- Check user role permissions
❌ Emails not sending?
- Confirm email is enabled: WooCommerce >> Settings >> Emails >> [Your Custom Status]
- Check spam folder + server error logs
- For coded emails: Verify trigger() function calls $this->send()
❌ Status changes not saving?
- Conflict test: Disable other order plugins temporarily
- Database check: Run “Verify base database tables” in WooCommerce >> Status >> Tools
Pro Tip: The Status Sandbox Rule
“Test new statuses with fake $1 orders before going live.
Your ‘Test Mode’ order is cheaper than fixing production chaos.”
Real mistakes we’ve seen:
- Auto-shipped status triggered before payment cleared
- “Refunded” emails sent accidentally to 2,000 customers
- Status name “Assembling” translated to “Fighting” in German
(Test. Always test.)
Wrap Up
So, let’s cut to the chase—how to add custom order status in WooCommerce boils down to two real-world paths:
- For coders: Drop PHP snippets in your theme’s functions.php (register with register_post_status, hook into wc_order_statuses, add CSS icons).
- For everyone else: Grab a plugin like Custom Order Status Manager for WooCommerce—click, configure, done in 5 minutes.
Whichever route you pick, you’re solving the same core problem: WooCommerce’s default statuses don’t reflect how your business actually works. Whether you’re tracking handmade pottery stages (“Kiln Fired”, “Glazed”) or B2B approvals (“Finance Approved”, “PO Issued”), custom statuses turn chaotic workflows into clear visual pipelines.
Just remember: test new statuses with dummy orders first, and always add email notifications before going live—nobody wants angry customers asking why their “Shipped” order never notified them.
At the end of the day, this isn’t about tech—it’s about running your store your way. Code gives you control; plugins give you speed. Start with one critical status missing in your process (like “Shipped” or “Quality Hold”), implement it this week, and watch how much smoother operations flow when everyone—your team, your customers, your reports—finally speaks the same language.

1 thought on “How to Add Custom Order Status in WooCommerce?”
Hello,
Whenever i use update_status to update the status of an order to the new custom status I created, the order disappears from the orders table for both the buyer and the vendor. Do you know why this might be happening?
Thanks,
Aritra Jindal