
You’ve already exhausted yourself by exploring the obvious options. You’ve probably tried adjusting the WooCommerce setting. Creating a coupon, or even installing a discount plugins and experimenting with its configuration.
But it’s a disaster, the discount applies too broadly – to the entire cart or every variation of the product.
But the good news is that it’s not you, and the reason isn’t a misconfiguration. WooCommerce dynamic pricing is not supported by WooCommerce’s native features. Standard WooCommerce coupons can not target individual product variations. It either operates at the product level, category level, or across the entire cart.
To apply a 10% discount to a single variation only, you would need a dynamic pricing plugin that allows variation-level targeting.
In this tutorial, you’ll learn the exat setup using Disco- Dynamic Pricing & Discount Rules for WooCommerce: a single plugin, simple configuration, and no coding.
Quick Answer:
Can you apply a 10% discount to just one WooCommerce product variant?
Yes, but you can not do that with WooCommerce’s built-in system. This will require a dynamic pricing plugin such as Disco.
Here’s the 7-step setup:
1. Install and activate Disco Plugin
2. Open Disco → Add New Rule.
3. Set the discount intent as product-based.
4. Select the specific product variation in the filter section.
5. Set User Limit and Validity date.
6. Set the discount type as a percentage and enter 10.
7. Save the rule and verify if the status is active.
Result: A 10% discount will be automatically applied to your selected variation at checkout. A full step-by-step guide with screenshots is included below.
Before diving into setup, here’s the business rationale behind getting this right: About 38% of all e-commerce transactions now involve a discount. Research reports that 40% of U.S. consumers consider the 10-20 %discount range the most compelling. -significant enough to encourage a purchase decision without undermining product perceived value.
Conversely, in coupon-based systems, when a coupon code fails at checkout, 46% of shoppers abandon their carts instantly. Automatic discounts at the variant level eliminate all of that friction.
WooCommerce runs 93% of WordPress e-commerce stores, yet it has a built-in coupon system that can not target discounts to a single variation. The Barn2 team documents these limitations, and many storeowners spend afternoons on it during configuration.
Why WooCommerce Can’t Discount a Single Variant by Default
The native WooCommerce coupon system can only target three levels: an individual product, a product category, or the entire cart. That’s the full extent of its targeting capabilities. For example, there’s no native option that says, “apply a discount only when a customer selects ‘Size M in Blue.” WooCommerce variation selector manages price, SKU, and stock; however, the coupon engine can not use those attributes as conditions.
This limitation affects the large ecosystem. Since this platform powers 93% of WooCommerce stores and accounts for 33.4% of the global economic platform market as of 2025, this limitation affects an enormous number of store owners.
A dynamic pricing plugin is a practical workaround, which the following steps demonstrate.
If you’re looking to do more than just a single variant. Such as – applying a discount to the entire category, like all men’s clothing.
Disco handles that too. Check out the linked example before moving forward.
What You Need Before You Start
Before proceeding with this tutorial, ensure these four requirements are already in place :
- A WooCommerce variable product has been created.
If not, follow WooCommerce’s official documents to create it first. This tutorial assumes your product exists.
- At least one variation is configured.
Your product should have at least one variation defined by built-in attributes. Such as- Size: M, Color: Black –with its own SKU, stock level, and price.
- Disco installed and activated
It can be installed for free from the WordPress plugin directory.
- WordPress administrator access
You need full administration permissions to install plugins. If someone else manages the technical side of your store, request them to install Disco before continuing.
Curious about what other types of discounts WooCommerce supports beyond variant-level rules? This guide to WooCommerce product discounts explains all the available options- useful context before you start creating rules.
How to Set Up Discount Rules for 10% Discount on a Specific Product Variant?
Example: 10% discount on V-Neck-T-shirt- Size M, Color: Green (Variant X)
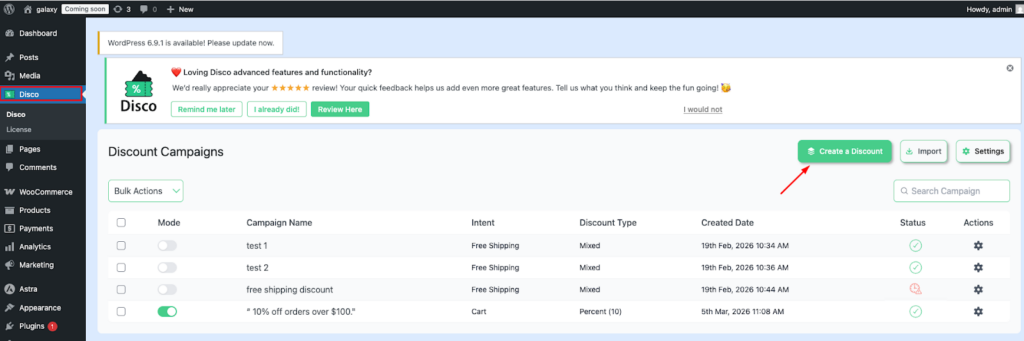
Step 1: Open the Disco Rule Builder
From your WordPress dashboard, navigate to Disco. Click to create a discount. This opens the rule builder, where all discount conditions and configurations are set.
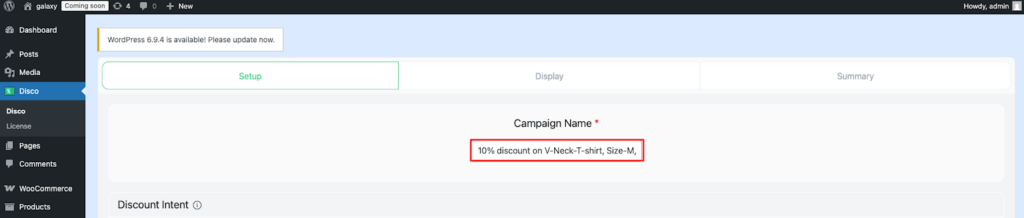
Step 2: Name Your Discount Rule
This is for your own reference, helping you identify and recognize the rule when multiple discount campaigns are running. Such as: 10% discount on V-Neck-T-shirt, Size-M, Color: Green
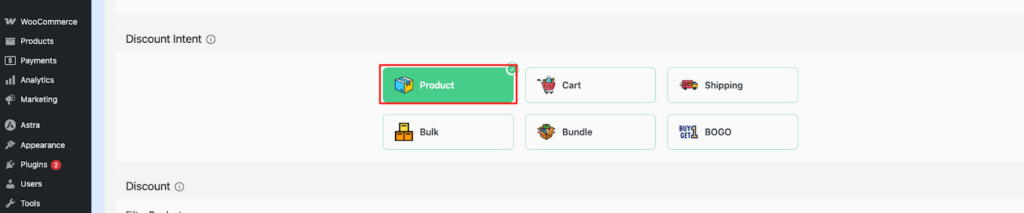
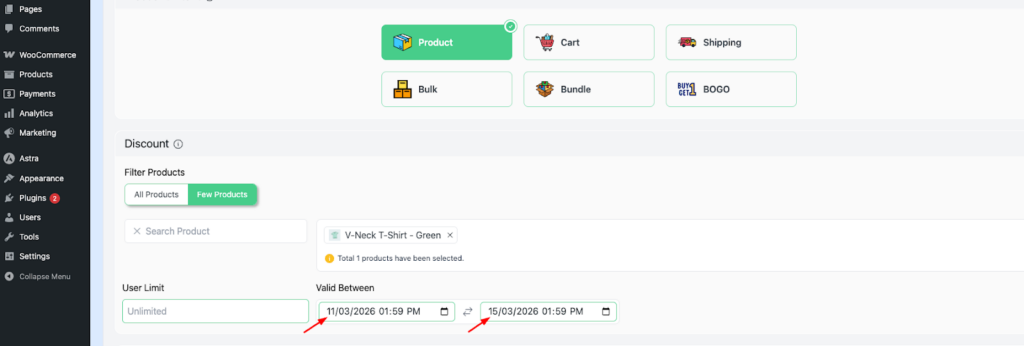
Step 3: Define the purpose of your discount
For this example, select your discount intent as a percentage discount.
Step 4: Set the Trigger Condition to Your Specific Variant
From the filter section, select a few products. Type your desired variant product in the search bar, Such as: V-Neck-T-shirt- Green (Variant X)
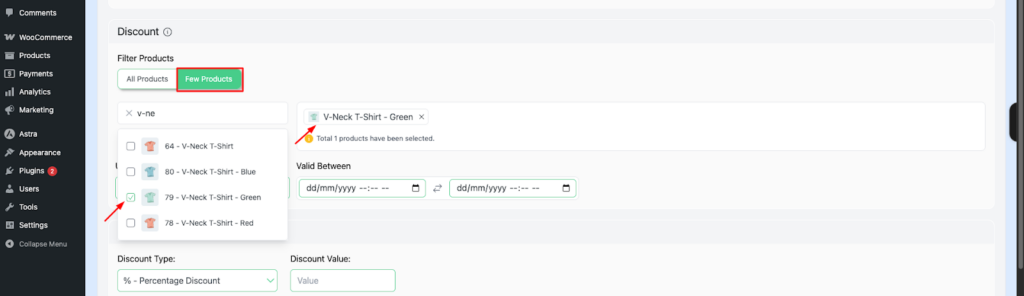
Common Mistake:
Do not select the parent category product name (e.g., T-shirt) instead of the specific variation (e.g., V-Neck-T-shirt-Green). Otherwise, every variation of the product gets a discount, not just the one you specified.
Step 5: Set User limit and Validity date
The User limit dictates the number of times the discount can be used. If you want this to be unlimited, you can leave the field blank.
The Validity date determines the timeframe of your discount, Such as 11/03/2026 to 15/03/2026.
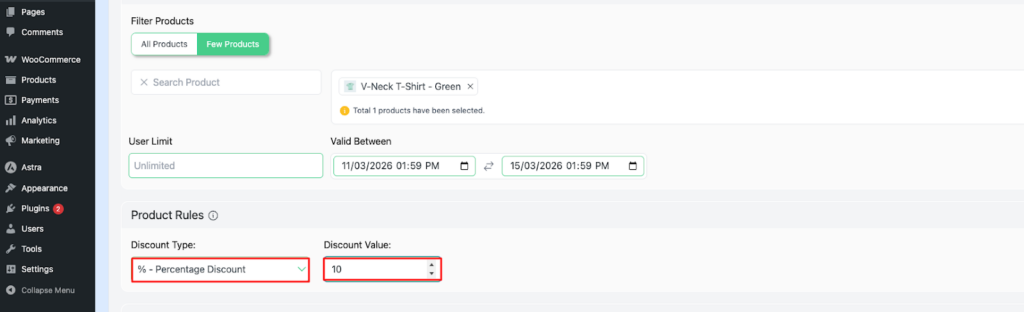
Step 6: Define the discount type and specify the value
For this example, set the discount type as a percentage discount and enter the value 10.
Common Mistake:
Do not choose a fixed discount. This type of discount removes a flat dollar value from the price. For example, for a $50 product, it would subtract $10, rather than calculating 10% of the price.
Want to learn more about how percentage discounts work on WooCommerce in general?Here’s a quick overview of how a percentage discount works in WooCommerce.
Running a premium or higher-priced product range? A fixed discount is better suited to this case. Check out the guide on flat fixed discounts for higher-priced products.
Step 7: Save the Rule and Confirm It’s Active
Once saved, return to your store to check if the rule is active. If applied correctly, your campaign will be automatically launched.
Common mistake:
Another common error is leaving the rule builder without saving the rule. Always confirm the rule is active before leaving the page. If it isn’t, go back and save again.
For a version-specific, if your interface looks different from the steps above, check out the plugin installation guide.
How to Test Your Discount Before Going Live?
Do not assume a discount rule is working before you have tested it yourself. Follow this exact verification process :
Step 1: Open your store in a private window.
Use a private or incognito browser to open your store. This ensures a fresh session without cached data or stored price information.
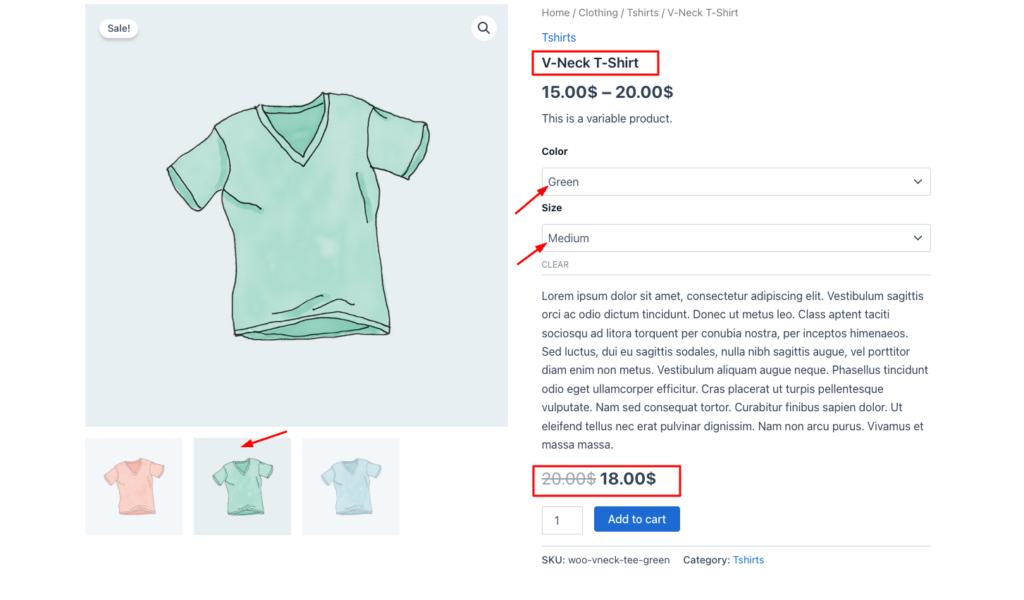
Step 2: Go to the Product Page
Go to your variable product page. Using the attribute selector, choose variant X- the exact variation you want to trigger in step 4.
Step 3: Add the Product to Cart
Step 4: Verify the Cart Page
Go to your cart page and confirm that the 10% discount has been deducted. This discount applies only to that single item; the other items remain unchanged.
Step 5: Confirm at Checkout
Navigate to the checkout page and verify 10% discount is displayed on the summary page. It’s an important step because the discount rule appears on the cart page but disappears during checkout.
Before/After Price Reference:
| Item | Before discount | After 10% discount |
| V-Neck-T-shirt- Size M, Color: Green (Variant X) | $20 | $18 |
| Other items in the cart | $25 | $25 (unchanged) |
| Cart Total | $45 | $43 |
If your discount only applies to the variant product, your discount rule is working.
What to Do If the Discount Isn’t Working?
| Problem | Most Likely Cause | Fix |
| All variants receive the discount | The parent product was selected rather than a specific product. | Edit the rule, go to the filter section, and choose the correct variant. |
| The discount displays on the cart page but disappears at checkout. | The rule scope is set to the cart subtotal instead of per item. | Adjust the rule to per line item instead of the entire cart. |
| Discount applies to all items in the cart | The scope is configured for all products | Go to the Filter section, select a few products, and choose your desired product from the search bar. |
| No discount is applied | The rule is saved as a draft | Open the Disco rules list, locate the rule, and set its status to active |
| The discount rule conflicts with another active rule | A higher priority overrides this one. | Update the rule priority settings, and move this rule higher |
What to Set Up Next
Your discount rule is live. You’ve tested it. The 10% discount applies correctly at checkout to variant X only.
Install Disco Free — Create Your First Discount in Minutes.
If Diso isn’t installed yet, you can find it on the WordPress plugin repository.
Prefer to see it done? Watch the full setup video:
Ready for the next rule? Now that you’re comfortable with the Disco rule builder, creating another discount is much easier. A Buy 1, Get 1 promotion follows the same process. You simply need to change the discount intent, condition, and discount type.
FAQs
Can WooCommerce apply a discount to just one product variant without a plugin?
No, the WooCommerce built-in system lacks this support. It can only target products, categories, or the full cart. An additional dynamic pricing plugin, such as Disco, is required to complete the action.
What is WooCommerce dynamic pricing?
WooCommerce dynamic pricing means automatic, rule-based discounts triggered by predefined rules without requiring a coupon code. A plugin defines IF/THEN logic. If certain conditions, such as product, variation, quantity, or cart value, are met, the discount is automatically applied.
Is Disco free to use for variant-specific discounts?
Yes, indeed. It’s free and available on the WordPress plugin repository. We’ve already covered the core functionality in this tutorial- How to Set Up Buy Product A (Variant X) and Get 10% Discount in WooCommerce. Check out our Disco plugin page for a complete breakdown of our paid vs free features.
Will the 10% discount apply automatically, or does the customer need a coupon code?
The Disco plugin lets you create automated discounts without requiring any coupon code. As soon as you’re done defining the rules in the rule builder, your discount will be automatically applied.
What happens if two of my Disco discount rules conflict?
Navigate to Disco’s settings page, and from there, you can adjust your priority order of the rules. Review the rule that is triggering to understand why it’s overriding the other one. Then decide if the priority order is correct for your setup.
Can I replicate this same setup for other variants?
Yes, run through the same 7-step process for each variant you want to discount. Make sure to use descriptive names for your campaigns, such as T-shirt, Size:L, Color: Black – so they are easily recognized later.
Is there a free dynamic pricing plugin for WooCommerce?
Yes, you can find Disco in the WordPress plugin repository. It’s free, and it supports the variant-specific, automatic discount setup described in the tutorial.


