Did you know, a staggering 77% of customers might abandon their carts if they don’t find their preferred payment method at your store?
And the fact that there’s a whopping 1.65 billion mobile shoppers out there screams loud enough to declare you must support digital wallet payments such as Google Pay.
That’s why in this guide we will show exactly how to add Google Pay in WooCommerce step by step with screenshots. Let’s dive right into it.
Table of Contents
Prerequisites: What You Need Before Adding Google Pay to Your Store
Let’s prepare your store for Google Pay! Here’s a simple list of things you’ll need to check before setting it up. Don’t worry—it’s easier than it sounds!
1. A “Security Lock” for Your Website (SSL Certificate)
- Google Pay only works on websites with https:// in the URL (not http://).
- How to check: Look for a 🔒 padlock symbol next to your website’s address in the browser.
- If you don’t have this, contact your hosting provider to install an SSL certificate.
2. Your Business Must Be in a Supported Country
- Google Pay isn’t available everywhere yet.
- Your business location (in Stripe/WooCommerce) needs to be in a country Google supports, like the U.S., U.K., Canada, or Australia. Check the full list here.
⚠️ Not on the list? Sadly, Google Pay won’t work for you yet. Contact Google to ask about future support.
3. Update WooCommerce & WordPress
- Old versions of WooCommerce or WordPress might cause errors.
- Go to your WordPress dashboard >> Updates >> click “Update” if anything is pending.
- This keeps things running smoothly and avoids weird bugs!
4. Set Up a Payment Gateway (Like Stripe)
- Google Pay doesn’t work alone—it needs a “partner” like Stripe to handle payments.
- Install the Stripe plugin for WooCommerce and connect it to your Stripe account.
- You’ll need your Stripe API keys (don’t panic—Stripe gives these to you in your account dashboard).
5. Test Mode Ready
- Before going live, test Google Pay in “sandbox” mode.
- Turn on Test Mode in Stripe/WooCommerce settings to use fake cards (like 4242 4242 4242 4242) without charging real money.
Quick Tips
- Use Chrome: Google Pay works best in Chrome for testing.
- Check Devices: Google Pay works on iPhones, Androids, and computers—but only in supported browsers (Chrome, Safari, Edge).
Double-check these points, and you’re all set to add Google Pay! Next up: Step-by-step setup!
How to Add Google Pay in WooCommerce?
You can integrate Google Pay in your Woo store through a Google Pay WooCommerce plugin. There are plenty of plugin options for WooCommerce Google Pay integration.
The easiest one is through WooCommerce’s own payment gateway plugin WooPayments. Let us walk you through the steps to Google Pay integration with WooCommerce official payment plugin.
Step 1: Install the WooCommerce WooPayments Plugin
WooPayments is an official plugin from WooCommerce and is available for free in the repository. Log in to your WordPress admin panel and –
- Go to Plugins >> Add Plugin.
- Search for WooPayments.
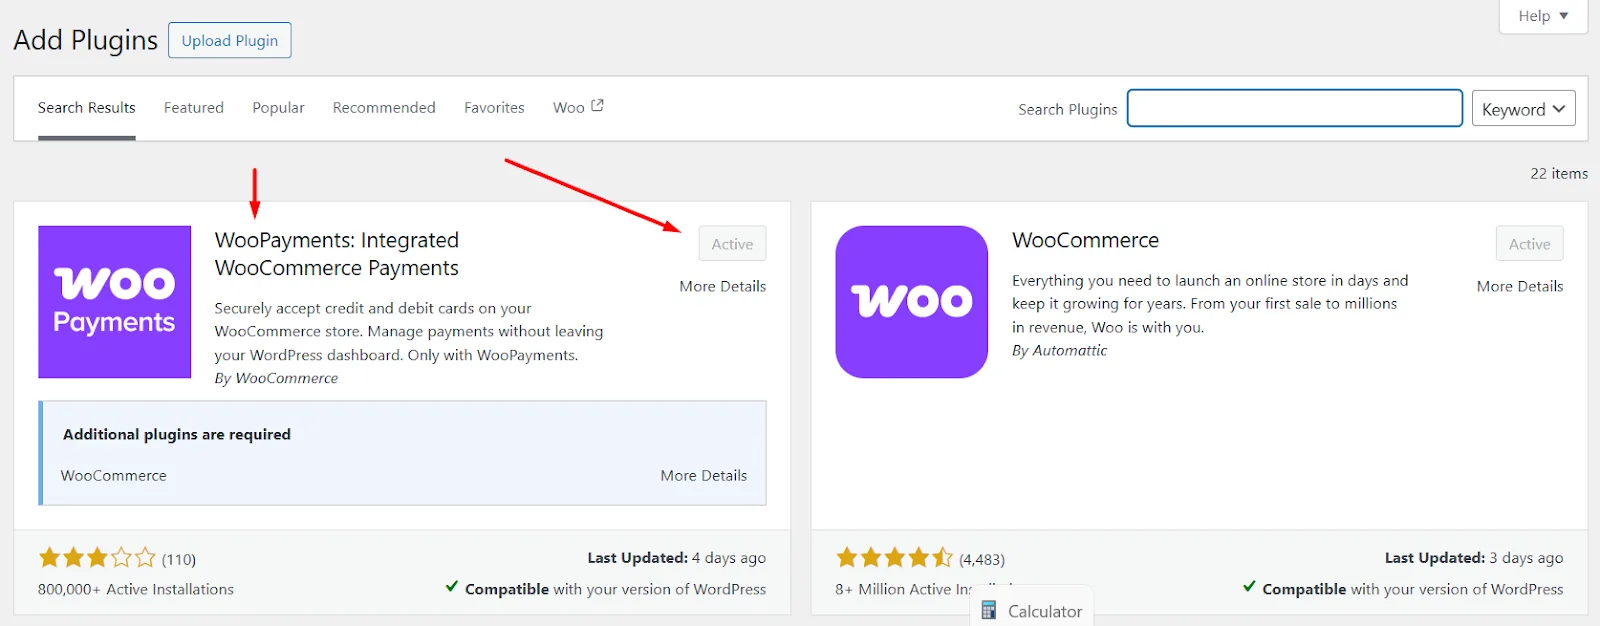
- Install and activate the plugin called “WooPayments: Integrated WooCommerce Payments.”
Step 2: Complete Sign Up Process
You need to connect your store to WordPress.com and then verify with WooPayments’s partner, Stripe.
- Go to Payments >> Connect Your Store.
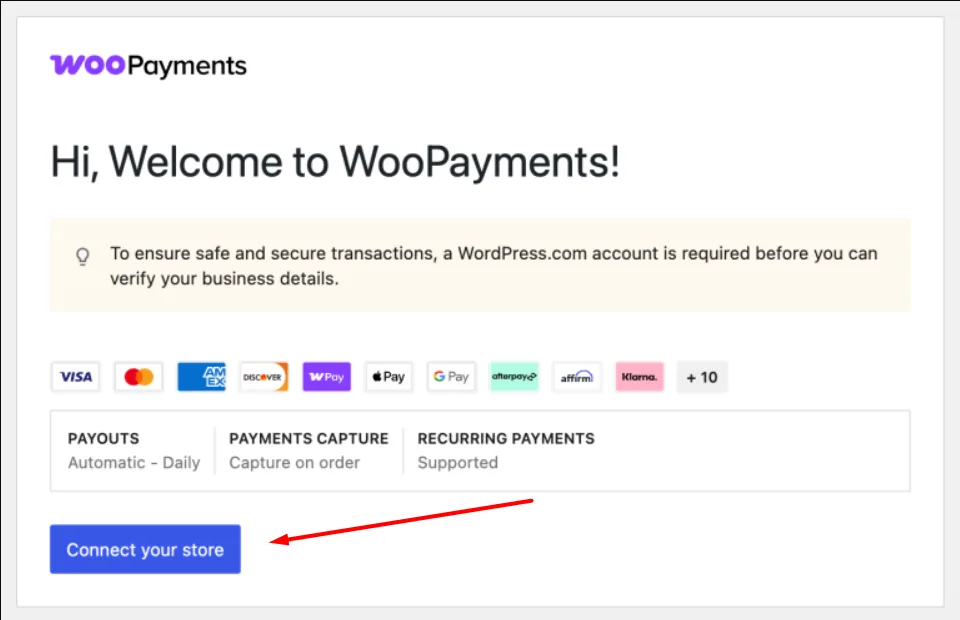
- Log in or sign up for a WordPress.com account.
- Enter your business details.
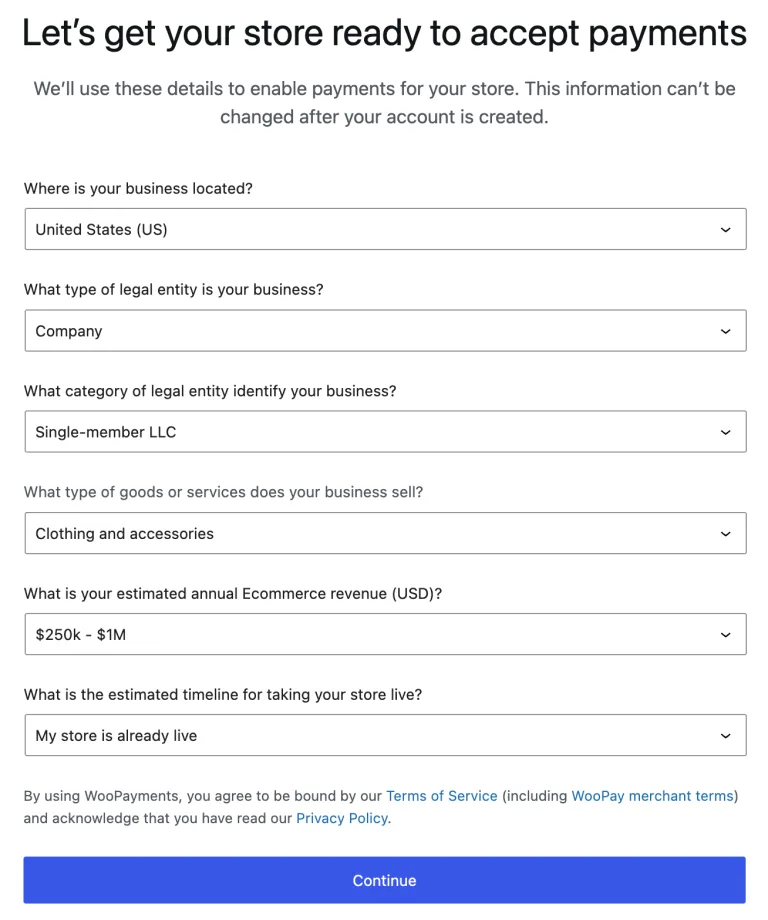
- Log in to your Stripe account from the following pop-up window.
- Verify your WooCommerce store with Stripe.
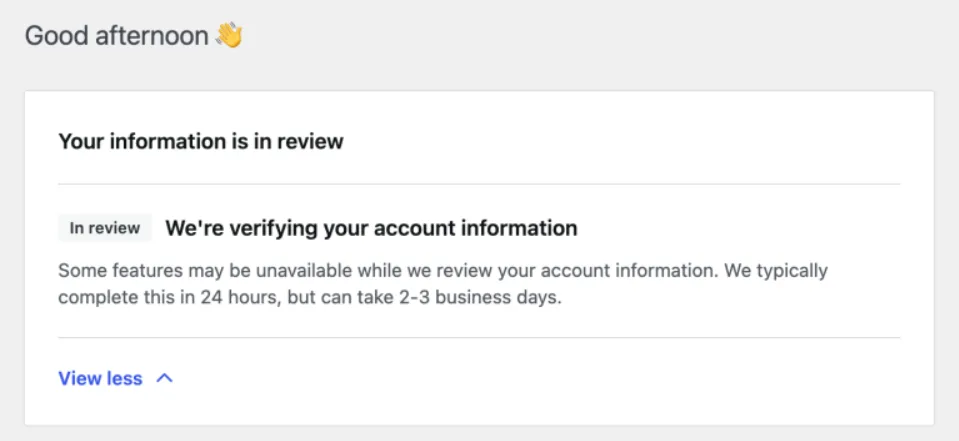
Once you successfully connect to Stripe, the plugin will add multiple payment-related sections to the Payments menu.

Step 3: Enable WooCommerce Google Pay
- Go to Payments >> Settings.
- Scroll down to the Express Checkouts section.

- Checkmark to enable Google Pay in WooCommerce.
Step 4: Customize Google Pay for WooCommerce Experience
- Click the Customize button beside the Google Pay checkmark.

- Enable the pages you want to display the G Pay WooCommerce button.

- Customize the button design from the button settings.

Step 5: Test from the Front
- Go to your storefront and check different pages.
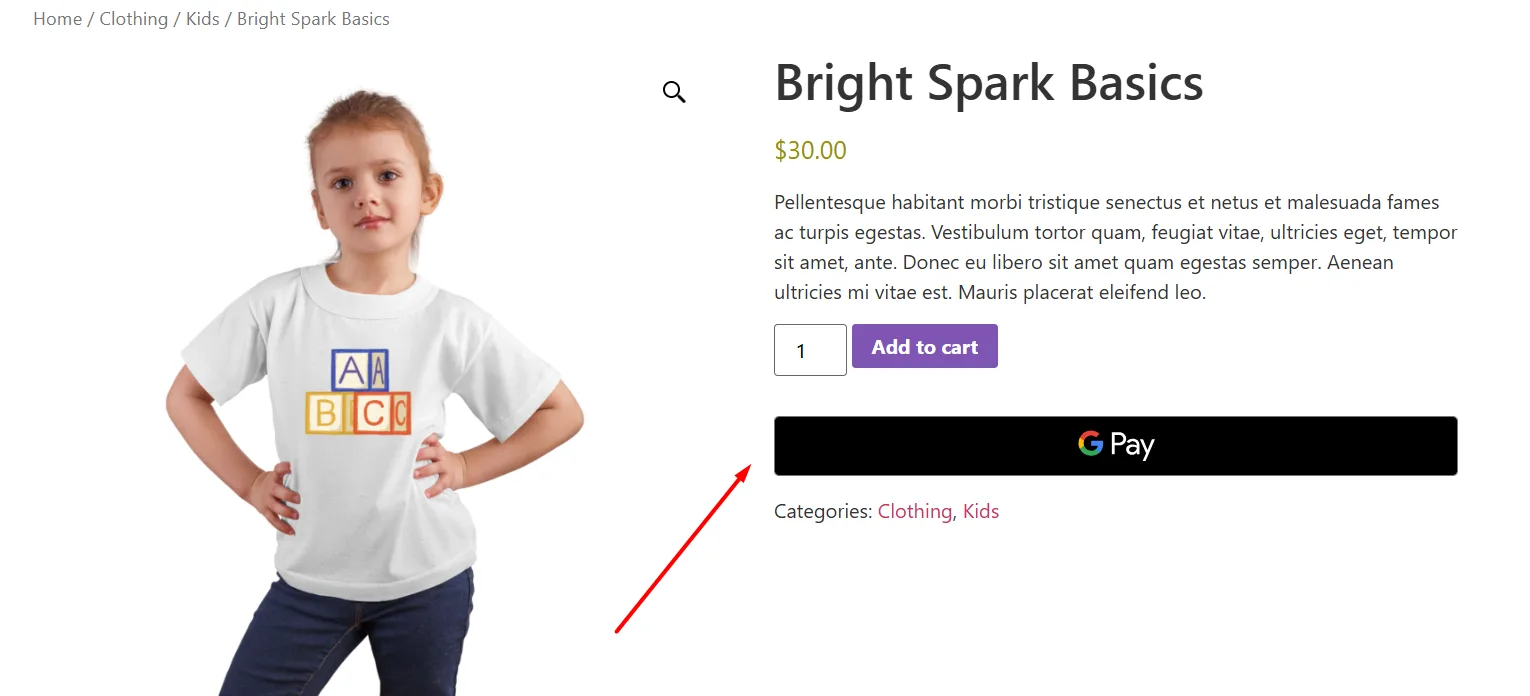
- Here’s how the cart page displays the Google Wallet WooCommerce button.
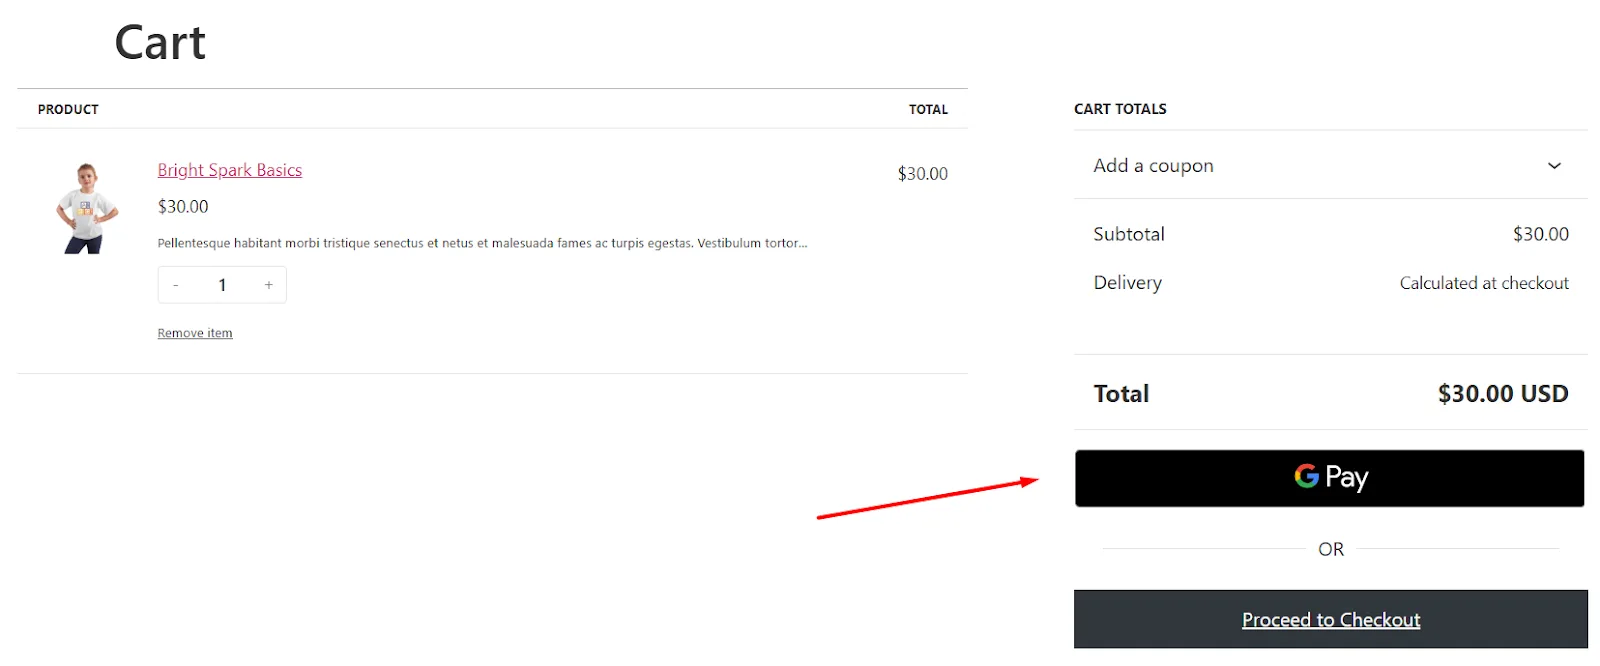
- When a user clicks the button, it will redirect them to the Google Pay wallet to complete the purchase.
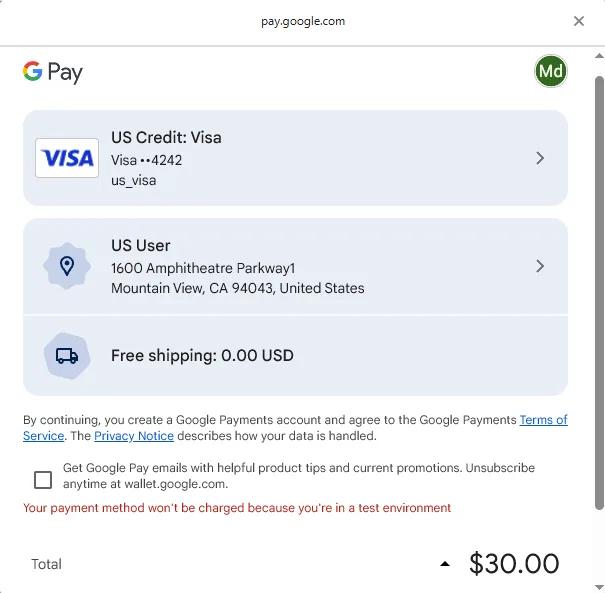
This is how to add Google Pay in WooCommerce using the WooCommerce Google Pay plugin. From the settings, you can also enable and allow your customers to pay in multiple currencies.

How to Add Google Pay in WooCommerce Using the Stripe Plugin?
If you are a Stripe user and, for some reason, you don’t want to use the official WooCommerce Google Pay WordPress plugin for payments, you can use the Stripe Google Pay WooCommerce plugin. Here are the steps –
Step 1: Install the Stripe Plugin
There are a number of Stripe plugins available in the repository. Let us show you which one to pick.
- Navigate to Plugins >> Add Plugin.
- Search for Stripe.
- Select the following Google Pay plugin for WooCommerce and Install & Activate.

Step 2: Connect to the Stripe Account
- Go to WooCommerce >> Stripe by Payment Plugins.

- Click on the Settings. It will take you to the Payments settings window under WooCommerce >> Settings.
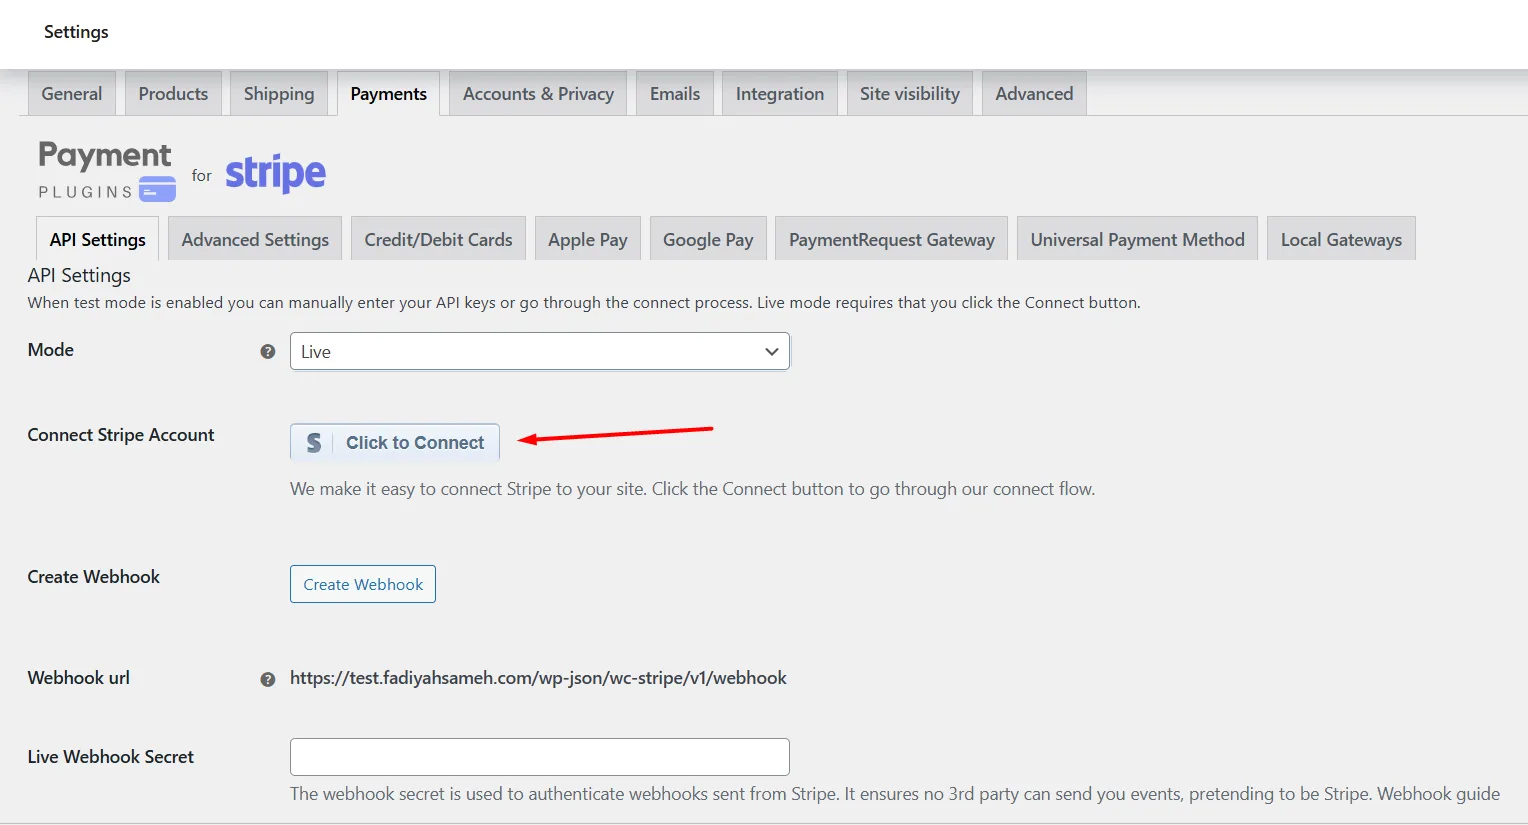
- Select your Mode and hit the Click to Connect button.
- You will be redirected to the following window. If you already have a Stripe account, enter your details to log in; otherwise, sign up for a new account.
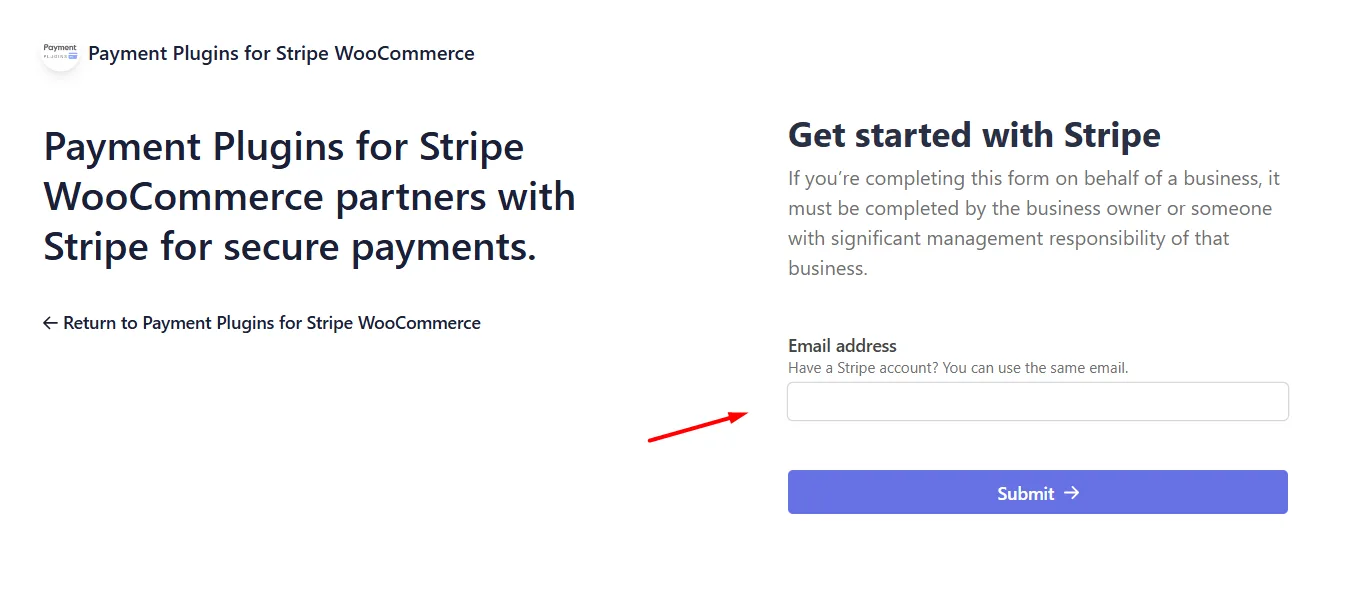
- After a successful connection, you will be returned to your back panel with a success message.

- It will display your account ID and API key.
Step 3: Enable Google Pay
To add Google Pay to WooCommerce, follow these steps –
- Click on the Google Pay tab under WooCommerce >> Settings >> Payments.
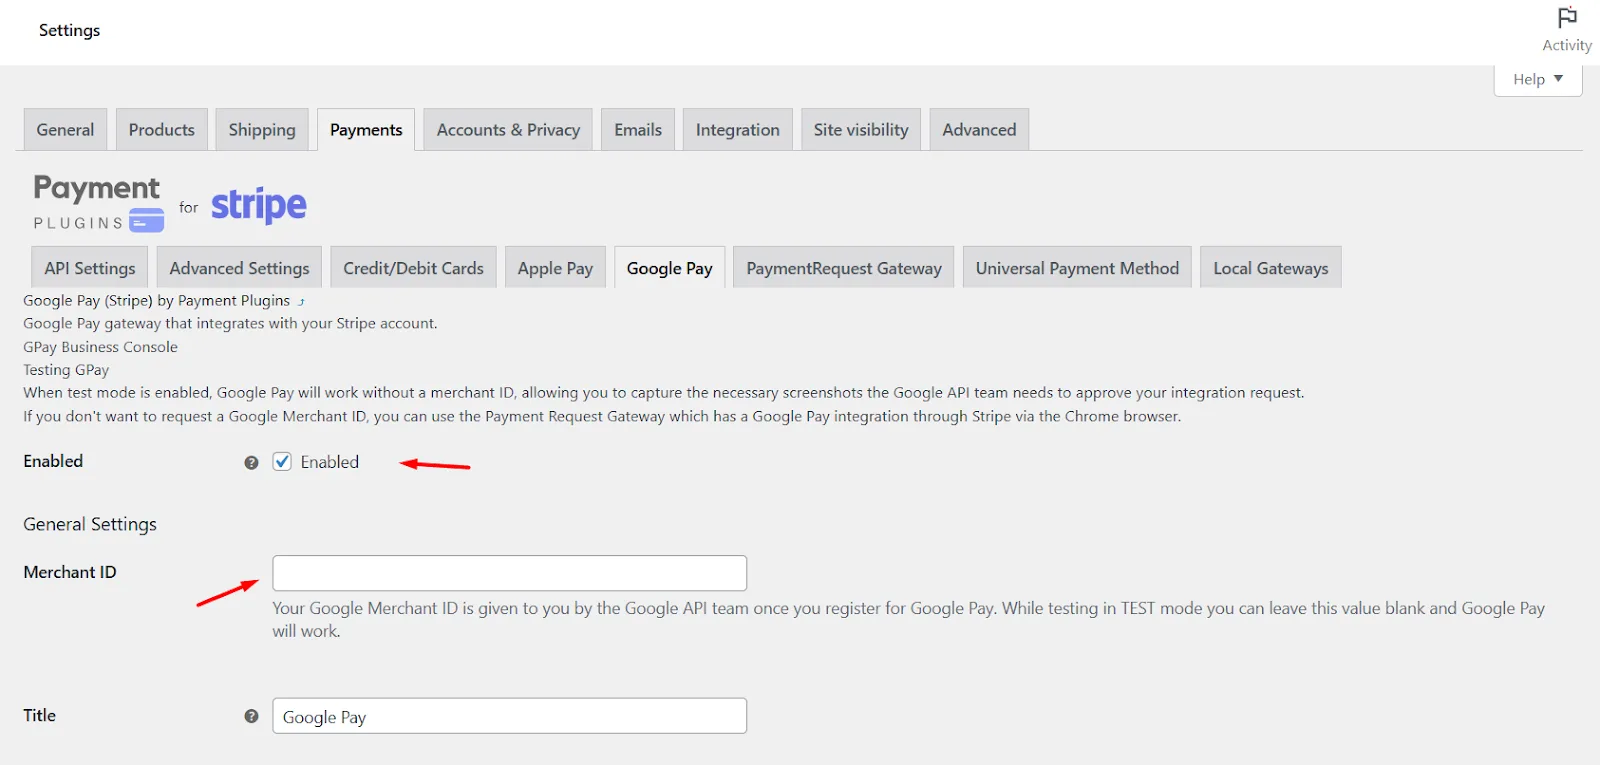
- Checkmark to enable Google Pay on WooCommerce.
- Enter your Google Pay Merchant Center ID. This ID will be given to you when you register for Google Pay.
Step 4: Customize the Google Pay Button
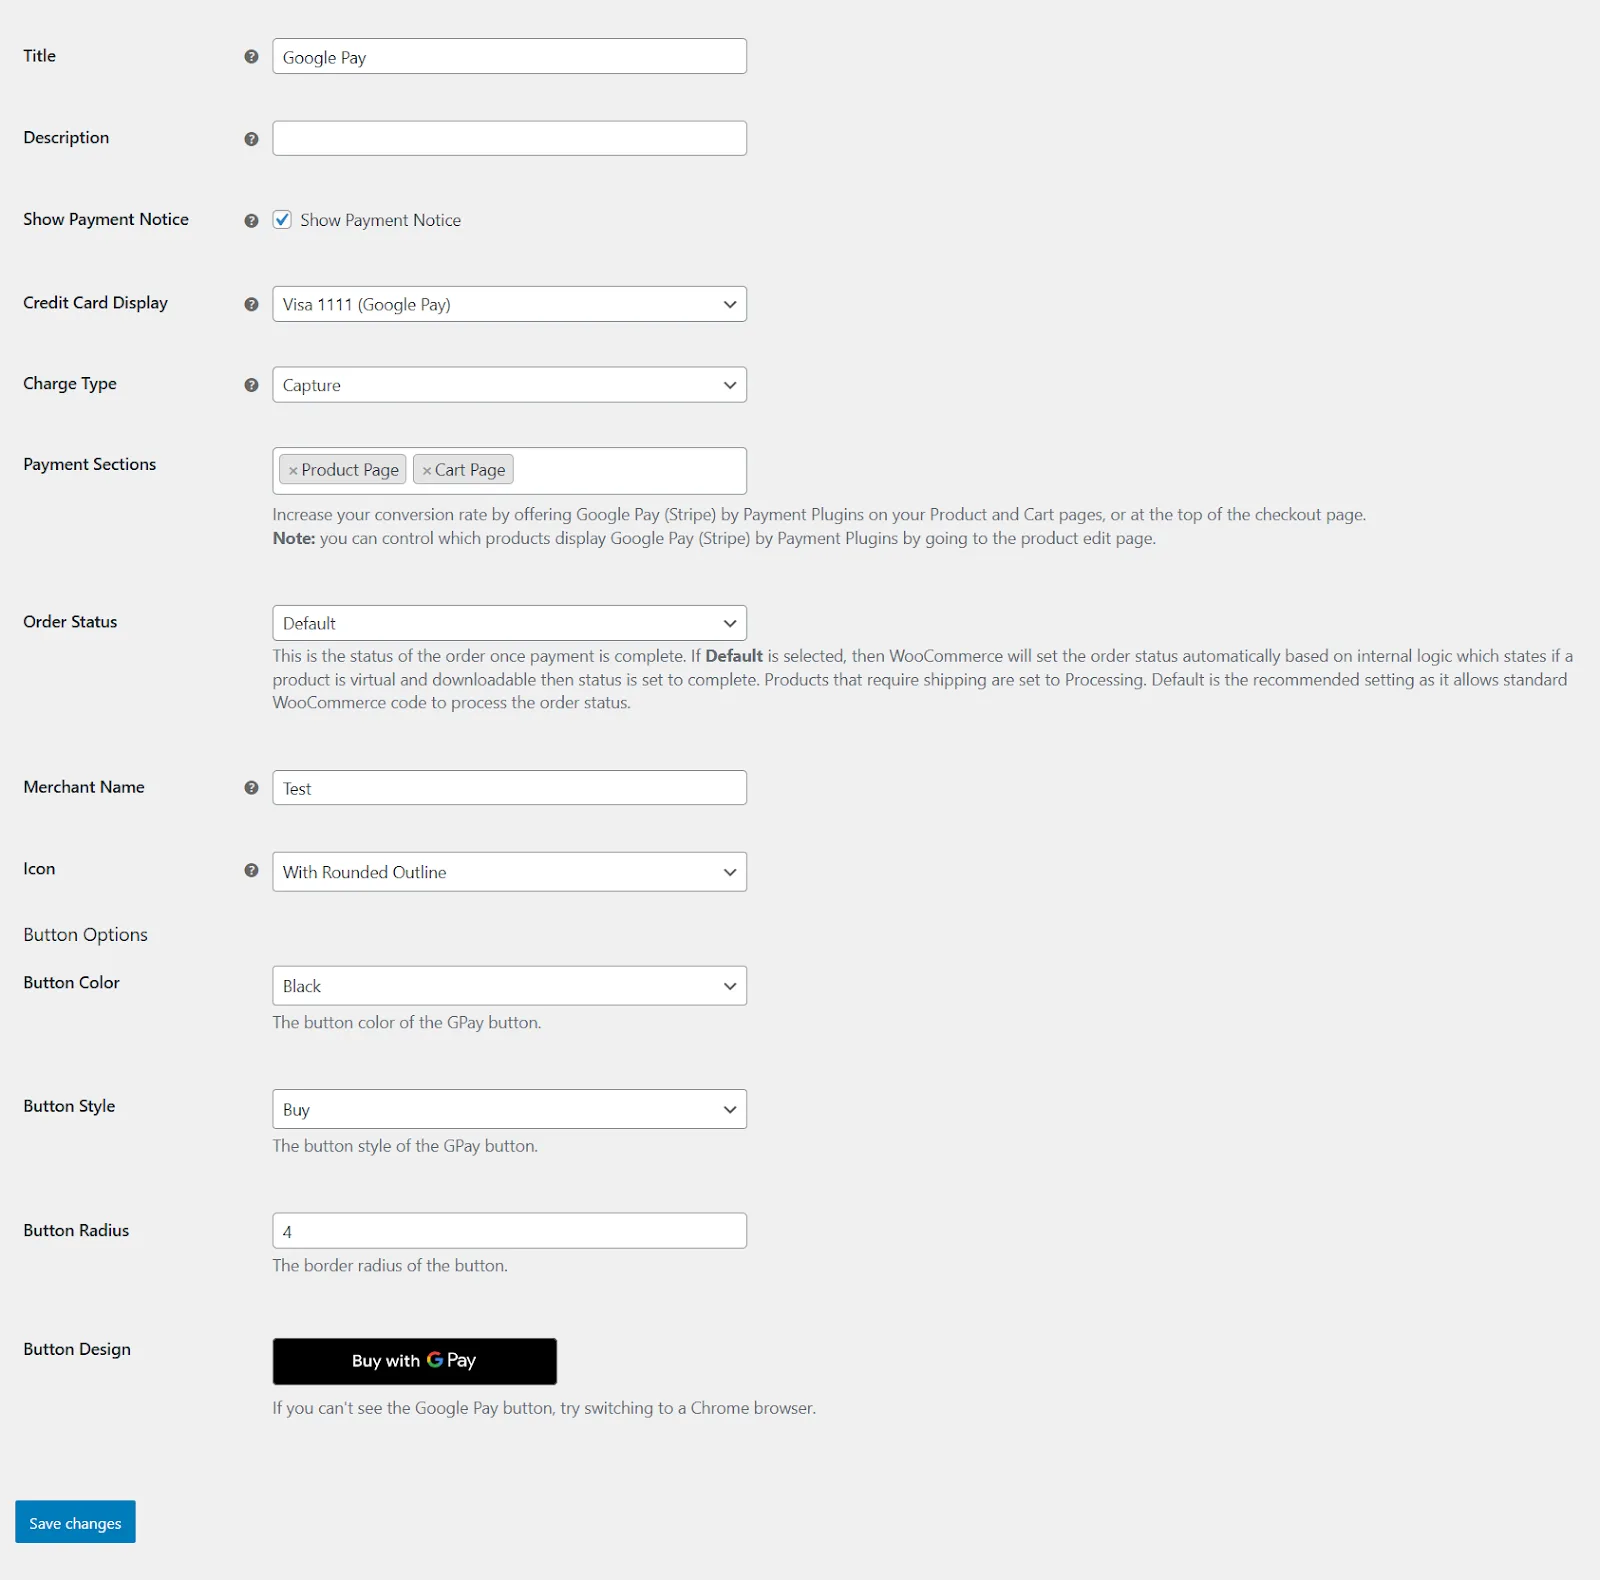
Make the button match your store’s style:
- Button Color: Choose black or white.
- Button Style: Select “Buy” or “Plain”.
- Button Radius: Adjust the corners (e.g., “4” for slightly rounded edges).
- Icon Style: Pick between a simple Google Pay logo or one with a rounded outline.
Step 5: Where to Show Google Pay
You can display the Google Pay button in multiple places to boost conversions:
- Product Pages: Let customers buy instantly without going to the cart.
- Cart Page: Speed up checkout after they review items.
- Mini Cart: Show it in the floating cart sidebar.
- Express Checkout: Add a button at the top of the checkout page.
Step 6: Test Google Pay
- Visit any of the landing pages you selected to display the Google Pay button. For example, here’s the cart page view.

- Clicking on the button will take users to the following Google Pay payment gateway for WooCommerce window.

This is how to add Google Pay in WooCommerce.
Troubleshooting Common Issues with Google Pay
Here are some common Google Pay with WooCommerce issues you may face and how to solve them.
A. Google Pay Button Isn’t Showing Up 😕
If WooCommerce Stripe Google Pay not showing, which means customers can’t see the Google Pay button, here’s what to check:
- SSL Certificate: Your website URL must start with https:// (🔒 padlock symbol). No padlock? Google Pay won’t work.
- Stripe Settings:
- Go to WooCommerce >> Payments..
- Is “Google Pay” toggled on under Payment Request Buttons?
- Check if your Stripe account is in a supported country.
- Plugin Conflicts:
- Turn off other plugins temporarily (except WooCommerce & Stripe). Does the button appear now? If yes, another plugin is causing issues.
- Browser/Device Issues:
- Test in Google Chrome (works best).
- Try a different phone/computer.
- Theme Problems:
- Switch to a default WordPress theme (like Astra). If the button shows up, your theme might need adjustments.
B. Payments Fail or Get Declined
- Test Cards: Use Stripe’s test card 4242 4242 4242 4242 in Test Mode.
- Live Mode Issues:
- Check if your Stripe account and WooCommerce store are verified.
- Are the customer’s card/bank blocking the payment? Ask them to contact their bank.
C. Google Pay Merchant Center Problems
- No Merchant ID? You can skip this for testing (use Stripe’s Payment Request Gateway instead).
- Approval Delays: Google takes time to review Merchant ID requests. Follow up politely if stuck.
D. Registering Your Site with Google
Most plugins handle this automatically. If your gateway (like Stripe) requires manual registration, follow their guide—it’s rare!
Best Tips for Using Google Pay (That Actually Work!)
So you’ve set up Google Pay—awesome! But how do you make the most of it? Here’s how to turn Google Pay into a checkout powerhouse for your store. No fluff, just practical tips:
1. Shout About Google Pay
Don’t hide it! Make sure customers know you accept Google Pay:
- Add the Google Pay logo to your:
- Checkout page (near the “Place Order” button).
- Product pages (“Buy now with Google Pay” under the price).
- Footer or header (e.g., “Fast checkout with Google Pay 🔒”).
- Use a plugin like Payment Icons for WooCommerce to add icons easily.
2. Make It Mobile-Friendly
Google Pay users are primarily on phones! Optimize for mobile:
- Big buttons: Ensure the Google Pay button isn’t tiny on small screens.
- One-click buy: Use plugins to let customers check out directly from product pages (great for impulse buys!).
3. Speed Up Your Checkout
Slow checkouts kill sales. Google Pay is fast, but your site needs to keep up:
- Simplify forms: Remove unnecessary fields (like “Company Name” if you sell to individuals).
- Cache your site: Use plugins like WP Rocket to load pages faster.
- Test loading times: Tools like Google PageSpeed Insights can spot slowdowns.
4. Build Trust with Security Badges
Skeptical customers? Show them it’s safe:
- Add a small note like, “Google Pay encrypts all transactions” near the button.
- Display trust badges (e.g., “SSL Secured” or “Verified by Stripe”) next to the payment options.
5. Keep Everything Updated
Old software = broken buttons. Once a month:
- Update WooCommerce, WordPress, and your payment plugins.
- Check if Google Pay still works (do a test order!).
6. Test Different Button Styles
Not all buttons work for every store. Experiment with:
- Colors: Black vs. white buttons (black stands out on light backgrounds).
- Placement: Try putting Google Pay above credit card fields—it’s often clicked first!
7. Train Customers to Use It
Many shoppers don’t know how Google Pay works. Add a tiny help link:
- Example: “What is Google Pay? Learn how to pay in seconds”.
- Create a short FAQ like, “No Google account needed! Just your saved card details.”
8. Watch for Abandoned Carts
If customers leave at checkout, Google Pay might not be working:
- Use a plugin like CartFlows to recover abandoned carts with an email reminder.
- Check WooCommerce >> Orders for failed Google Pay transactions.
9. Pair It with Other Payment Options
Not everyone uses Google Pay. Offer 2-3 alternatives:
- PayPal: Trusted worldwide.
- Apple Pay: For iPhone users.
- Credit Cards: Still a must-have.
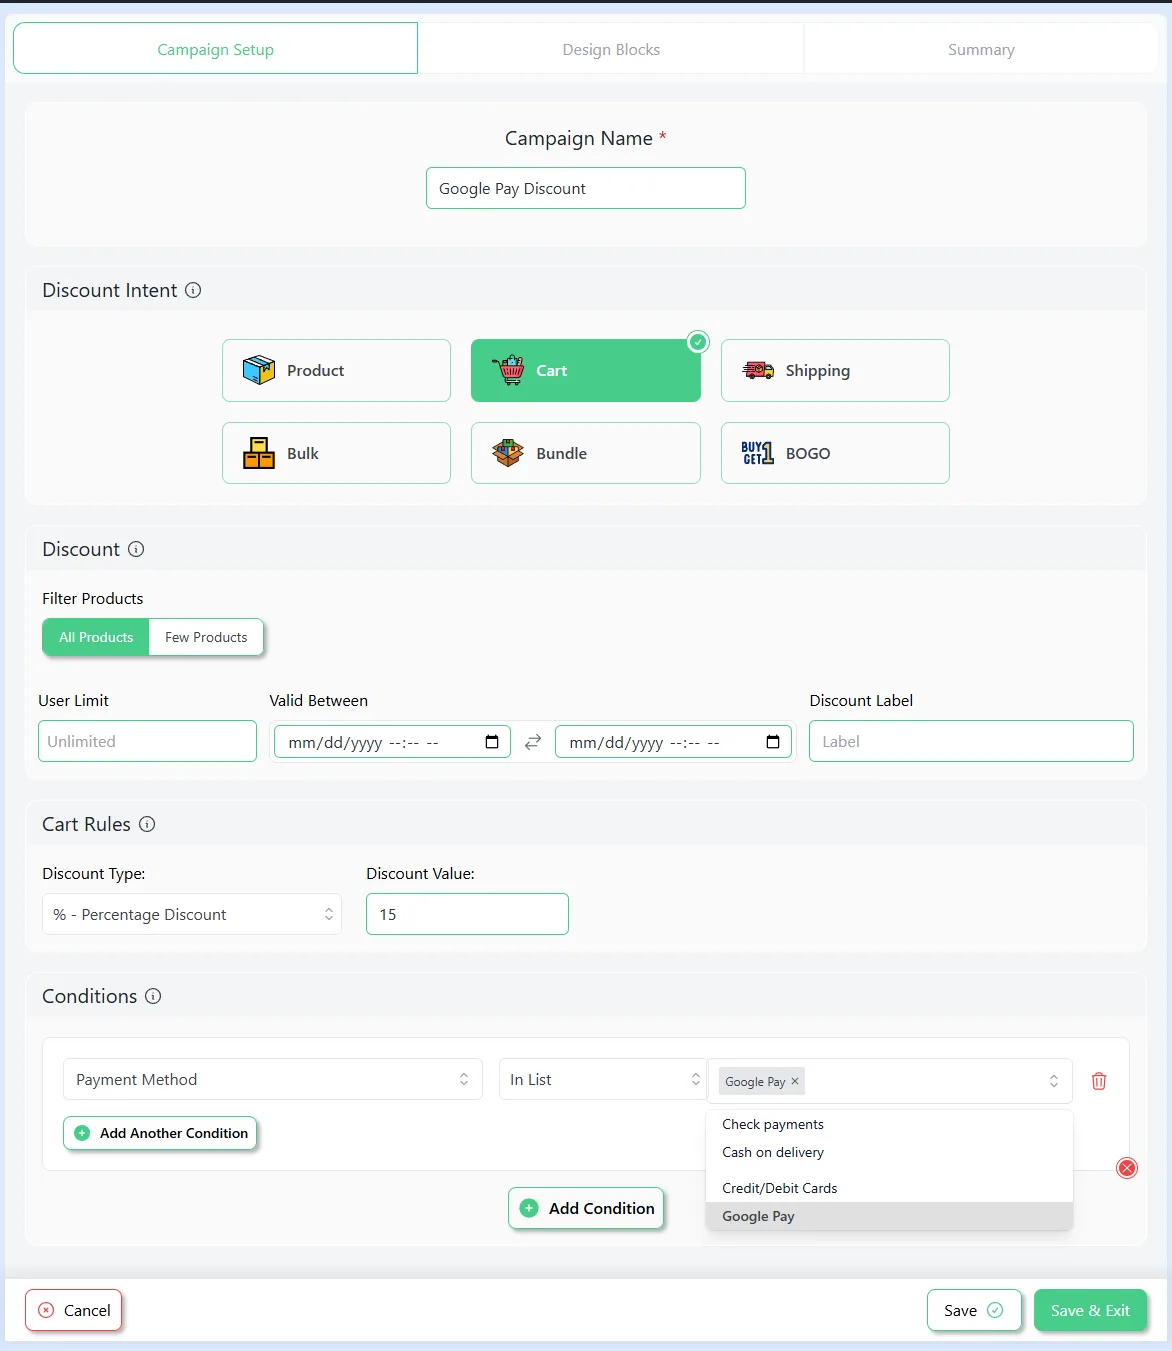
10. Run a “Google Pay Discount”
Boost adoption with a small incentive:
- Offer 5% off for first-time Google Pay users.
- Add a banner: “Skip the forms! Save time with Google Pay.”
Use a free plugin like Disco to offer discounts for paying through Google Pay. This nifty plugin supports payment method discounts even in its free version.
Final Pro Tip: Ask for feedback! Add a post-purchase survey:
“How was your checkout experience? 😊 / 😕”
If customers mention Google Pay was easy, you’re winning!
Google Pay isn’t just a button—it’s a way to make buying effortless. Try these tips, tweak what works, and watch your conversions climb!
Add More Payment Options (It’s Easy!)
Google Pay is a great option for accepting payments; however, it shouldn’t be your only payment method. Customers always prefer multiple options and will leave your cart if the preferred payment option is unavailable at your store.
A. Other Popular Payment Methods
- WooCommerce Apple Pay: Works like Google Pay! Enable it in Stripe settings.
- PayPal: Install the PayPal for WooCommerce plugin. Customers love it.
B. Why Offer Multiple Options?
- More Trust: Customers prefer stores with familiar payment methods.
- Fewer Abandoned Carts: If Google Pay fails, they can use PayPal or a credit card.
👉 Pro Tip: Start with Google Pay + 1-2 others (like PayPal). Add more later!
Wrap Up
So, this is how to add Google Pay in WooCommerce. Let’s recap what you’ve achieved:
- You made checkout faster: Google Pay lets customers buy with just a tap, cutting out forms and fuss.
- You boosted trust: Shoppers love secure, familiar payment options.
- You’re ready for mobile: Perfect for iPhone and Android users browsing your store.
Google Pay isn’t just a payment method—it’s a way to delight customers. The easier it is to buy, the more they’ll come back. Now go celebrate—you’ve earned it!
