Imagine losing a customer at checkout because they didn’t see their favorite way to pay. Frustrating, right?
For a staggering 434 million online shoppers, PayPal isn’t just an option—it’s a dealbreaker. If you run a WooCommerce store, adding PayPal could be the simplest upgrade you make this week.
Why?
Shoppers trust that blue button. They know their payments are secure, their refunds are protected, and they can buy in seconds without pulling out a credit card.
For you, that means fewer abandoned carts and sales that cross borders effortlessly.
If you’ve been wondering how to add PayPal to WooCommerce, you’re not alone. Thousands of store owners search for this every day—and for good reason.
Integrating PayPal isn’t just about slapping a logo on your checkout page. It’s about unlocking a payment method that turns visitors into buyers. And yes, accepting PayPal payments works whether you’re selling handmade candles or premium software.
In this guide, we’ll cut through the jargon. I’ll walk you through step by step from adding PayPal to your store to accepting PayPal payments.
By the end? You’ll have PayPal live on your store—smooth, secure, and ready to welcome buyers from over 200 countries.
Table of Contents
Before You Start: Prerequisites
Before we integrate PayPal with WooCommerce, we need to make sure your store is compatible. Make sure you have the following things configured.
- WooCommerce is Live:
Your WordPress site must have WooCommerce installed and activated. Not just sitting there – actually working. Check all WooCommerce settings. - PayPal Business Account (Non-Negotiable):
Personal PayPal accounts? They’ll freeze your funds if they spot business activity. You need a PayPal Business Account.- Already have personal? Convert it in 5 minutes: Settings > Upgrade to Business.
- API credentials / REST app (sandbox & live). Create a REST app in the PayPal Developer Dashboard to get Client ID and Secret Key for testing and production.
- Lock-Tight Security (SSL):
No “https://” in your site URL? Stop right here.- Why? PayPal will not work without SSL. It’s how browsers hide card details.
- Fix it first: Ask your host (like Bluehost/SiteGround) or install a free Let’s Encrypt certificate.
- Updates Done:
Running WordPress 5.0 or WooCommerce 2.6? That’s like driving a car with flat tires.- Update WordPress + WooCommerce + your theme. Old versions break payment gateways.
- Your “Undo Button” (Backup):
Messing with payments? Always backup. Use UpdraftPlus (free) or ask your host. Takes 2 minutes. Save your future self.
How to Add PayPal to WooCommerce? Step-by-Step
Time to set up PayPal on WooCommerce. Here are the steps on how to add PayPal to WooCommerce.
Step 1: Install the PayPal plugin for WooCommerce
WooCommerce does have a official PayPal plugin available both in the WordPress repository and the WooCommerce marketplace. However, this plugin has significant negative reviews, and we don’t recommend it.
Instead, we will go with the Payment Plugins for PayPal WooCommerce By Payment Plugins option. This free plugin is more advanced and easier to use compared to the official one.
- Log in to your WordPress admin panel and navigate to Plugins > Add Plugin.
- Search with PayPal, detect the plugin.
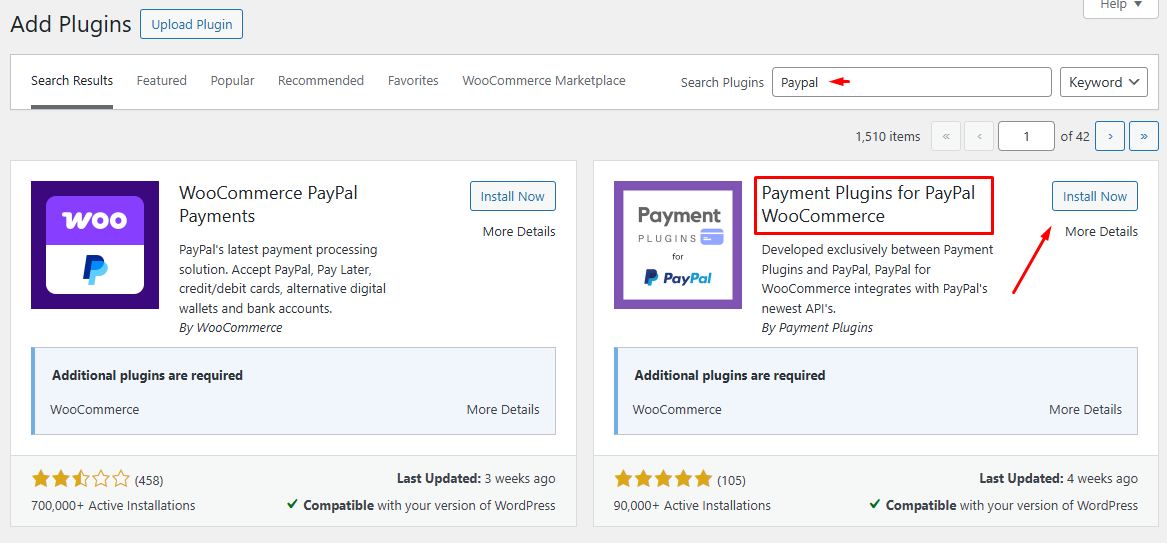
- Install the PayPal Payments plugin for WooCommerce and activate it.
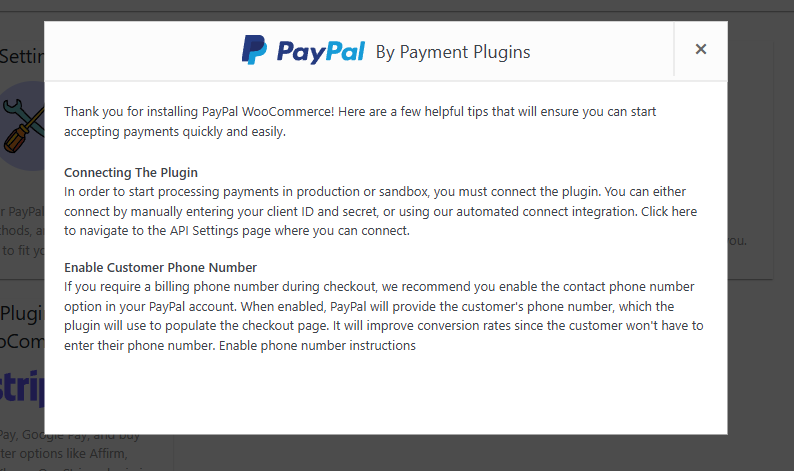
- After you activate the plugin, it will return the following suggestions.
Step 2: Connect PayPal to WooCommerce
This is the most important step for configuring PayPal for WooCommerce.
- Go to WooCommerce > Settings > Payments.
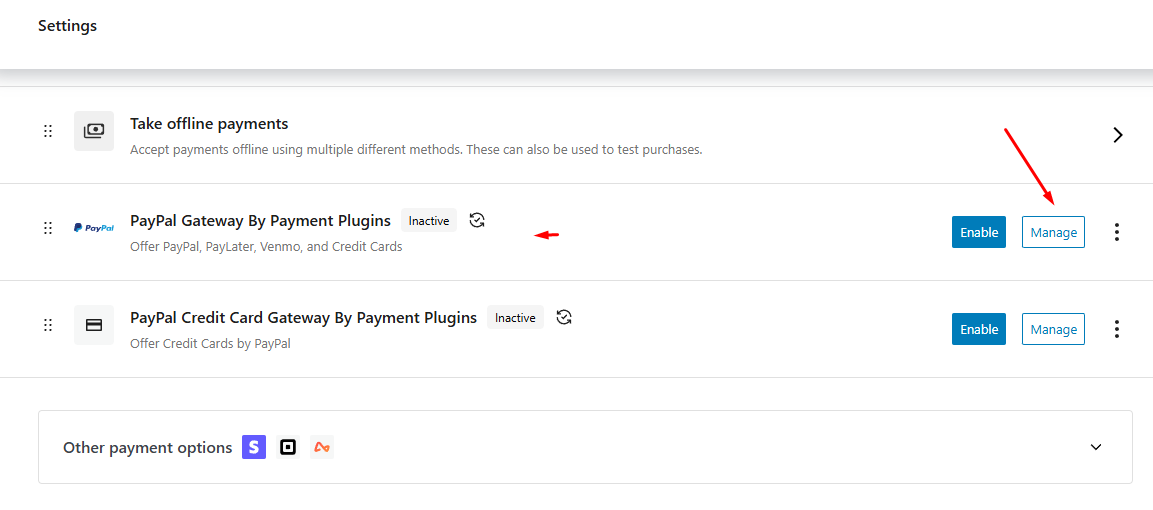
- Click the Manage button beside the PayPal Gateway by Payment Plugins option.
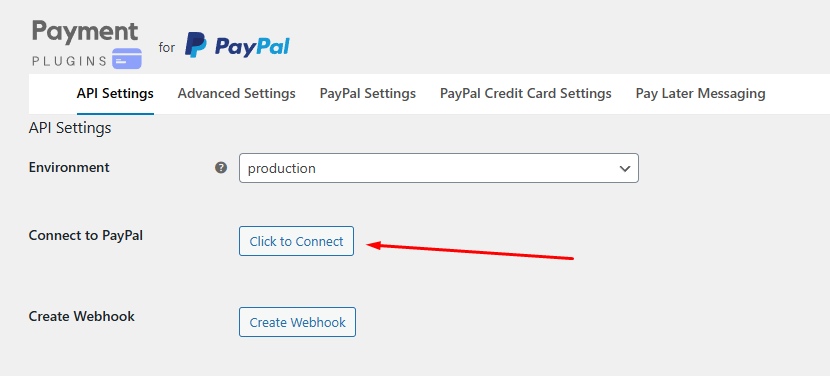
- Click the API Settings and select your Environment. For accepting live payments, select Production, or select Sandbox for testing the PayPal gateway.
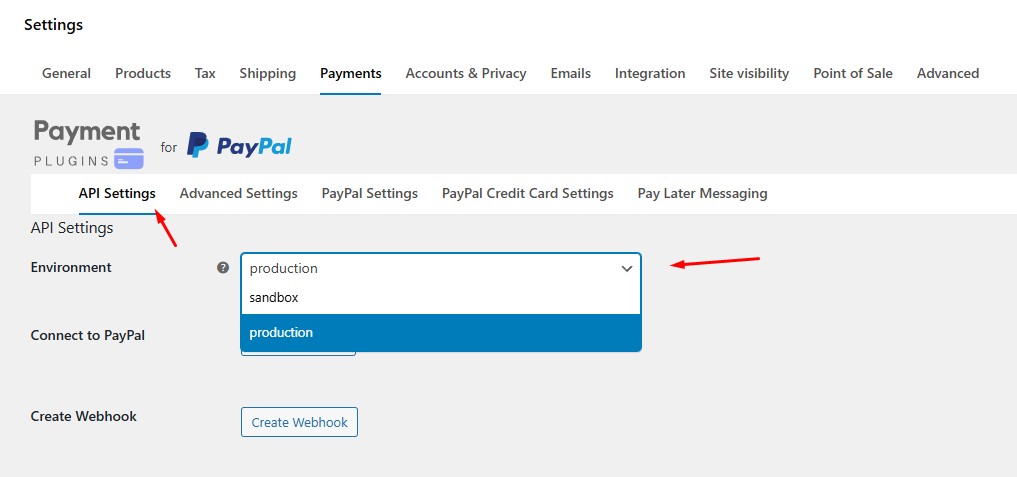
- Hit the Click To Connect button.
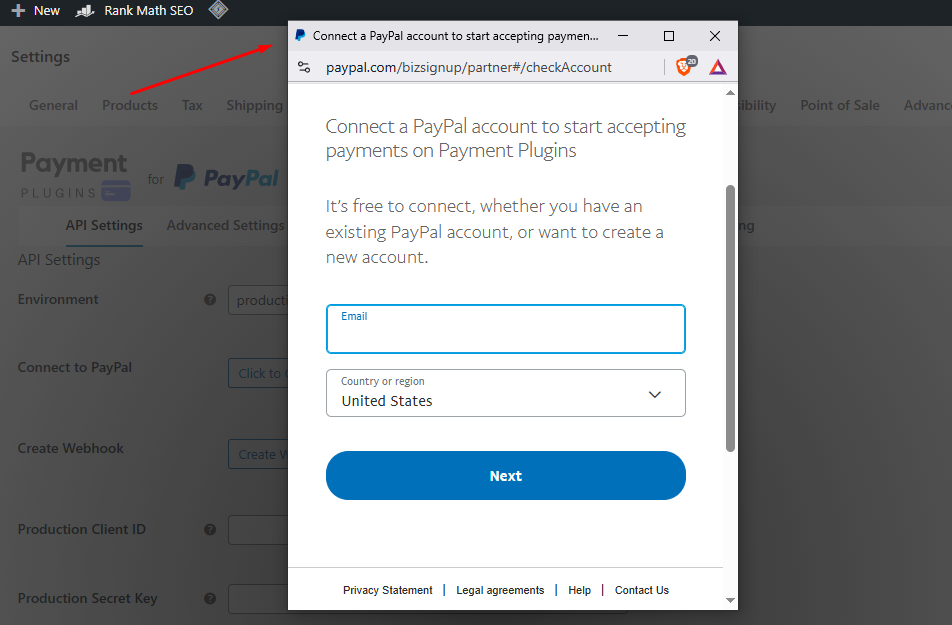
- It will redirect you to the PayPal login pop-up.
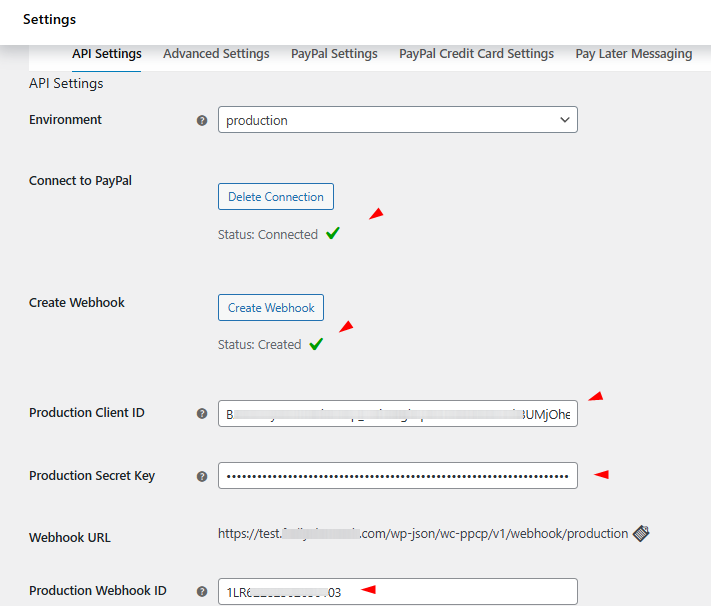
- After you successfully log in, it will automatically generate Webhook, Client ID, Security Key, and Production Webhook ID for you in the API Settings.
Step 3: Enable PayPal in WooCommerce
- Jump to the PayPal Settings tab from the previous screen. (WooCommerce > Settings > Payments > Manage – PayPal Gateway)
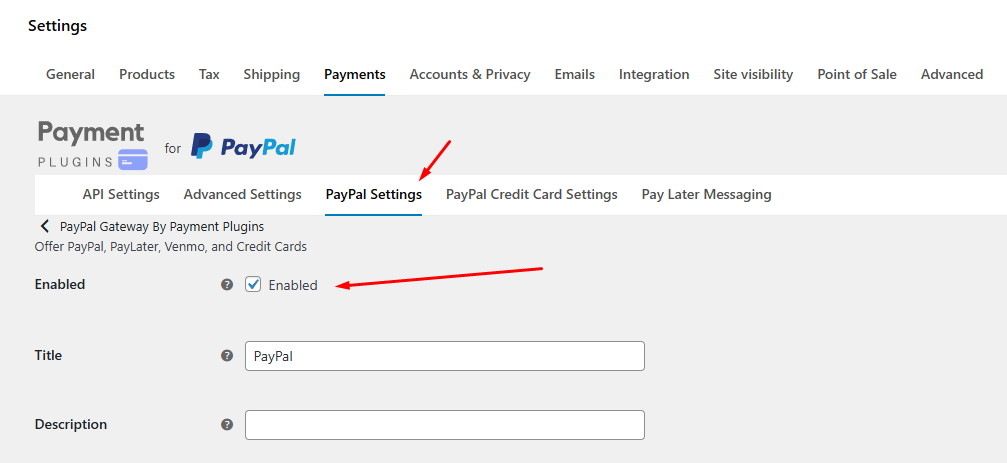
- Check the Enabled box to enable PayPal payments for your WooCommerce store.
- Save your changes.
Step 4: Configure Key Features (Smart Buttons, Pay Later, Vaulting)
Now that you have connected your PayPal account, the next step is to fine-tune some key features that can improve your customers’ experience at your store and ultimately boost sales.
The plugin offers a wide range of control over how and where PayPal payment options appear. It also lets you choose whether customers can save payment methods for future use.
Let’s explore some of the important settings of the plugin.
PayPal Settings (General Checkout Option)
This controls how PayPal shows up on your checkout page.
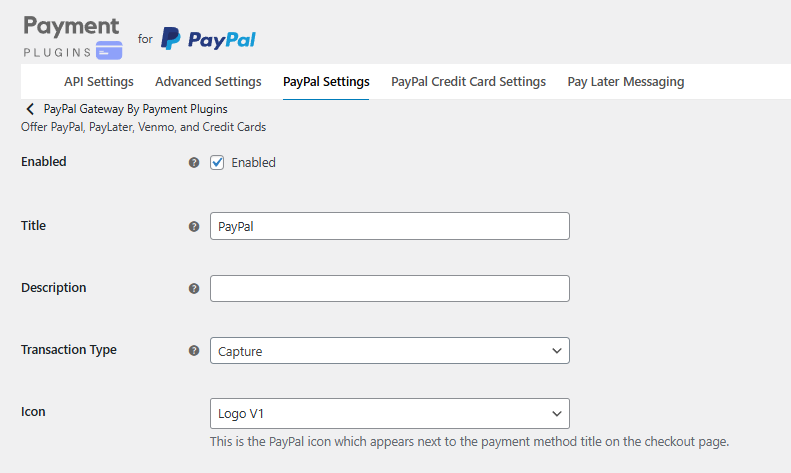
- Enable PayPal → As you we have covered above, turn this ON to accept PayPal payments.
- Title → This is what your customers see at checkout. Example: PayPal.
- Description → Short text below the title. Example: Pay securely using your PayPal account or credit/debit card.
- Transaction Type → Usually set to Capture (takes payment immediately). You can also use Authorize if you want to approve orders manually later.
- Icon / Logo → The PayPal logo that shows at checkout.
PayPal Button Design
These settings customize the PayPal button’s look.
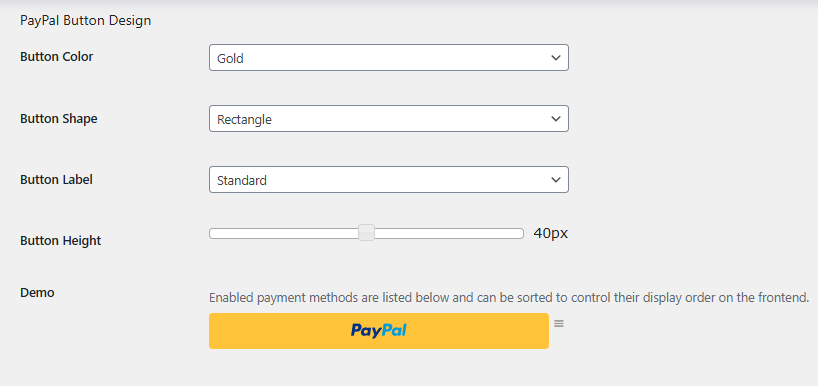
- Button Color → Options like Gold, Blue, Silver, or Black. Gold is the standard.
- Button Shape → Rectangle or Pill (rounded).
- Button Label → Choose text like PayPal, Checkout, or Pay with PayPal.
- Button Height → Default is 40px, but you can adjust to fit your theme.
Checkout Page Settings
Controls where and how PayPal buttons appear.
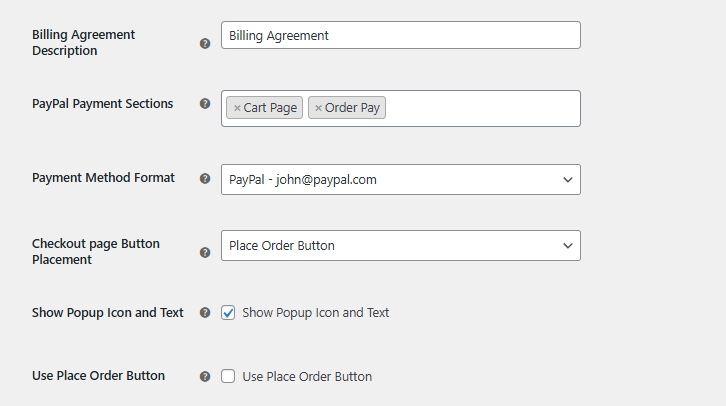
- Button Placement → Choose if the PayPal button should appear above the “Place Order” button or in the payment gateway section.
- Use Place Order Button → If enabled, the default WooCommerce “Place Order” button will trigger PayPal directly.
- Popup Checkout → Shows PayPal in a pop-up instead of redirecting to a new page.
Pay Later Messaging
Encourages customers by showing PayPal’s financing option. To enable the pay later option –
- Go to the PayPal Settings tab and check the Pay Later option.
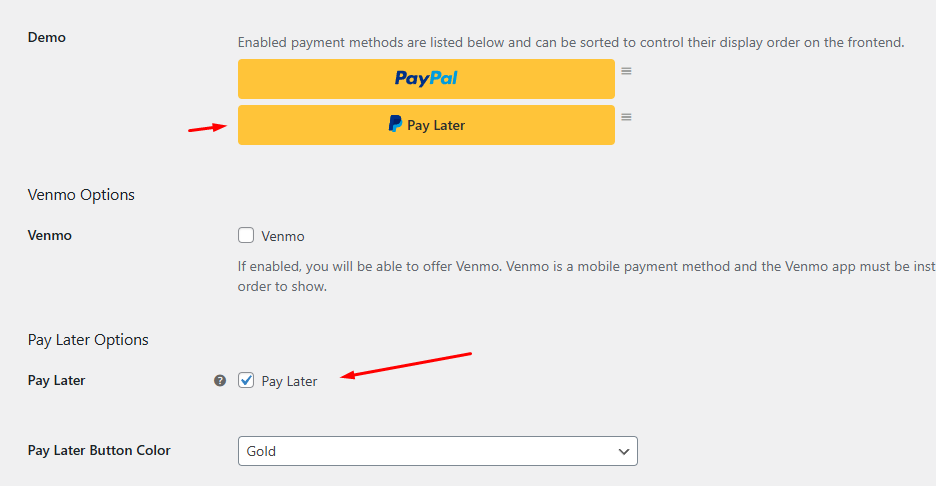
After that, jump to the Pay Later Messaging tab.
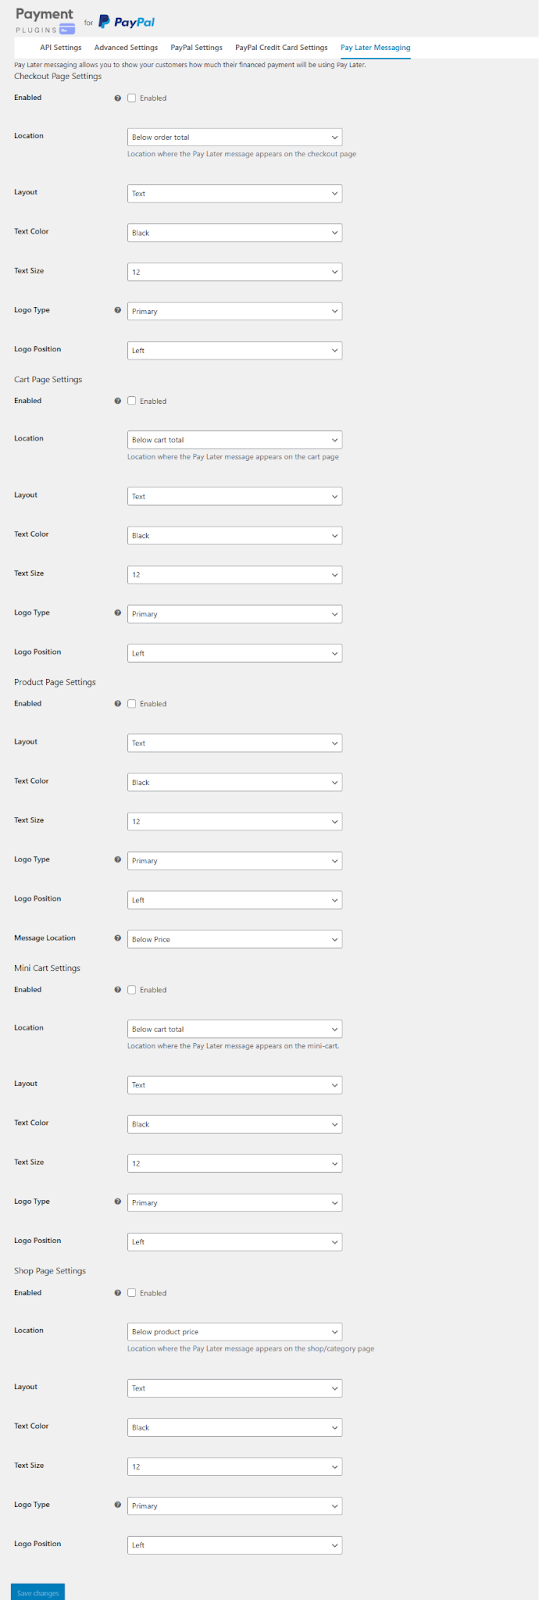
Here are some of the most useful settings from that page.
- Enable Pay Later Messaging → ON.
- Locations → Choose where the message appears (Product page, Cart, Checkout, Mini-cart, or Shop page).
- Layout → Text only, or Text + Logo.
- Text Size / Color → Small adjustments for styling.
Credit Card Settings (via PayPal)
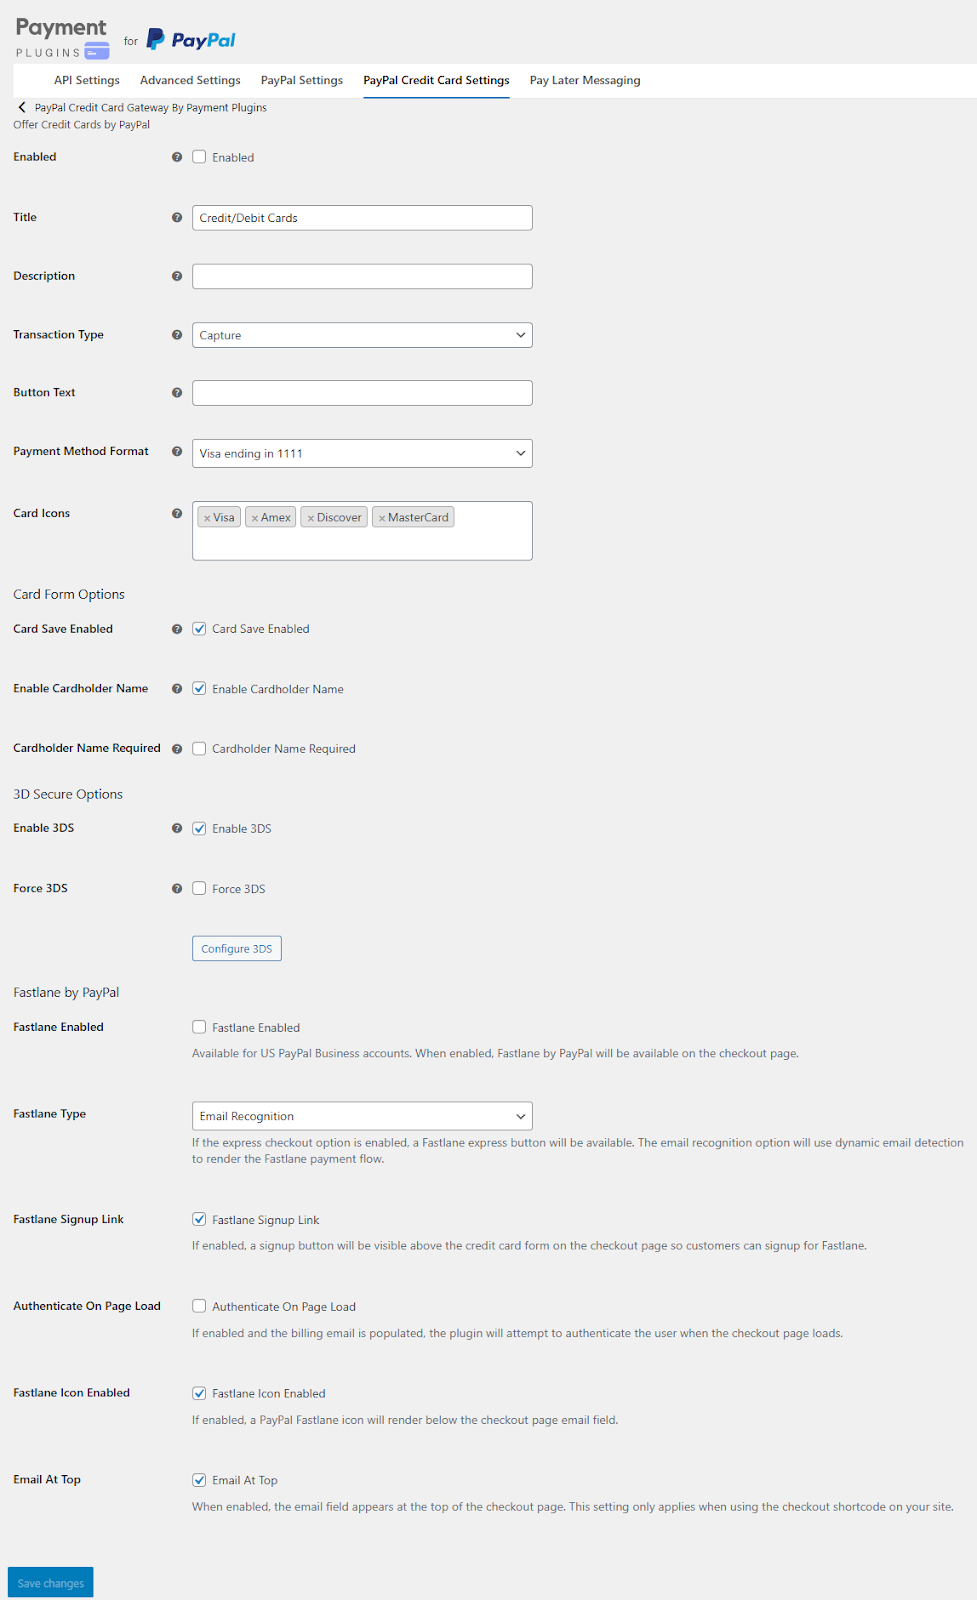
If you want to accept credit/debit cards directly without customers logging into PayPal, navigate to the PayPal Credit Card Settings tab. Some notable options from this page are –
- Enable Card Payments → ON.
- Title → Example: Credit/Debit Card.
- Save Card Option → Allow customers to save cards for faster checkout next time. Especially if you sell subscriptions or expect repeat customers, enabling this option is important.
- Card Icons → Show Visa, MasterCard, Amex, etc.
- 3D Secure → Enable if required by your region (extra fraud protection).
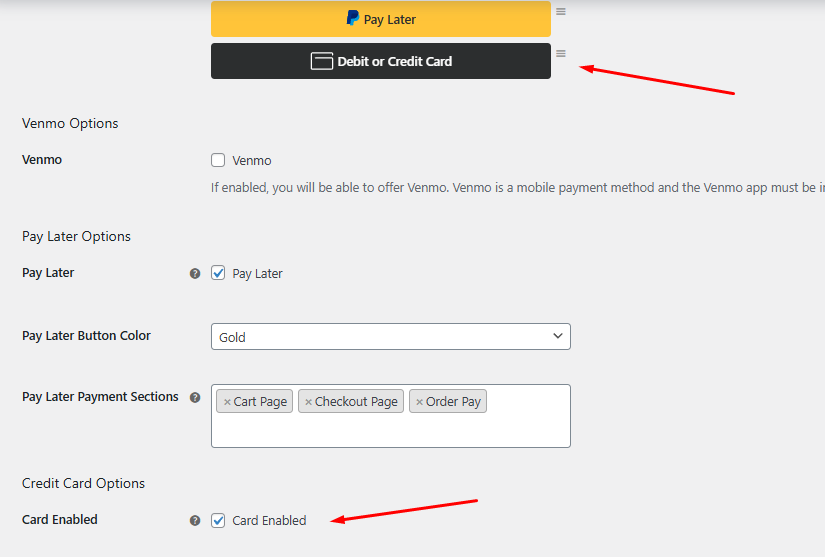
If you want to display a separate Card button in the Cart page, enable it from PayPal Settings > Card Enabled.
Venmo (Optional)
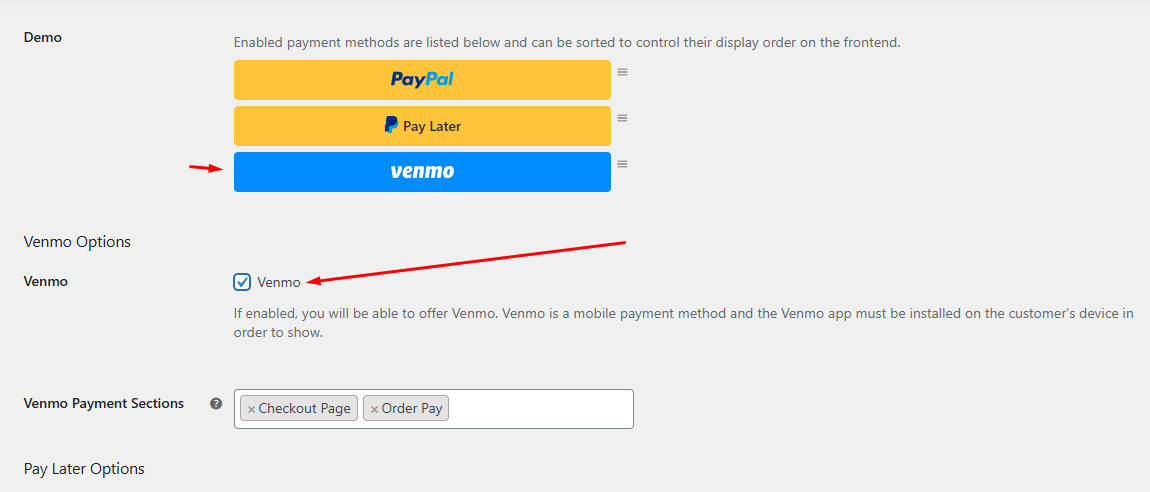
- Enable it from the PayPal Settings tab if your customers are in the US and use Venmo.
- The Venmo button will only appear for users with the Venmo app installed.
Step 5: Save and Test Your Settings
If you want to test your WooCommerce PayPal payment gateway before going live, you can set up the PayPal sandbox for WooCommerce from the Environment dropdown under the API Settings tab.
- To test your current PayPal setup, add any product to the cart, and the Cart page will display the PayPal buttons.
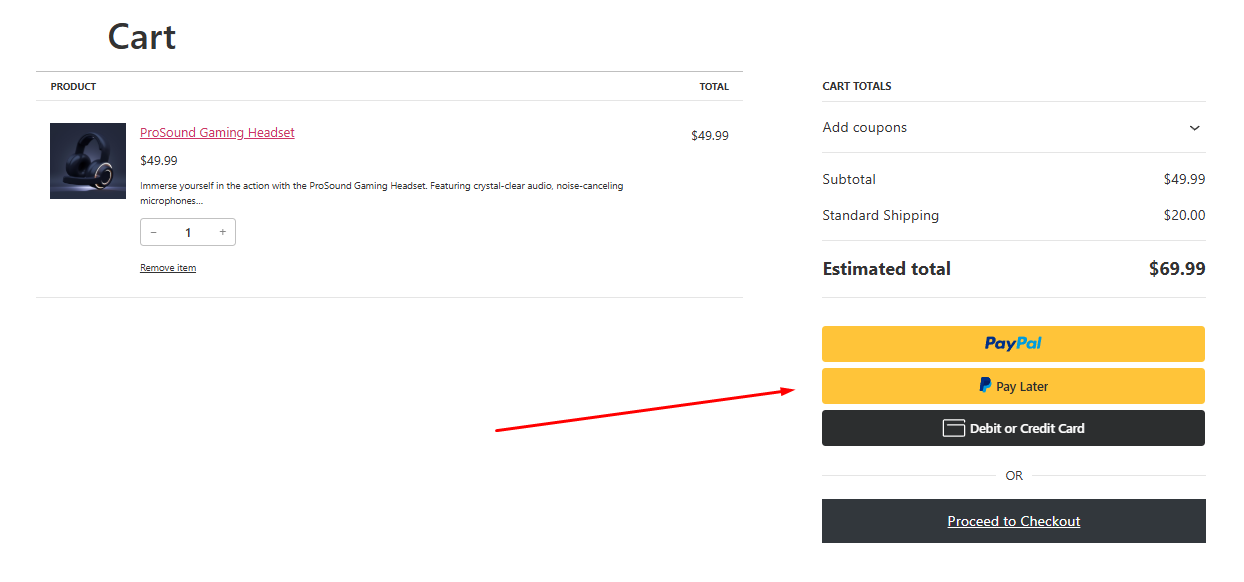
- If a customer clicks the PayPal button, it will open a pop-up where they can log in to their account and confirm the payment.
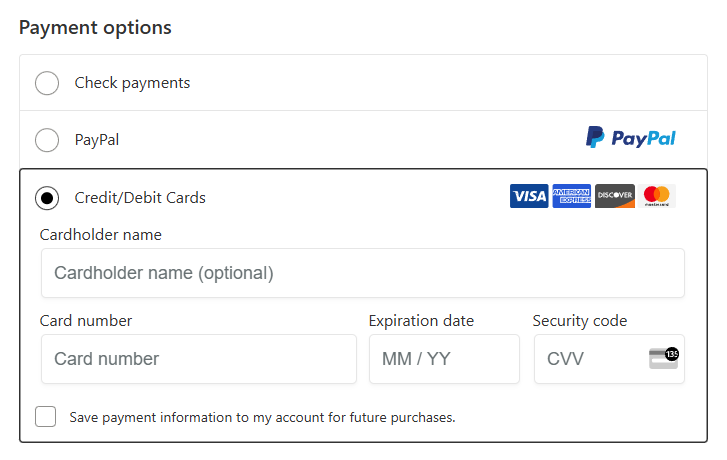
- If you have enabled PayPal Credit Card Gateway, the Checkout page will display an additional Credit/Debit card payment option.
Recommended Conversion Settings
- Show PayPal Smart Buttons on both product and checkout pages.
- Enable guest checkout so new customers can pay without creating an account.
- Display Pay Later messaging at least on the product and checkout pages.
- Turn on vaulting if you offer subscriptions or want faster repeat purchases.
So there you have it, this is exactly how to add PayPal to WooCommerce.
Why Your WooCommerce Store Needs PayPal (The Real Reasons)
Imagine this: A customer really likes your product. They get to the checkout and then stop. “Can I trust this site with my credit card information?” That’s when PayPal becomes your secret weapon.
Here’s why smart store owners never miss PayPal:
Shoppers Trust That Blue Button More Than Your “Secure Checkout” Badge
Why? Because over 430 million people already use PayPal worldwide. People who see it think, “Oh good, I can pay safely.” That instant comfort changes “maybe” to “sold.”
It Stops Customers From Getting Annoyed At Checkout
Ever tried typing a 16-digit card number on your phone? It’s torture.
- PayPal lets customers pay in 2 taps.
- No forced account sign-ups (guest checkout works!).
Real result: Fewer abandoned carts. Studies show 7 out of 10 shoppers bail before paying – PayPal fights this.
Your Store Suddenly Goes Global
Got buyers in Germany, Japan, or Brazil?
- PayPal handles payments in 200+ countries.
- Converts currencies automatically.
- Shows international shoppers you speak their language (literally).
You Can Relax Knowing That Every Sale Is Safe
Are you worried about fraud or false claims? PayPal has guardrails:
- Buyer Protection: Customers feel safe knowing that disputes will be looked at fairly.
- Seller Protection: If you ship with tracking and get scammed, PayPal might pay for the loss.
Express Checkout = Impulse Buyers’ Best Friend
Returning customers? They skip all forms. One click → Log in → Done. Faster than grabbing a coffee.
“But what about fees?”
Yes, PayPal charges them – like any payment service. But think: What’s the cost of missing sales from PayPal loyalists? For most stores, the math favors adding it.
Troubleshooting Common PayPal Issues
Below are the most common PayPal problems and the exact checks you should run. Read the problem, then follow the steps.
1) PayPal Does Not Appear At Checkout
Why it happens: missing plugin, wrong keys, insecure site, or a theme/plugin conflict.
What to do
- Confirm the PayPal plugin is installed and enabled: WooCommerce > Settings > Payments.
- Make sure you entered the correct Client ID and Secret Key for the environment you use (Sandbox keys for Sandbox mode, Live keys for Live mode).
- Ensure your site uses HTTPS (SSL). PayPal requires secure checkout pages.
- Verify your store currency is supported by your PayPal account. Some currencies are not available in all accounts.
- Rule out conflicts: temporarily switch to a default theme and deactivate other plugins.
- If the button still does not load, open the browser console (press F12) and look for JavaScript errors.
2) Payments Start But Fail Or Do Not Complete
Why it happens: account limits, wrong environment, or plugin errors.
What to do
- Check your PayPal Business account status. Ensure it is active and has no restrictions or limits.
- Verify you are not using Sandbox keys while processing a live order.
- Turn on plugin debug logging. Then go to WooCommerce > Status > Logs and search for PayPal error entries. Logs usually show the exact problem.
- Reproduce the issue in Sandbox to test safely without real money.
- If you use currency-switching or multi-currency plugins, test with a simple product in your site’s default currency to rule out conversion problems.
3) “Receiver Email Invalid” Or Wrong Merchant Email
Why it happens: WooCommerce is sending a different merchant email than PayPal expects.
What to do
- Open your PayPal business profile and copy the primary email address exactly.
- Paste that exact email into WooCommerce settings (merchant/receiver email).
- If testing in Sandbox, use the Sandbox business email from the PayPal developer dashboard.
4) IPN / webhook problems (orders stuck or not updating)
Why it happens: webhooks/IPN not registered, blocked, or failing to deliver.
What to do
- In the PayPal developer dashboard, confirm your webhooks are registered and the endpoint URL is correct.
- If you still use IPN, check IPN History in your PayPal account for delivery errors.
- Ensure your server accepts incoming POST requests. Firewalls or security plugins can block webhooks.
- Verify WooCommerce can write logs: the wc-logs (or plugin log) folder must be writable. Logs help you compare incoming events to what the plugin expects.
5) Sandbox works but live fails
Why it happens: environment mix-up or account verification issues.
What to do
- Replace Sandbox keys with the Live keys in the plugin settings, save, then test a small live transaction.
- Confirm your PayPal account is a Business account and that all verification steps (ID checks, bank linking) are complete.
- Check if any advanced features you rely on (for example, Reference Transactions) require manual approval from PayPal.
6) Subscriptions Failing — Reference Transactions / Vaulting
Why it happens: recurring billing often needs special PayPal permissions.
What to do
- Recurring charges commonly use Reference Transactions or vaulting. PayPal disables Reference Transactions by default.
- Request activation of Reference Transactions from PayPal for your live account. Without approval, automatic renewals and saved-payment renewals can fail.
Quick fixes for other errors
- “Seller only accepts encrypted website payments” — Turn off Block non-encrypted website payments in your PayPal profile.
- File or permission errors — Ensure the web server can write to wp-content/uploads/wc-logs/ or the plugin’s log folder.
- Still stuck? Enable plugin debug, gather the error logs, and contact PayPal or the plugin author. Provide versions and log excerpts.
Final quick checklist before contacting support
- Plugin is enabled and up to date.
- Live / Sandbox keys match the environment you are testing.
- HTTPS is active site-wide.
- Receiver/merchant email exactly matches the PayPal business email.
- Webhooks / IPN are registered and not blocked by firewalls.
- Debug logs are enabled and saved for sharing.
Wrap Up
We covered the quickest method on how to add PayPal to WooCommerce so that you can easily enable and start accepting payments via PayPal at your Woo store. Also covered the common problems and fixes.
Hope this guide will help you integrate PayPal and boost your conversion and sales. Remember to stay updated with the latest documentation from both PayPal and WooCommerce to keep your payment gateway optimized and secure.
