A variable product lets you sell one item in many versions.
For example, a T-shirt in different sizes or a mug with different prints.
Each version, called a variation, can have its own price, stock, image, and SKU, so you manage many options from a single product page.
If you have ever opened the Variations tab in the WooCommerce product page and felt lost, you are not alone. Store owners often get confused about where to enter prices, when to use regular versus sale prices, and why the shop sometimes shows a price range instead of a single number.
That confusion makes listing products slower and can hurt sales if customers see unclear pricing. No worries, we’ve got your back.
This article explains, step by step, how to add price in WooCommerce variable product.
You will learn how to set a price for each variation, how to apply one price to all variations, when to use CSV or bulk editors for large catalogs, and simple tweaks to change how prices appear on the product page.
By the end, you will know the exact fields to edit and the safe ways to update many prices at once.
Let’s get started.
Table of Contents
Understanding WooCommerce Variable Product Pricing
Before learning how to add price in WooCommerce variable product, you must be familiar with the WooCommerce variable product concept and tools. Below are the key concepts you need to know. We kept it short and clear, so you can move from setup to pricing with confidence.
What is a Variable Product?
A variable product is one product with multiple versions. Think of a T-shirt that comes in different sizes and colors. Each version is a variation and can have its own price, stock, image, and SKU.
This lets you manage many options from a single product page. It’s not only about sizes and colors; variations differ for different product types.
For example, for smartphone variations can be in storage and RAM size – 8GB:64GB, 12GB:128GB, 12GB:256GB. Ice cream or chips in different flavors (e.g., chocolate, vanilla, BBQ), etc.
Therefore, any product that comes in multiple versions based on size, color, material, or any other variation is a variable product.
Product Attributes
Attributes are the building blocks for variations.
Remember the versions or variations – size, color, capacity, etc. These are called attributes of a product.
You create attributes and add values (S, M, L, or Red, Blue). When you mark an attribute as “used for variations,” WooCommerce can combine those values to make the actual variations.
The Product Data Tab
The Product Data box on the product edit screen is the central place to manage a product in WooCommerce. Here, you choose the product type (select Variable product), add attributes, set inventory, and control shipping and pricing.
All possible actions for WooCommerce variable product pricing are configured inside this metabox.
The “Variations” Tab
The Variations tab (inside the Product Data section) is where you set the price for WooCommerce variations.
After generating variations from attributes, you will see one row per variation. Open a row to enter the Regular price (required) and an optional Sale price. Variations without a regular price may be hidden in the shop, so always set the regular price.
Enough with the theories, let us walk you through the steps practically.
How to Add Price in WooCommerce Variable Product?
In order to add prices to product variations, you first need to create a variable product. Here are the steps to add prices to a variable product in WooCommerce.
Step 1: Create a Variable Product
Log in to your WordPress admin panel and –
- Go to Products > Add New Product.
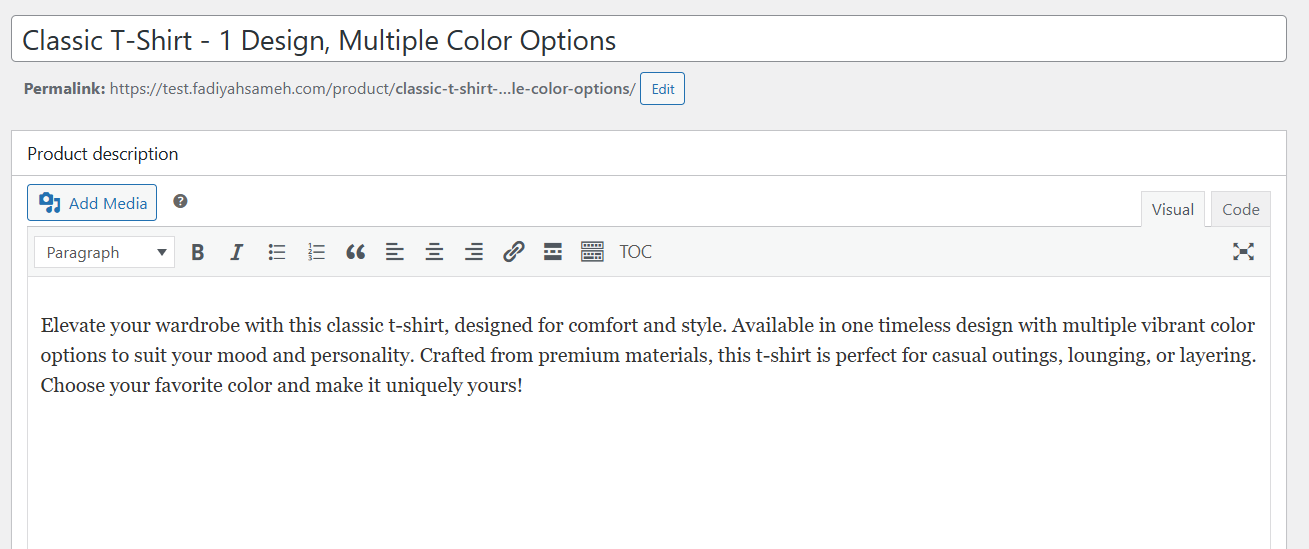
- Give your variable product a title, write the necessary descriptions, and add the main gallery images.
- Most Important Part: Scroll down to the Product Data section.
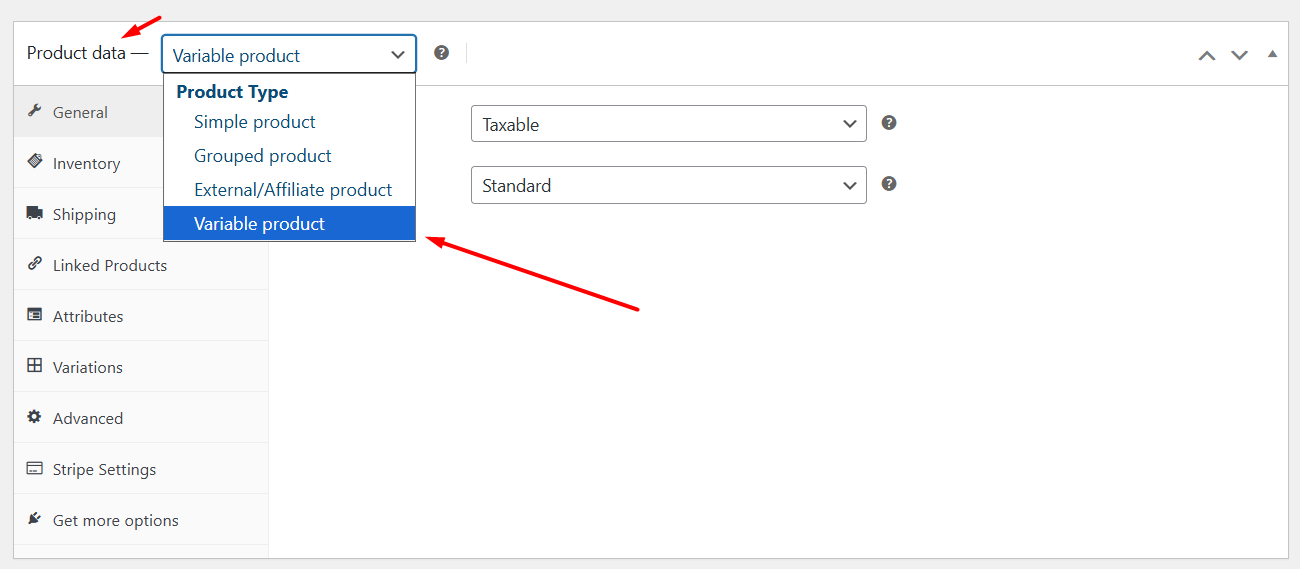
- From the following Product Type dropdown, select the Variable Product option.
- Save the product as a draft for now.
You now have a variable product, but you still need to add the variations. To do so, you need to create attributes. Let’s get to that.
Step 2: Add and Configure Product Attributes
Here’s how to add product attributes in WooCommerce.
- Under Product Data, click the Attributes tab.
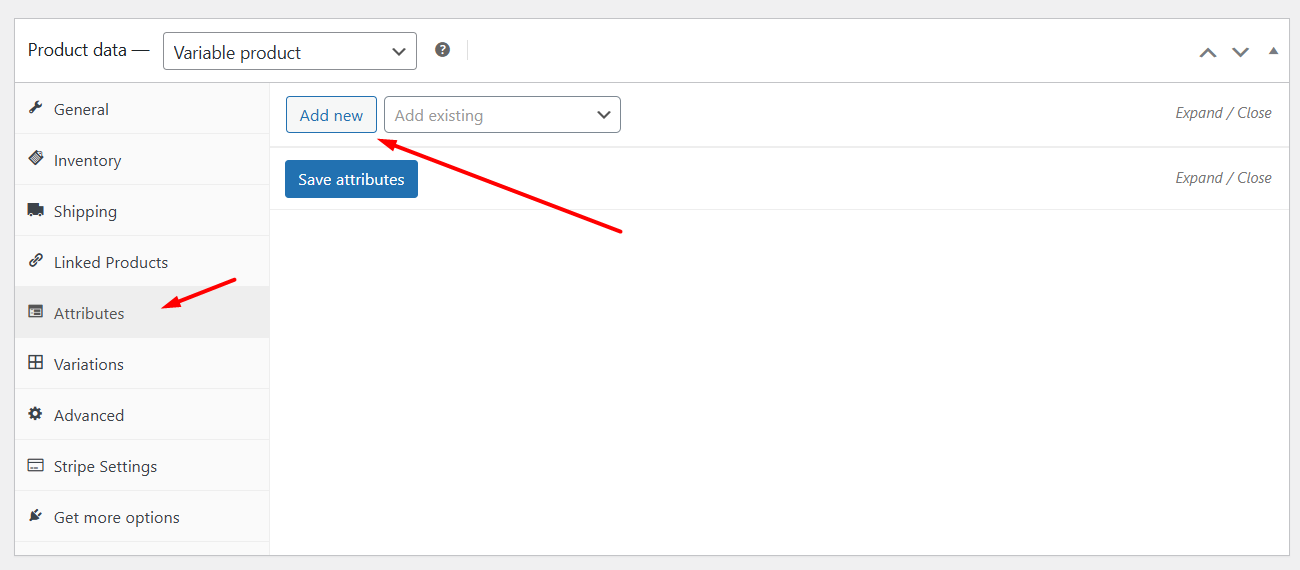
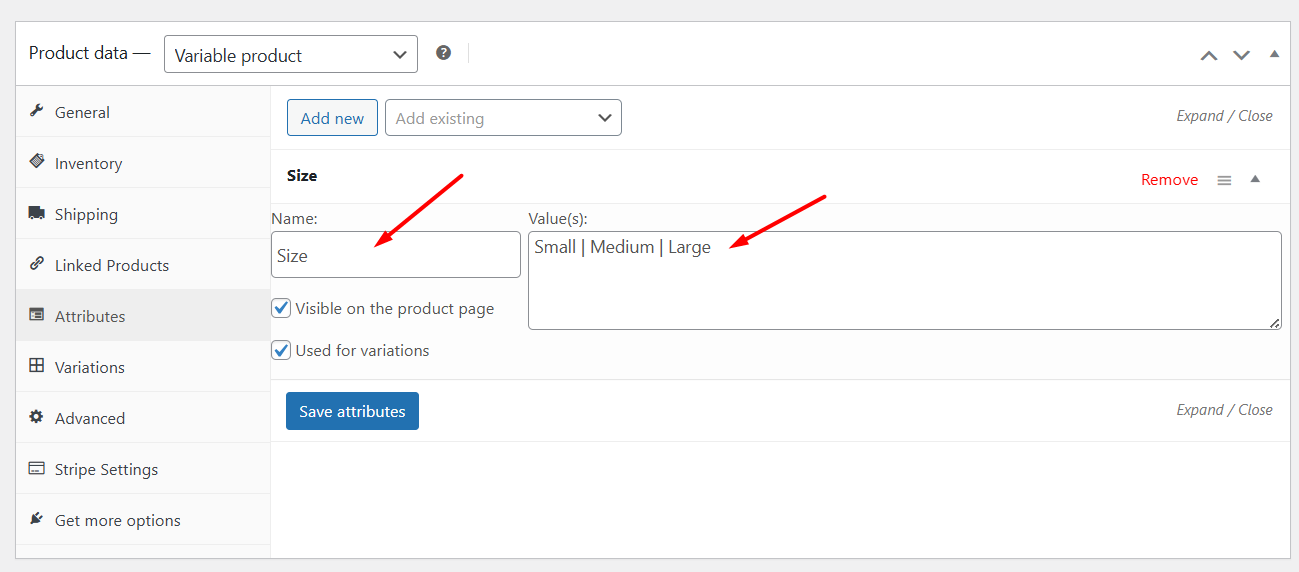
- Give your attribute a name and enter the values separated by a “|”. For example, “Small | Medium | Large.”
- To add a new attribute, click the Add New button.
- Input your new attribute details. Make sure you check the “Used for variations” box.
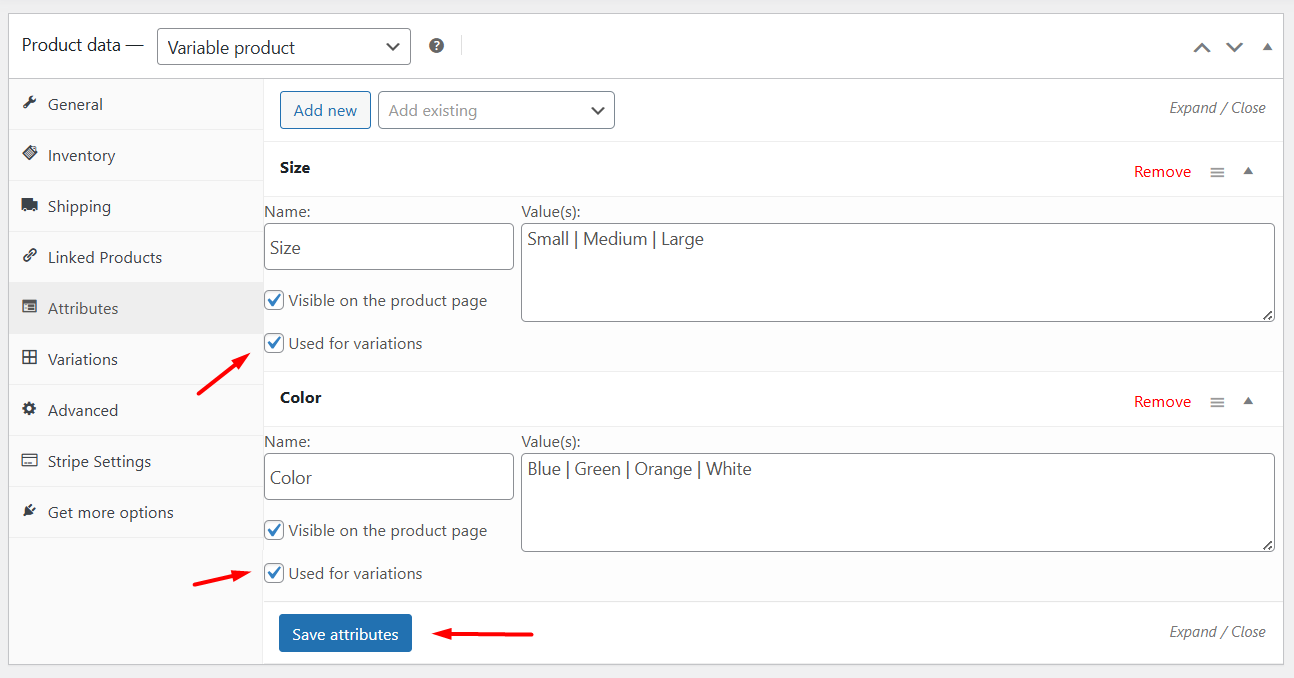
- Click the Save Attributes button when done.
Step 3: Generate and Price Your Variations
In this part, we will learn to create variations and how to set a price for each variation in WooCommerce.
- Navigate to the Variations tab under Product Data metabox.
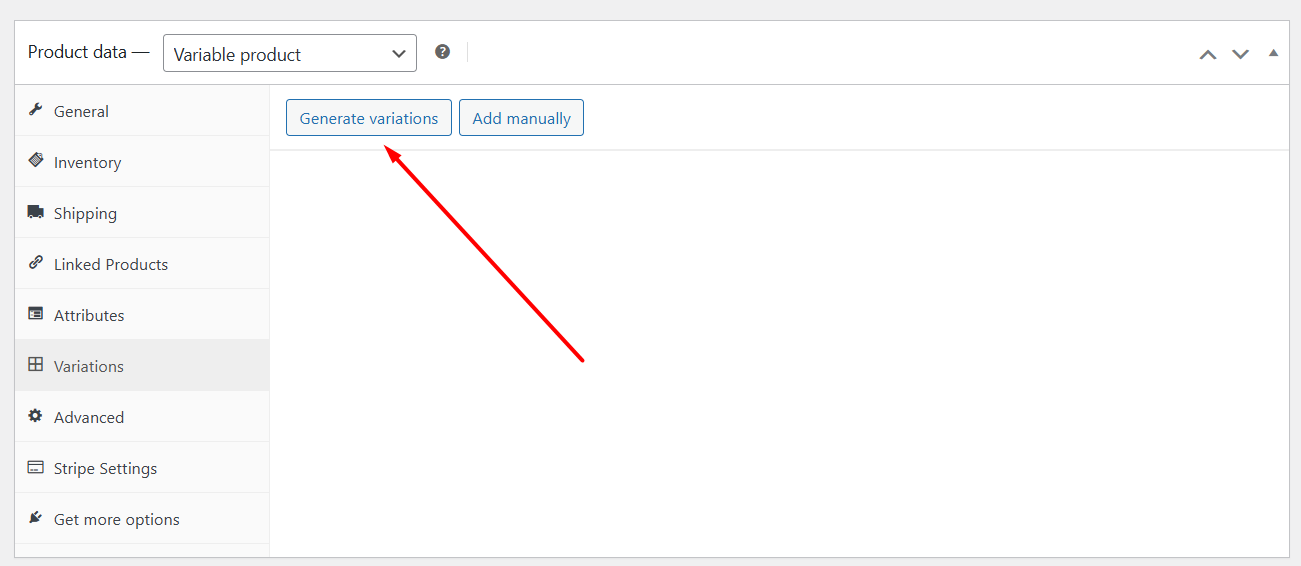
- Click the Generate Variations button, and WooCommerce will automatically create all possible variations based on your created attributes.
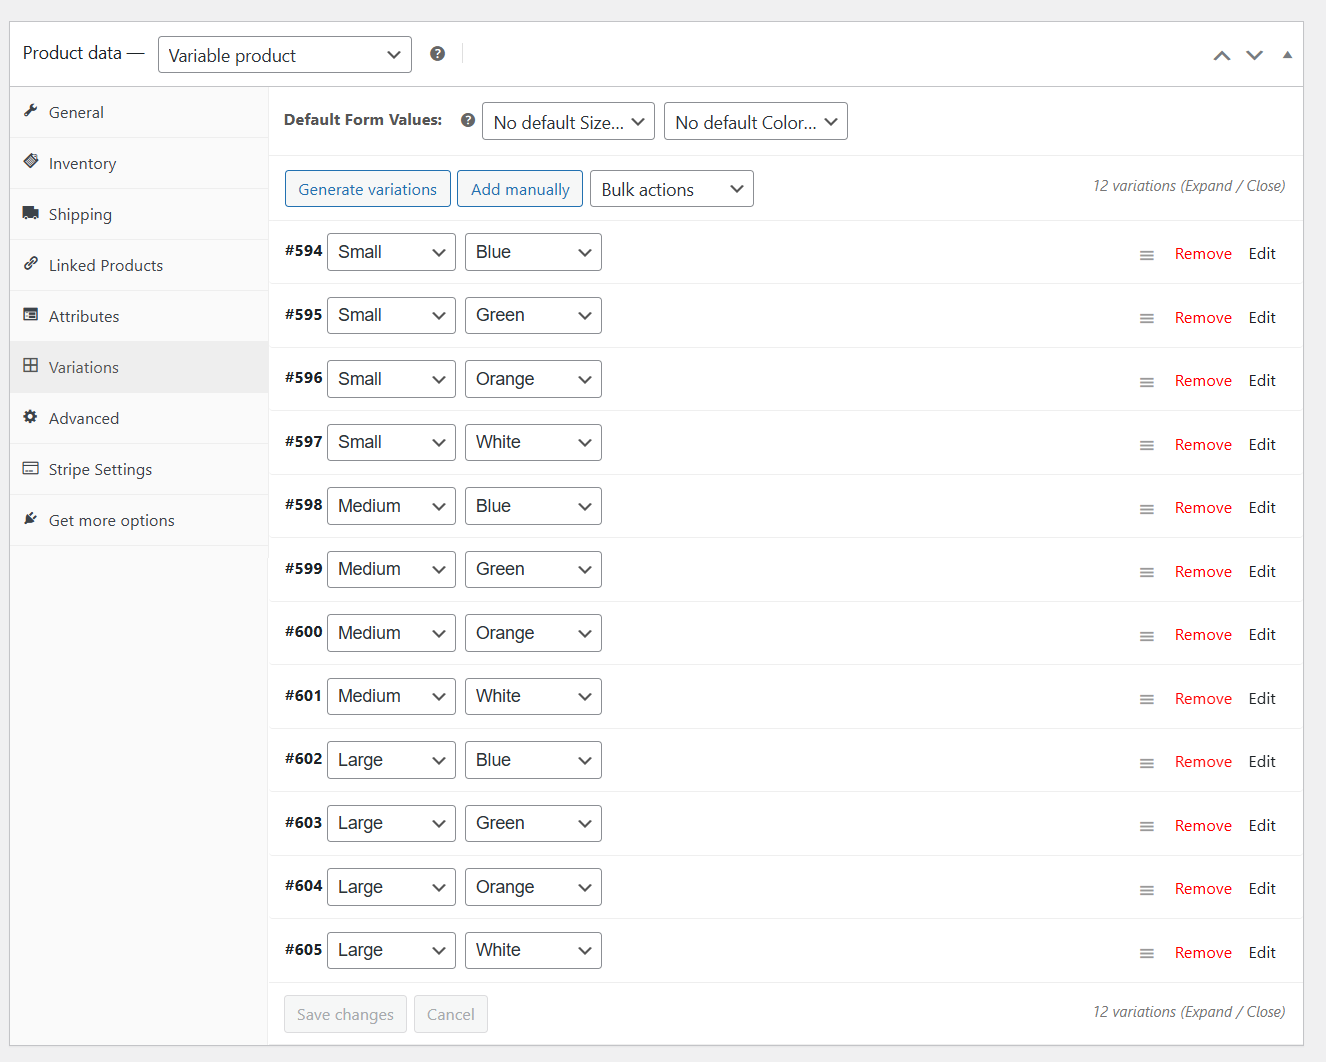
- After generation, you will see one row per variation. Click a variation row to expand its settings. The two price fields are where you change prices on a variable product in WooCommerce:
- Regular price — the main price for that variation. This field is required. Variations without a regular price can be hidden or fail to display in the shop.
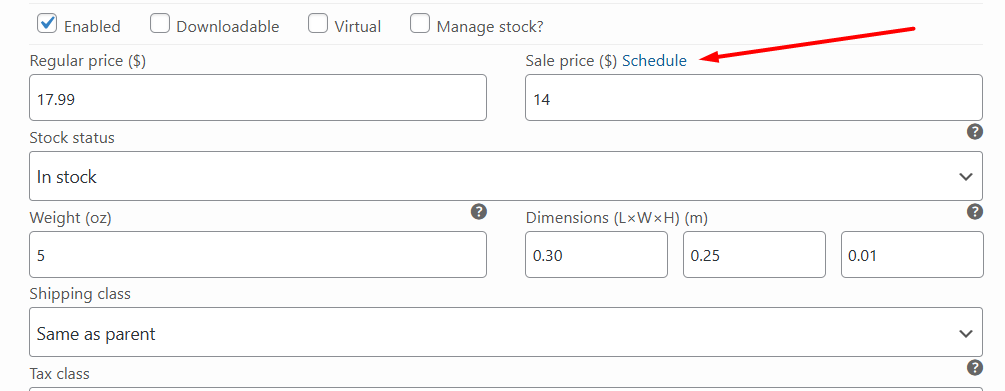
- Sale price — an optional discounted price. Enter the sale price here and, if you want. The sale price will override the regular price during the scheduled period.
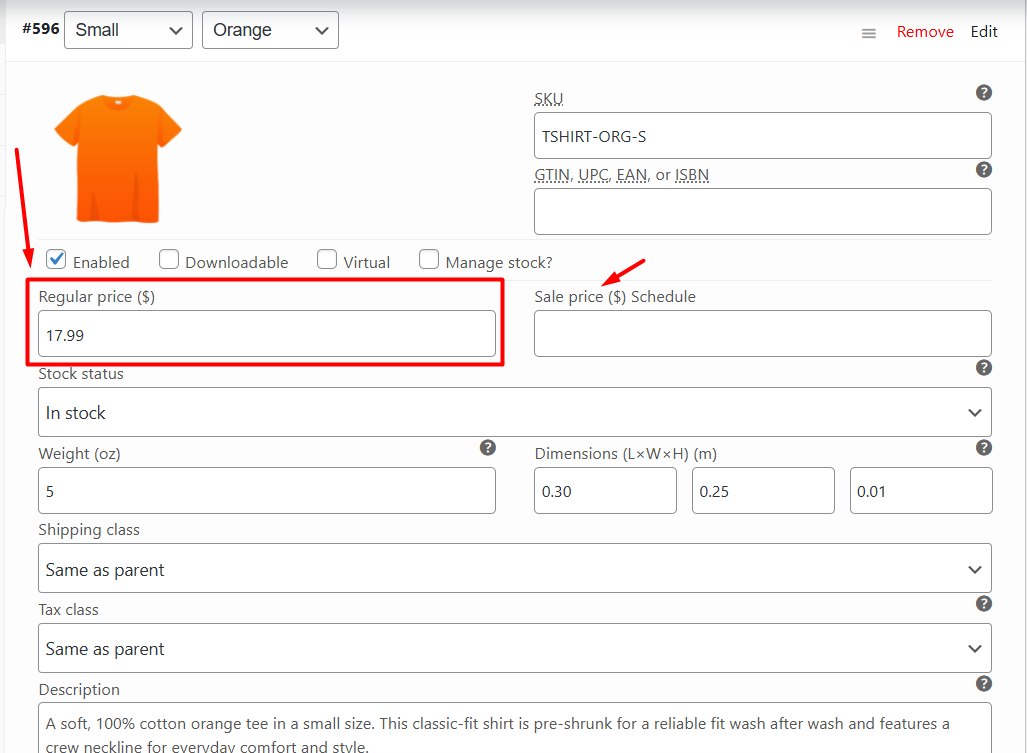
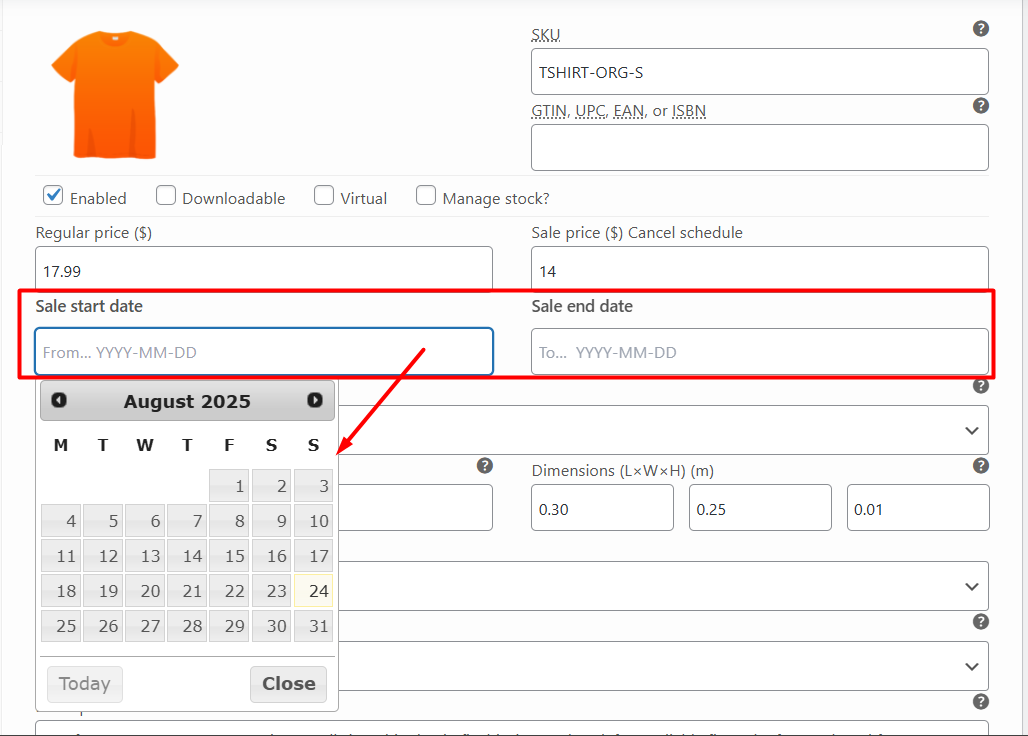
- Schedule — After you set a sale price, you can click the Schedule link at the top of the Sale field.
- Two new fields will appear for you to set a start and end date for the Sale.
- Repeat for each variation you need to price.
- Add other details such as variation image, SKU, dimensions, etc.
- When done, click Save changes in the Variations tab.
Step 4: Save and Test WooCommerce Variable Product Price Range
- Publish/Update the variable product you created.
- Jump to the storefront to view the product.
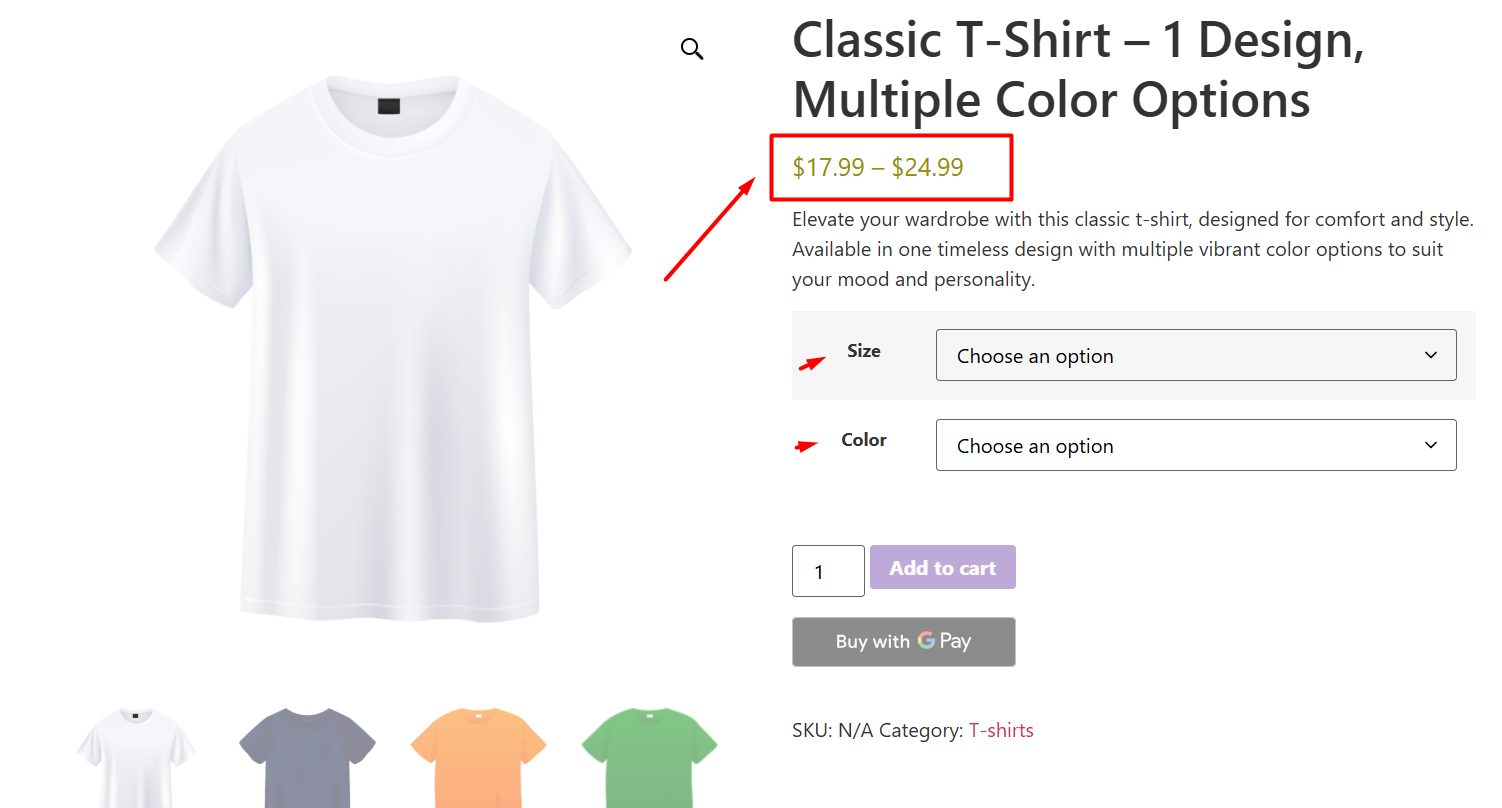
- As you can see, by default, WooCommerce is displaying the price range and attributes with no selected values.
- If you select any values to make a variation, it will show the appropriate price as per what you have configured at the back end under the Variations tab.
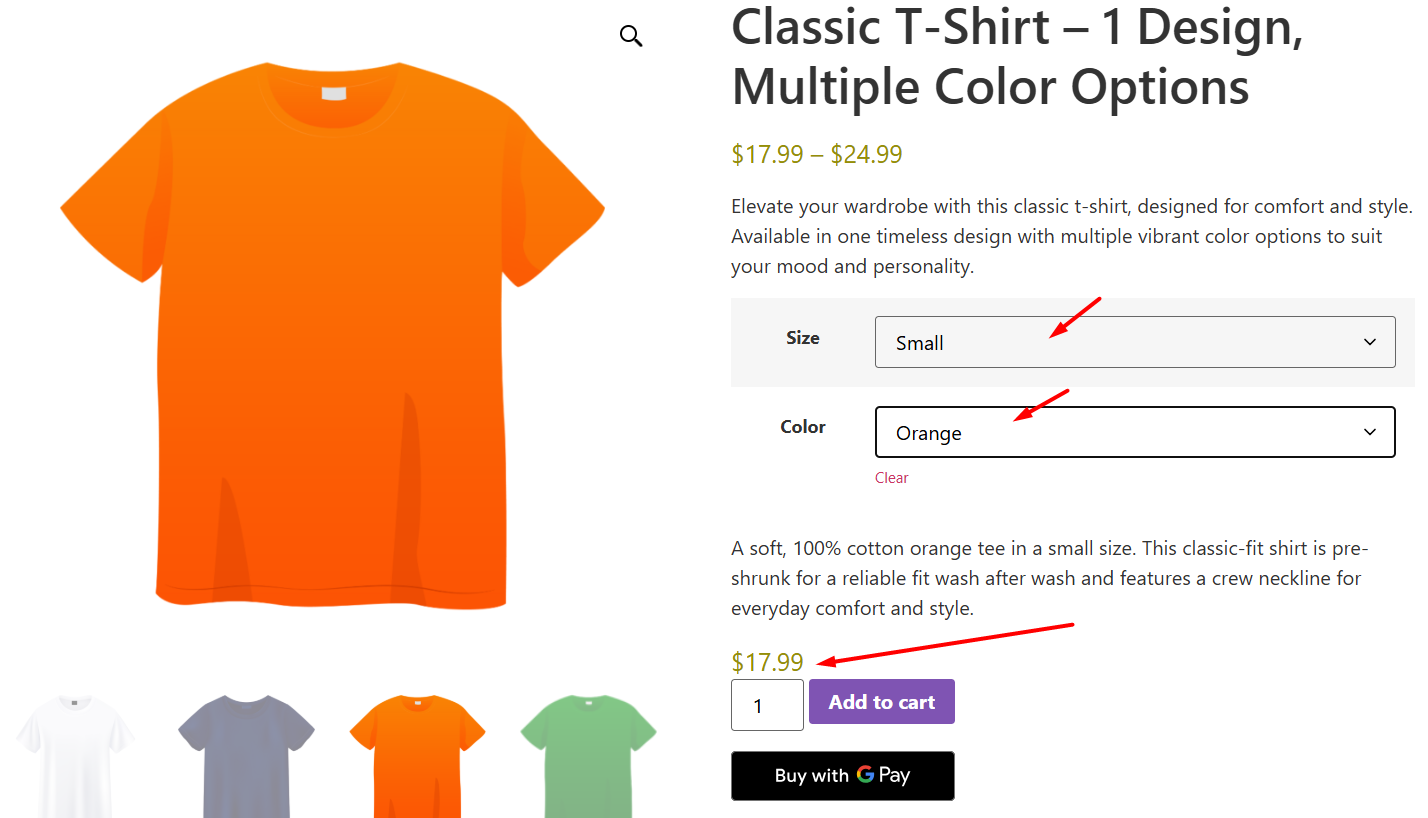
This is pretty much all the steps on how to add price in WooCommerce variable product.
Understanding The Price Display On the Frontend
WooCommerce decides how to show price range on a variable product in WooCommerce. However, you can use hooks or plugins to modify this display for your advantage and requirements. Let’s explore what can be done.
Default Behavior (Price Range)
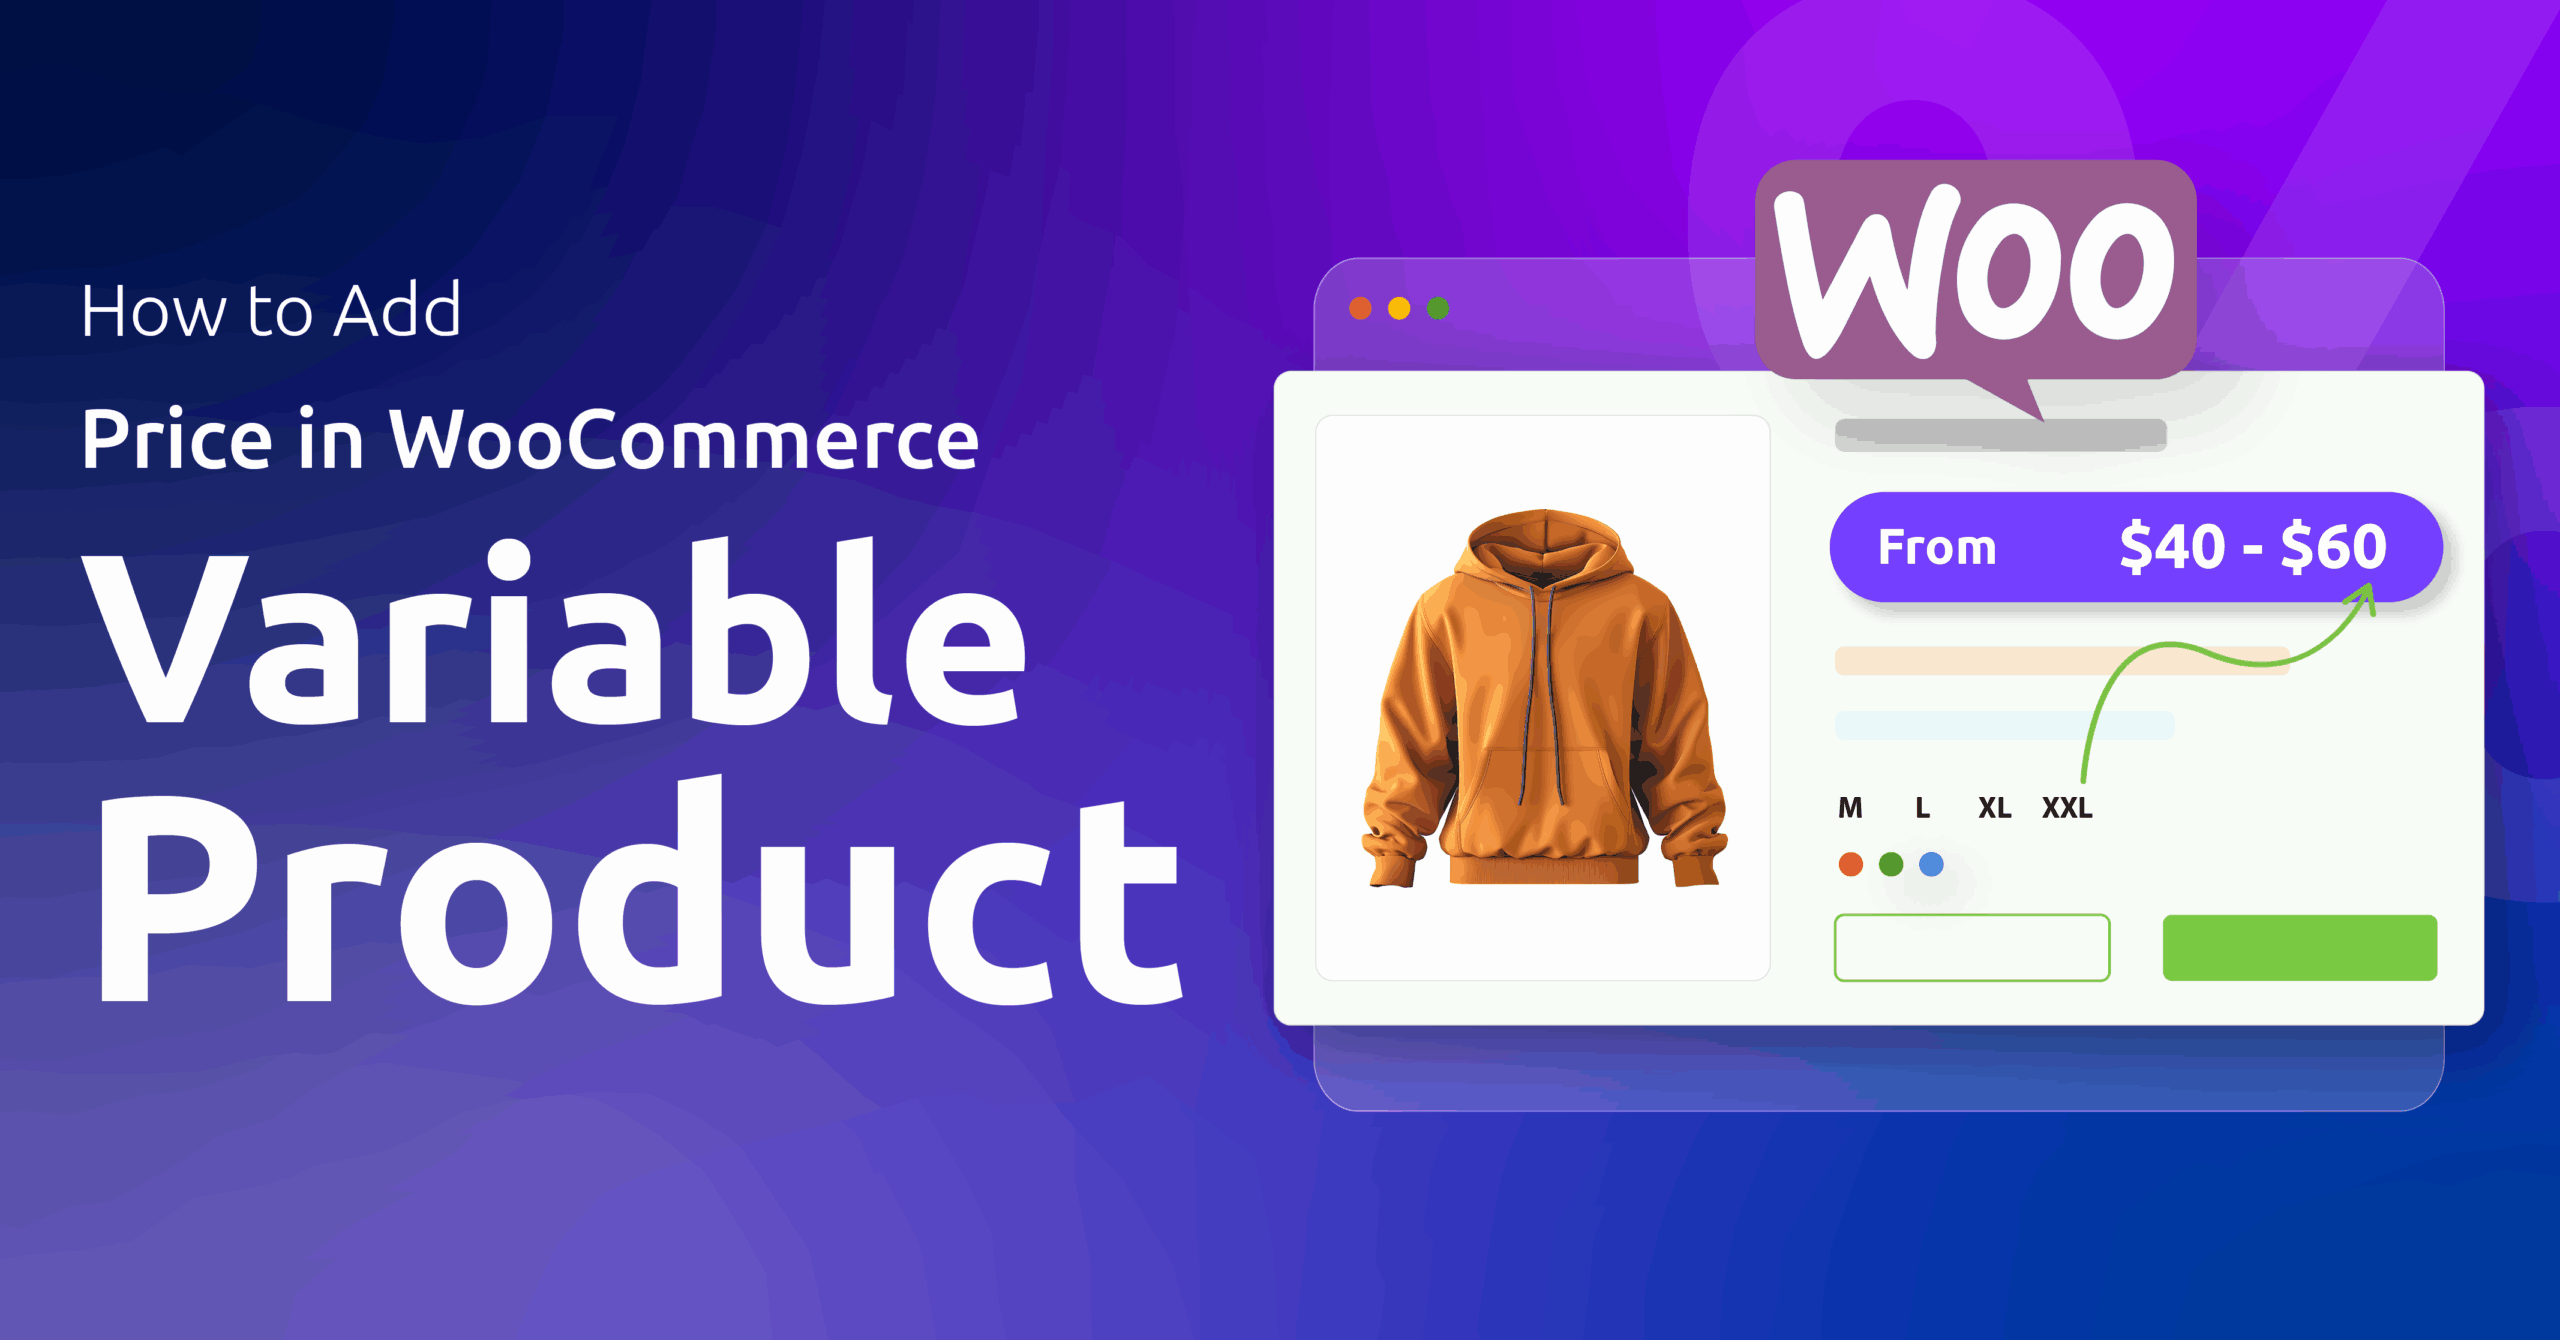
When your variations have different prices, WooCommerce shows a price range on the product and shop pages.
That looks like $10 – $25 and tells shoppers the lowest and highest variation price at a glance. This is the built-in behavior for variable products.
When A Single Price Appears
If every variation has the exact same regular price, WooCommerce will display that single price instead of a range. Internally, WooCommerce compares the minimum and maximum variation prices and shows one value when they match.
What about “From $X”?
“From $X” is not the automatic default. Stores usually show “From $X” when they want to highlight the starting price rather than the full min–max range.
To make WooCommerce show “From $X” you can either add a small filter to your theme (hooks such as woocommerce_variable_price_html and woocommerce_variable_sale_price_html) or install a plugin that changes the price format.
This is commonly used when you want a simpler, conversion-focused display.
How Sale Prices Affect the Display
If one or more variations have sale prices, WooCommerce will use the variation sale values when building the displayed price. That means you may see a sale price range (min sale to max sale) or a mixed display depending on which variations are on sale.
To force a “From” label for sale prices, you would also use the sale-specific filter (woocommerce_variable_sale_price_html) or a plugin.
Quick UX Tip
Use a single price when all variations cost the same. Use a clear range when prices vary moderately.
Use “From $X” when you want to focus attention on the entry price and encourage clicks to the product page. If you change the default display, test on mobile and desktop to make sure customers understand the real cost once they pick a variation.
Advanced Pricing and Management Techniques
Below are clear, practical steps and tips for WooCommerce bulk edit variation prices, and when to use plugins for more complex pricing rules.
Bulk Editing Variation Prices (Fast Way to Update Many Variations)
WooCommerce gives you a few ways to edit many variation prices at once. Use the Variations tab for quick changes or CSV/import tools for large catalogs.
How to use the Variations → Bulk actions (quick method)
- Open the product and go to Product data > Variations.
- At the top of the Variations section, use the Bulk actions dropdown.
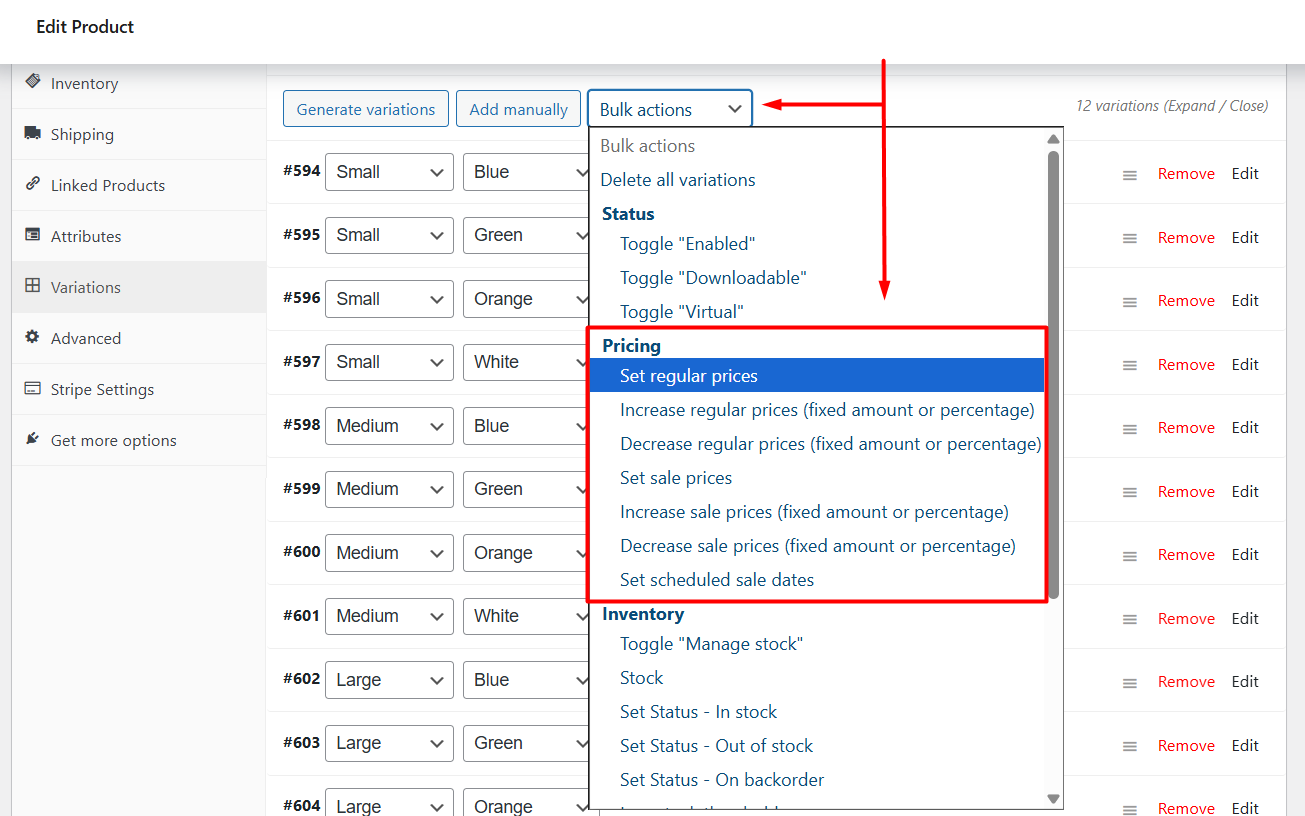
- Choose actions such as Set regular prices or Set sale prices. Enter the value and apply. This updates all variations in one go.
- You can also increase/decrease regular/sale prices of variations by percentage or fixed amount from the Bulk Actions dropdown options.
- Click Save changes and then Update the product.
When to use bulk actions
- Small to medium product sets where variations are already created.
- When many variations share the same regular price or sale price.
When to use CSV or an import tool instead
For large catalogs or frequent updates, export your products, edit regular_price and sale_price in a spreadsheet, then re-import.
WP All Import and WooCommerce’s built-in Product CSV Importer work well for this workflow.
These let you match rows by SKU or variation ID so you update only the intended items. Always test on staging first.
Quick tip: if you schedule price changes often (holiday promotions, flash sales), a plugin with scheduled price updates can automate the process rather than manual CSV edits.
Advanced Pricing Rules (When to Use a Plugin)
Simple price edits are fine in the product editor. But for rules that depend on quantity, role, or product attributes, use a dynamic pricing extension.
Common advanced scenarios
- Quantity discounts (e.g., buy 3 get 10% off).
- Role-based pricing (different prices for wholesalers or logged-in user groups).
- Attribute-based rules (price adjustments when a certain attribute is chosen).
- Cart-level promotions (cart discounts, BOGO, free gift conditions).
Which plugin types to consider
If you need one plugin that covers the advanced scenarios we listed above, then it is Disco (Dynamic Discount Plugin for WooCommerce). Whether you need to apply quantity discounts, role-based pricing, attribute-based rules, and cart-level promotions — Disco is built to handle them.
It’s an all-in-one discount manager that supports product-based discounts, cart-based rules, BOGO, bundles, bulk discounts, shipping discounts, and more.
How to decide
- Use the built-in editor and bulk actions for straightforward updates.
- Choose CSV/import tools (WP All Import, WooCommerce CSV) when you must programmatically update many rows or sync prices from an external feed.
- Use a dynamic pricing plugin if your rules are conditional, recurring, or must apply across many products automatically. Test performance impact and compatibility with your theme and other plugins.
Wrap Up
I believe we have covered enough for you to learn how to add price in WooCommerce variable product.
Quick recap: create attributes, generate variations, open each variation to set the Regular price and optional Sale price, use bulk actions or CSV for many items, and decide how prices show on the frontend (range, single price, or “From $X”).
For advanced rules like quantity discounts, role pricing, attribute-based rules, or BOGO, a single plugin like Disco can handle the lot without custom code.
Final tips before you go live:
- Always test changes on a staging site first.
- Backup your store or database before large CSV imports.
- Check the price display on mobile and desktop so shoppers see the right cost.
- Use clear wording (From $X vs $X–$Y) so customers won’t be confused at checkout.
