Imagine selling hoodies where XXL costs way more to make… but you’re stuck charging the same as Small. Ouch—your margins just shrank faster than cotton in a hot wash!
Or picture a printing shop charging $10 for business cards… whether they’re basic paper or luxe gold foil. (Your wallet’s crying, right?)
One-size-fits-all pricing? Nope. Smart stores use multiple prices per product to match real costs and customer needs.
Now comes the question: how to set multiple prices per product in WooCommerce?
To set multiple prices per product in WooCommerce, use variable products with attributes (size, material) and assign unique prices to variations. For dynamic pricing or multiple prices per product for different conditions, use plugins like Disco or code custom rules. Display prices dynamically based on selections.
In this guide, we’ll walk through step-by-step methods—no tech jargon, promise! Whether you’re a newbie or a pro, you’ll find the perfect fix for your pricing puzzles. Let’s dive in!
Table of Contents
Understanding WooCommerce Product Types
Before discussing pricing strategies, it’s crucial to understand WooCommerce’s product types. Think of these as the building blocks of your store—they determine how you sell items.
Whether you’re offering a basic notebook or a hoodie with 10 sizes and colors, choosing the right product type (simple vs. variable) shapes your pricing flexibility.
Let’s discuss the difference between simple product and variable product in WooCommerce to avoid costly mistakes.
Simple vs. Variable Products
A simple product in WooCommerce is a basic item with no variations. For example, a plain notebook sold in one color and size. The price stays fixed, and you cannot offer options (like different hardware, weight, or specs) with unique prices.
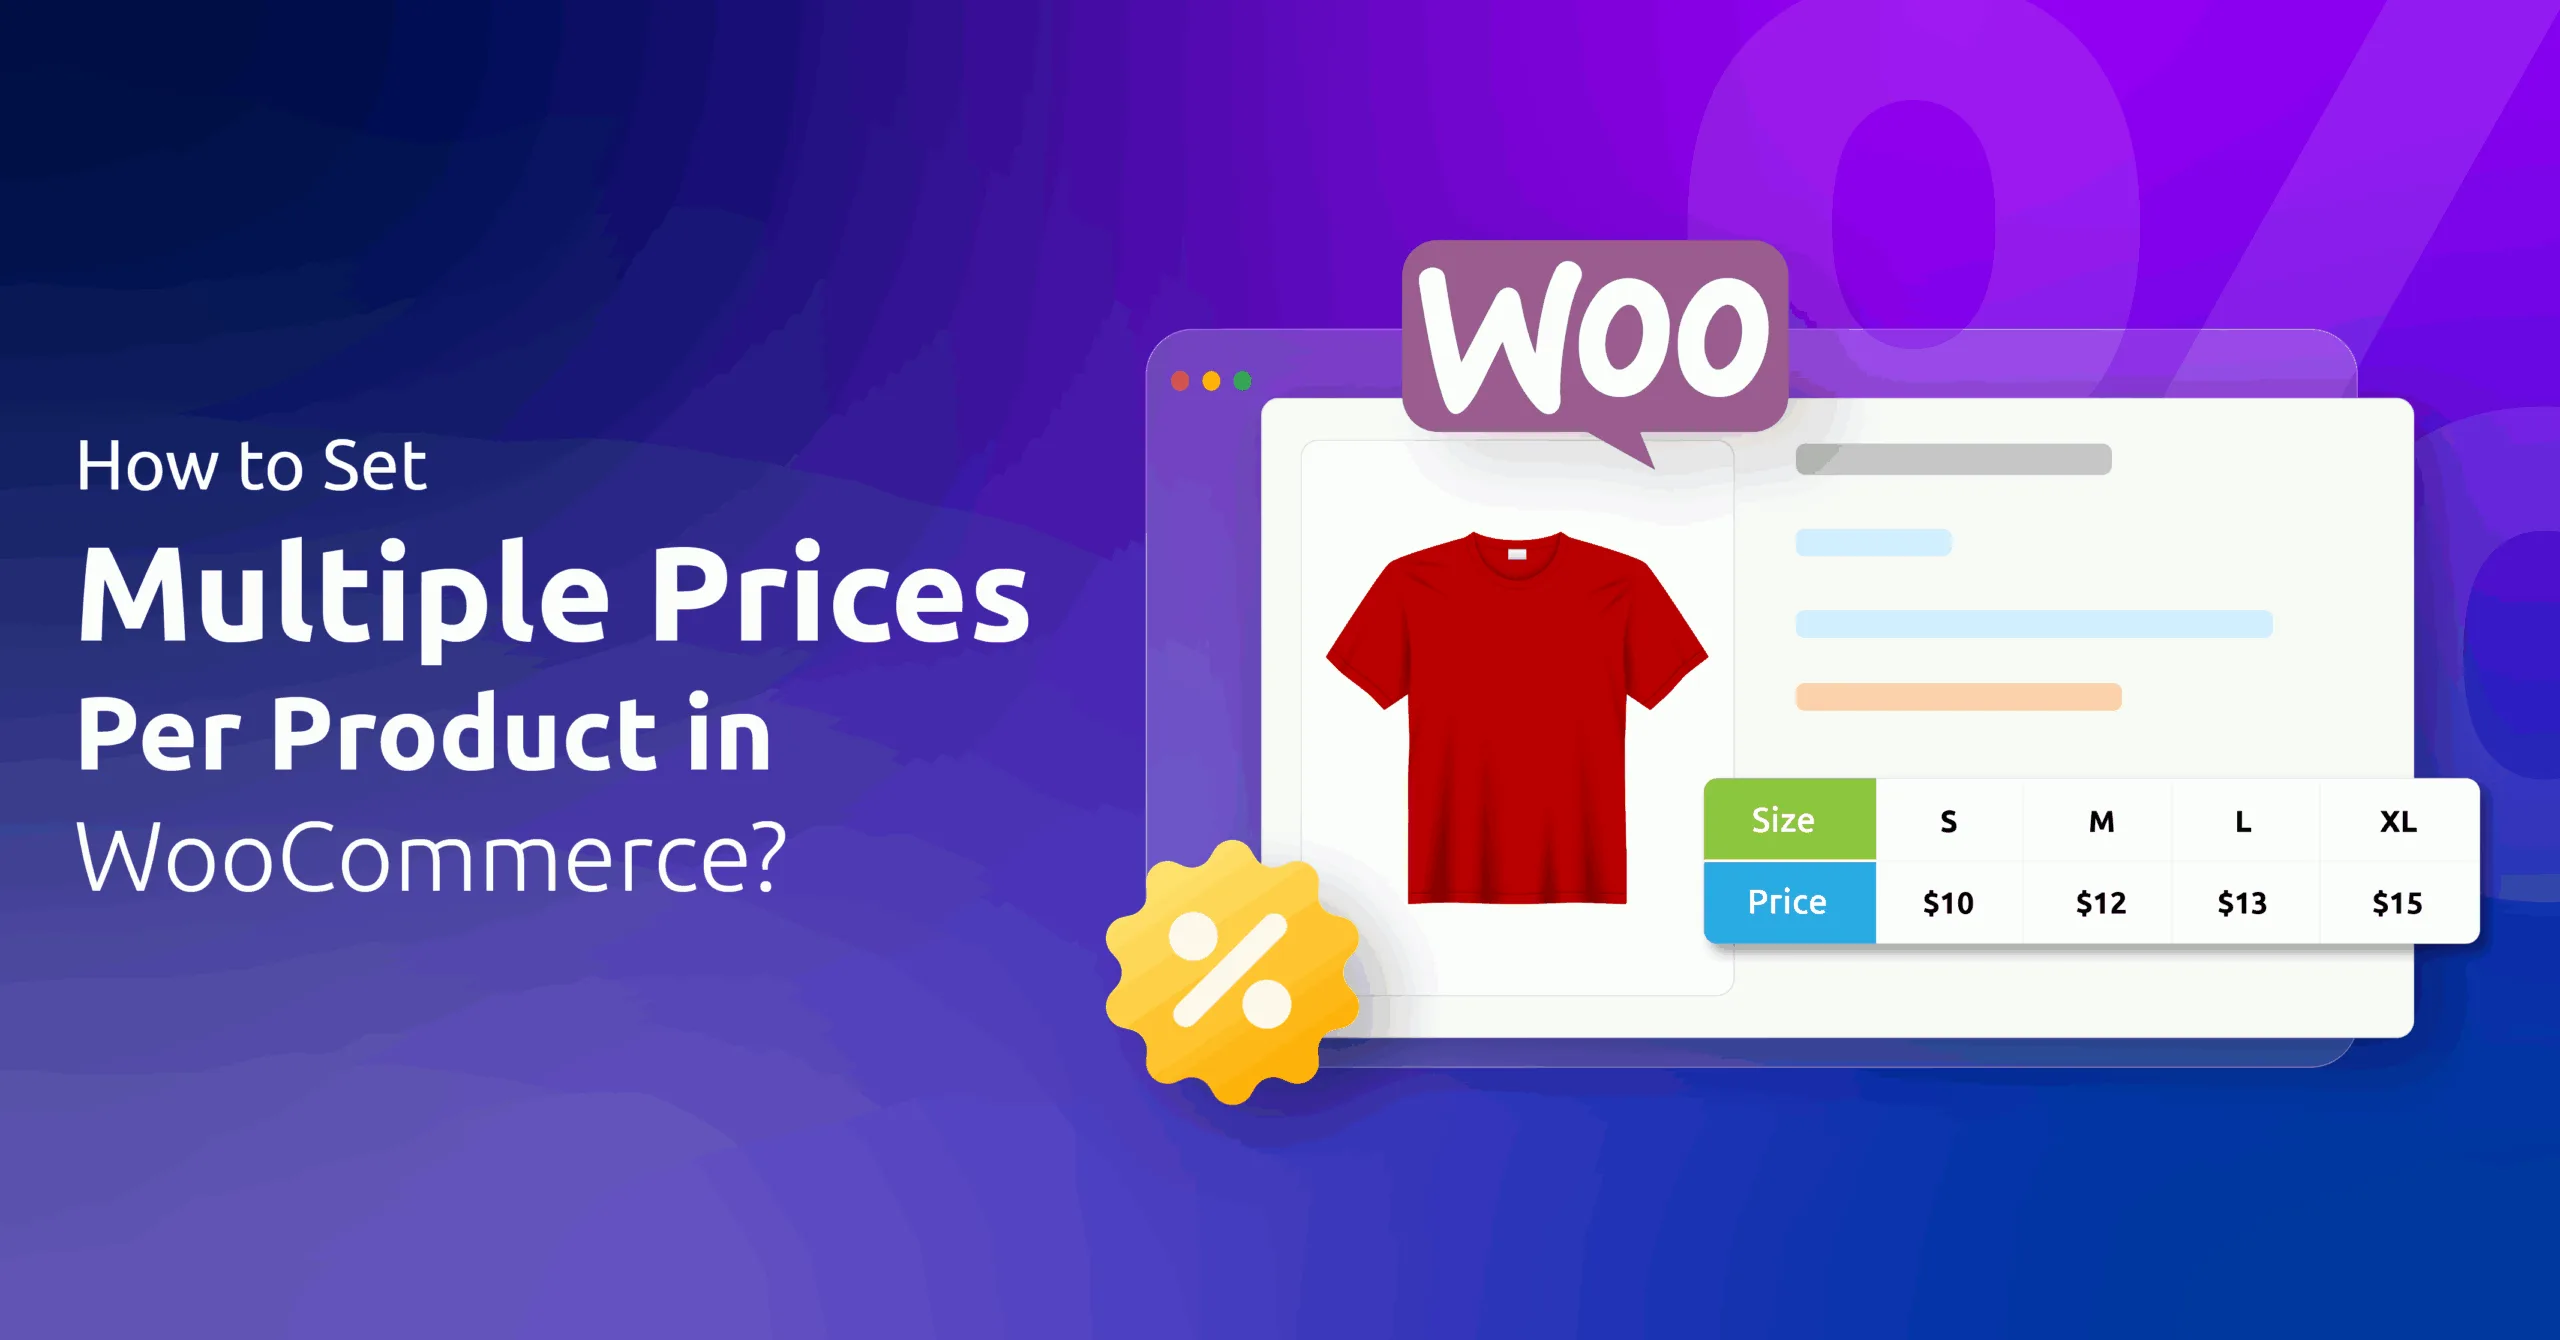
A variable product, however, lets you create multiple versions of a product. Think of a hoodie sold in sizes S to XXL. Each size can have its own price, inventory, or even image. This is essential for charging differently based on costs (e.g., XXL uses more fabric) or customer preferences.
Key difference:
- Simple products = single price.
- Variable products = multiple prices tied to variations.
Attributes and Variations
Attributes are product features like size, color, or material. There are two types:
- Global Attributes
- Local Attributes
Let us explain what they are.
- Global attributes: You define them from Products >> Attributes in your WordPress admin. As the name suggests, once created, they become available for any product on your site (for example, a “Color” attribute with terms “Red,” “Blue,” “Green”).
- Local attributes: You need to manually create them for individual products. They are created within the product edit screen itself and apply only to that one product. They are useful for one-off options that you do not wish to reuse elsewhere.
Creating Global Attributes for Variation-Based Pricing
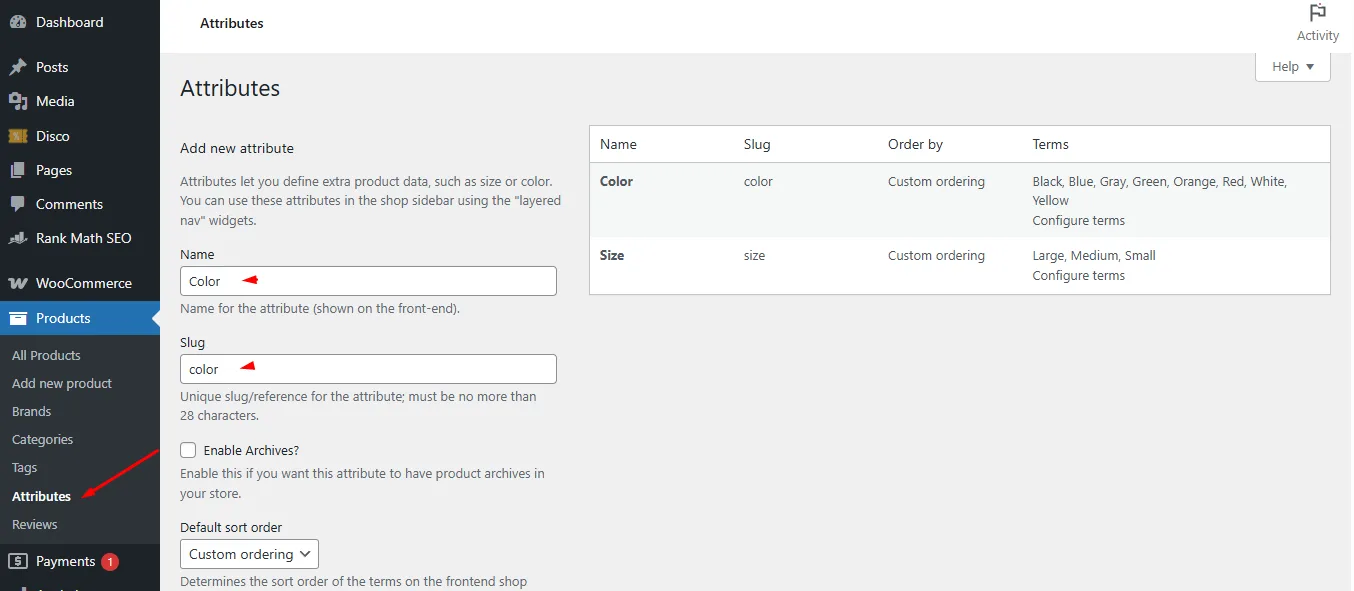
- In your dashboard, go to Products >> Attributes. Enter a Name (e.g., “Size”) and an optional Slug, then click Add attribute.
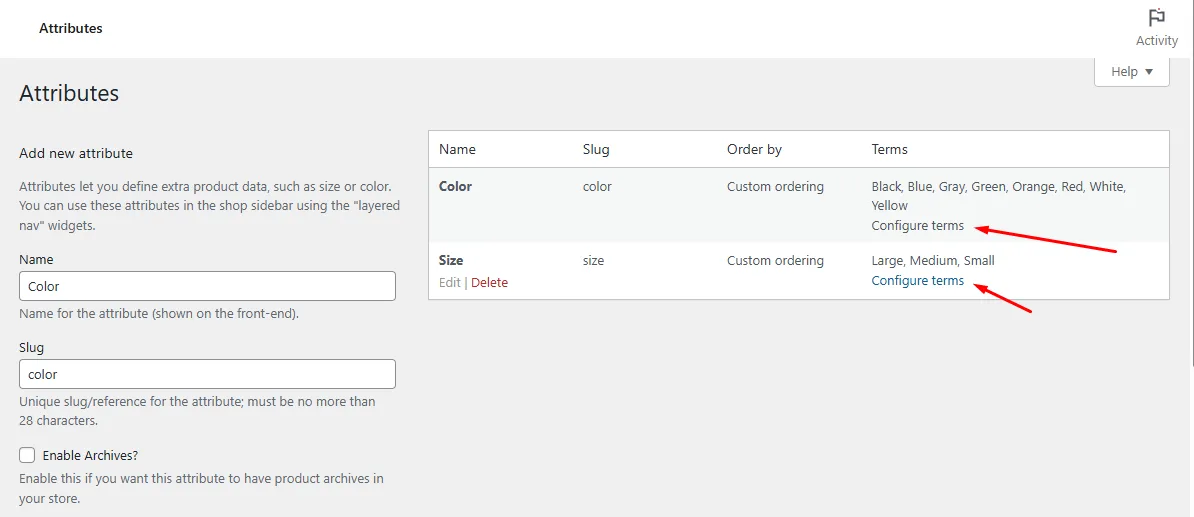
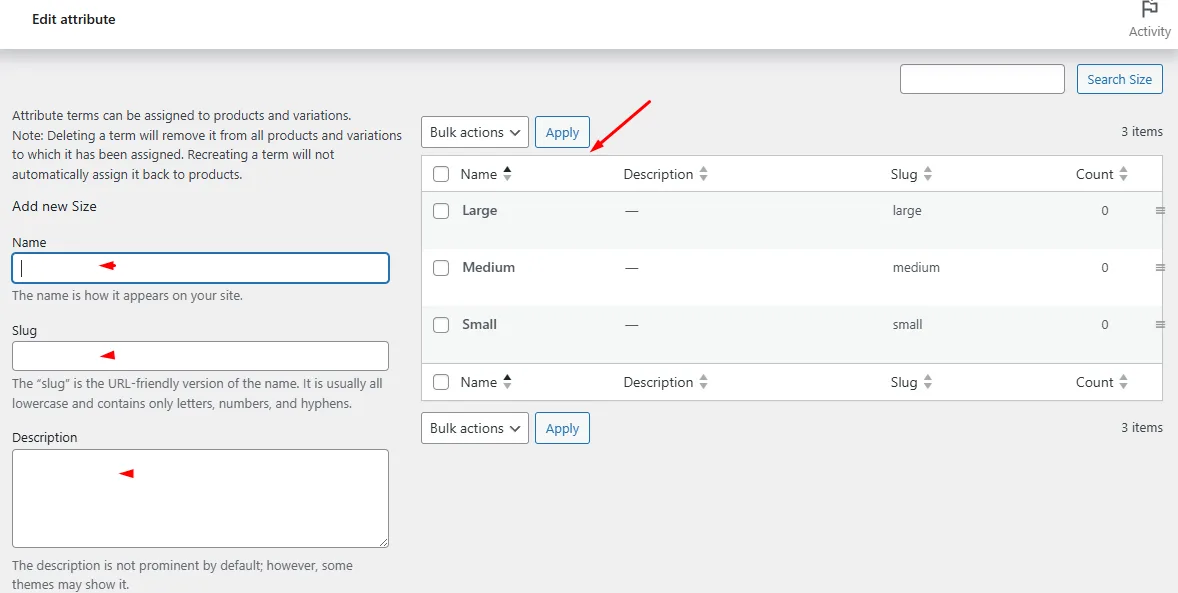
- After the attribute appears in the table, click Configure terms next to it. On that page, add your specific values (for example, “Small,” “Medium,” “Large”) one by one, clicking Add new Size after each entry.
- In the product edit screen for your variable product (see next section), choose either an existing global attribute from the Add Existing dropdown or click Add New to define a local attribute. Enter the values separated by a vertical bar (|) (e.g., Small | Medium | Large), then check Used for variations and click Save attributes.
Setting Up Variable Products for Multiple Prices
Here’s how to make a variable product in WooCommerce.
Configuring a Variable Product
- In the WordPress admin, navigate to Products >> Add New or open an existing product to edit, ensuring you start from the standard product screen.
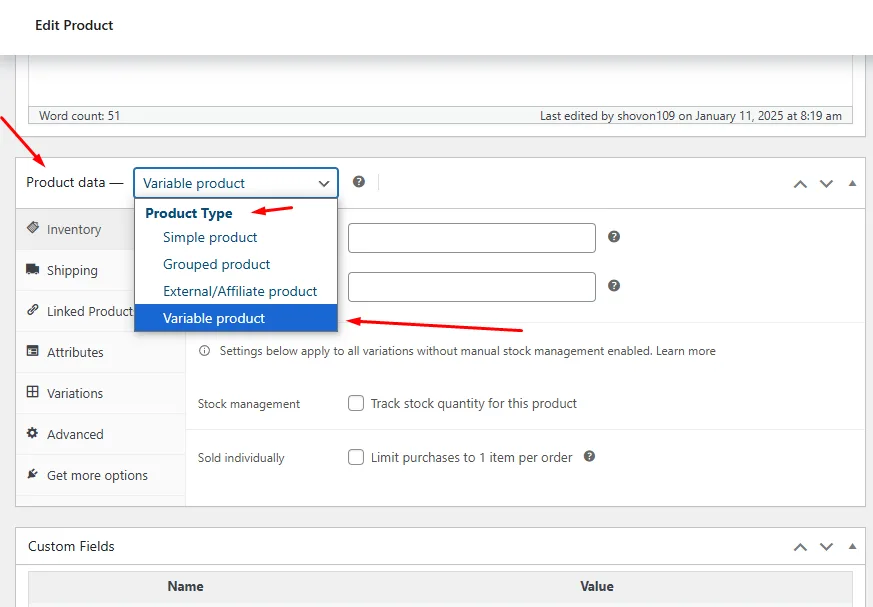
- In the Product Data box below the editor, click the WooCommerce product dropdown options labeled Product type and select Variable product to enable variation settings.
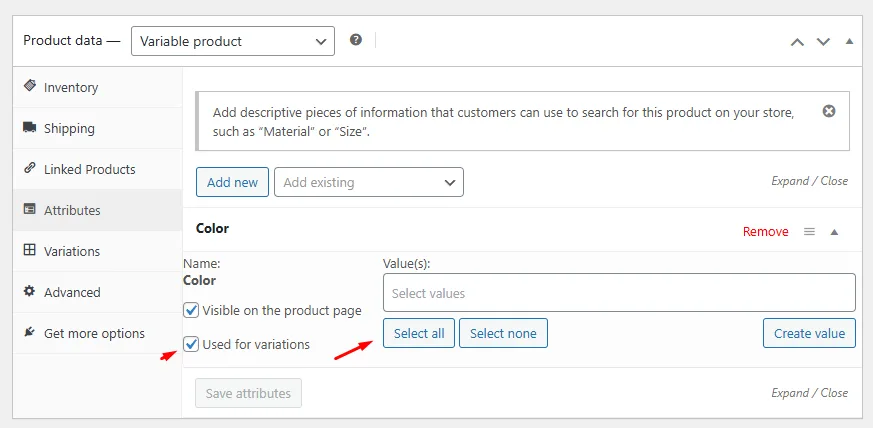
- Next, click the Attributes tab within the Product Data panel. Choose either an existing global attribute from the Add Existing dropdown or click Add New to define a local attribute.

- In case you selected an existing global attribute, hit the Select All button to add all the values attached to that attribute.
- If you are creating a local/new attribute from the scratch, enter the values separated by a vertical bar (|) (e.g., Small | Medium | Large), then check Used for variations and click Save attributes.
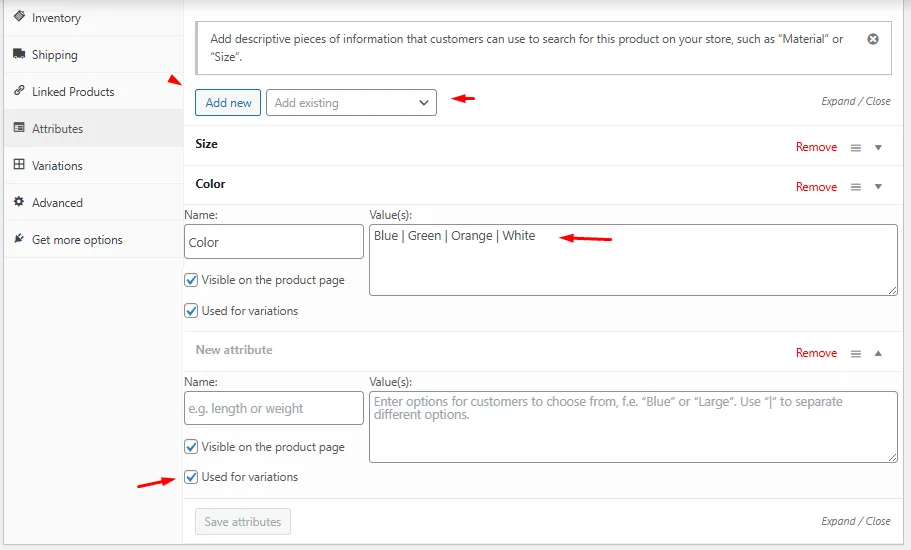
- Saving the attributes makes your attribute values available when you generate variations.
Adding WooCommerce Multiple Prices Per Product Via Variations
Time to learn the very steps on how to set multiple prices per product in WooCommerce.
- Still in the Product Data panel, switch to the Variations tab to start creating individual variation entries.
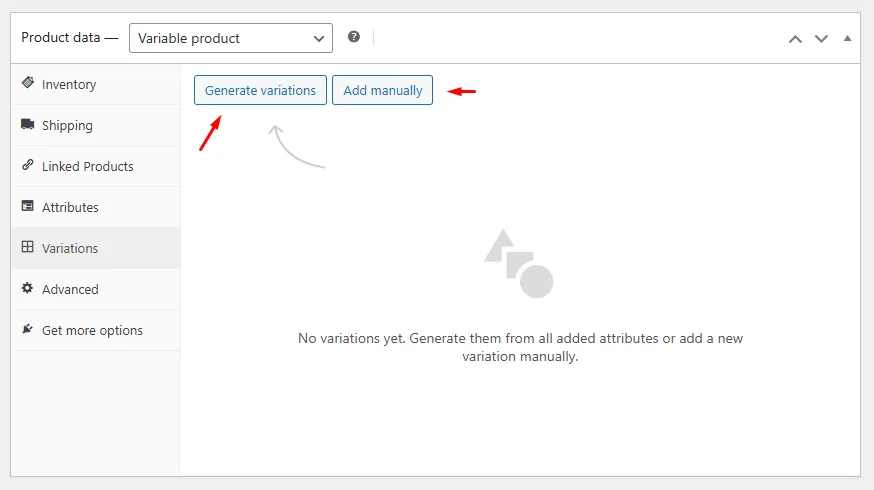
- You can create all possible variations automatically by clicking the Generate Variations button. Alternatively, you can also add variations manually.
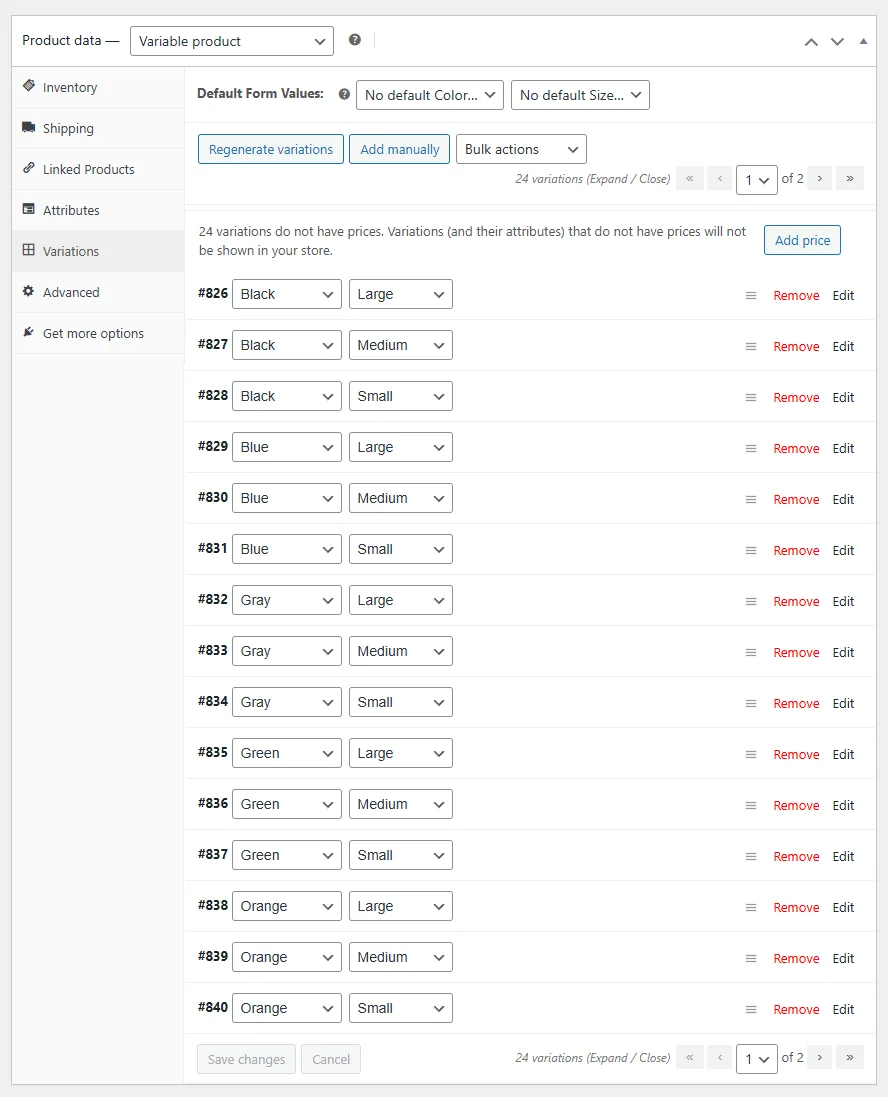
- Click the expand arrow next to any variation to reveal its settings, including price, SKU, and stock status.
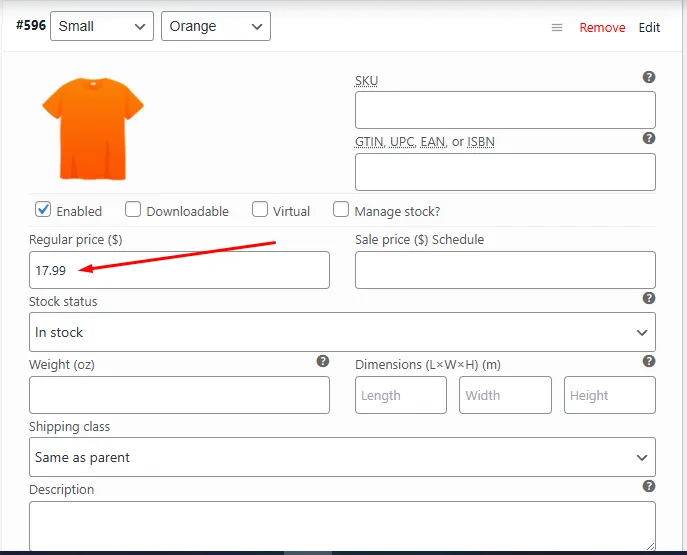
- In the Regular price field, enter the exact amount for that variation (for example, $17.99 for Small or $19.99 for Medium), demonstrating precisely how to edit product variations prices in WooCommerce through the native interface.
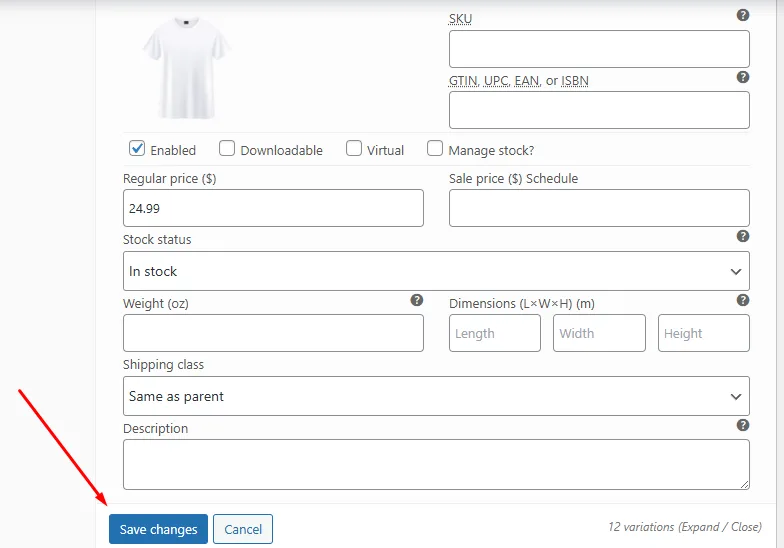
- Repeat this process for every variation you have, then click Save changes at the bottom of the Variations panel and finally Update or Publish the product to apply your WooCommerce variable product price range.
- Check and test the WooCommerce product with multiple options.
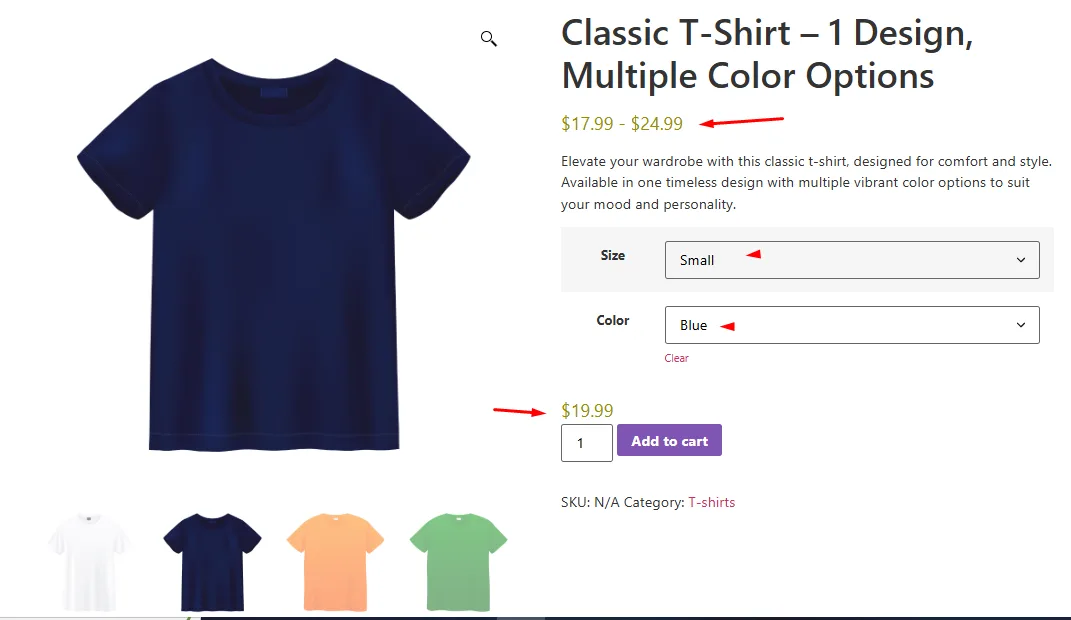
This is how to edit product variations prices in WooCommerce. By following these steps, you will have fully configured a variable product in WooCommerce with distinct prices assigned to each variation, using only the built-in interface.
Advanced Pricing Techniques
In today’s competitive eCommerce landscape, store owners use different pricing methods to boost sales and give customers better deals. Some of the most useful ones are dynamic pricing, tiered discounts, and bulk pricing.
Dynamic pricing means the product price can change based on things like demand, stock level, or even who the customer is. Tiered pricing gives better prices when shoppers buy more items, which helps increase order size.
WooCommerce has its own Dynamic Pricing extension. It lets you set rules based on quantity, user roles, or product categories. However, many store owners seek a more all-in-one solution for complex campaigns.
That’s where Disco comes in. Disco is a free, open-source plugin made for WooCommerce.
It helps you create all kinds of discounts from one simple dashboard—product discounts, cart rules, shipping deals, buy-one-get-one offers, and more. You can set different prices for each product based on user role, product attributes, order history, or even cart total—and you don’t need to touch any code.
Disco also lets you run time-based campaigns, show customers how much they save, and combine different rules to meet your store’s needs. It’s built for store owners who want smart pricing without the hassle.
Overall, Disco is your one-stop solution for creating WooCommerce dynamic pricing programmatically. Let’s explore some strategies that applies WooCommerce multiple prices per product using the plugin.
1. Attribute-Based Discounts
Want to clear out specific colors or reward customers for choosing budget-friendly options? Attribute-based discounts let you slash prices for select variations like size, color, or material. For example, offer 10% off red hoodies to boost sales of overstocked colors, or discount polyester fabric to compete with premium cotton.
Why Use This?
- Move slow-selling inventory (e.g., unpopular colors/sizes).
- Encourage purchases of cost-effective variants.
- Simplify promotions without cloning products.
Example:
- “15% off all Large hoodies this week!”
How to Set Multiple Prices Per Product in WooCommerce Based on Attribute?
The above example is a category-based discount, and we will need to add multiple conditions for this one. Disco supports adding multiple conditions within the same rule with AND/OR logic.
First things first, install and activate the plugin from Plugins >> Add Plugin.
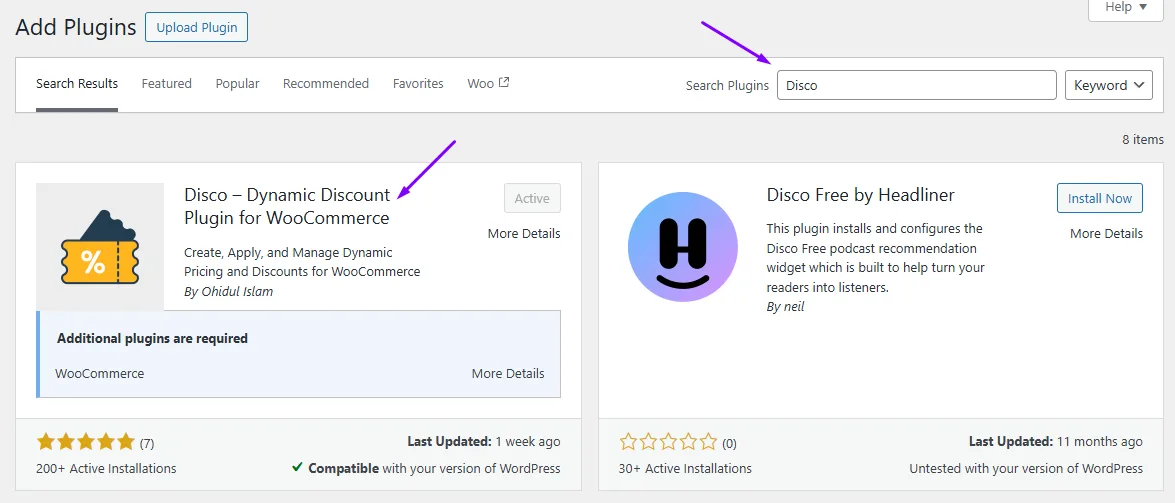
Now, let’s create the above example.
- Go to the Disco dashboard and click the Create a Discount button.

- Give your pricing campaign a name.
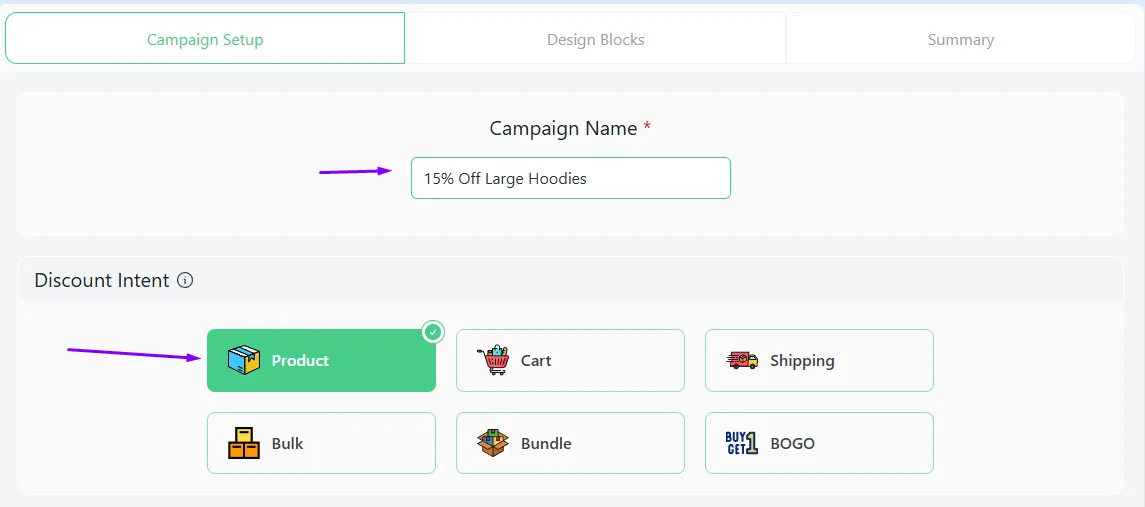
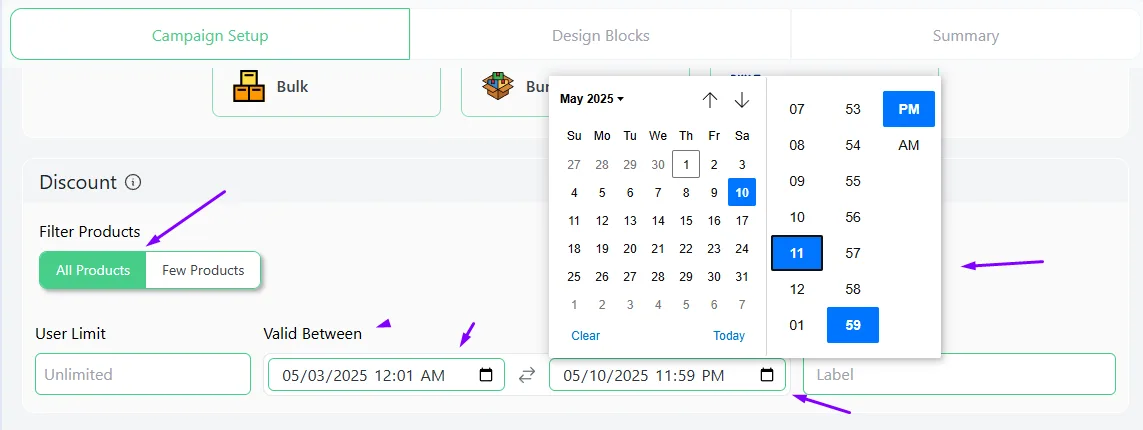
- Select the Product discount intent and specify the products.
- Set the starting and ending date and time for the rule.
- Select the Percentage Discount option from the Discount Type dropdown.
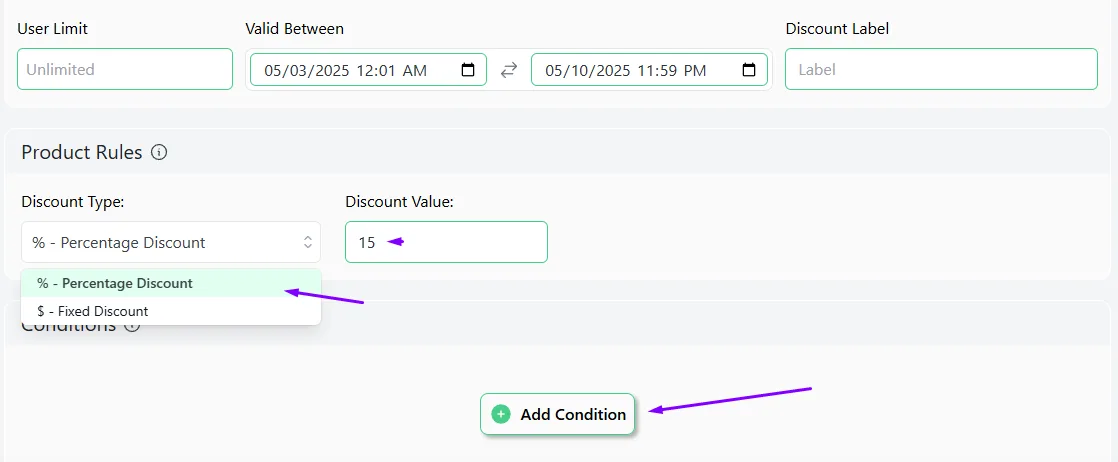
- Enter the value in the Discount Value box.
- Click the Add Condition button.
- Select the Categories filter and set the target category.

- Click the Add Another Condition button.

- Select the AND logic and pick the Size filter from the Product Attributes.
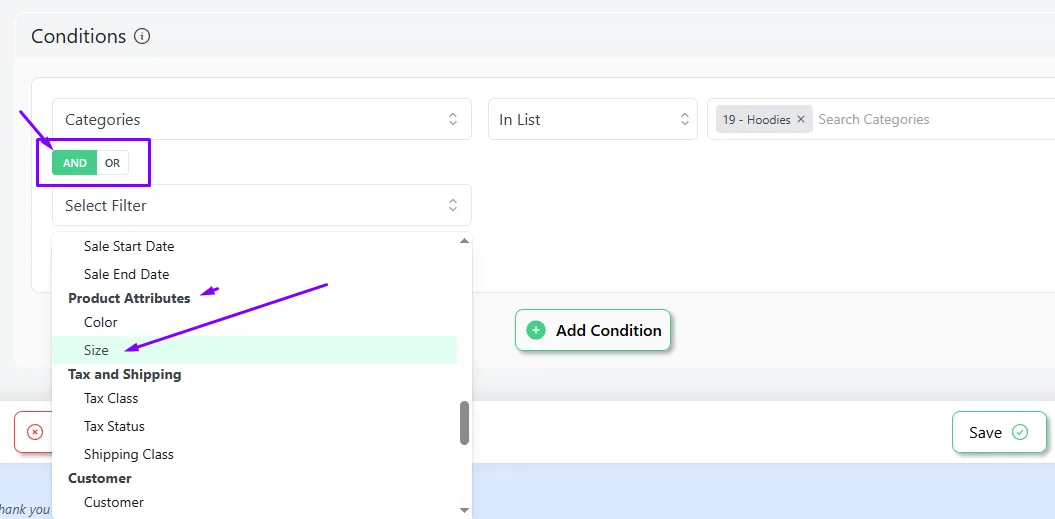
- Select and set the Large option as the value.
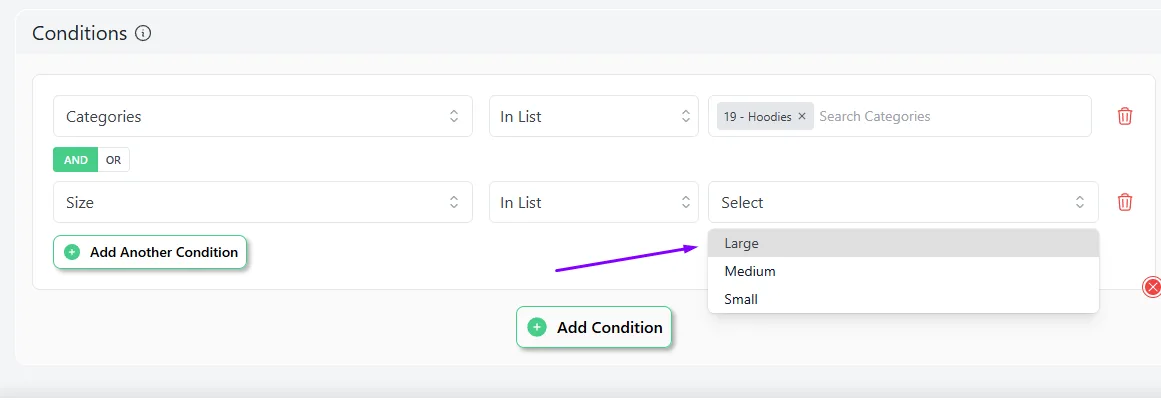
- Save the rule and customers can now enjoy a 15% off on large-sized hoodies for a week.

2. Quantity and Tiered Discounts
Want to reward customers for buying more?
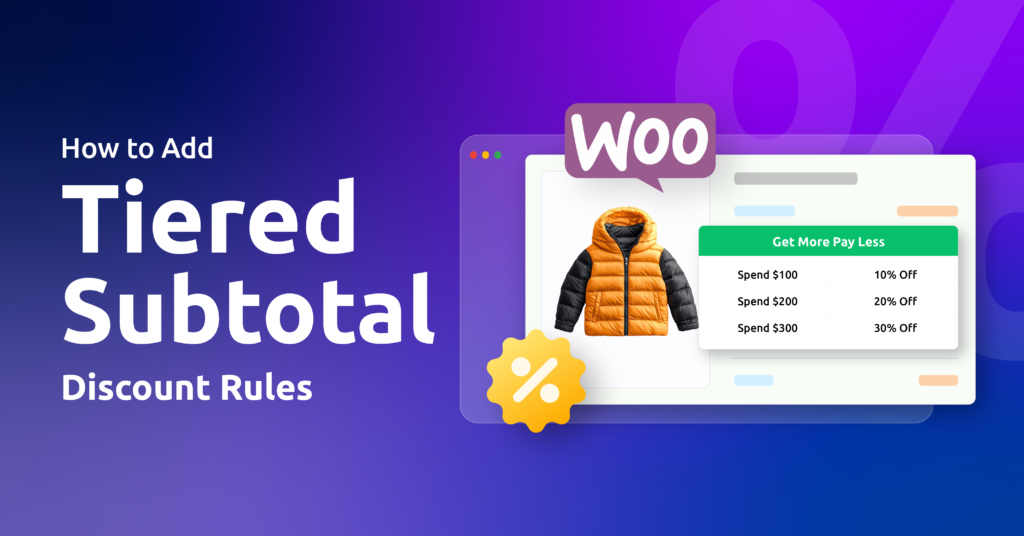
WooCommerce tiered pricing per product offers steeper savings as quantities increase. This “bulk incentive” works wonders for products like office supplies or apparel, where higher volumes mean lower per-unit costs for you, and bigger savings for buyers.
Why Use This?
- Boost average order value with volume-based deals.
- Compete with wholesale pricing effortlessly.
- Simplify upselling (e.g., “Buy 10, save 20%!”).
Example:
- Buy 2-5 Items: Get 5% Off.
- Buy 6-10 Items: Get 10% Off
- Buy 11+ Items: Get 20% Off
How to Set Multiple Prices Per Product in WooCommerce Based on Quantity?
Here’s how to set bulk pricing in WooCommerce using Disco.
- Create a new rule and select the Bulk discount intent.
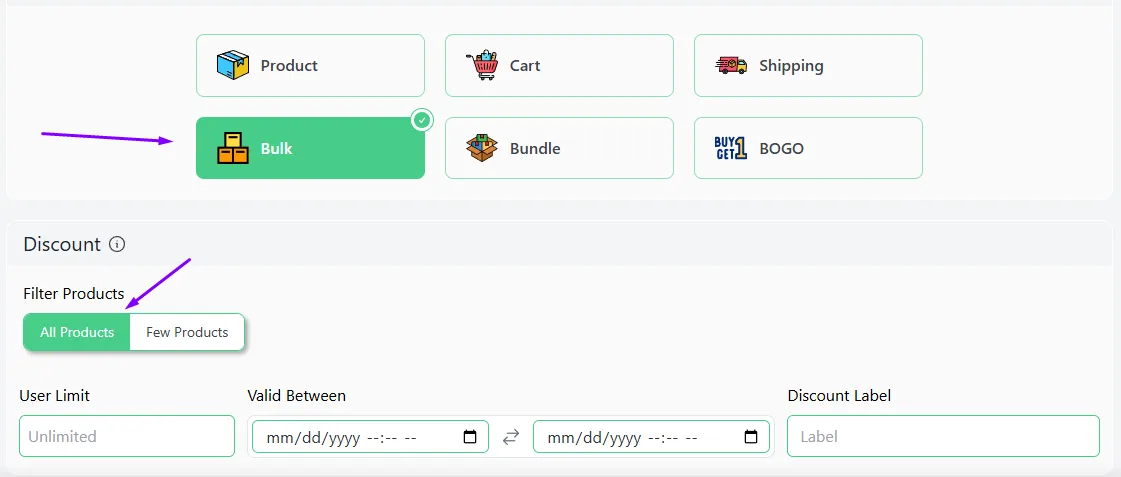
- Specify the products and validity period.
- Enter 2 in the Minimum and 5 in the Maximum Quantity box.

- Select the percentage option and set the value.
- Click Add More twice to add 2 new rows.

- Set the remaining values according to your strategy. We left the last Maximum field empty to indicate an unlimited value.
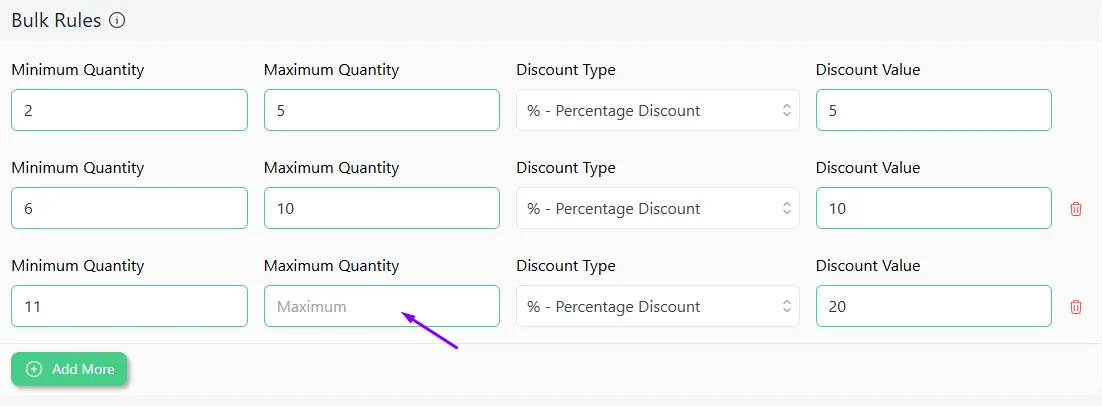
- Save the rule and test it from the front. Here’s the result for the 2-5 range.
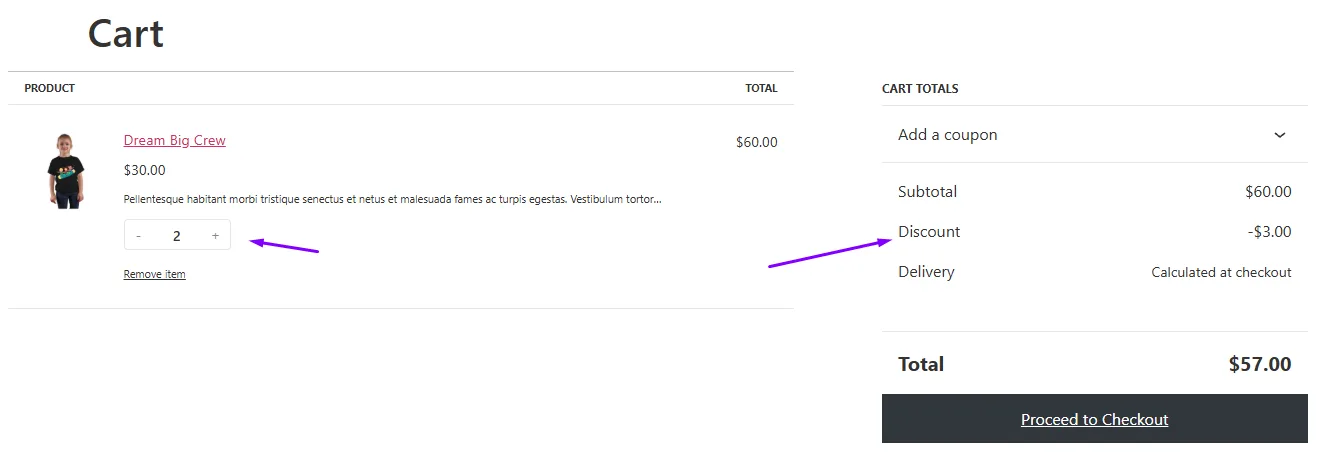
- For the 6-10 range –

- Finally, for 11 or more products, it will deduct 20% from the total price.

This is how to add quantity-based pricing in WooCommerce.
3. User Role Discounts
Wholesalers, VIPs, and loyal customers deserve special treatment, but manually setting prices for each group is a hassle. User role discounts let you automate unique pricing for specific buyer groups, hidden from regular shoppers.
Why Use This?
- Build B2B relationships with wholesale pricing.
- Reward loyalty (e.g., members-only discounts).
- Hide exclusive deals from the public.
Example:
- “Offer 30% off to Wholesalers on all hoodies.”
How to Set Multiple Prices Per Product in WooCommerce for Specific User Roles?
Here are the steps to set up this WooCommerce multiple prices per product rule.
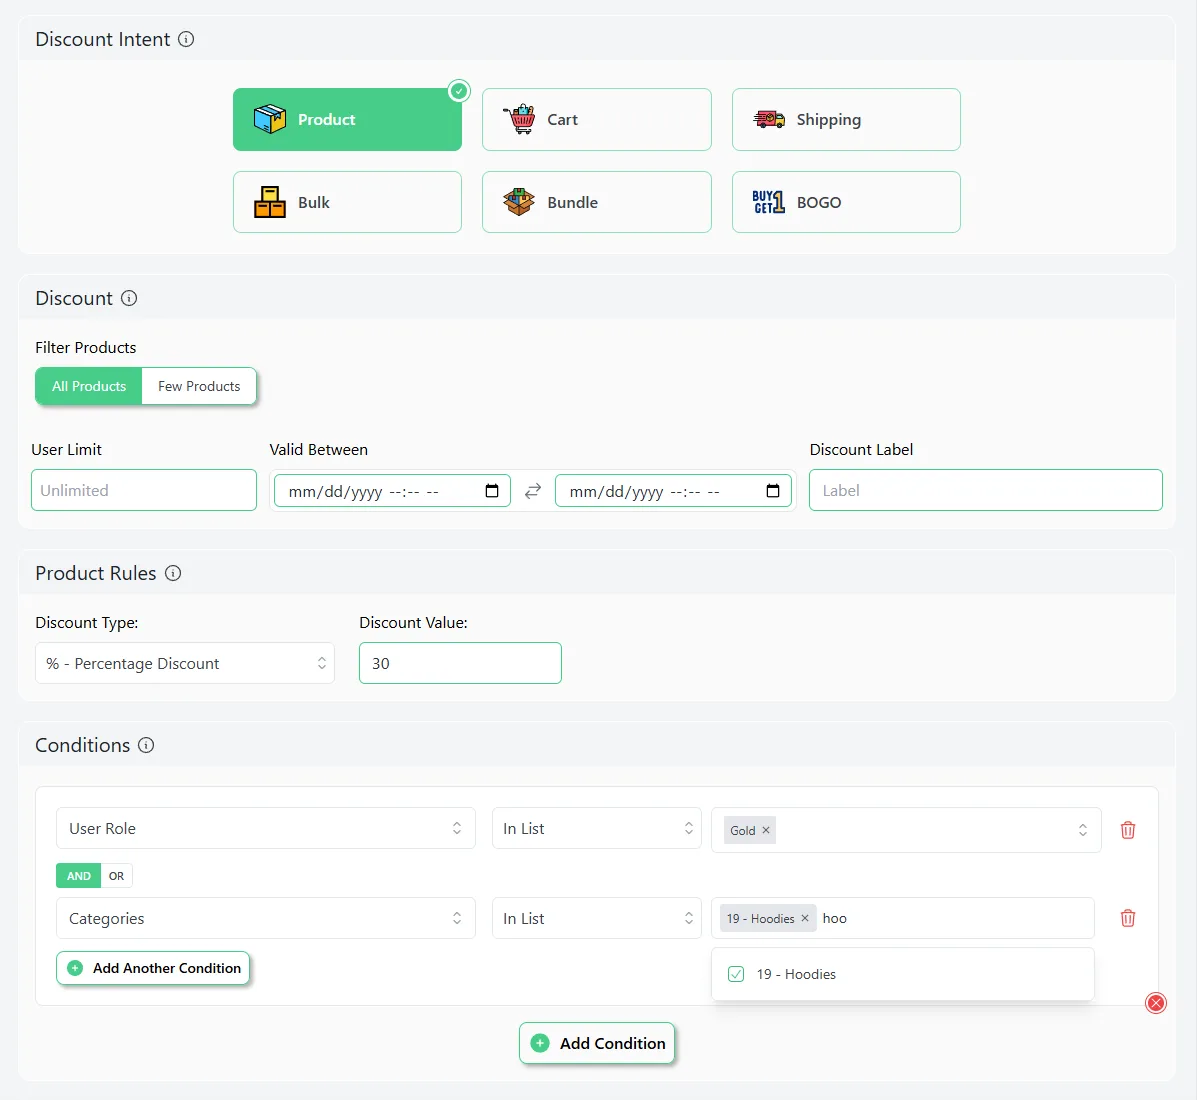
- After creating a new rule, select the Product intent and the products.
- Set the percentage value from the Product Rules section.
- Add the User Role condition.
- Select and set the target user role.
- Click the Add Another condition with AND logic and set the Categories condition.
- Save the rule, and only your wholesale customers can now enjoy 30% off on all hoodies.
4. Custom Conditions & Advanced Filters
Need ultra-specific rules? Combine product tags, customer locations, or cart totals to create hyper-targeted pricing. Perfect for regional promotions, limited-time offers, or niche audiences.
Why Use This?
- Target local markets (e.g., discounts for NYC shoppers).
- Create urgency with “weekend-only” deals.
- Layer multiple conditions for precision.
Example:
- “20% off Blue hoodies for Gold members in California only for this weekend.”
How to Set Multiple Prices Per Product in WooCommerce Based on Multiple Conditions?
Here are the steps –
- Select the Product discount intent and select the products if you want to set specific choices.
- Set the start and end date and time from the Valid Between fields.
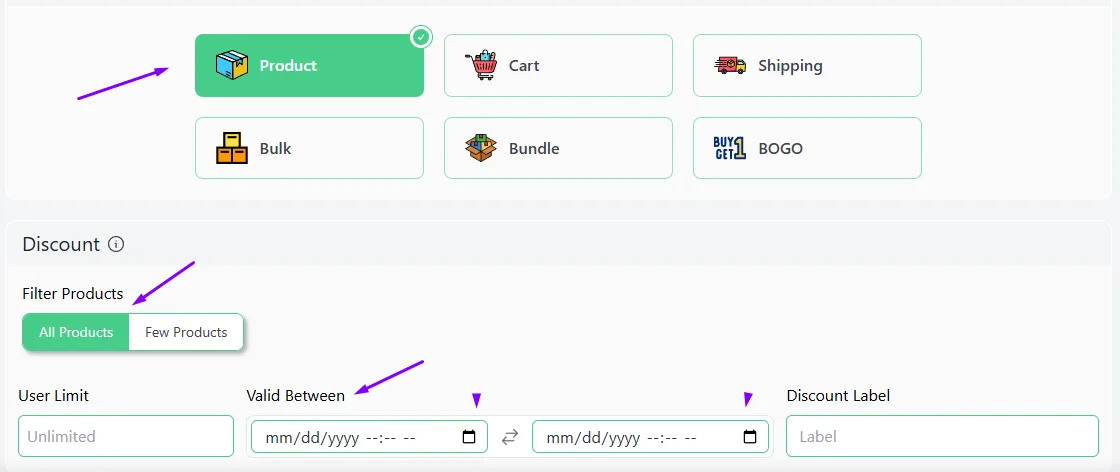
- Specify the percentage value from the Product Rules section.
- Add the condition Categories and select the Hoodies category in case if you selected All Products above.

- Click the Add Another Condition button and set the logic to AND.
- Add and set the Color product attribute filter to Blue.

- Hit the Add Another Condition button again and select the User Role filter along with AND logic.
- Select the target user role and add another condition with AND logic.
- Select the State filter and set the location.
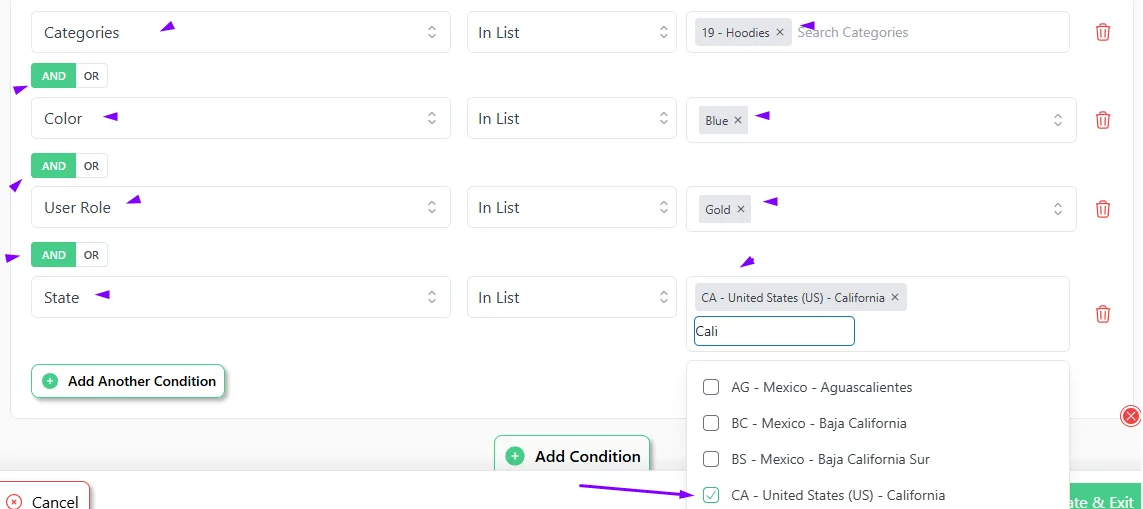
- After you save this multi-condition rule, customers from California can enjoy a 20% discount on black hoodies during the set weekend.
Wrap Up
Mastering how to set multiple prices per product in WooCommerce is like unlocking a secret weapon for your store.
Whether you’re charging extra for XXL hoodies (because fabric isn’t free!), rewarding bulk buyers, or hiding VIP deals for loyal customers—variable products and tools like Disco make it simple.
No more flat pricing headaches. Adjust prices to match real costs, boost sales, and keep customers happy—all while protecting your profits.
Ready to ditch one-size-fits-all pricing? Your store (and wallet) will thank you.
