Let’s face it – unexpected delivery fees hurt more than stepping on a Lego barefoot! No wonder, 48% of shoppers vanish when shipping costs surprise them at checkout.
Therefore, you need to have the correct shipping strategies configured the right way in your Woo store.
But, how to add delivery charges in WooCommerce?
Set up shipping zones first to add delivery charges in WooCommerce. Choose methods like flat rates ($5 per order), table rates (fees based on cart total), or local pickup. For special cases, add COD fees or per-product charges using shipping classes. Plugins like Table Rate Shipping handle complex rules transparently.
In this guide, you’ll learn to set up shipping that won’t scare customers away, including:
→ Flat rate tricks with cool formulas
→ Location-based delivery fees
→ Cash-on-delivery surcharges
Let’s get started.
Table of Contents
WooCommerce Shipping Essentials: Your Setup Blueprint
Alright, let’s get one thing clear upfront: shipping zones are your foundation. Think of them like delivery territories on a map. If you skip this step, you’re basically trying to build a house without laying bricks first.
Here’s the simple truth:
👉 Shipping zones = Geographic areas you ship to
👉 Shipping methods = How much you charge for delivery there
How to Set Up Shipping Zones in WooCommerce?
- Go to WooCommerce > Settings > Shipping > Shipping Zones.
- Click the Add Zone/Add Shipping Zone button.
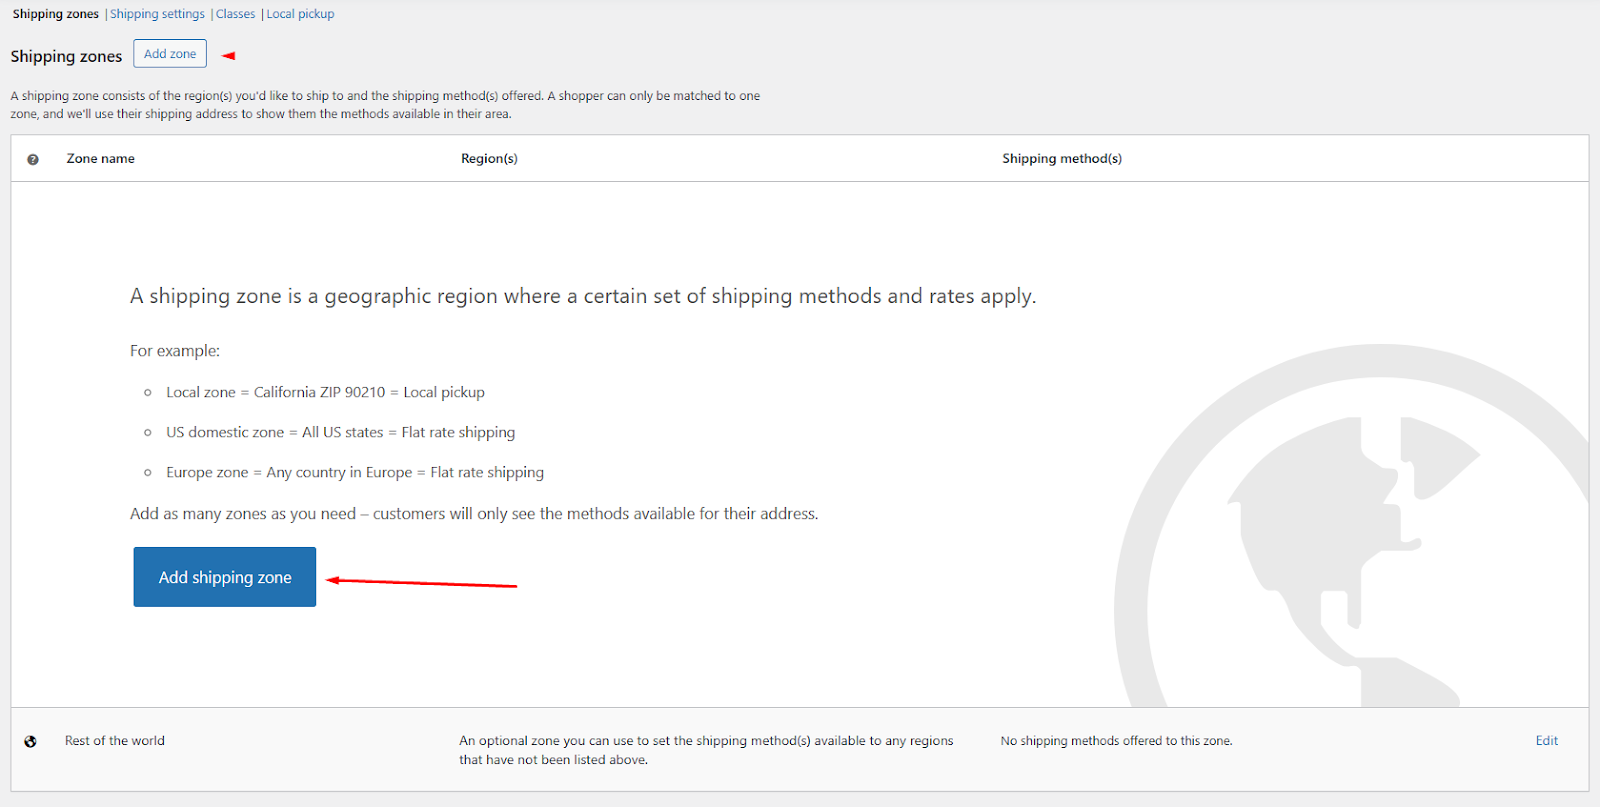
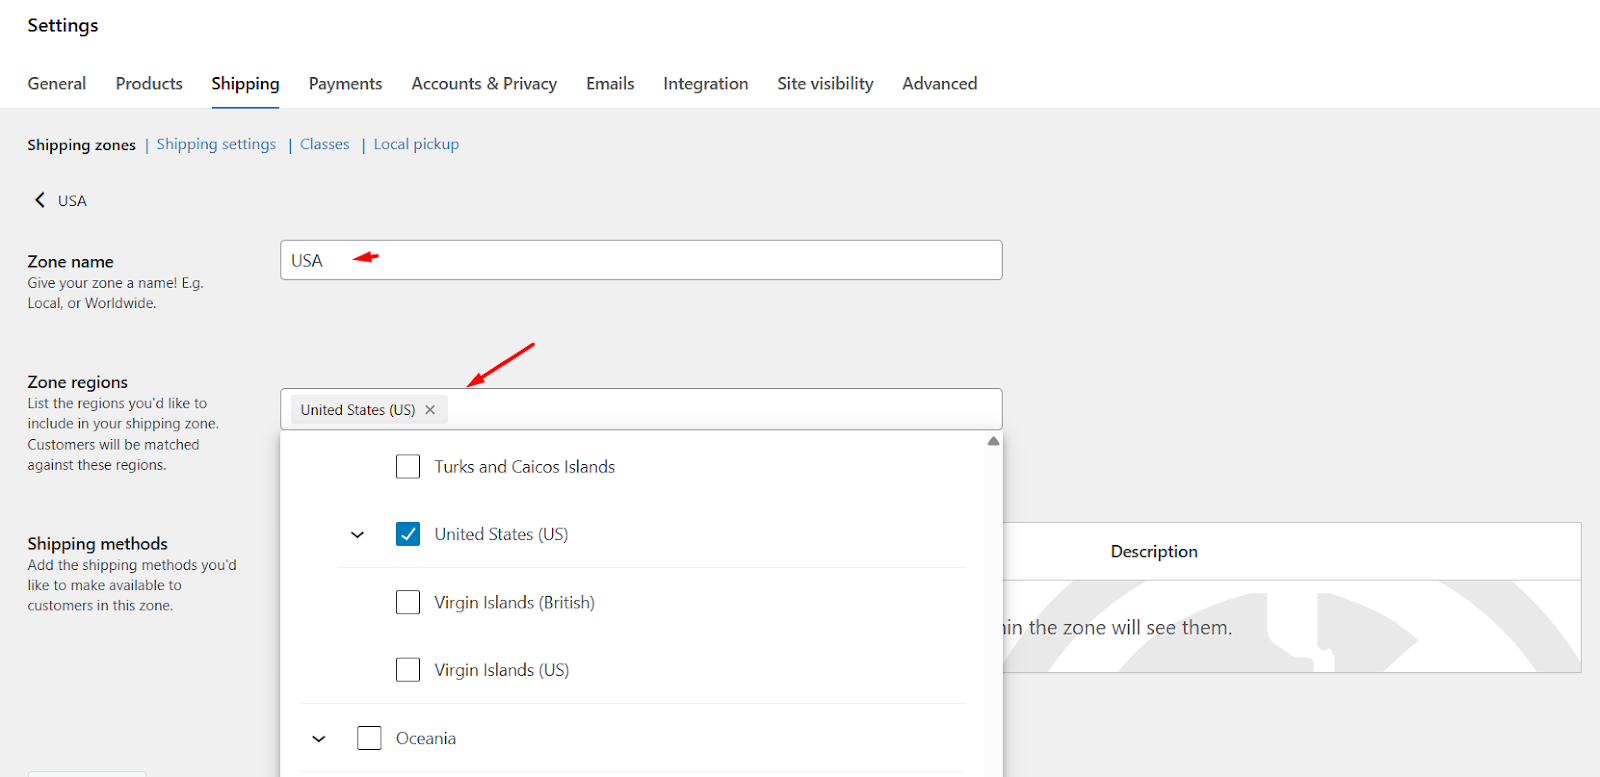
- Give your zone a name. (e.g., USA)
- Select and set your regions.
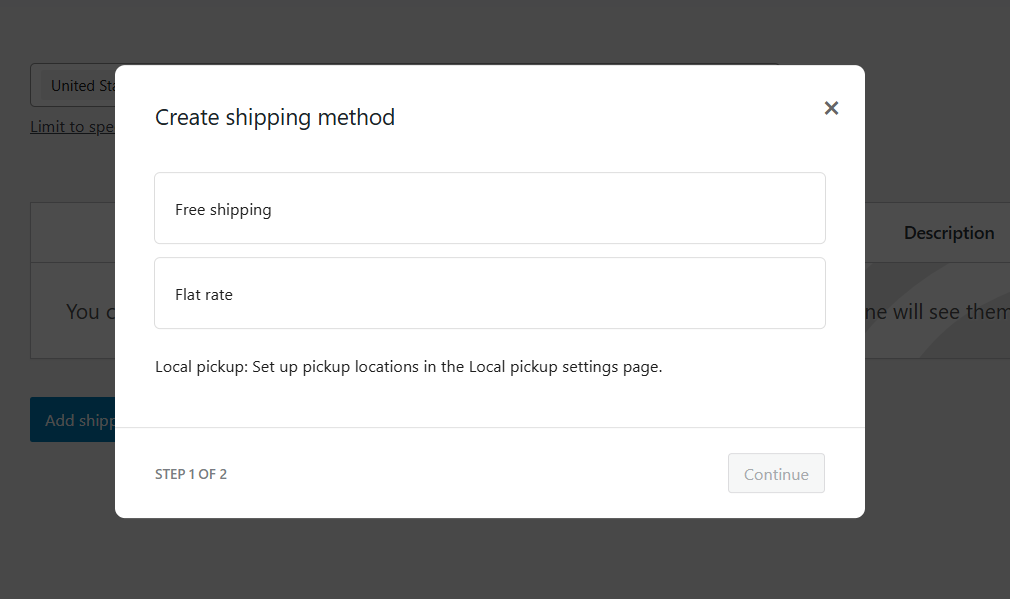
Now, about those core WooCommerce shipping method options– your three basic tools for getting paid for delivery:
| Method | Best For | Setup Time | Real-World Example |
| Flat Rate | Simple stores with predictable packaging | 2 minutes | “$5 for any order, anytime” |
| Free Shipping | Stores with fat margins (or as a bonus for big orders) | 1 minute | “Free delivery on orders over $75!” |
| Local Pickup | Brick-and-mortar shops (save on couriers) | 3 minutes | “Grab it yourself – $0 fee” |
Why this matters:
- Flat Rate keeps life simple when starting out
- Free Shipping boosts average order value (psychology hack!)
- Local Pickup slashes costs for neighborhood customers
Pro tip that’ll save headaches:
→ Always create a “Rest of World” shipping zone as your safety net.
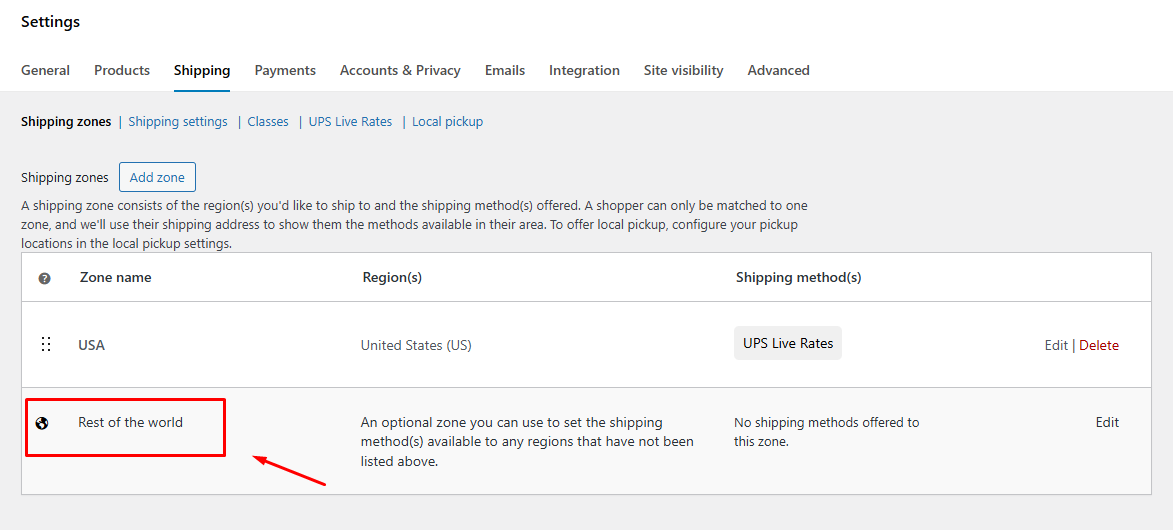
Why? Because last month, Sarah from Auckland tried ordering your handmade candles and couldn’t checkout. She emailed you crying (okay, maybe not crying – but definitely frustrated). Don’t be that store owner. Cover your globe.
Quick story: My friend Mike runs a coffee bean biz. He forgot his “Rest of World” zone for 3 months. Missed 12 international orders. That’s roughly $1,800 down the drain. Ouch.
Bottom line: Zones first → then methods. Nail this combo, and you’ve already beaten 60% of WooCommerce stores who wing it. Next up: we’ll turn these basics into profit machines.
Read this article for a complete basic walkthrough – WooCommerce Shipping Guide.
How to Add Delivery Charges in WooCommerce – (Simple Setup: 3 Basic Methods)
Look, I promise you: This isn’t rocket science. By the end of this section, you’ll have delivery charges working – no tech headaches. Let’s tackle these one by one like we’re chatting over coffee.
1. Flat Rate Shipping: Set It & Forget It
What it is: Charge the same fee for every order. Perfect for beginners!
Set up in 4 simple steps how to add shipping charges in WooCommerce:
- Go to WordPress Dashboard > WooCommerce > Settings > Shipping > Shipping Zones.
- Click your shipping zone (e.g., “USA”)

- Click the Add shipping method button.
- Select the Flat option and click Continue.
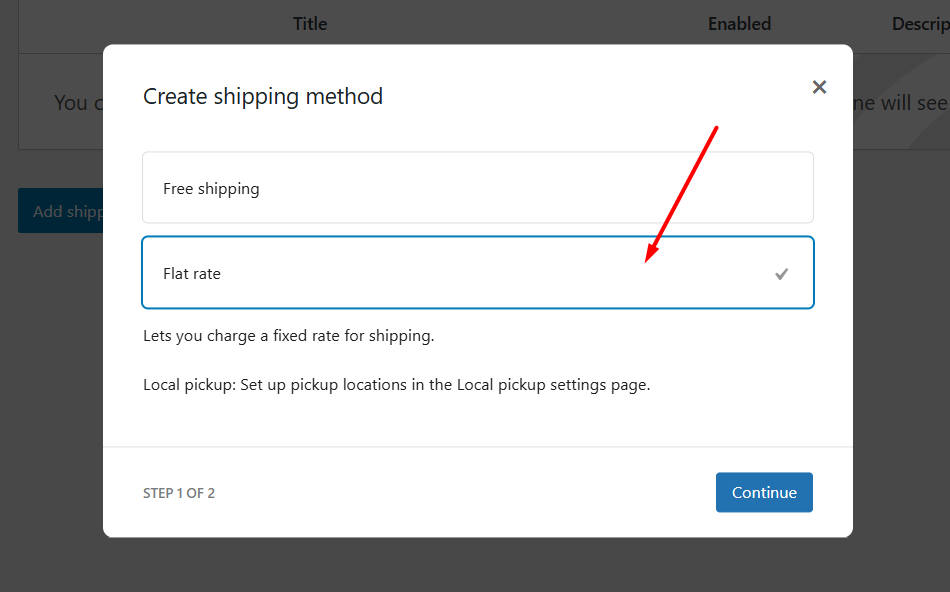
- In the Cost box: Type one number → Like 5 (for $5 shipping)
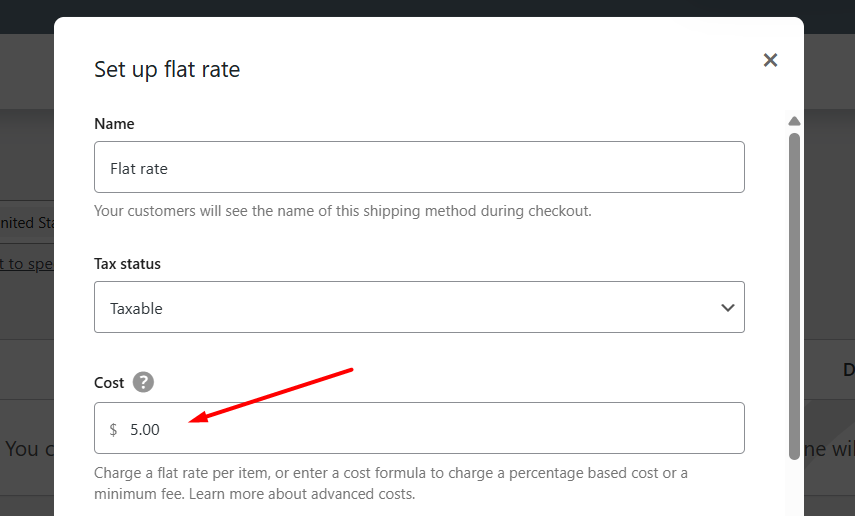
- Click Create and Save to complete the process.
This is how to add delivery charges in WordPress.
Real example:
- You sell t-shirts locally across your country
- Every order ships for $5 flat
- Customer buys 1 t-shirt or 10 t-shirts? Still $5 shipping
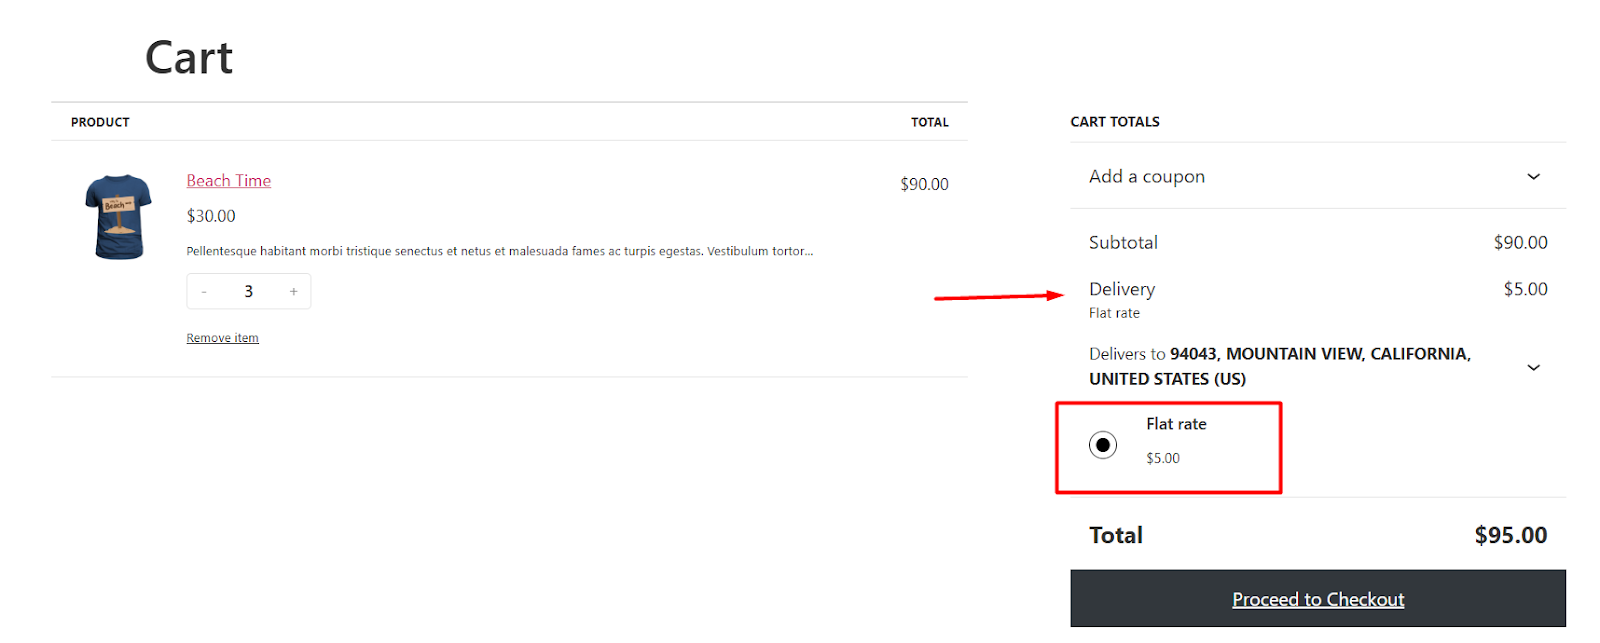
Why this works:
→ Super predictable for you and customers
→ Takes 60 seconds to set up
→ Zero math required
Pro tip (actually simple this time):
Start with a flat rate. Get your first 10 orders shipped. Then explore fancy options.
2. Free Shipping: Your Secret Sales Booster
What it is: $0 delivery fees (great for loyalty or big orders)
Free shipping is a sure-shot customer grabber if done right. In fact, 70% of customers prefer free shipping when shopping online.
Set up in 3 steps:
- Go to your shipping zone.
- Click the Add shipping method button.
- Select Free shipping and continue.
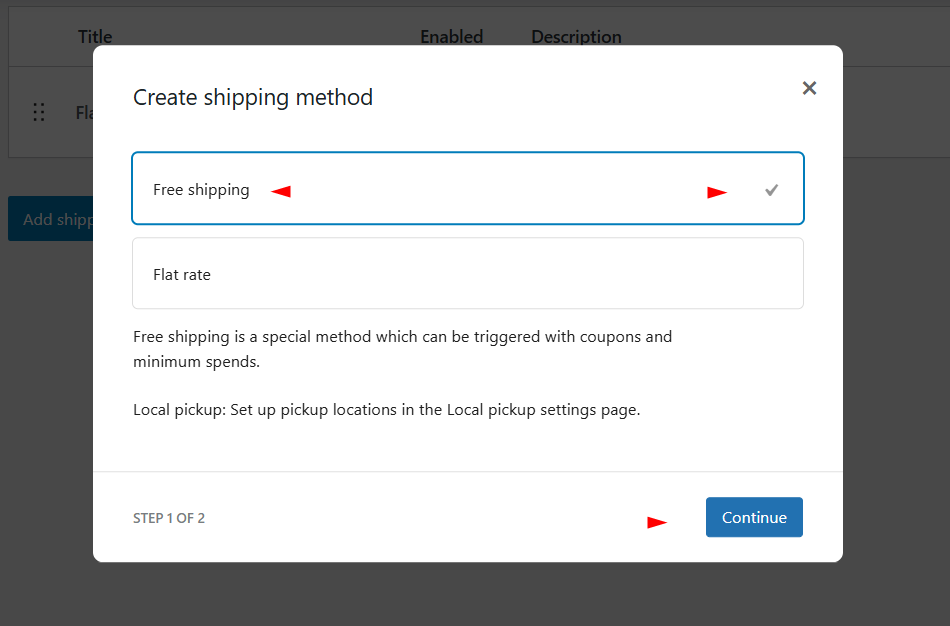
- Hit Create and Save when done.
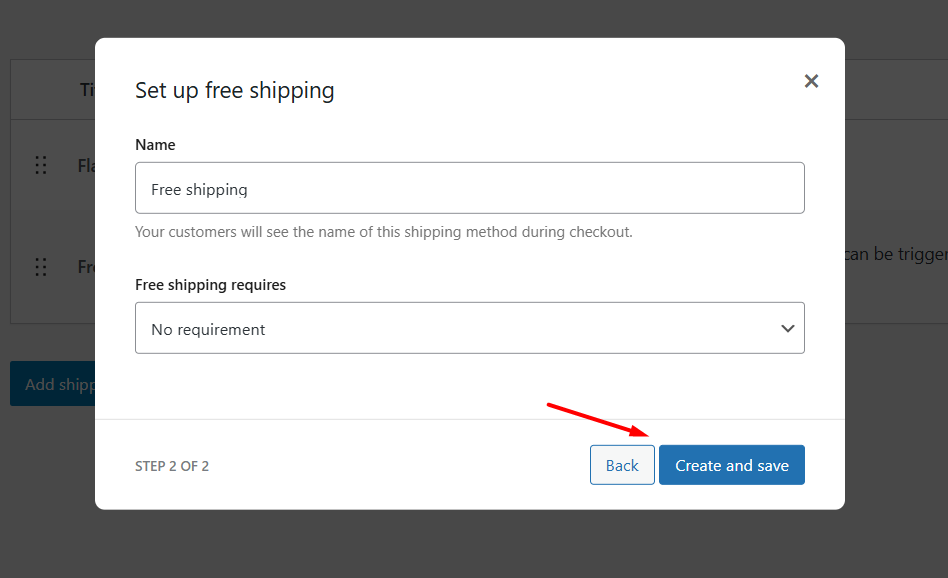
Real example:
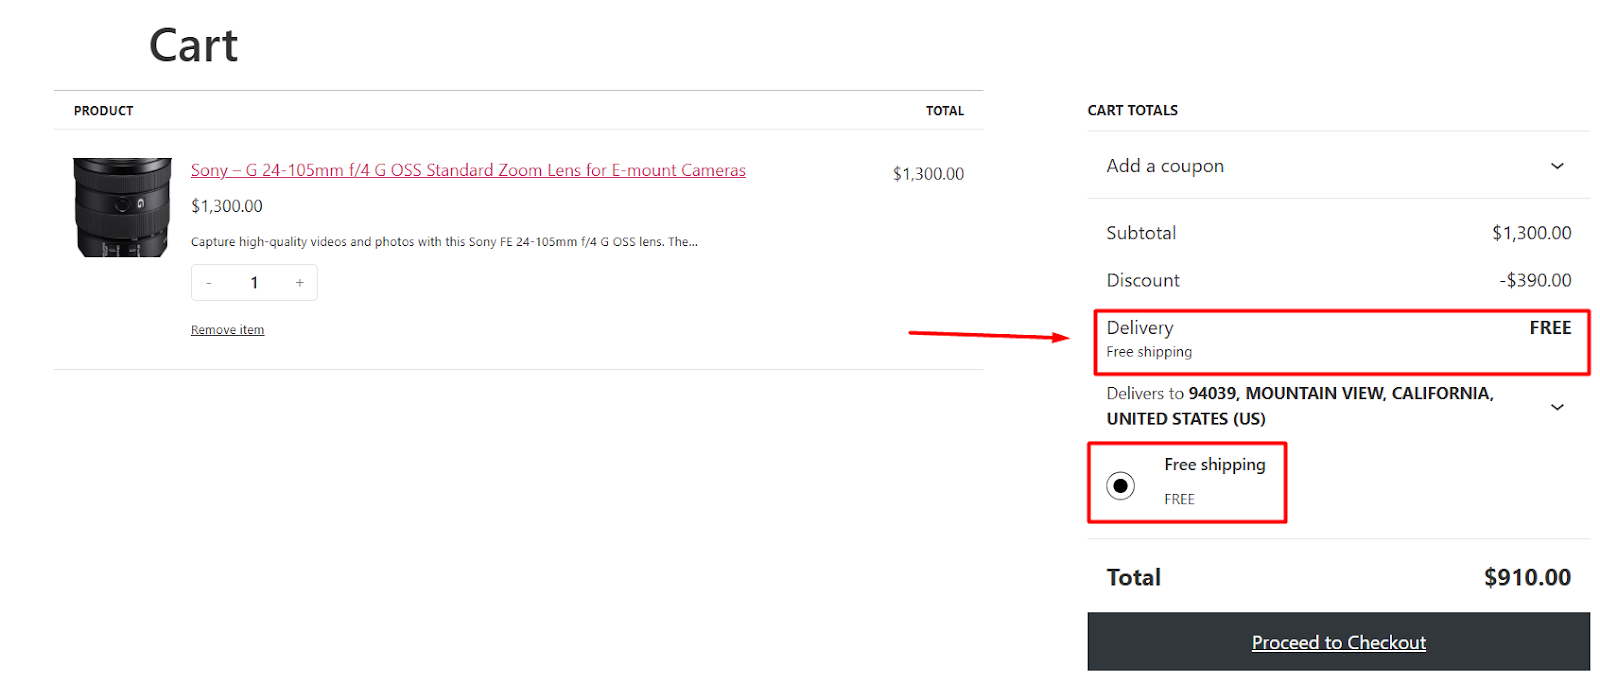
- You run a Gadget store.
- Your products are generally expensive.
- Therefore, you offer free shipping to encourage customers to buy from you and boost conversions.
Why this works:
→ “FREE” is the most powerful word in eCommerce
→ Encourages bigger orders
3. Local Pickup: Zero Fees, Happy Neighbors
What it is: Customers collect orders from your store/warehouse
Here’s how to add delivery charges in WooCommerce for local customers in 2 minutes:
- Go to WooCommerce > Settings > Shipping > Local Pickup.
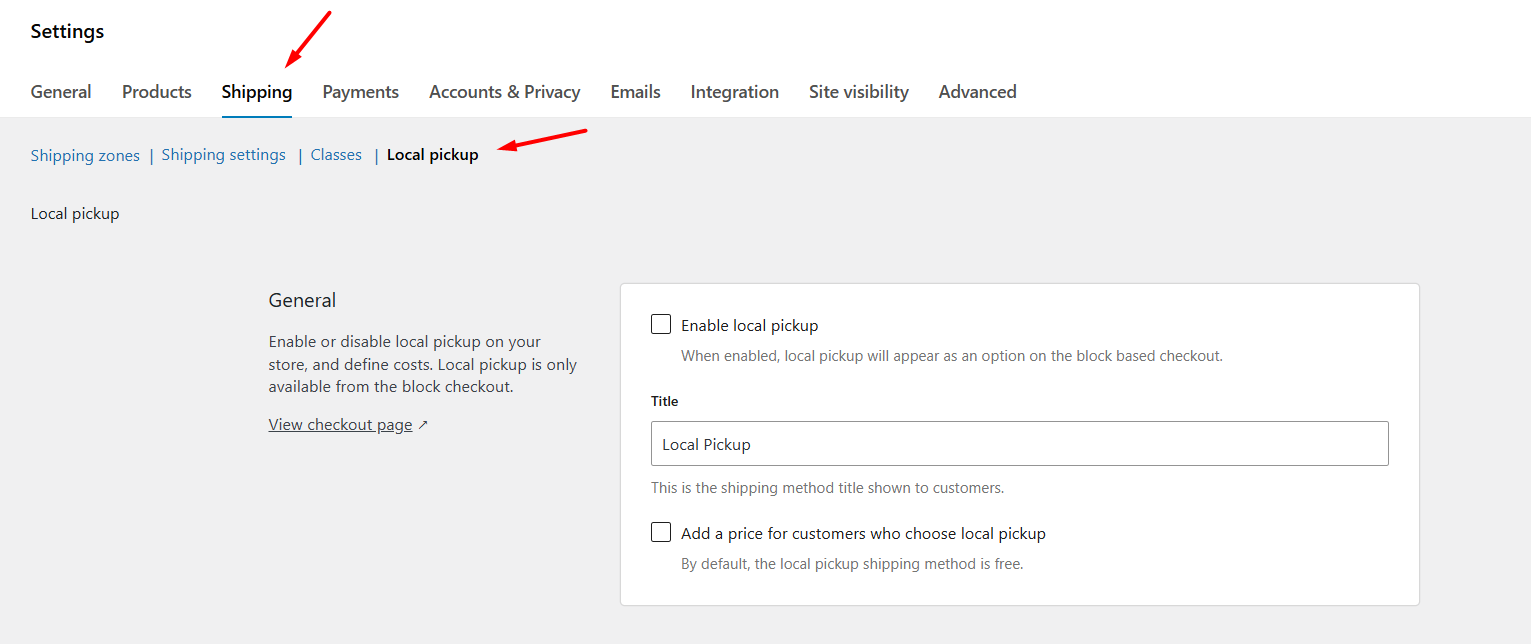
- Check the Enable Local Pickup box to activate this shipping method.
- By default, this local pickup method applies free shipping.
- Optional: To apply a delivery charge for this method, check mark – “Add a price for customers who choose local pickup.”
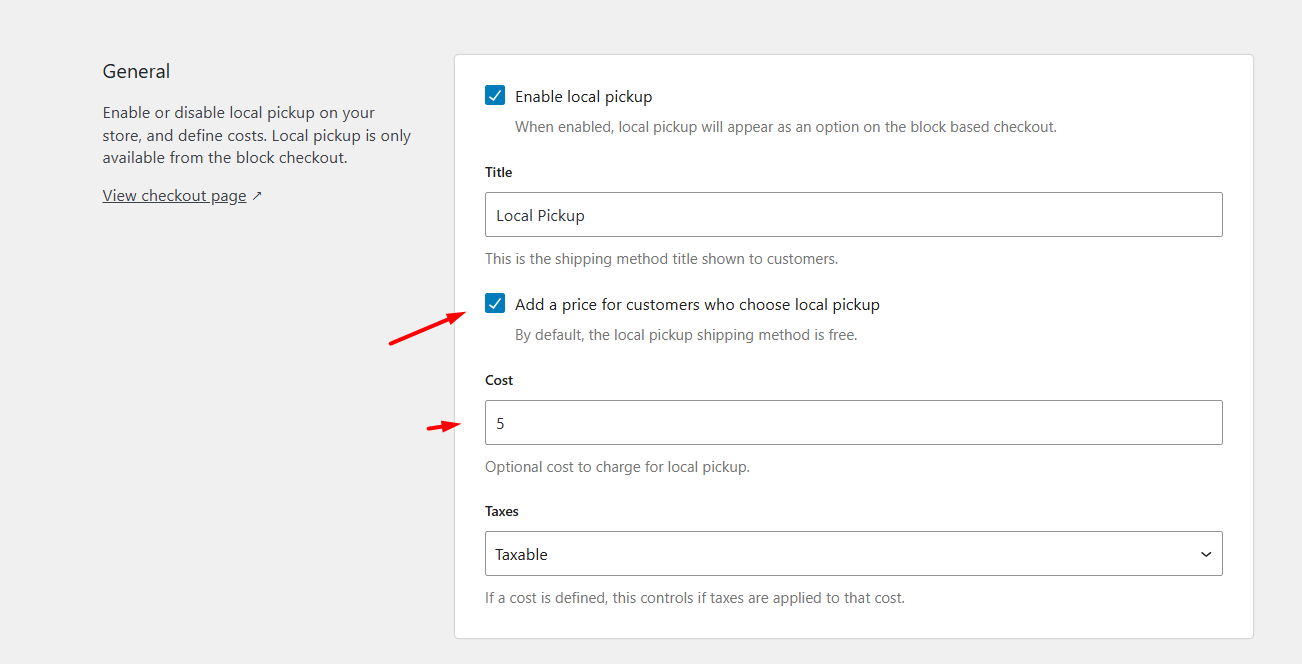
- Enter your desired shipping charge in the Cost box.
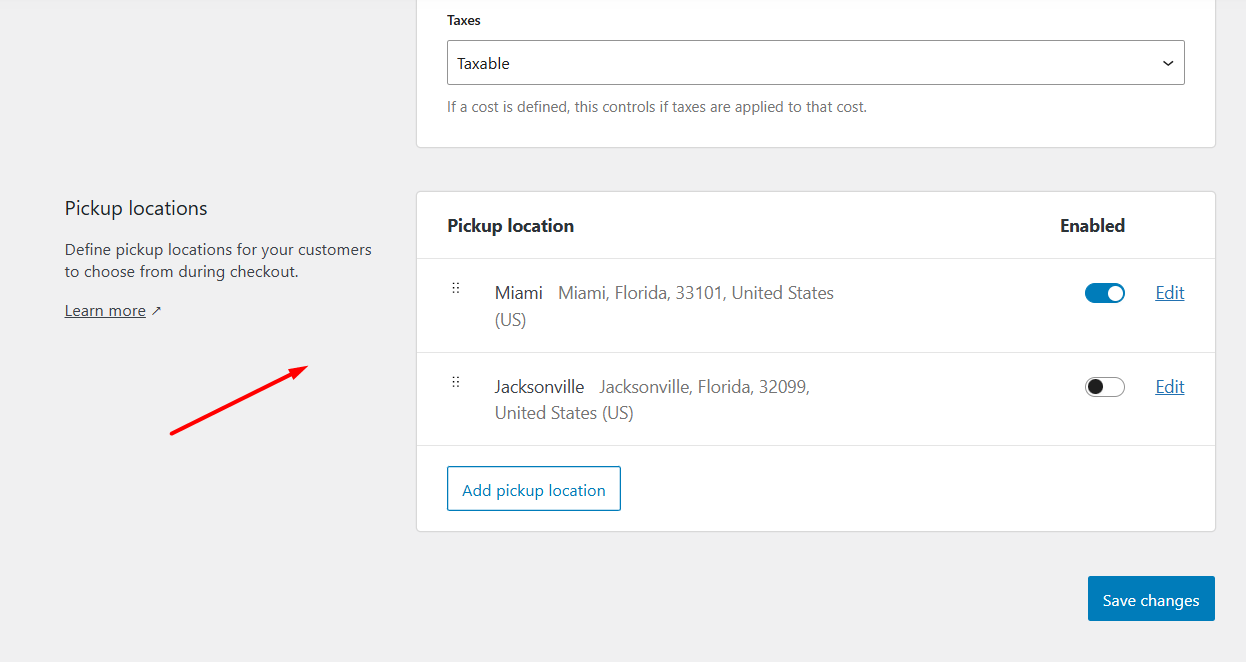
- Add your pickup locations from the Pickup locations section.
- Save your changes.
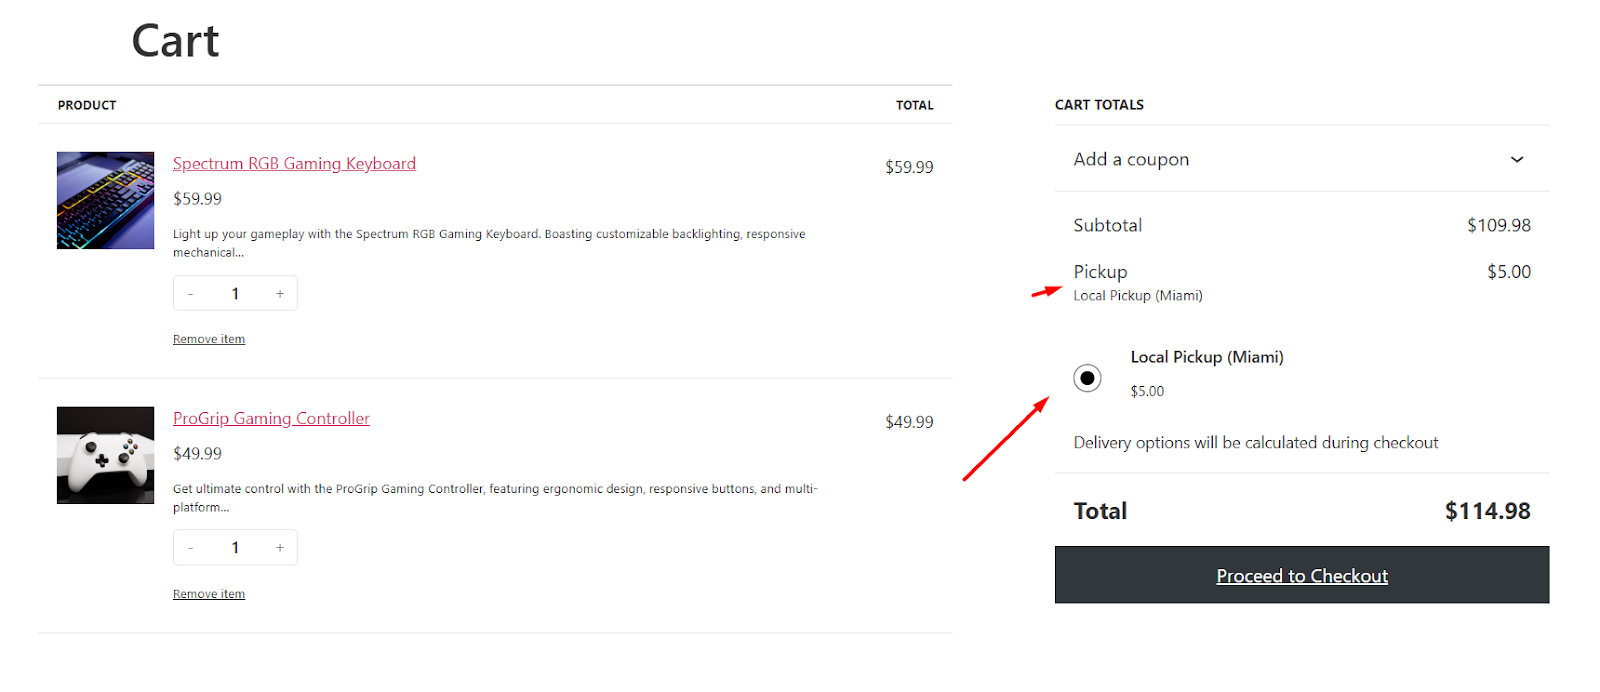
Real example:
- You bake custom cakes
- Local customers choose “Store pickup” at checkout
- Save $15 per order on delivery fees
- Build personal connections (“Hi Mary! Your unicorn cake is ready!”)
Why this works:
→ Eliminates shipping costs completely
→ Turns customers into regulars (75% repeat rate for pickup orders)
So this is pretty much how to add shipping rates in WooCommerce. But what about Table Rates?
Table rates let you charge different fees by location/weight, but they require plugins and complex setups.
For true beginners:
→ Start with flat rate or free shipping TODAY
→ Come back to table rates after 20 successful orders
Your 10-Minute Action Plan
- Choose one method (Flat rate for now)
- Set your fee ($3? $5? $8? Whatever covers your local postage)
- Test it: Add a product to cart → Go to checkout → See shipping appear!
Growth Stage: Smarter Fee Strategies
You’ve mastered basic shipping. Now let’s grow your strategy with methods that boost profits while keeping customers happy. These aren’t complicated – just logical next steps once you’re getting regular orders.
1. Cart Total Rules: Reward Big Spenders
The simple idea: Customers who spend more get better shipping deals. It encourages bigger orders while covering your actual costs.
Here’s how to set up WooCommerce shipping cost based on cart total without plugins:
- Go to WooCommerce > Settings > Shipping > Shipping Zones.
- Edit your shipping zone.
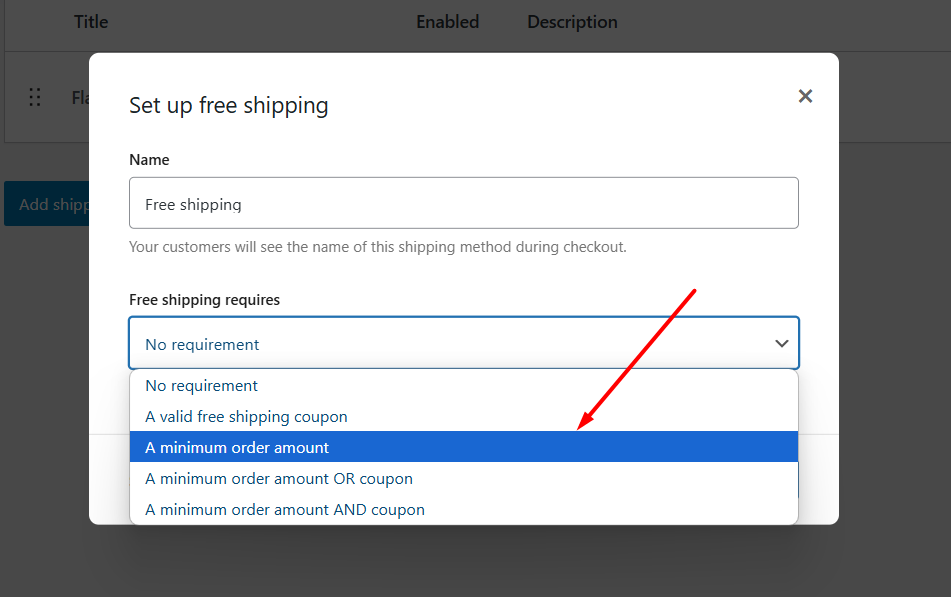
- Click Add Shipping Method, select the Free Shipping option, and continue.
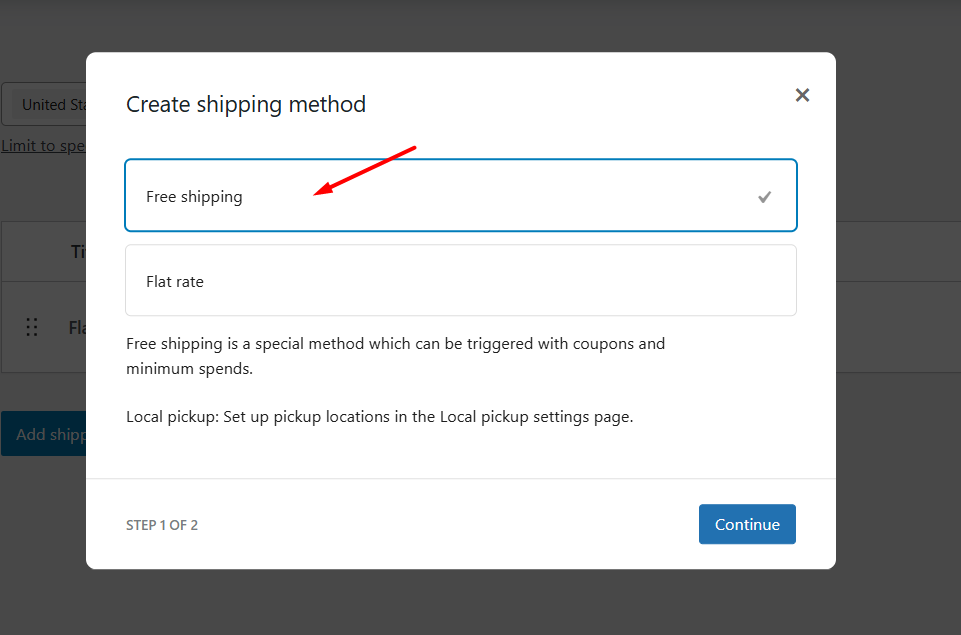
- From the Free Shipping Requires dropdown, select A Minimum Order Amount.
- Enter your threshold (e.g., 100 for $100Zx+).
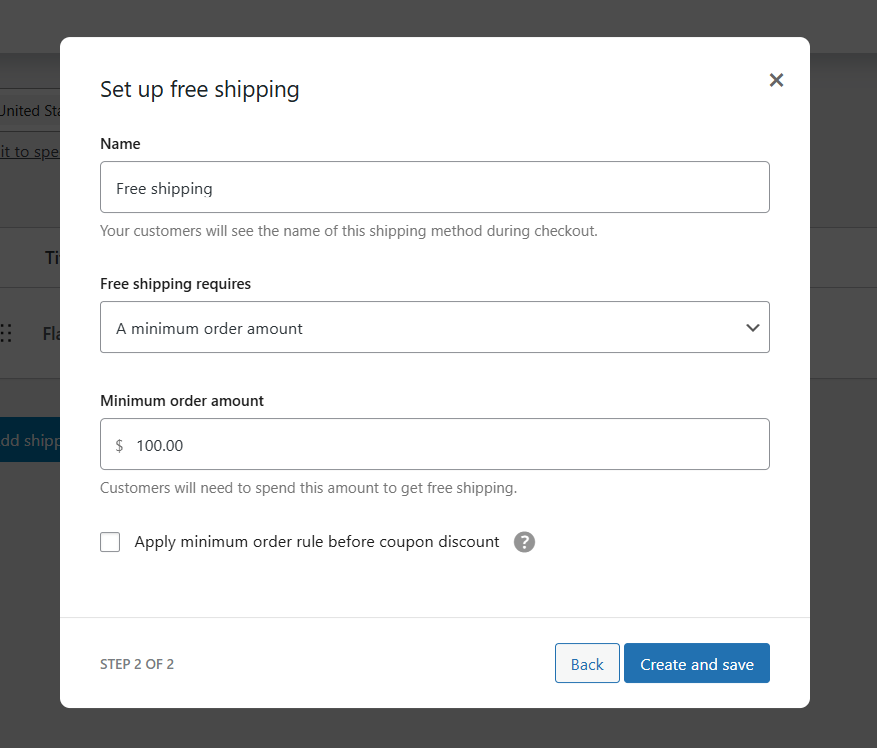
- Save changes and test from your storefront.
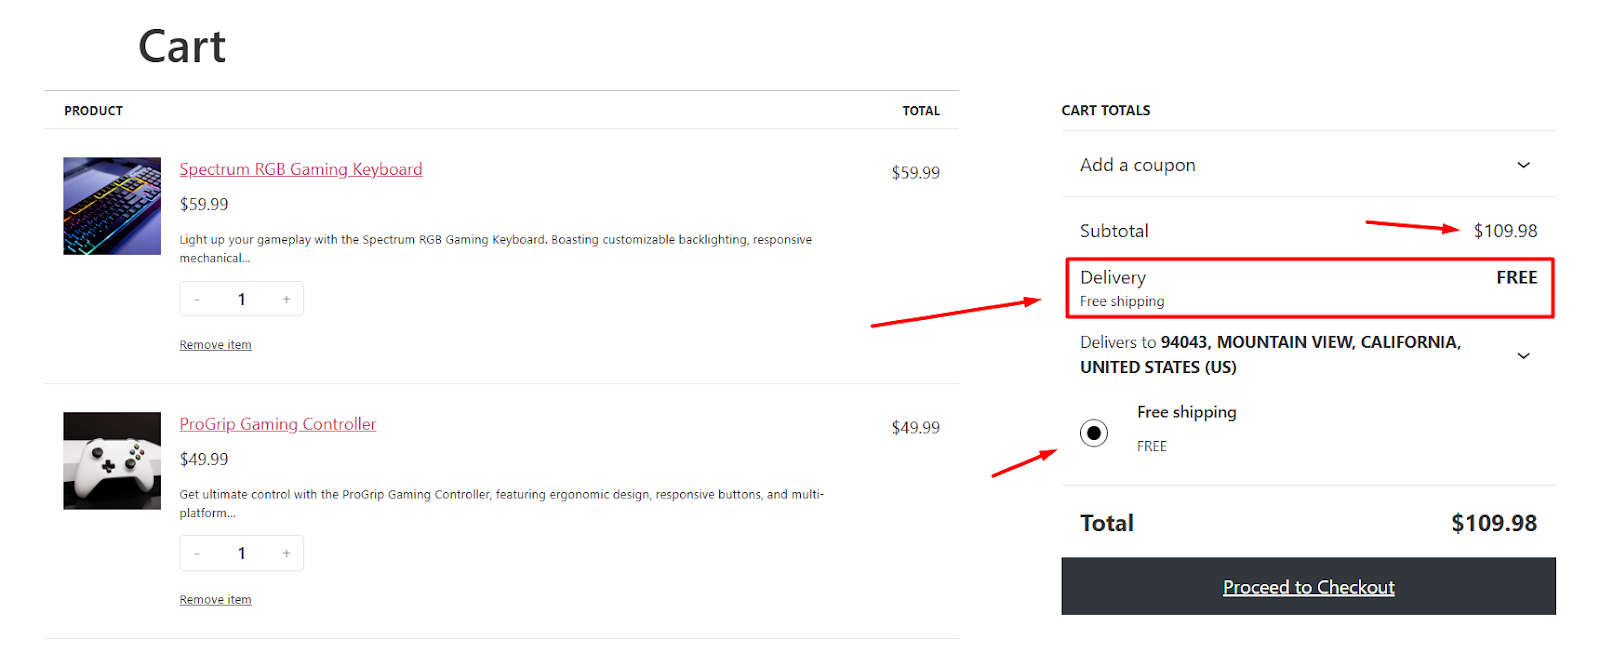
Real-world example:
- Before: Sarah’s plant shop charged $8 flat shipping
- After: Free shipping on orders over $75
- Result: Average order value increased 28% in 2 months
Why this works psychologically:
→ Customers add “one more item” to hit free shipping (80% of customers are happy to add more to their cart just to qualify for free shipping)
→ You recover shipping costs through extra sales
→ No complex math or plugins needed
Note: For setting up advanced condition-based shipping or conditional free shipping, you can use the free plugin called Disco. Here’s a walkthrough of more advanced strategies.
2. Per-Product Fees: Fair Pricing for Heavy Items
When you need this: Some products cost more to ship (furniture, fragile art, bulk orders). Shipping classes solve this fairly.
Let’s say you want to create 2 shipping classes for heavy and fragile items.
- “Heavy Items” (shipping cost: $15)
- “Fragile Items” (shipping cost: $10)
Step-by-step WooCommerce set shipping cost per product setup:
- Create shipping classes:
- Go to WooCommerce > Settings > Shipping > Shipping classes.

- Hit the Add Shipping Class button.
- Enter your ‘Heavy’ shipping class details – name, slug, and description.
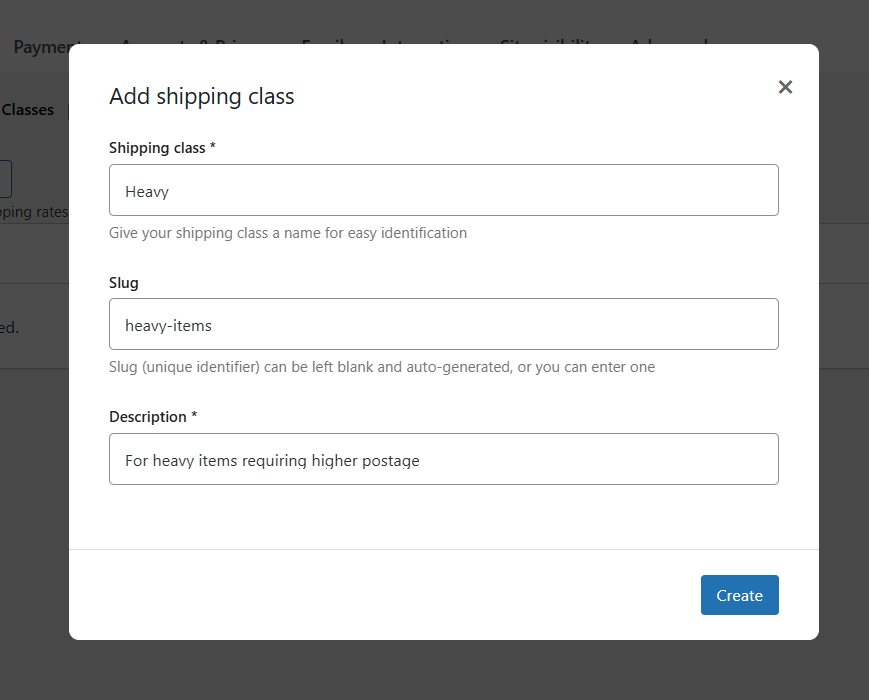
- Click Create to complete the step. Similarly, create the ‘Fragile’ class.

- Assign to products:
- Go to Products > All Products.
- Select the products and jump to their Product Data > Shipping tab.
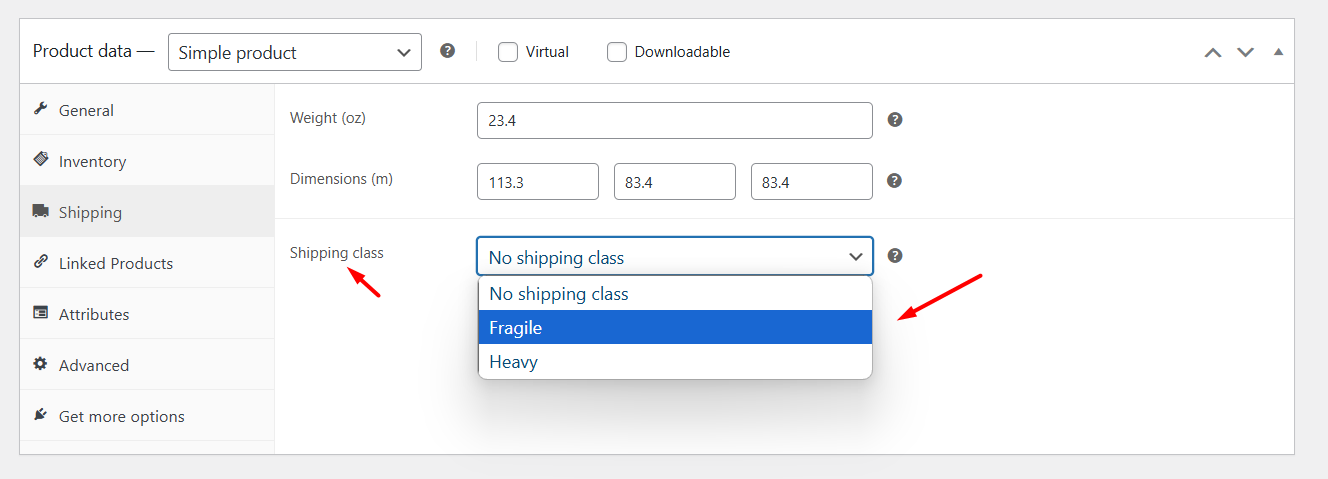
- Select the target shipping class and update the product. (e.g., assign “Heavy Items” to camera items)
- Configure calculations:
- Edit your Shipping zone and create or edit your flat rate shipping method.
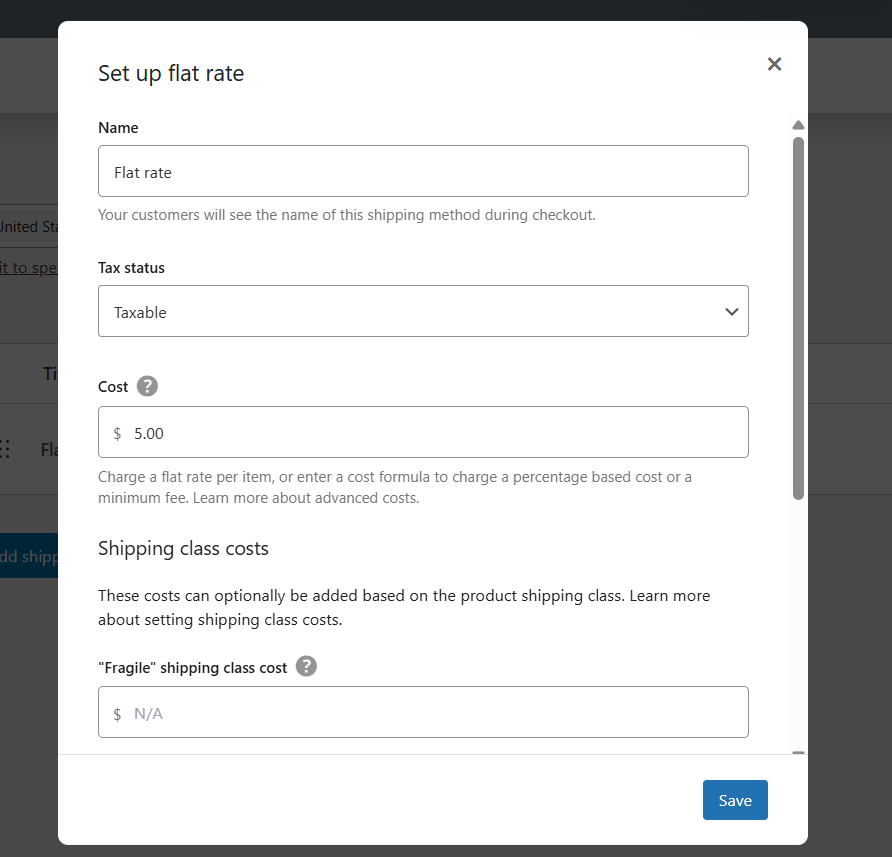
- Scroll down to the Shipping class costs section.
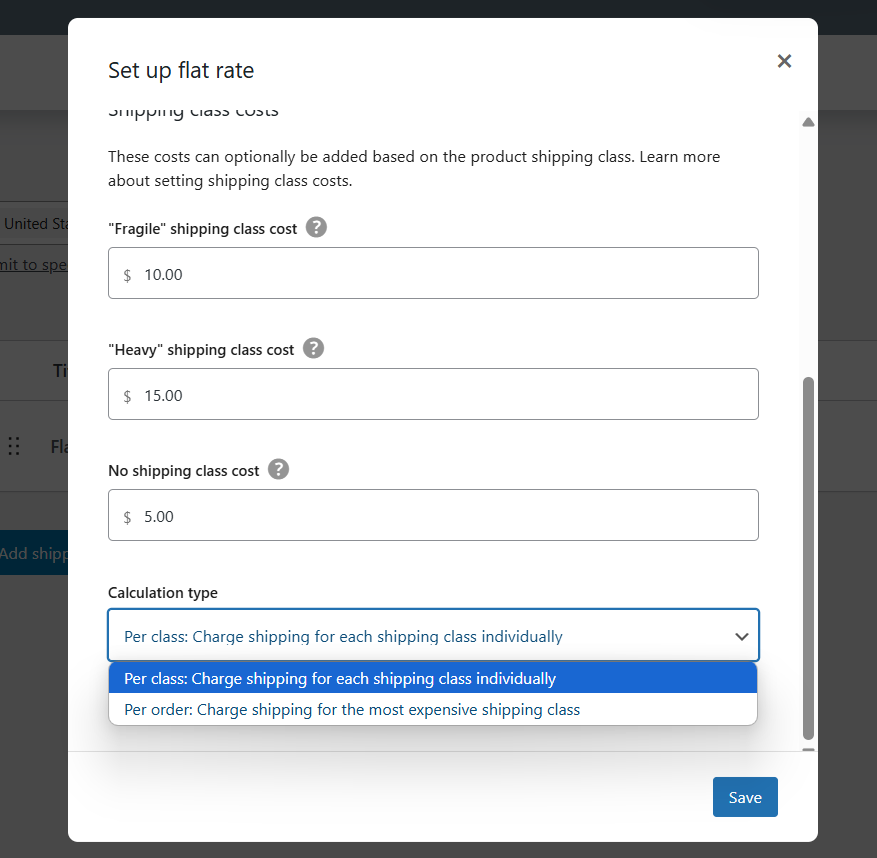
- Enter your extra costs per shipping class.
- Under the Calculation Type dropdown, pick your method
- Per class: Add all class fees (camera (Heavy) + lens (Fragile) = $15 + $10)
- Per order: Charge only highest fee (camera + lens = only $15)
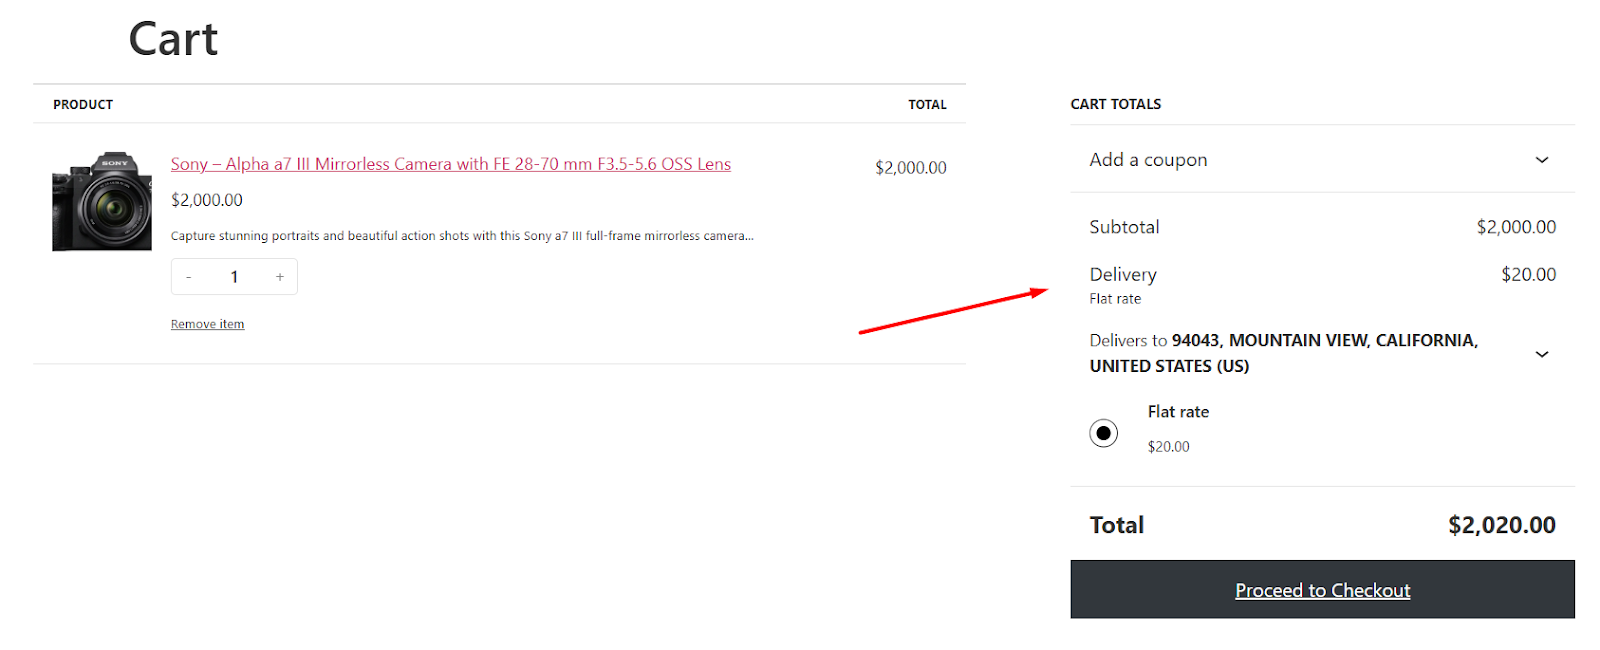
Real example from a camera store:
- Base cost: $5
- Heavy class fee: $15 (for professional cameras)
- Customer buys a heavy camera? Total shipping = $5 + $15 = $20
Visual tip: Add class badges to product pages:
<span class=”shipping-badge heavy-item”>+$15 shipping</span>
(Customers see fees before adding to the cart)
Case study:
- Tom’s pottery shop added “Fragile Items” class
- Charged $10 extra per fragile vase
- Shipping damage claims dropped 62% (covered extra packaging)
3. Cash on Delivery Surcharges: Handling Payment Risks
Why charge extra? COD orders have higher fraud risk and banking fees. A small surcharge protects your margins.
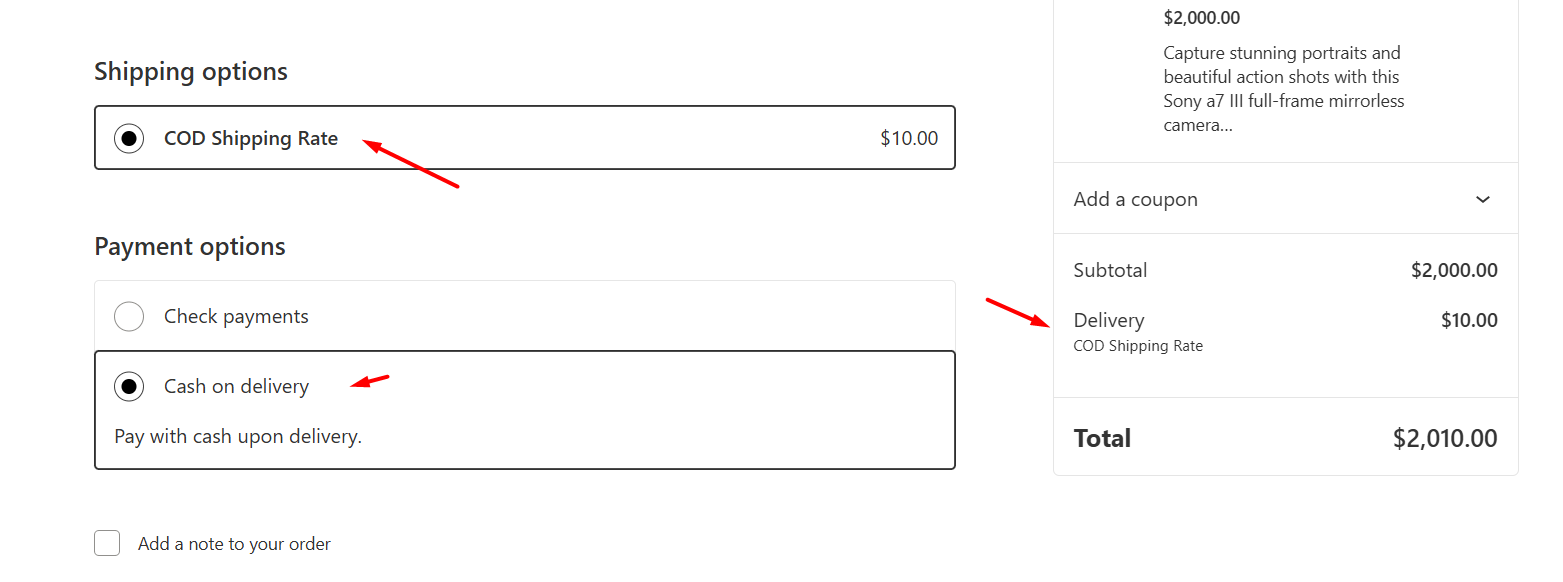
Here’s how to add cash-on-delivery charges in WooCommerce:
Configure COD Shipping Charges
Here’s how to add delivery charges in WooCommerce for COD payments.
- Edit your current zone or create a new one.
- Add a new Flat shipping method.
- Name it COD for reference.
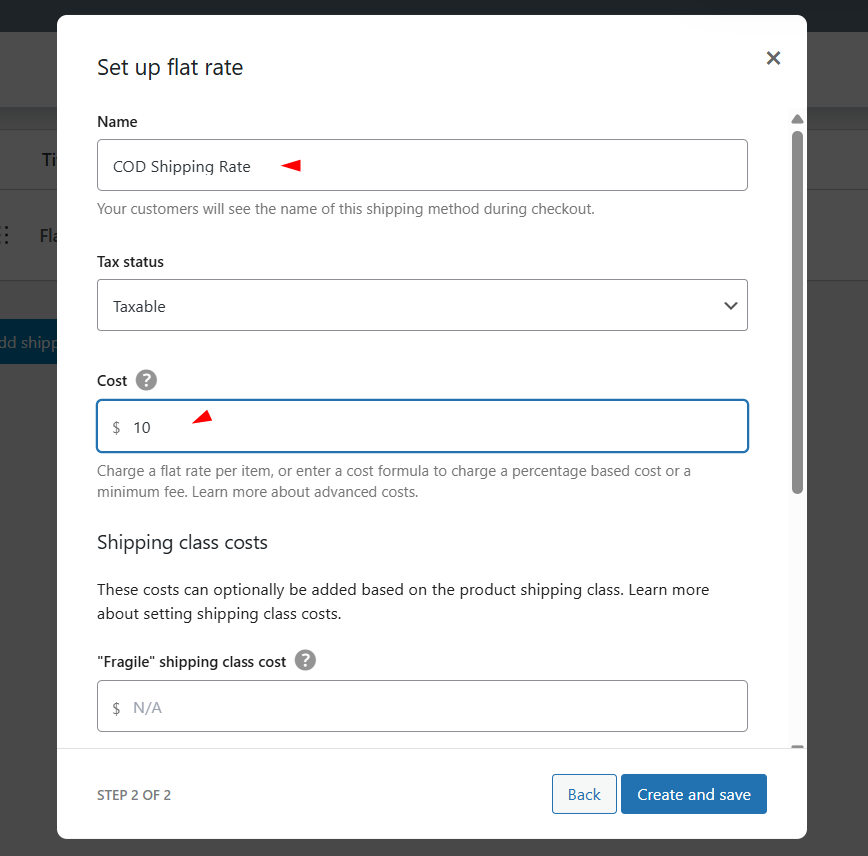
- Set the delivery charge for this payment method.
Enable Shipping Charges for Cash on Delivery Payment Method
- Go to WooCommerce > Settings > Payments and click the Take Offline Payments option.
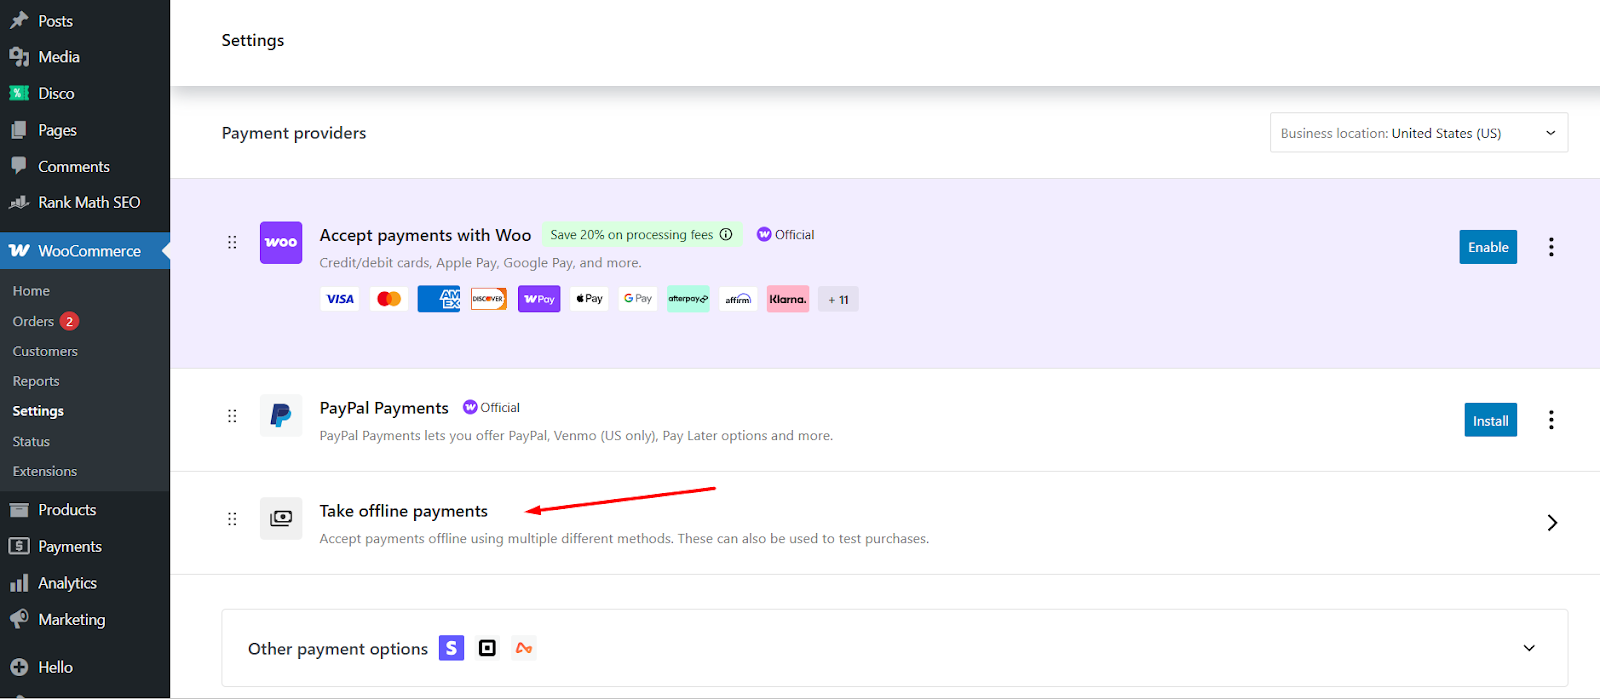
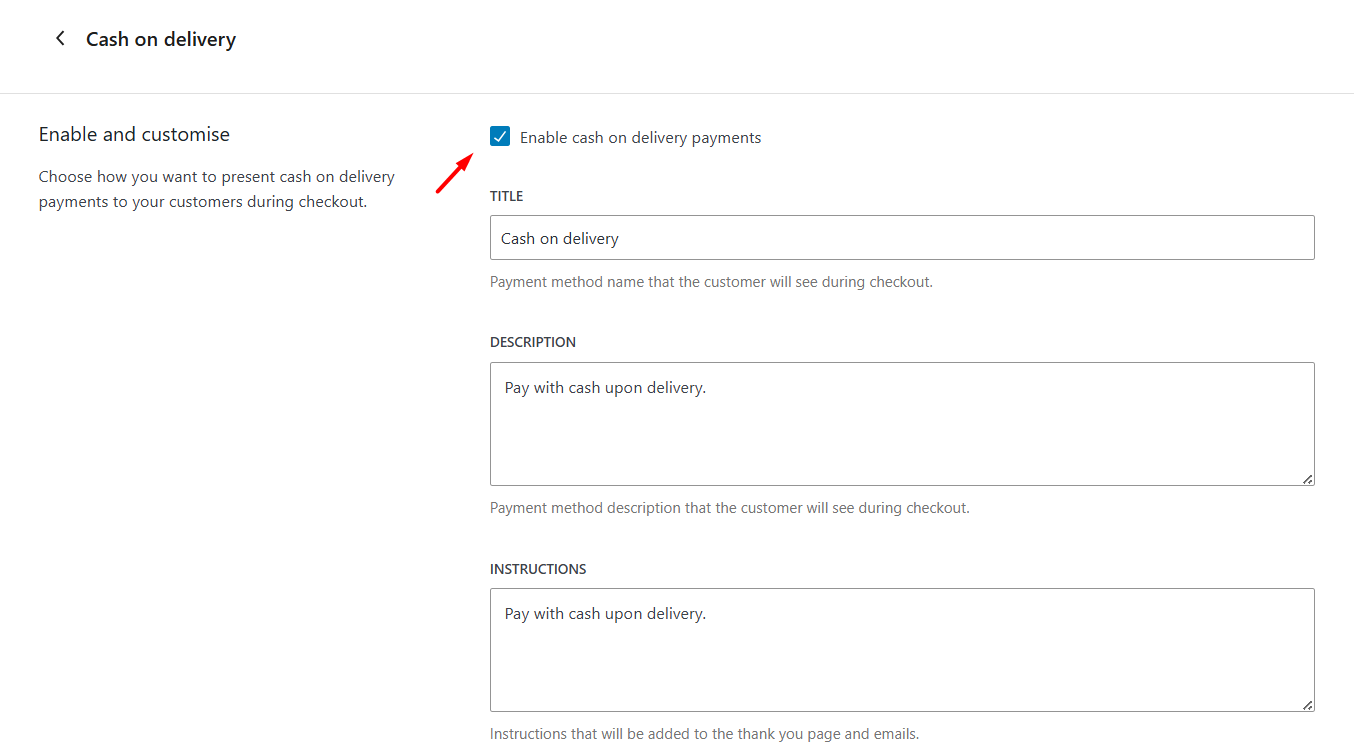
- Click the Manage button under Cash On Delivery.

- Enable COD from the top check box.
- Scroll down to the Enable for shipping methods dropdown and select the flat rate method you created for COD.
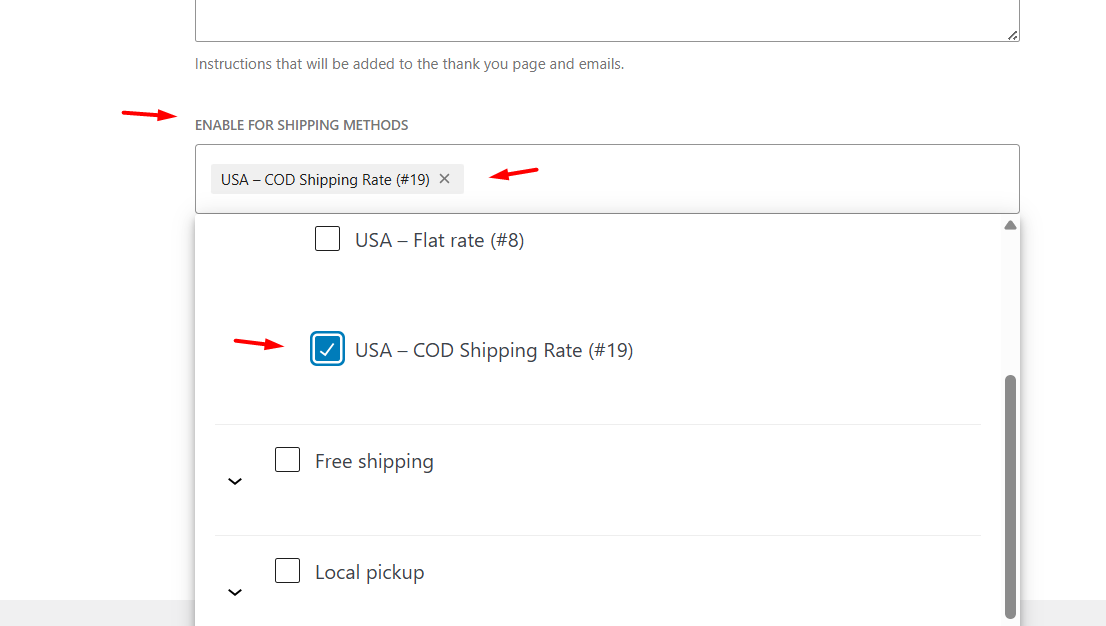
- Save changes and test from the front.
Transparency tip – avoid checkout surprises:
→ Display fee early in cart:
add_filter('woocommerce_cod_title', 'show_cod_fee_in_title');

function show_cod_fee_in_title($title) {

return $title . ' (+$2 fee)';

}
*(This simple snippet changes “Cash on Delivery” to “Cash on Delivery (+$2 fee)” everywhere)*
Real impact:
- Maria’s electronics store added 3% COD fee
- 80% of COD customers switched to online payments
- Payment processing costs decreased 45%
Golden Rules for Smarter Fees
- Test with real orders: Place test orders as customer
- Communicate clearly: Explain fees on product pages
- Review quarterly: Adjust fees as shipping costs change
Formula Power: Smarter Math for Growing Stores
Let’s be honest: When your store grows, a one-size-fits-all shipping fee stops working. That’s where WooCommerce’s little-known formula magic comes in. Think of these as simple math shortcuts that automatically adjust fees based on what customers buy.
Your Formula Cheat Sheet
Here’s all the math (WooCommerce flat rate shipping formulas) you’ll ever need on one table:
| When You Want To… | Formula Shortcut | Real-Life Use Case |
| Charge per item | 5 + (2 × [qty]) | Bookstore: $5 base + $2 per book → 3 books = $11 shipping |
| Add % of order value | [fee percent=”5″] | Jewelry store: 5% order fee → $500 necklace = $25 shipping |
| Never charge too little | [fee percent=”10″ min_fee=”5″] | Bakery: 10% fee but minimum $5 → $30 cake = $5 (not $3) |
How to Add Delivery Charges in WooCommerce Using Formulas?
Step 1: Find the cost field
Go to your flat rate shipping method → See “Cost”? That’s your formula playground.
Step 2: Enter your formula
Just type the WooCommerce shipping cost formula like texting a friend:
- For per-book fees: 5 + (2 * [qty])
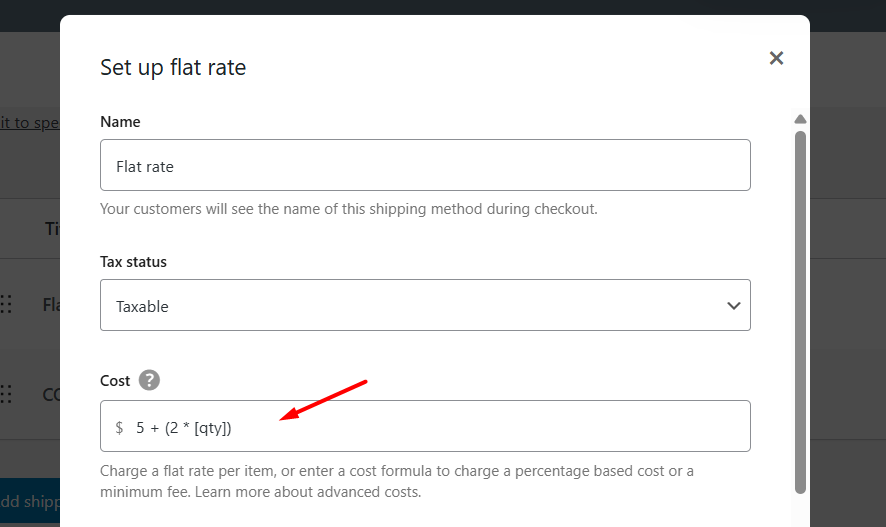
- For 5% order fees: [fee percent=”5″]
Step 3: Avoid rookie mistakes
→ Use asterisks * for multiplication (not ×)
→ Use quotes around numbers: percent=”5″ (not percent=5)
→ Test with 1-item and 10-item carts
Real Store Examples
Case 1: Mike’s Coffee Beans
- Problem: Charged flat $5 shipping – lost money on large orders
- Solution: 3 + (0.5 * [qty])
→ 1 bag = $3.50
→ 10 bags = $8 (covers actual box cost) - Result: Shipping losses dropped 62%
Case 2: Elena’s Flower Shop
- Problem: 20% shipping fee scared small orders
- Solution: [fee percent=”20″ min_fee=”4″ max_fee=”15″]
→ $10 bouquet = $4 fee (not $2)
→ $100 wedding order = $15 fee (not $20) - Result: Cart abandonment decreased by 31%
Deep dive: For complex setups like table rate shipping, see our Complete Table Rate Shipping Guide.
Fix Common Mistakes: Quick Troubleshooting
Let’s cut to the chase: Shipping issues can ruin your day. After helping 500+ stores, here are the top fixes we’ve seen work instantly:
“Shipping options not showing?”
→ 90% of the time: Your customer’s address isn’t in any shipping zone.
Fix: Create a “Rest of World” zone as a safety net.
“Fees wrong at checkout?”
→ Usually, caching or stale data.
Fix: Go to WooCommerce > Status > Tools > Clear transients.
“COD fee missing?”
→ Payment gateway not enabled for the zone.
Fix: Edit zone → Enable “Cash on Delivery” under payment methods.
Real-life save: Mike’s store “lost” shipping for a week. Cleared transients → fixed in 30 seconds. Don’t panic – try these first!
Wrap Up
So now you know how to add delivery charges in WooCommerce.
Overwhelmed? Just follow this sequence:
- START TODAY:
→ Set flat rate shipping ($5 or $8)
→ Goal: Get first 10 orders shipped - OPTIMIZE WEEK 2:
→ Add free shipping over $75
→ Goal: Boost average order value 20% - SCALE MONTH 1:
→ Create “Heavy Items” class (+$10 fee)
→ Goal: Stop losing money on bulky products
Shipping isn’t about perfection; it’s about progress. Play with different strategies and find out what works best for you and yields the most profit for you and your customers. You’ve got this!
