You can’t run a successful WooCommerce store without working payments.
Let’s be real – if customers can’t pay you, your business is just a digital window display.
Worse, a broken checkout experience will make buyers vanish faster than a limited-time offer.
This guide shows exactly how to add payment methods in WooCommerce – whether you need:
✓ Basic built-in options like Cash on Delivery
✓ Bank transfers (BACS)
✓ Popular gateways (Stripe, PayPal)
✓ Or custom solutions
Follow these steps to start accepting real orders today.
Where Do I Add a Payment Method in WooCommerce?
(The absolute first step every store owner needs)
- Log in to your WordPress panel.
- Navigate to WooCommerce > Settings > Payments.
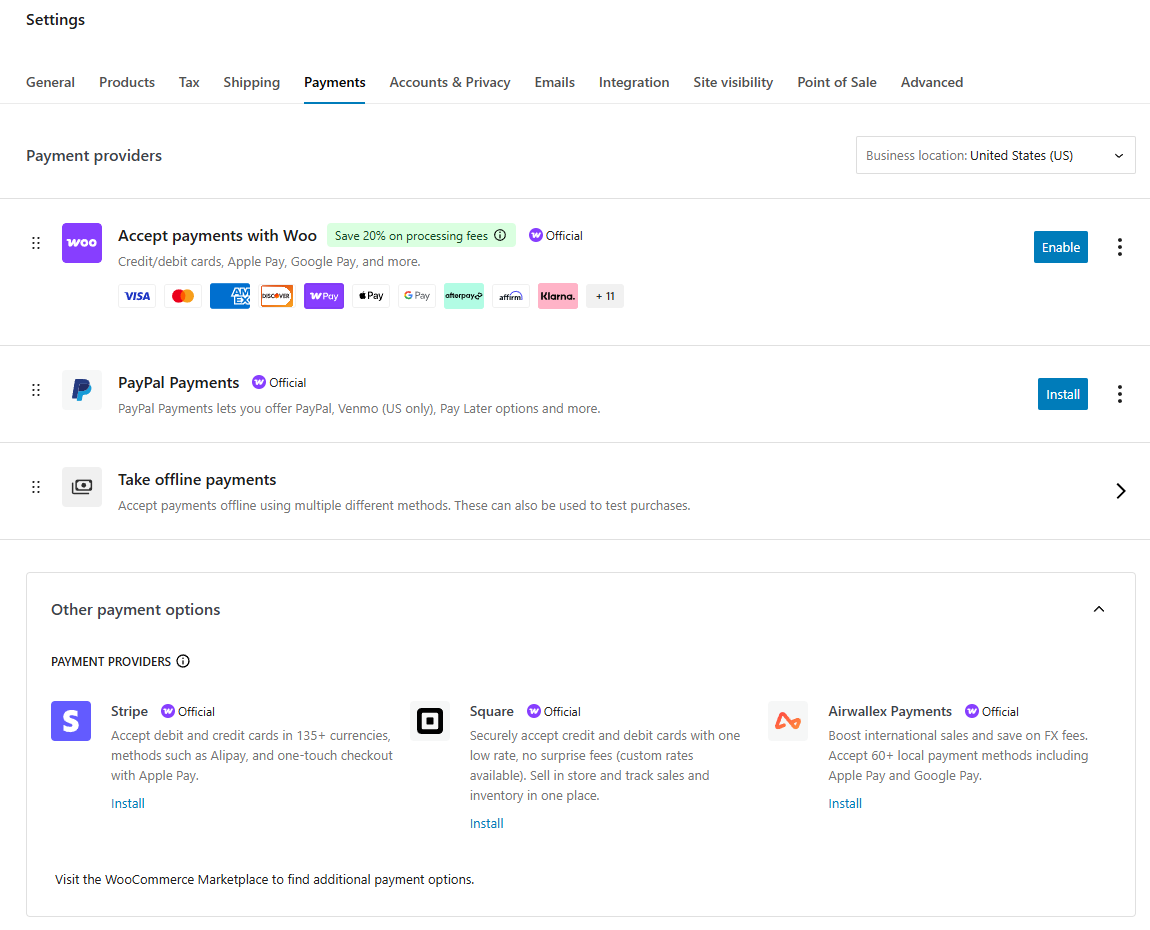
This is your payment gateway headquarters. You’ll see every available gateway listed right there – whether it’s built-in or something you added later.
Available Buttons
Enable: This button activates the payment method immediately.
Manage: This button takes you to the gateway configuration page, where you need to configure credentials, instructions, fees, and display labels. For gateways that use API keys (for example, Stripe), the Manage screen is where you paste live and test keys, enable Webhooks, and set test mode
Install: Means this gateway isn’t available yet. You need to install that plugin or method to make it available, and after that, use the Manage and Enable buttons to activate the payment method.
Payment Gateway Types Explained
There are two types of payment gateways, built-in and external.
Built-in options (ready immediately)
You can find them under Take Offline Payments in the Payments page.
- Cash on Delivery (COD) – no account needed
- Bank transfers (BACS) – just add your IBAN details
- Check payments – for local pickup orders
External gateways (require setup)
You need to install and configure third-party plugins to activate any of these payment methods.
- PayPal, Stripe, Amazon Pay – need business accounts
- Square, Authorize.Net – require plugin installation
- Regional processors (iDEAL, PayNow) – need country verification
Non-Negotiable Requirements
You must make sure the following before adding or configuring gateways
SSL Certificate
- SSL showcases the safety and security of a site. Without this padlock 🔒 in the browser bar, most payment processors won’t work
- All hosting providers nowadays provide this out of the box. You can install free certificates in case your host doesn’t provide one.
Business Accounts
- You must have Stripe/PayPal verified business profiles, not personal ones.
- Keep tax IDs and bank details handy during setup.
Currency Consistency
- Your store’s default currency must match your payment processor’s base currency
(Find and set default currency from WooCommerce > Settings > General > Currency)
How to Add Payment Method in WooCommerce: Built-in Options
Here are the steps to WooCommerce payment methods setup using built-in options.
- Go to WooCommerce > Settings > Payments.
- Click on the Take offline payments option.
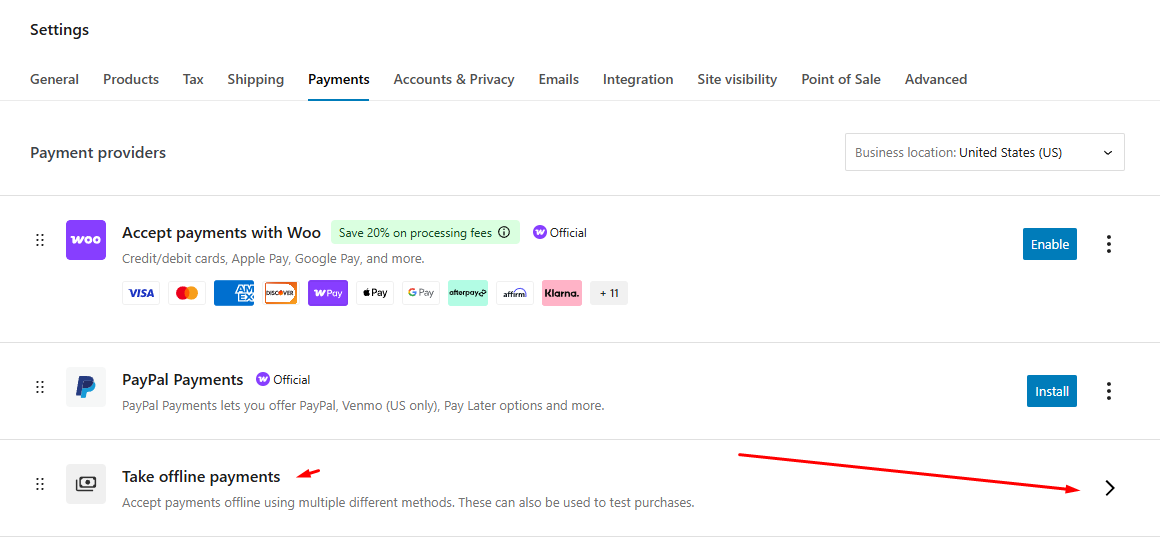
- The built-in options are –
- Direct Bank Transfer
- Check Payments
- Cash on Delivery (COD)
How to Add Bank Transfer Payment Method in WooCommerce?
Here’s how to configure the bank transfer payment gateway in WooCommerce.
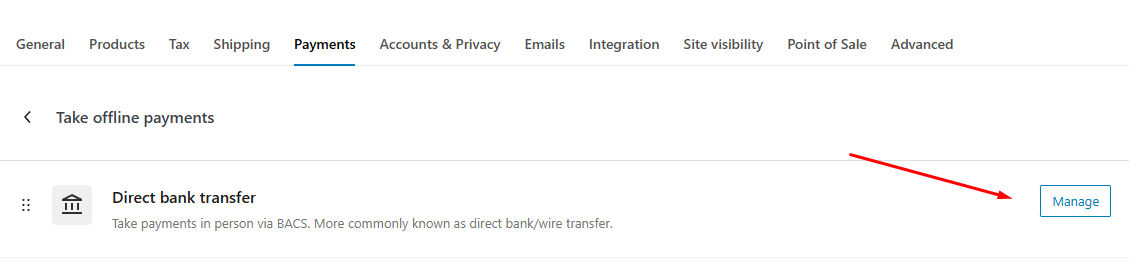
- Click the Enable button beside the Direct Bank Transfer option.
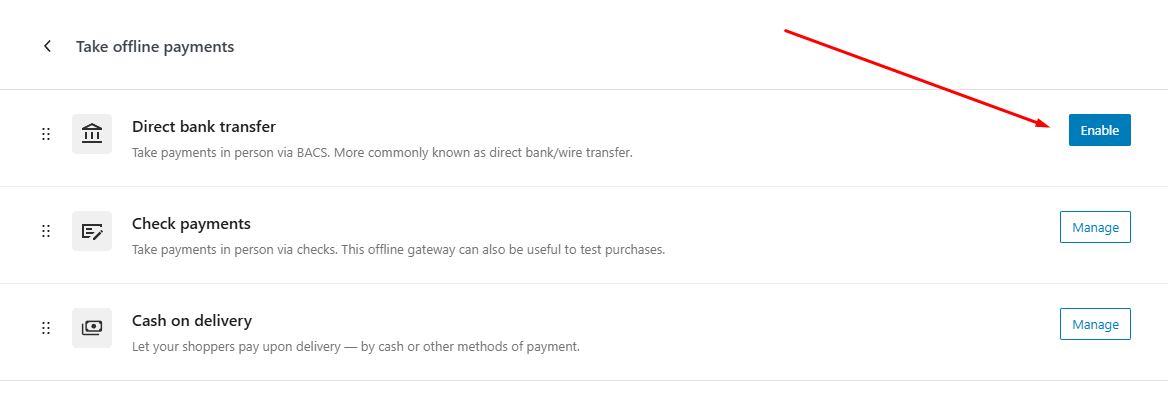
- Now, click the Manage button.
- Give your payment method a title. Customers will see this as the payment method name during checkout.
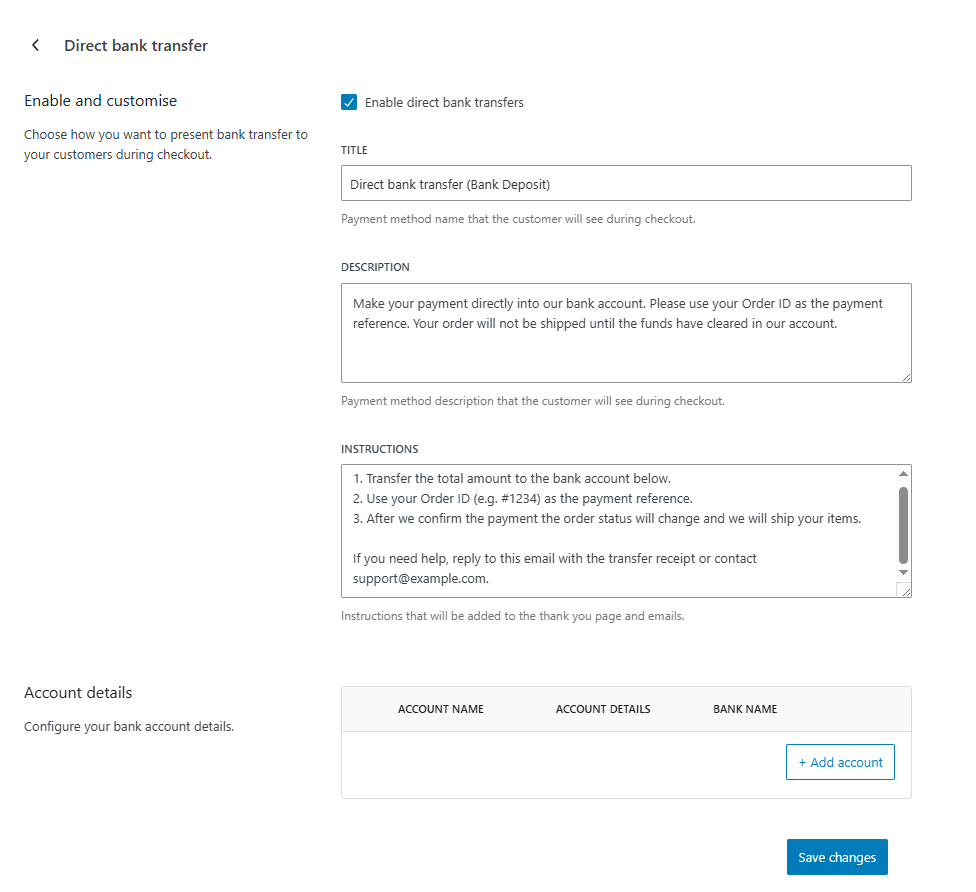
- Provide appropriate descriptions and instructions for payment.
- Click the Add Account button in the Account Details section.
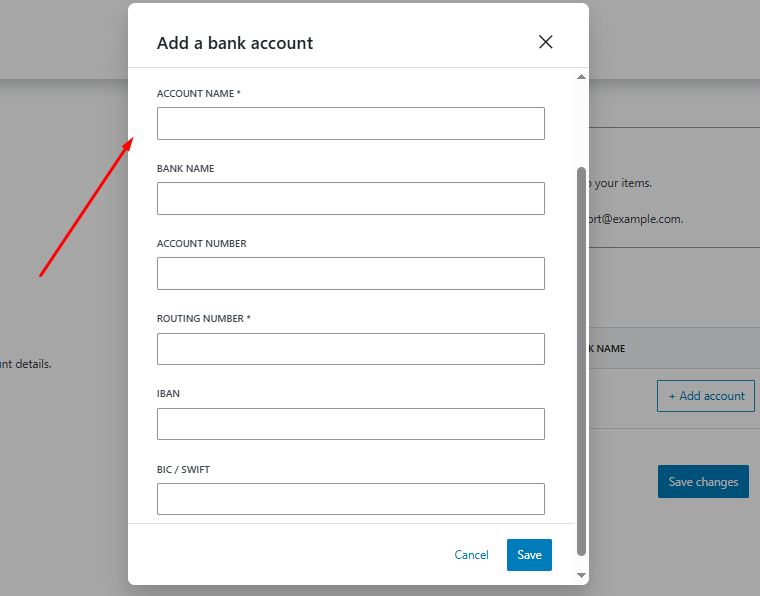
- Add your bank account details where you want to receive the payment.
- Save all your changes.
If you accept multiple currencies or have multiple bank accounts, add one row per account and label the currency clearly. This is how to add payment method in WooCommerce to accept bank transfers.
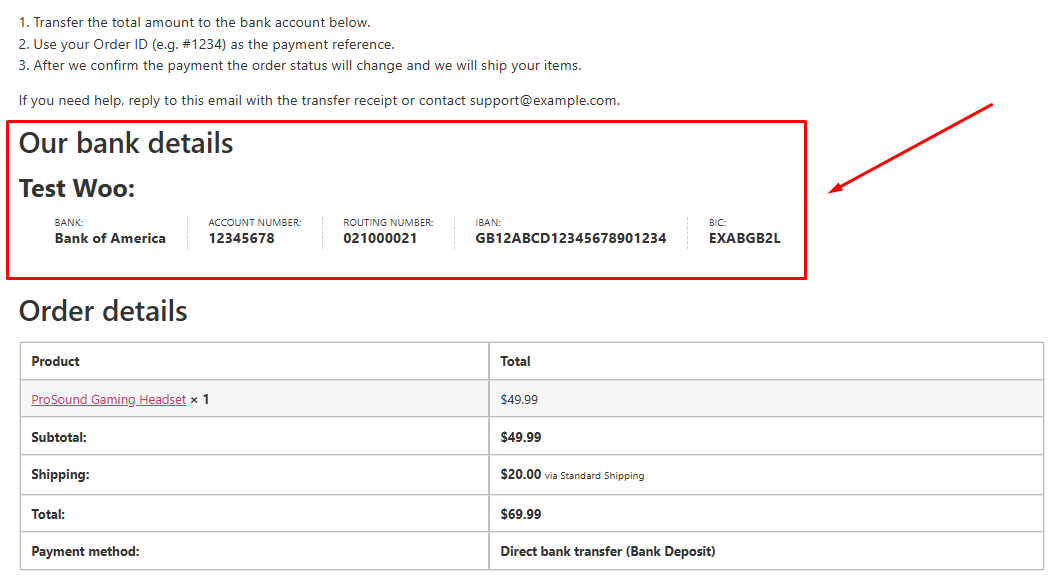
WooCommerce will provide the bank account details after a customer completes the purchase by clicking the Place Order button at the checkout page.
How to Add Cash On Delivery Method in WooCommerce?
Here’s how to add payment method in WooCommerce when you want customers to pay upon receiving the products.
- Inside the Take offline payments page, click Enable beside the Cash On Delivery option.
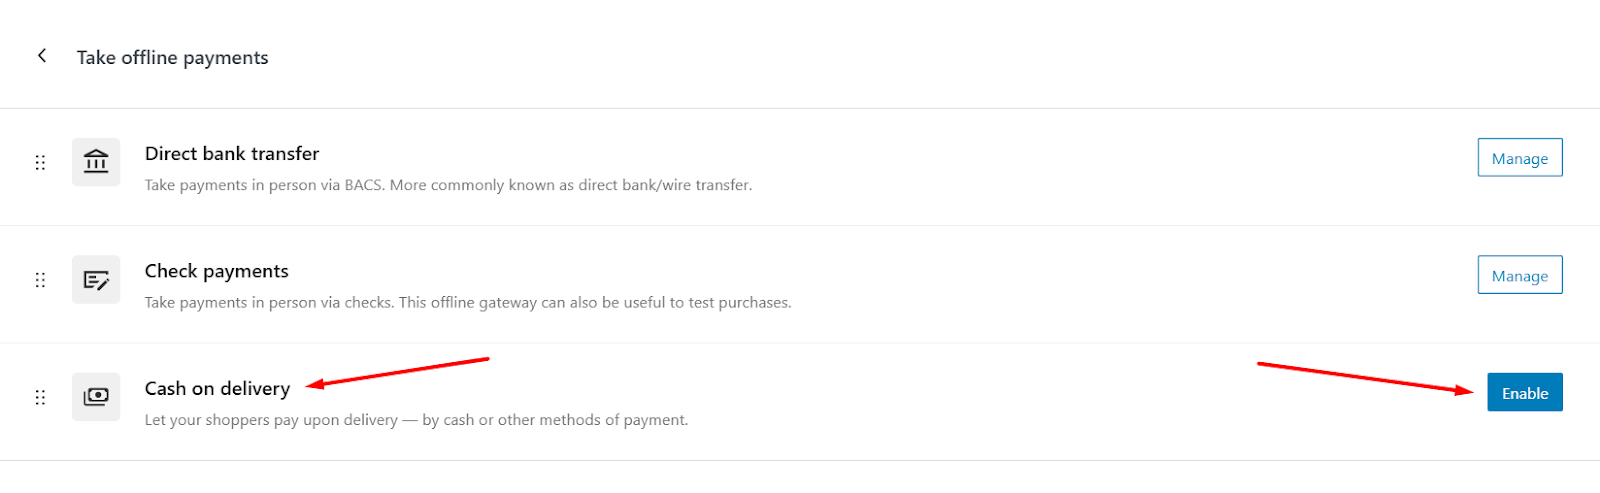
- Once enabled, click the Manage button.
- In the following page, you can set your COD title, description, and instructions.
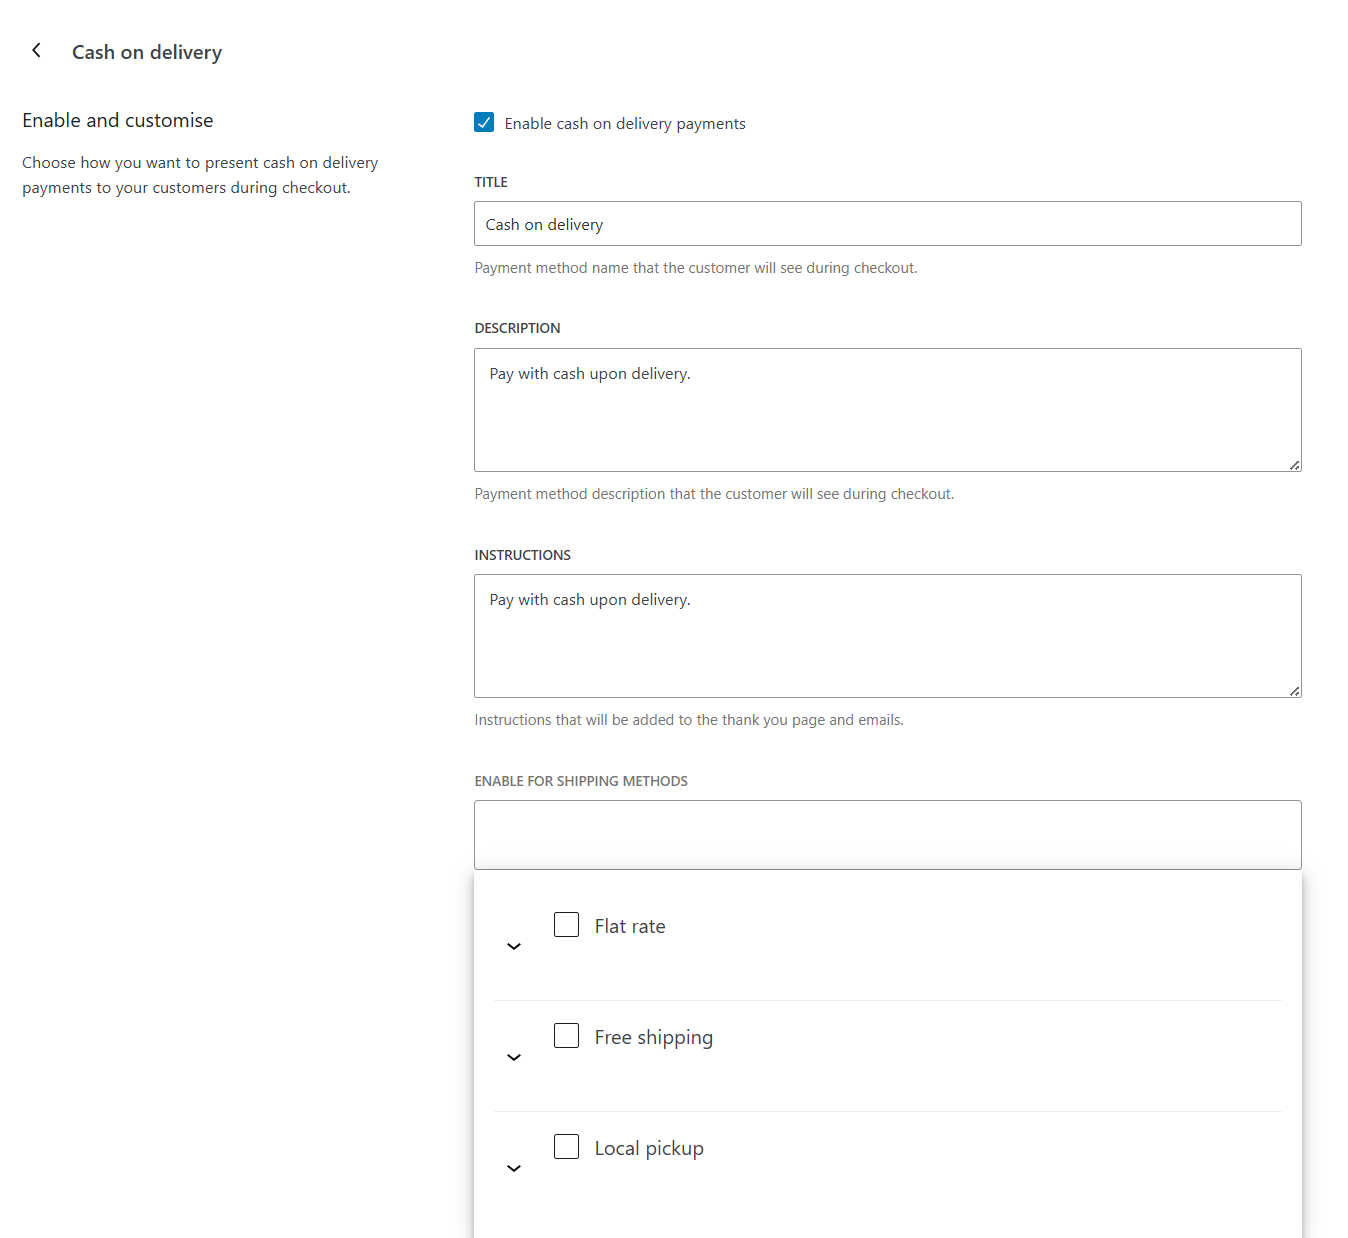
- Additionally, you can set this payment gateway for specific shipping methods.
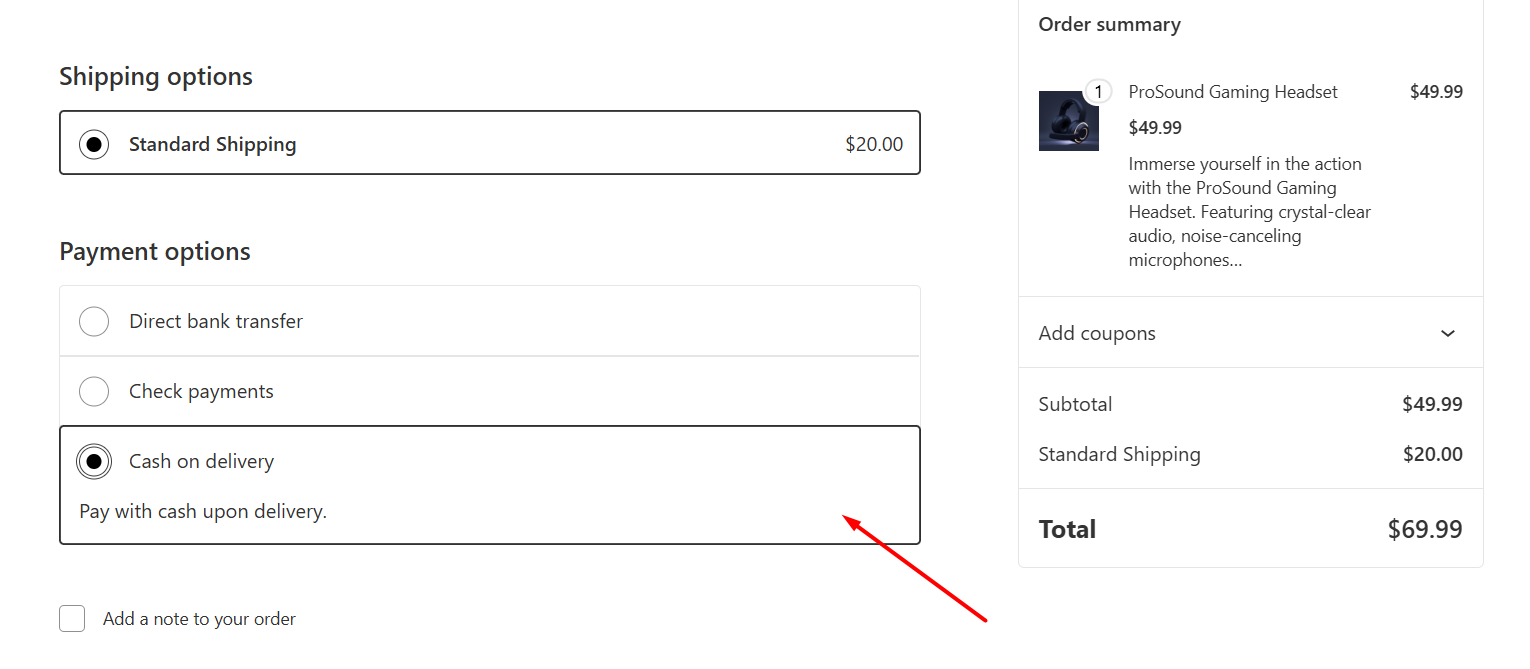
- The checkout page will now display and offer the COD (Cash On Delivery) option.
In addition to the above two options, WooCommerce also allows you to take Check payments. You have to provide your mailing address where they will send the check.
The order will be on hold until you receive and verify the check. This is a complete offline and lengthy process.
Customers worldwide prefer faster and secure payment gateways such as credit/debit card payment, PayPal, etc, where payment is processed immediately. And that’s what we will cover next.
How to Add Payment Method in WooCommerce: External Options
As we all know, WordPress and WooCommerce reign supreme for their flexibility. There are a plethora of payment plugins available for you to integrate any payment gateway into your WooCommerce store.
Whether you want to add the most popular gateway, Stripe, or accept mobile digital wallets such as Google Pay or Apple Pay, WooCommerce has your back.
The greatest news is that WooCommerce now has its own dedicated payment processor plugin called WooPayments that packs all possible gateways, including Stripe card payments, Apple/GPay, and many more.
How to Set Up WooCommerce Payments (WooPayments)
WooCommerce Payments, now called WooPayments, is WooCommerce’s own official payment processor. It bundles credit and debit cards, Apple Pay, Google Pay, and several local payment methods into a single plugin, so you don’t need to juggle separate gateway plugins for each option.
- Go to Plugins > Add Plugin and search for WooPayments.
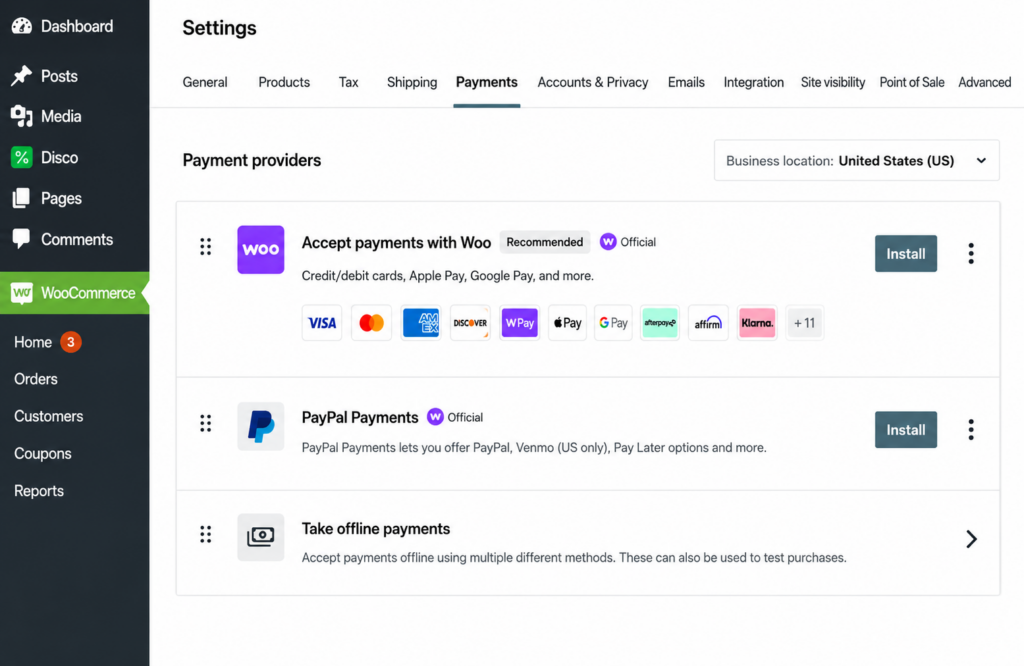
- You’ll see it listed as “Accept payments with Woo,” tagged Recommended and Official, right at the top of the Payment providers list.
- The logo strip shows what’s bundled in: Visa, Mastercard, Amex,
Discover, WPay, Apple Pay, Google Pay, and buy-now-pay-later options
like Afterpay, Affirm, and Klarna. - Click Install to add the plugin, then follow the prompts to connect a
business account. - Once connected, click Manage to set your deposit schedule, supported
currencies, and which local payment methods to display.
WooCommerce Payments vs. a separate Stripe plugin
If you want one dashboard for payments, deposits, and disputes without managing a third-party account separately, WooPayments is the simpler route. If you already have an established Stripe account with custom logic, or you need a feature WooPayments doesn’t support yet, a dedicated plugin like Payment Plugins for Stripe (covered below) gives you more control.
Where to check WooPayments status
If you or a customer can’t find “WooCommerce Payments” in your settings, confirm the plugin is active under Plugins > Installed Plugins, and that your account setup was completed (an incomplete connection is the most common reason it doesn’t appear on the checkout page).
How to Add Stripe Payment Method in WooCommerce Step By Step?
You can simply install and connect WooPayments, which comes integrated with Stripe. However, if you want to set up Stripe separately, follow these WooCommerce Stripe setup guide steps.
- Go to Plugins > Add Plugin.
- We will go with the plugin – Payment Plugins for Stripe. This one is better than the official plugin.
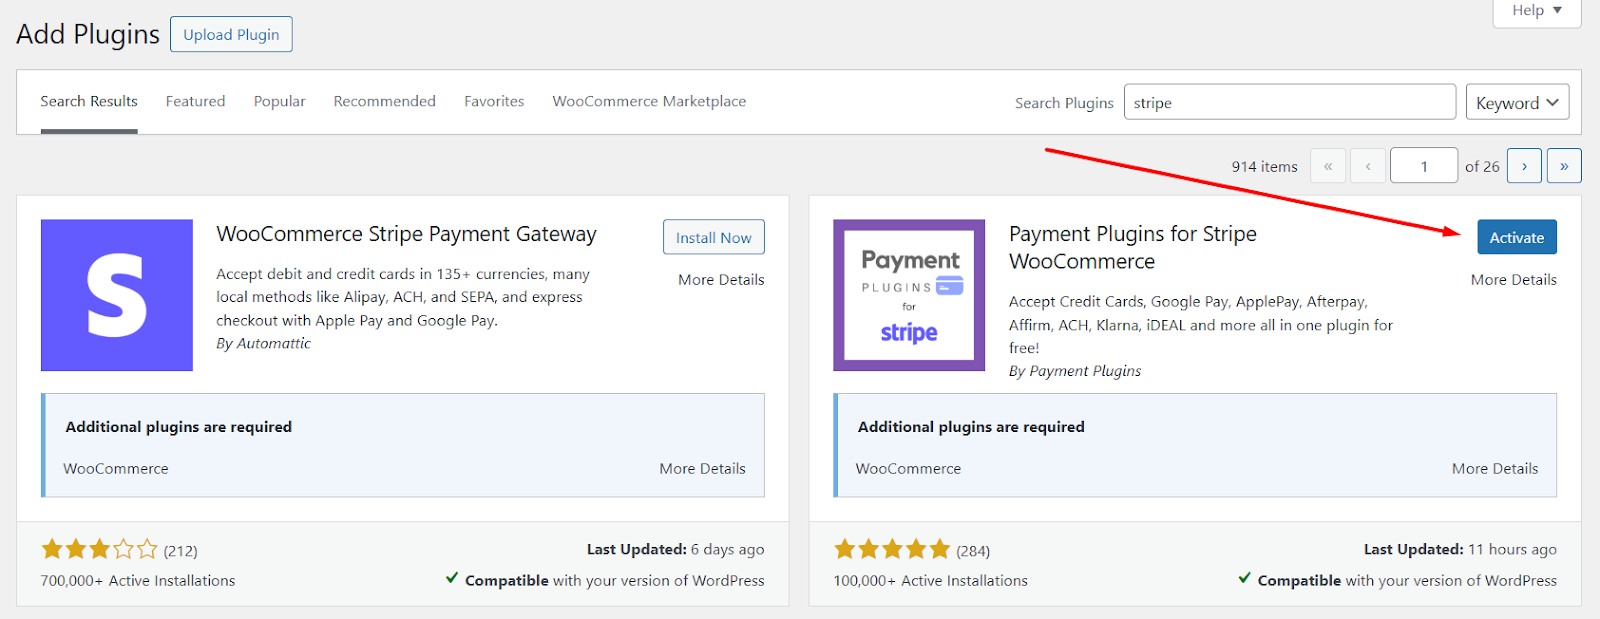
- After you activate, go to WooCommerce > Settings > Payments. The plugin adds a wide range of payment gateways to your WooCommerce setup.
- To accept Card payments, Enable the Credit Cards (Stripe) by Payment Plugins option.
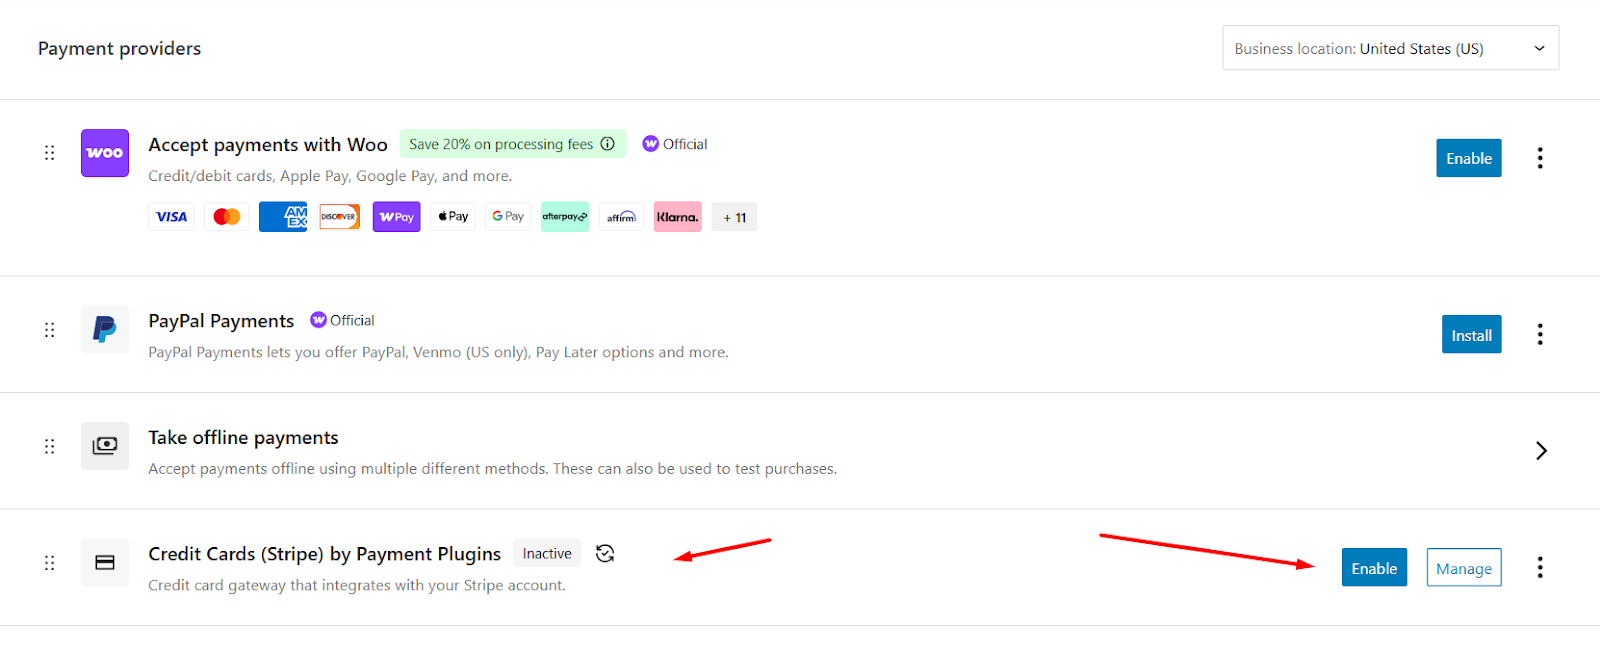
- Next, click Manage and access the API Settings tab.
- Select your Mode: Live/Test.
- Hit the Connect button. This will redirect to the Stripe login page. You can register or log in to your existing Stripe account.
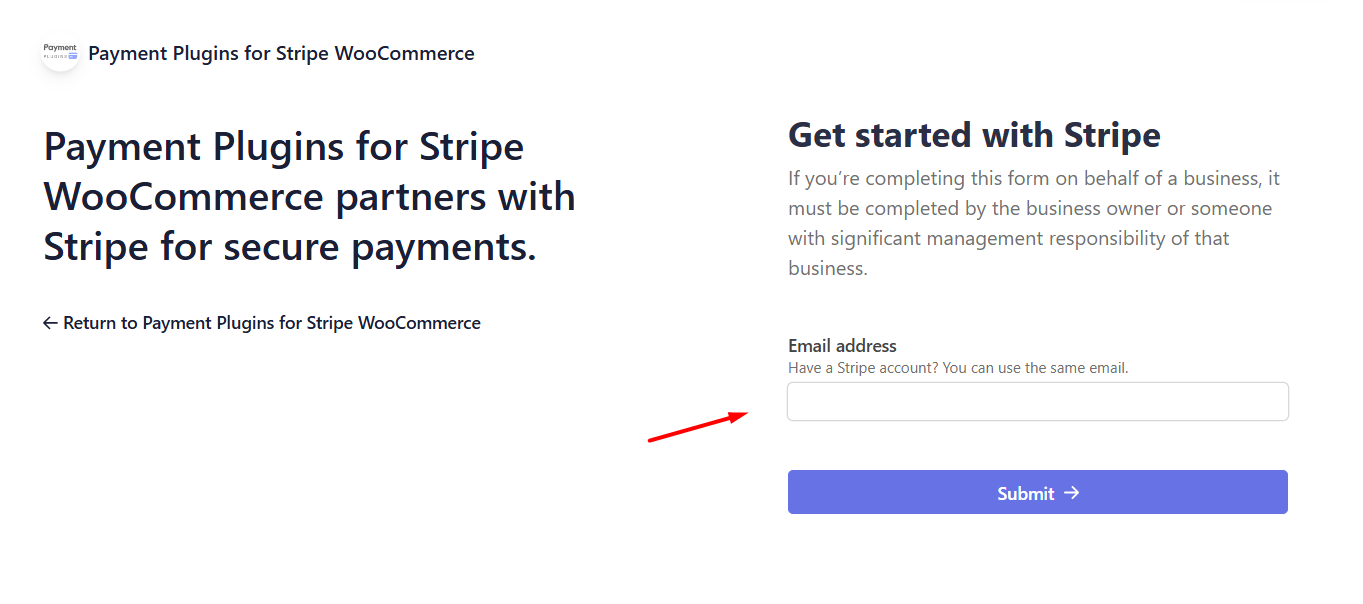
- After successfully logging in, the plugin will automatically fetch the necessary ID and Keys.
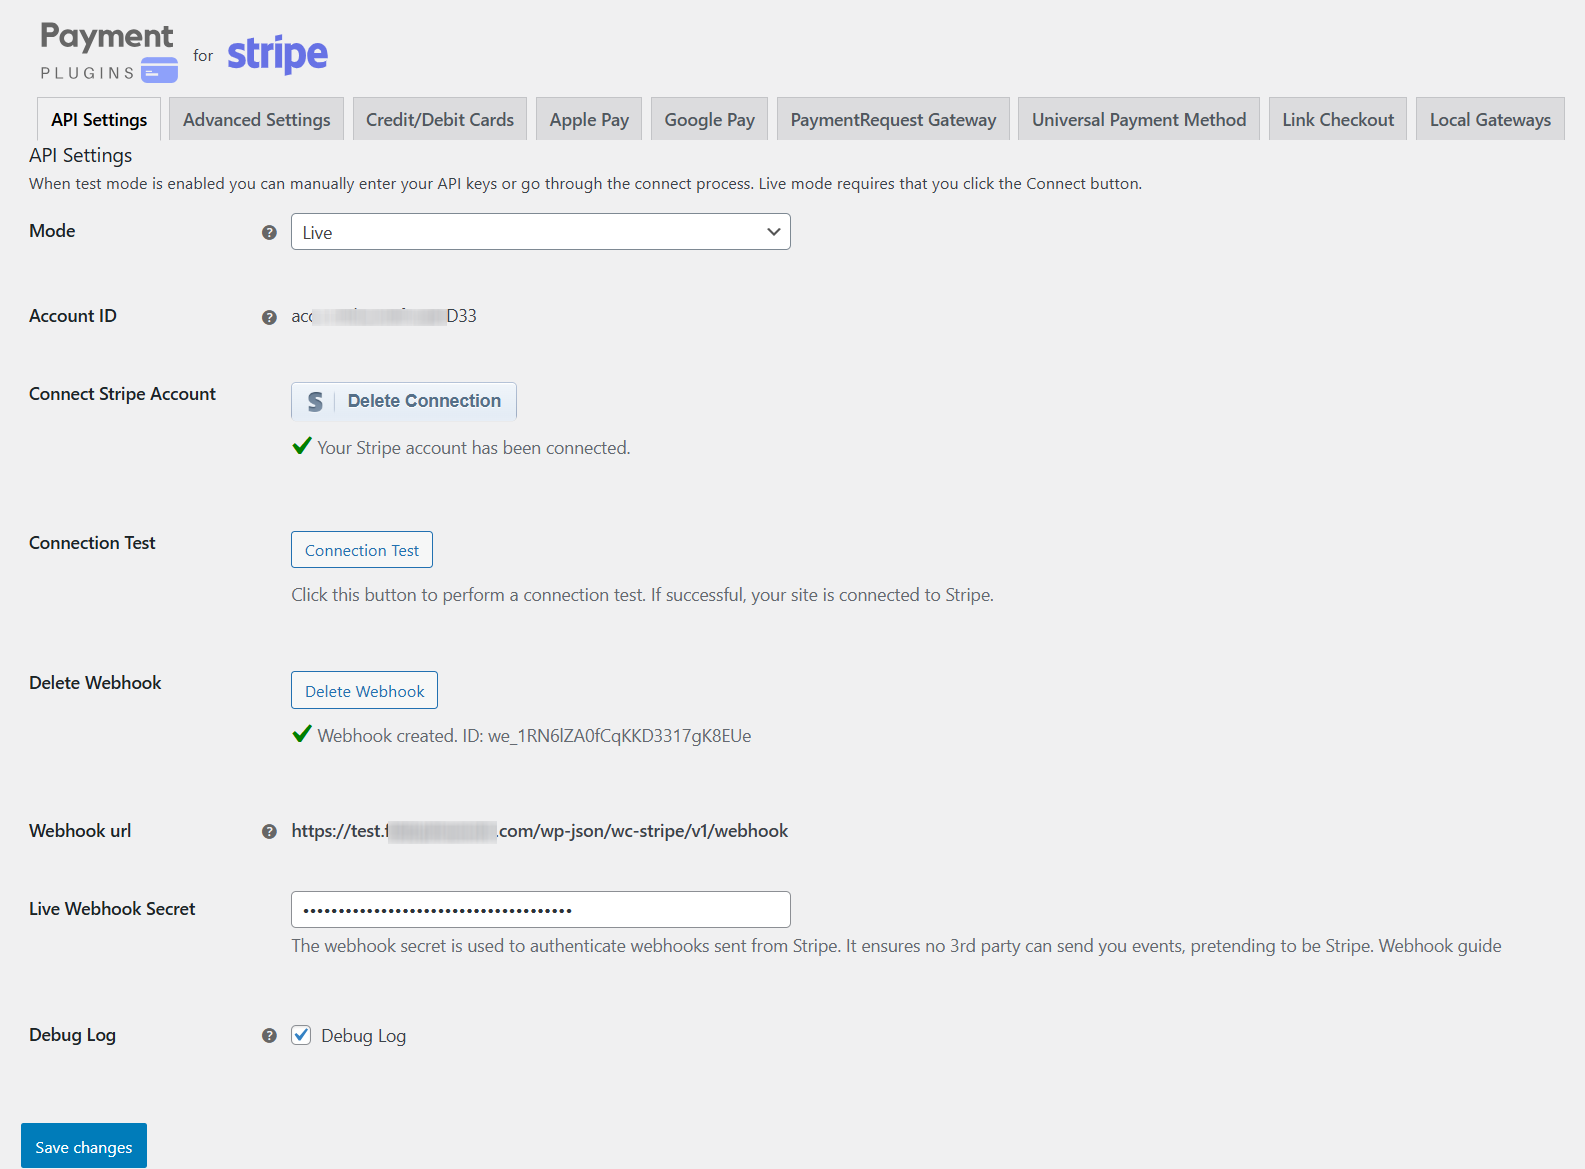
- After that, jump to the Credit/Debit Cards tab and make changes as per your requirements, or keep them as it is.
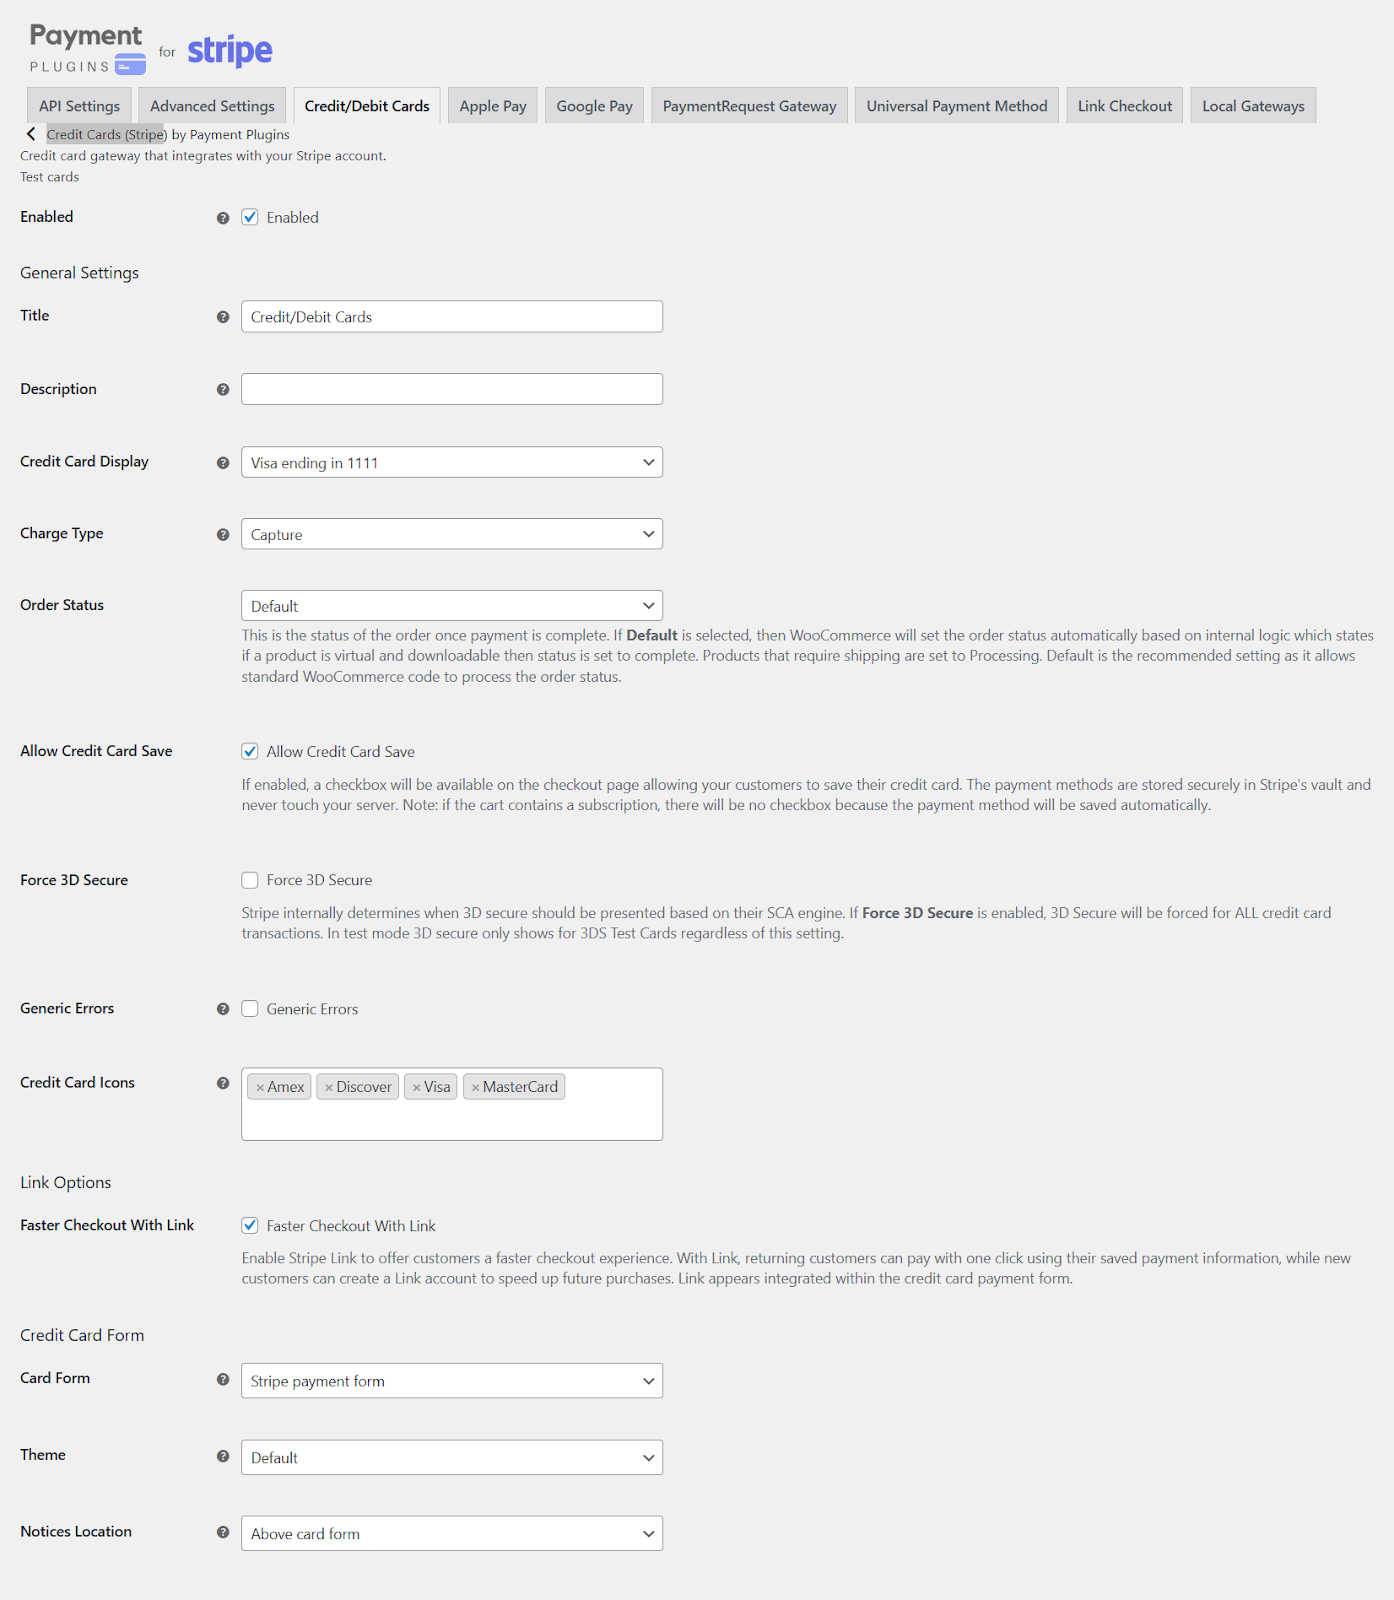
- To test the payment method, put the API Settings mode to Test and add products to the cart.
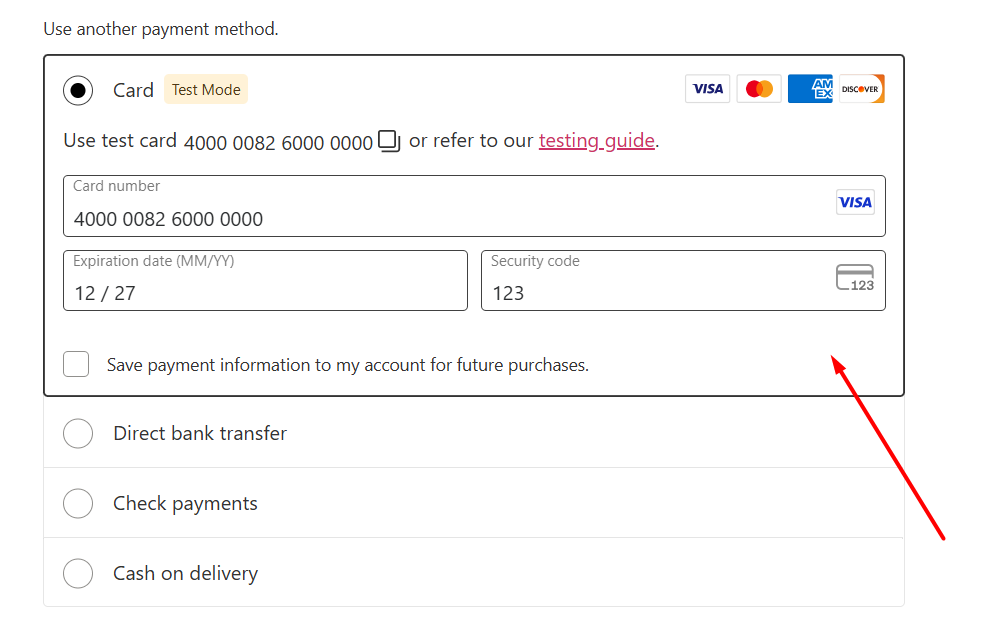
- You can now insert test card numbers to complete the purchase. If your setup is correctly configured, the purchase will be complete.
How to add Apple Pay and Google Pay in WooCommerce?
You can use the same plugin (Payment Plugins for Stripe) to set up Apple and Google Pay at your store.
- Register for Google Pay to be able to accept payments on Android/supported devices.
- Go to WooCommerce > Settings > Payments.
- Scroll down to find the Apple Pay and Google Pay options.
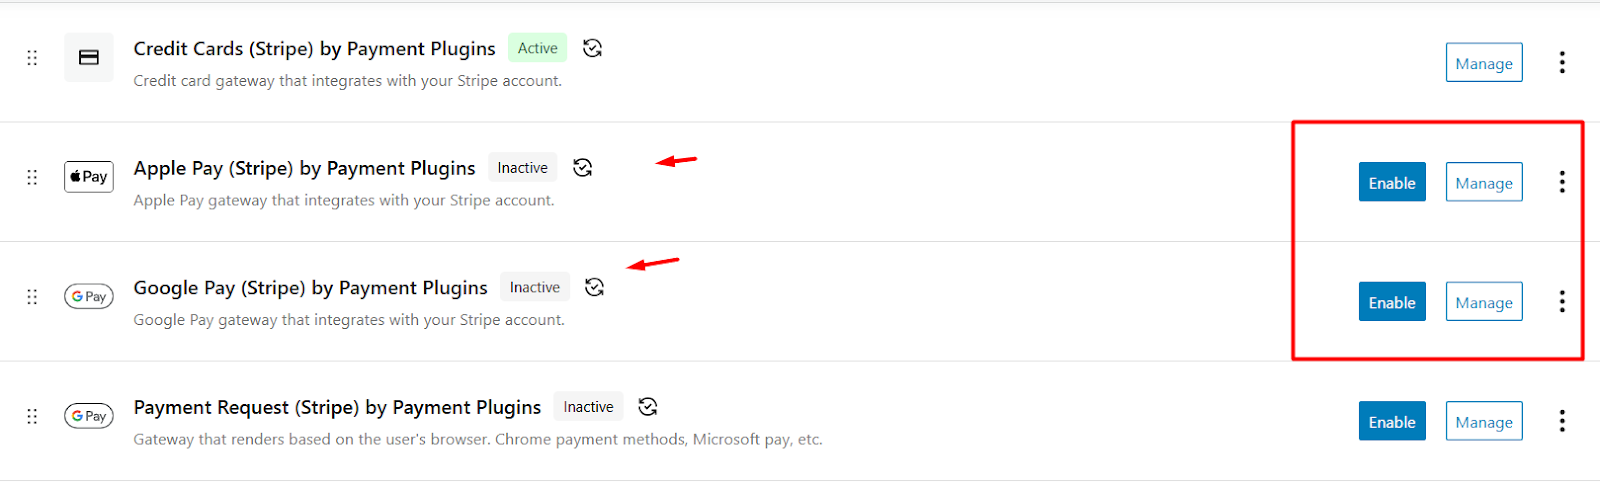
- Enable both of them and click Manage to configure.
- The Google API team provides a Google Merchant ID when you register for Google Pay. Enter that ID in the Merchant ID box.
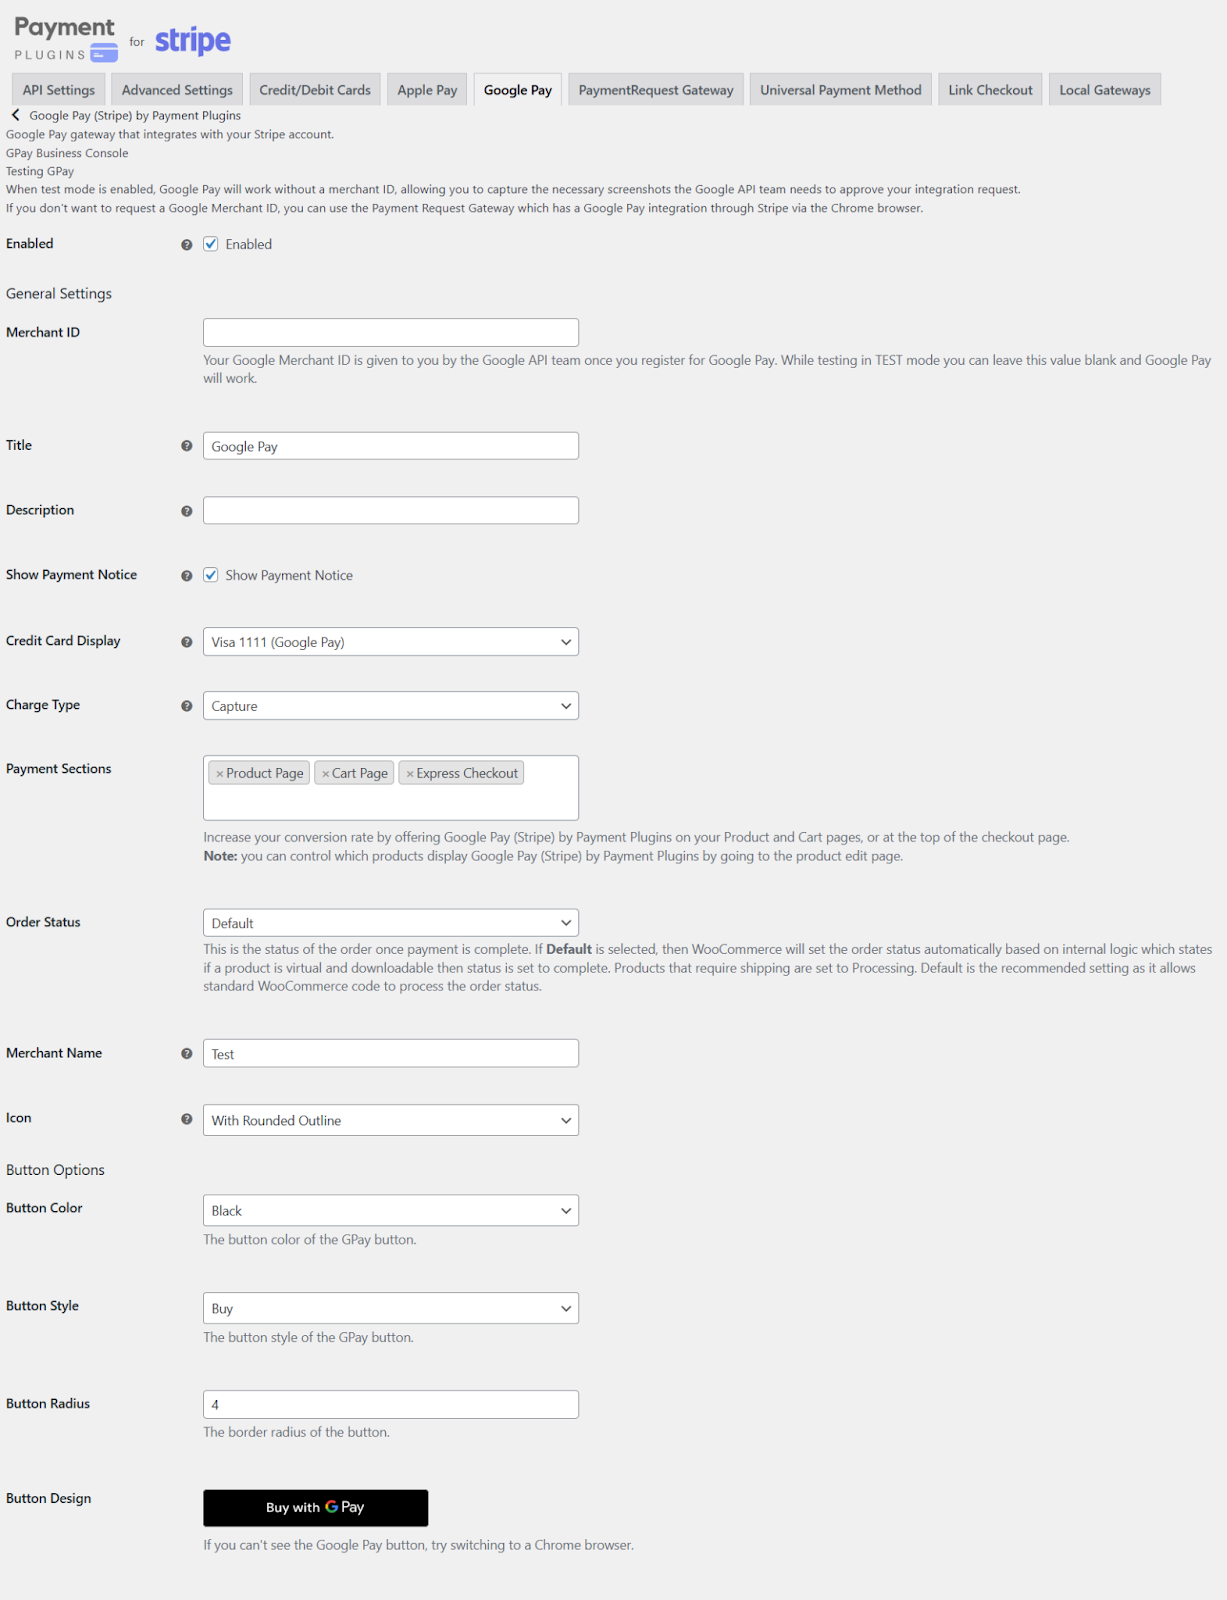
- Additionally, you can customize button designs and select where they will be displayed.
- Now you will see the Google Pay button on your front end.
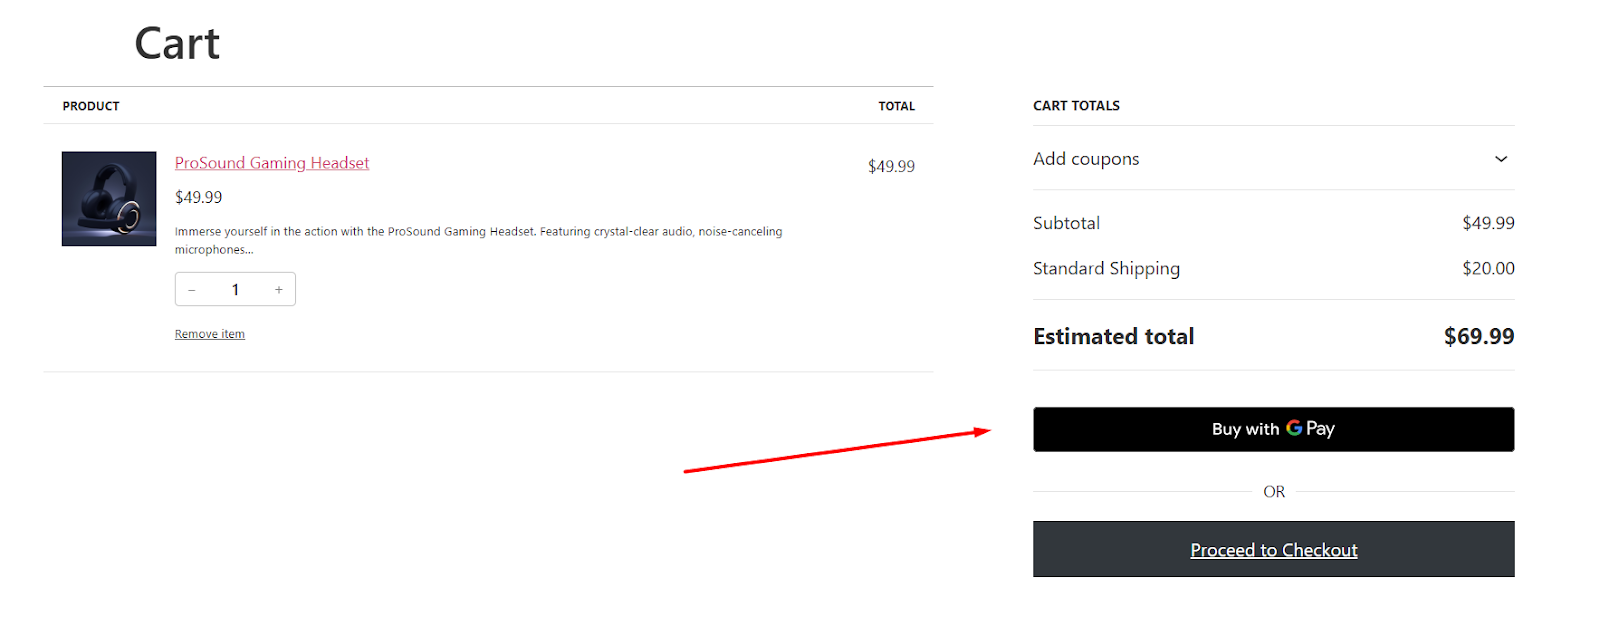
For a detailed walkthrough with different plugins, including WooPayments, check out our article on WooCommerce Google Pay integration.
To activate Apple Pay in your store, jump to the Apple Pay tab and do the following.
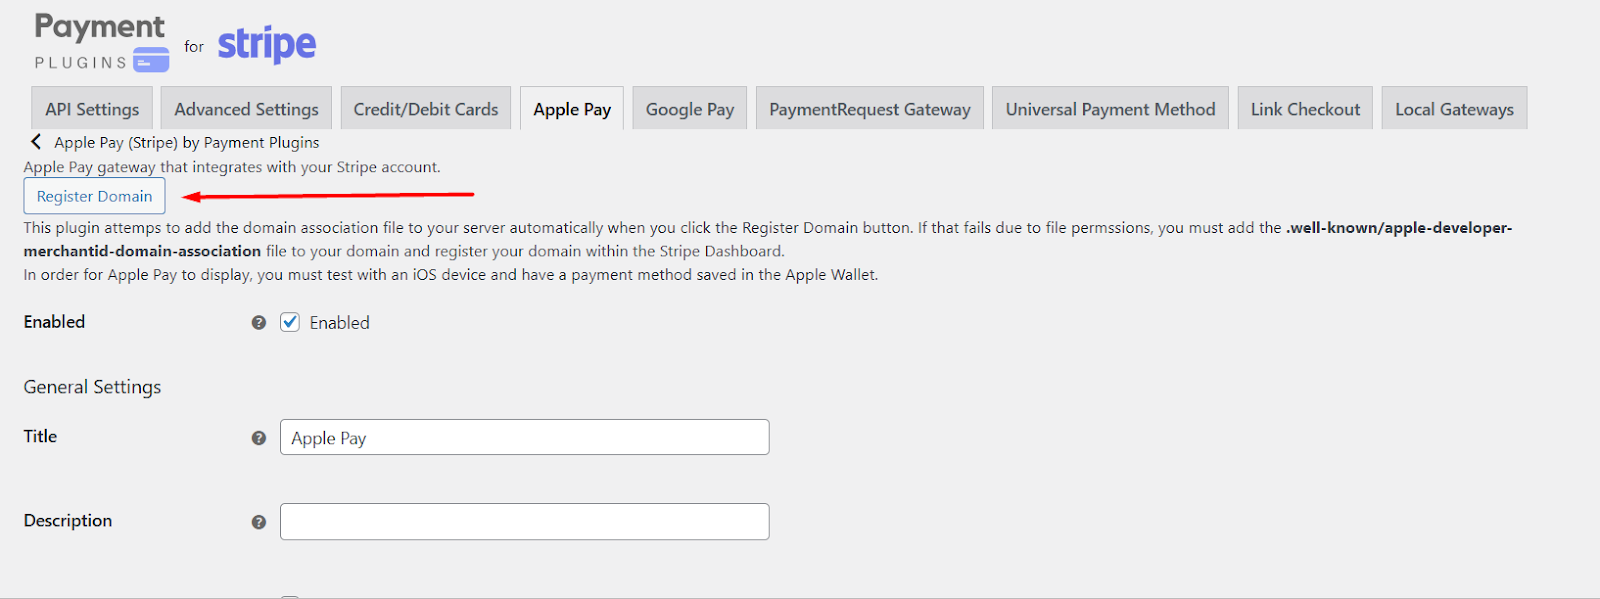
- Click the Register Domain button in the Stripe settings.
- If it fails (due to file permission issues), you need to manually upload a file:
- Download the file: apple-developer-merchantid-domain-association.
- Upload it to this folder on your server:
- yourdomain.com/.well-known/apple-developer-merchantid-domain-association
- Then go to your Stripe Dashboard > Settings > Payment Methods > Apple Pay and register your domain.
- Once Stripe approves it, your site will be ready for Apple Pay.
- Open your store checkout page on an iPhone, iPad, or Safari on a Mac.
- Make sure you have a card saved in your Apple Wallet.
- The Apple Pay button should now appear as a payment option.
How to Add PayPal Payment Method in WooCommerce?
We have covered this topic in detail in the following article: How to Set Up PayPal for WooCommerce
You can also set up a PayPal payment gateway using the official WooCommerce PayPal plugin. However, we recommend using the Payment Plugins for PayPal WooCommerce option.
Here’s the overview of the steps to follow.
- Find and install the plugin.
- Enable it from WooCommerce > Settings > Payments.
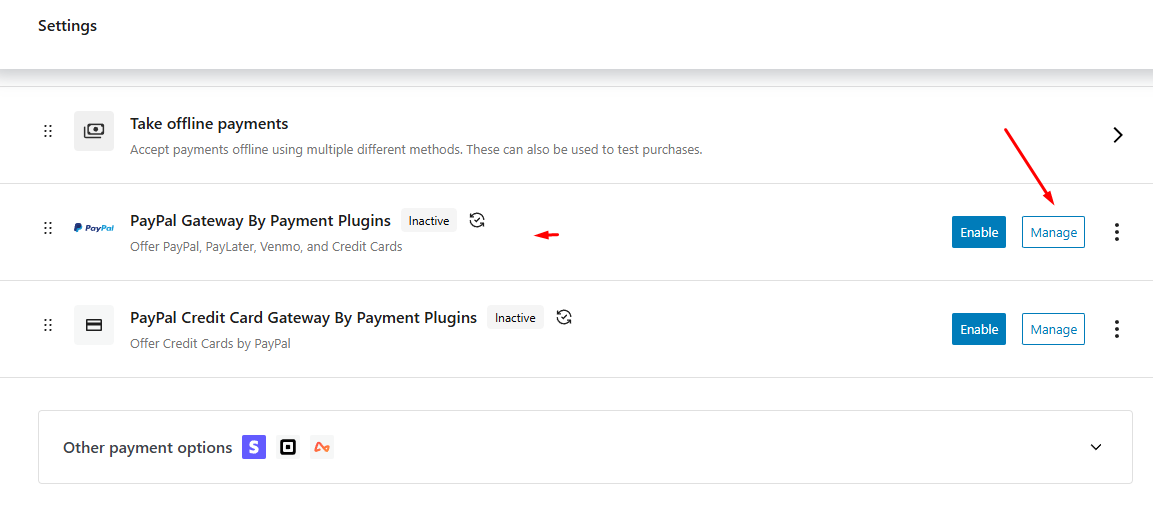
- Click Manage and then go to the API Settings tab.
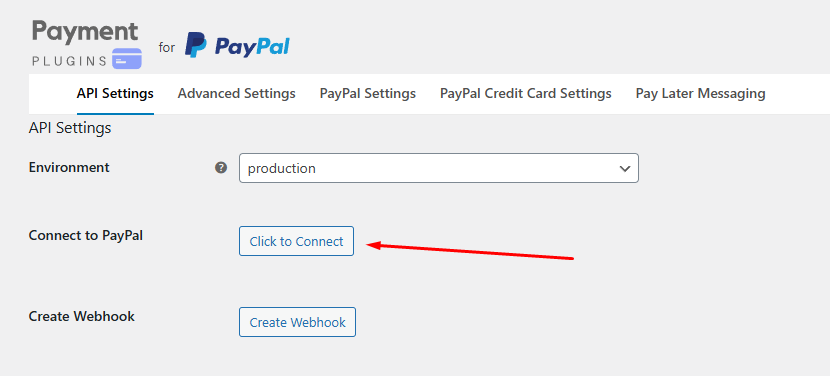
- Select your preferred environment and click Connect. A PayPal login window will pop up.
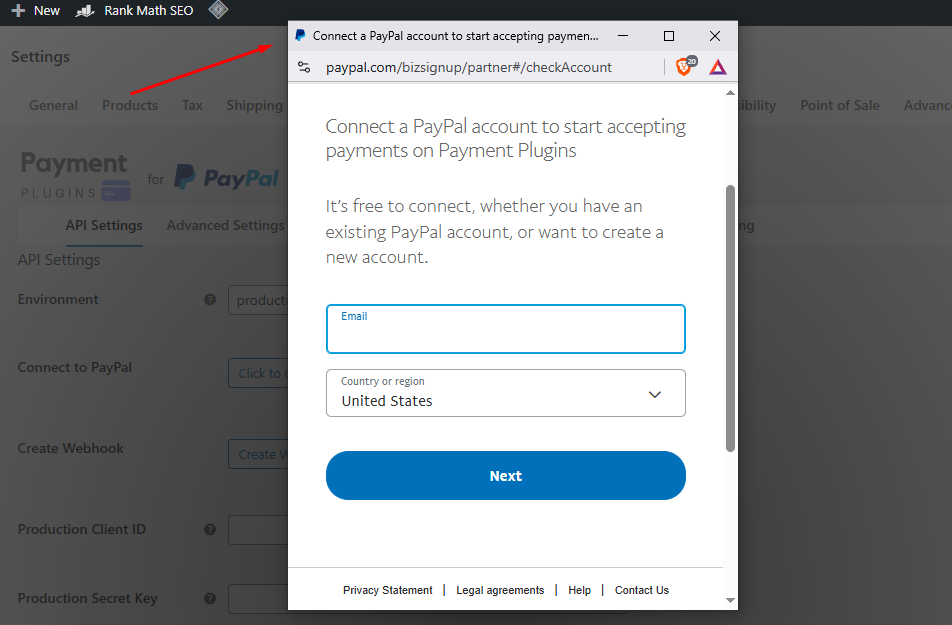
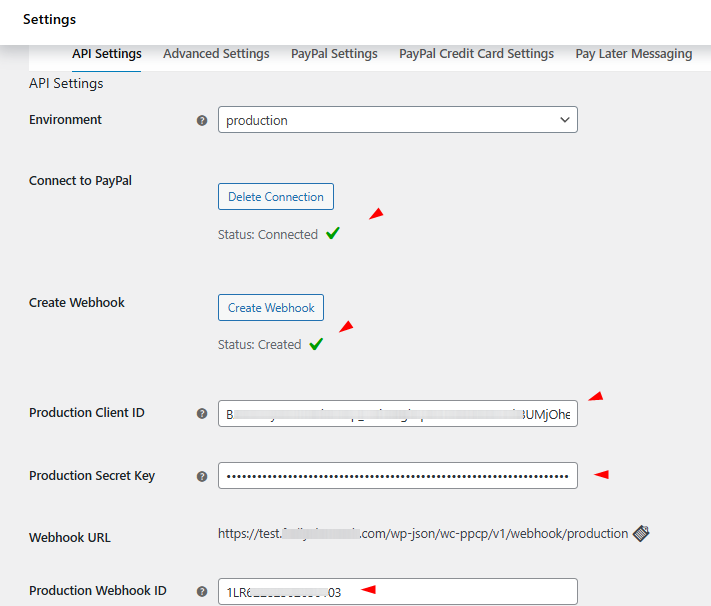
- Log in to your PayPal business account, and the plugin will automatically fetch the necessary keys.
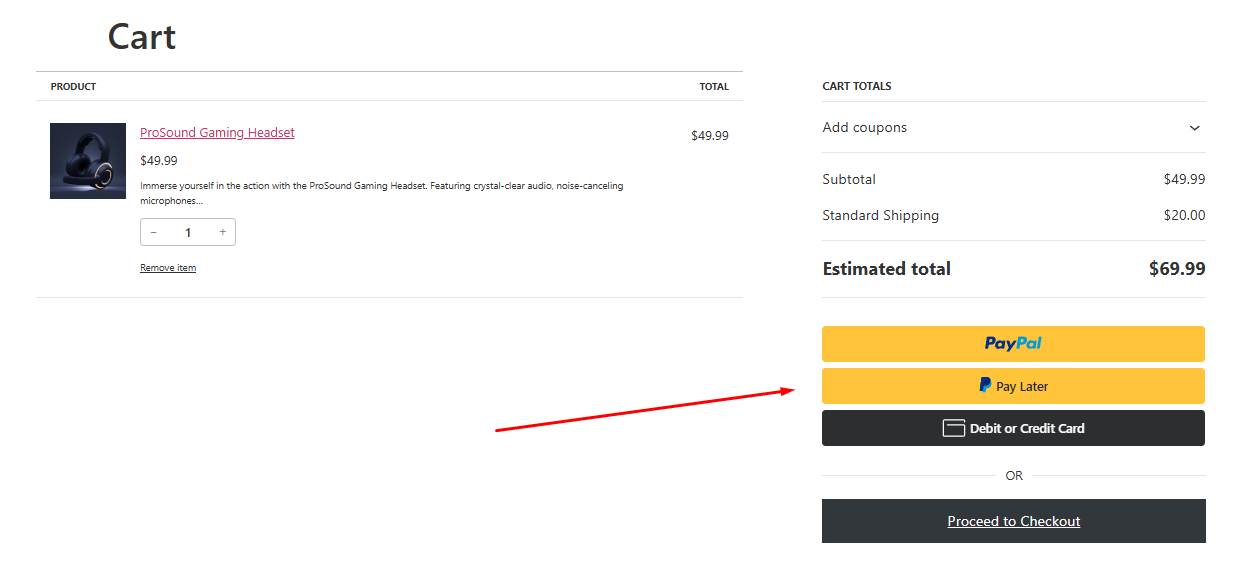
- Now your storefront will display the PayPal buttons.
As we mentioned already, for a complete step-by-step walkthrough, follow our dedicated article on the topic. This is pretty much how to add a payment method in WooCommerce using third-party plugins.
Managing and Customizing Payment Methods
Once your gateways are live, most stores need to fine-tune how they behave. Here’s how to handle the most common requests.
How to Add a Fee to a Payment Method in WooCommerce
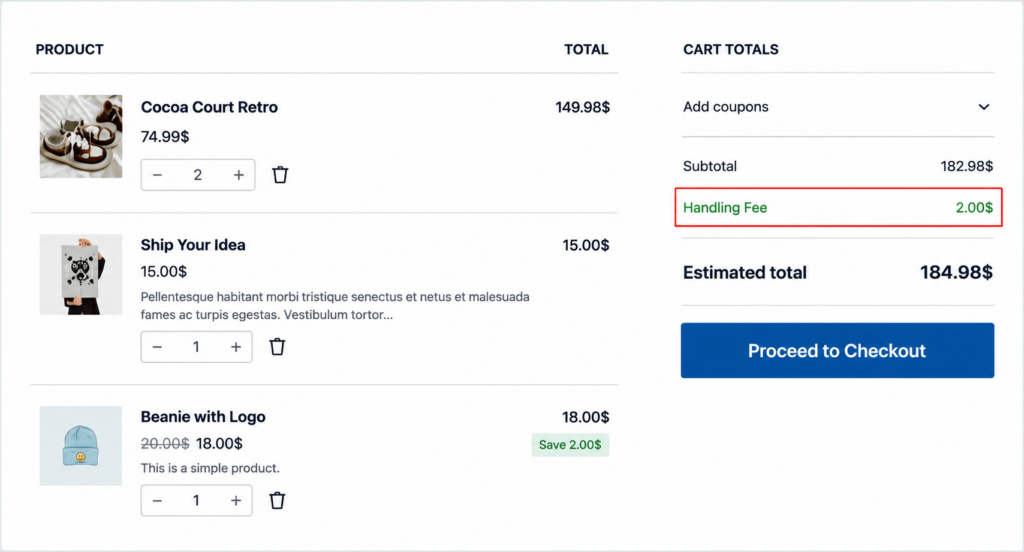
Some stores add a small surcharge to offline methods like COD to offset processing costs, or add a fee to a specific gateway to cover transaction charges.
- The built-in COD and Bank Transfer settings don’t include a fee field, so you’ll need a small snippet or a fees plugin such as WooCommerce Payment Gateway Based Fees (by WooCommerce.com) or a free alternative like Advanced Order Fees.
- With a fees plugin, go to its settings, select the payment gateway (for example, Cash on Delivery), and set either a flat fee or a percentage.
- If you’d rather do it with code, hook into
woocommerce_cart_calculate_feesand checkWC()->session->get('chosen_payment_method') to apply the fee conditionally. This requires a developer if you’re not comfortable editing theme or plugin files.
- Always display the fee clearly before checkout. Hidden fees are one of the top reasons shoppers abandon carts at the last step.
How to Restrict or Discount Payment Methods
You can limit which payment methods appear based on cart total, customer role, shipping country, or product, and you can offer a discount for choosing one method over another (a common tactic to nudge customers toward bank transfer to avoid card fees).
- Native WooCommerce doesn’t include conditional payment method logic out of the box. You’ll need a plugin such as Conditional Shipping and Payments for WooCommerce or Payment Gateway Based Fees, which handles both fees and discounts.
- In the plugin settings, create a rule: select the payment gateway, then set a negative fee (a discount) or a positive one (a surcharge), and add conditions like minimum cart total or customer country.
- To hide a method entirely for certain products or roles, look for a “restrictions” or “availability” tab in your gateway plugin, or use the
woocommerce_available_payment_gatewaysfilter if you’re comfortable with code.
Offer a payment-method discount with Disco (free)
If you want to reward a gateway rather than charge for one, the free Disco plugin has a Payment Method condition. It lists the payment methods enabled in your store, and you can select one or several.
- In Disco, click Create a Discount, choose Cart as the intent, and set the reduction in Cart Rules, for example a 3% percentage discount.
- Click Add Condition, choose Payment Method, and pick the gateways that qualify, such as Direct Bank Transfer.
- Save, then place one test order with a qualifying gateway and one without.
Disco checks the condition against the method chosen at checkout. Before announcing the offer, confirm how your own checkout shows the discount when a shopper switches between methods.
How to Set a Default Payment Method in WooCommerce
- Go to WooCommerce > Settings > Payments.
- Drag and drop the gateways using the handle icon on the left of each row. The one at the top of an enabled list is shown first at checkout, which functions as the default controls it.
- There’s no separate “set as default” button. Order in this list is what
- controls it.
How to Filter WooCommerce Orders by Payment Method
- Go to WooCommerce > Orders.
- Use the search box or the built-in filters at the top of the order list. If payment method filtering isn’t visible by default in your WooCommerce version, you can add a payment method column and filter dropdown with a free plugin like Advanced Order Export For WooCommerce, or export orders as CSV and filter there.
- For a permanent filter dropdown in wp-admin, a short custom code snippet hooking into restrict_manage_posts (or views_edit-shop_order on HPOS setups) will add one, but this is a developer-level customization.
How to Change the Payment Method on a WooCommerce Subscription
This applies if you’re running WooCommerce Subscriptions.
- The customer logs in and goes to My Account > Subscriptions.
- They select the subscription and click Change Payment.
- They can then choose a different saved card or payment method for future renewal payments.
- As the store owner, you can also change it manually from the order or subscription edit screen in wp-admin if the customer contacts you directly.
Adding Custom Payment Gateways & Local Payment Methods
We have covered how to add payment method in WooCommerce using built-in options and third-party plugins to integrate popular options. What if you want a complete custom method or want to integrate a local method that the popular plugins don’t offer?
That’s what we will cover in the following sections.
How to Add a Custom Payment Gateway to WooCommerce
Custom gateways are built as small plugins that extend WooCommerce’s payment gateway class. A developer will register the gateway, add an admin settings form, implement the payment flow, and handle webhooks or IPNs from the payment provider.
Steps (developer checklist)
- Decide scope and provider
- Choose whether your gateway uses a hosted checkout (redirect) or a direct API (on-site tokenization). Hosted redirects simplify PCI scope.
- Confirm the provider supports your country, currency, and testing (sandbox) keys.
- Create a plugin with a gateway class
- Make a small plugin file and register it with WordPress.
- Create a class that extends WC_Payment_Gateway and implement required methods: __construct(), init_form_fields(), admin_options() (settings UI), process_payment($order_id) (what happens when customer pays) and optionally add_payment_method() / refund methods.
The official WooCommerce docs and code reference show these hooks and methods.
- Register the gateway with WooCommerce
- Use the woocommerce_payment_gateways filter to add your gateway class so it appears under WooCommerce > Settings > Payments. Business Bloomer and other developer guides show working examples and minimal boilerplate you can adapt.
- Build the settings form (admin UI)
- Define init_form_fields() to expose Title, Description, API keys, Test mode toggle, and any other merchant settings. This makes the gateway configurable from the WooCommerce Payments tab.
- Implement payment processing and webhooks
- process_payment($order_id) should create the payment request, redirect the customer if needed, or create a token for on-site card flows.
- Implement an endpoint to receive webhooks or IPNs from the provider to confirm payments and update order status. Always verify signatures and event authenticity.
- Test thoroughly
- Use sandbox/test API keys. Simulate success, failure, and webhook retries. Check order statuses and email notifications. Document how to switch from test to live.
- Consider client-side (blocks) integration if using the block checkout
- If your store uses WooCommerce Blocks for checkout you may need to register a payment method client-side using the payment-method integration API. See WooCommerce’s client-side docs for registering block-based payment methods.
When to hire a developer
You should engage a developer when: you must handle card data directly, require tokenization, need custom reconciliation logic, or want a tightly integrated hosted checkout.
For simple redirect gateways or when a merchant plugin already exists, a developer may only be needed for small tweaks. Business Bloomer and other tutorials provide example code, but expect PHP and WooCommerce experience.
Enabling Local & Geo-Specific Payment Methods
Why this matters
Providing local payment options improves conversion. Shoppers prefer familiar local methods (for example, UPI in India, iDEAL in the Netherlands, Bancontact in Belgium). Many gateway plugins surface these options automatically for eligible customers when properly configured. WooPayments, Mollie, Razorpay, and other providers specifically support region-specific methods
How to Add Local Methods (Practical Steps)
- Choose a gateway that supports your target region
- Example providers: Razorpay or local acquirers for India (UPI), Mollie for iDEAL and many European APMs, WooPayments for a collection of local methods. Install the provider’s official WooCommerce plugin.
- Create and verify your merchant account
- Register with the provider and complete KYC. Get test and live API credentials. Many local methods require additional setup or onboarding.
- Install, enable, and configure the plugin
- Install the official plugin from WordPress.org or the provider’s site. Enter API keys in the plugin settings and enable the specific local payment methods you want to offer. Many plugins let you choose which methods show at checkout.
- Use geo-targeting / currency options
- For local relevance, enable multi-currency if the provider supports it and restrict methods to the countries/currencies they serve. WooPayments and other plugins support showing local methods only to eligible buyers. Check WooCommerce > Settings > Payments and the gateway plugin’s options for country/currency controls.
- Register domain/webhooks if required (example Apple Pay/Stripe flow)
- Some payment methods or digital wallets need domain verification and webhooks. Follow the provider’s domain registration and webhook instructions (for example, Stripe/Apple Pay require domain association).
- Test in real devices / local conditions
- Test UPI flows on Indian devices or Apple Pay on iOS devices. Test iDEAL flows from EU IPs or using provider test tools. Ensure the checkout displays the local method only when appropriate.
Common local methods (examples)
- UPI, netbanking, mobile wallets — India (Razorpay, PayU).
- iDEAL — Netherlands (Mollie, Stripe).
- Bancontact, Przelewy24, EPS, SEPA — Europe (Mollie, WooPayments).
- Local APMs via PayPal / WooPayments — many providers show APMs automatically to eligible users.
Invoice and B2B Payment Methods in WooCommerce
B2B stores often need to allow customers to pay by invoice rather than by card at checkout, especially for large or recurring orders. If you need automatic accounting sync, connect your invoicing plugin to
Xero or QuickBooks so invoice status updates order status automatically.
The simplest native option is to enable Direct Bank Transfer (BACS) and relabel it as “Pay by Invoice” or “Net 30,” with instructions in the description field explaining your invoicing terms.
For a more structured setup, plugins like YITH WooCommerce Invoice and Packing Slips or a dedicated B2B suite (such as B2BKing) let you generate proper invoices, set net payment terms, and restrict the invoice option to approved wholesale accounts only.
Final tips
- Show only relevant methods to avoid checkout clutter and confusion. Use the gateway settings to restrict methods by country/currency.
- Keep PCI scope small: prefer hosted/redirect flows or tokenized client-side integrations to limit compliance burden.
- Document testing and go-live steps for each provider so switching from sandbox to live is repeatable.
Wrap Up
Learning how to add a payment method in WooCommerce is a fundamental step you cannot by any means ignore. It’s the very reason you created your store: to get paid.
However, you must be aware of the most popular payment methods and how to configure them at your WooCommerce store. Remember, 77% of customers will abandon carts if they don’t find their preferred payment method at your store.
Therefore, integrate all possible popular options for both desktop and mobile shopping. Hope this guide will help you set up payments in WooCommerce efficiently and grow your sales.
Related guide: How to Add Custom Order Status in WooCommerce?
Frequently Asked Questions
Where do I find payment methods in WooCommerce?
Payment methods are managed under WooCommerce u003e Settings u003e Payments in your WordPress dashboard. This page lists every available gateway, whether it’s built-in or added through a plugin, along with Enable, Manage, and Install options for each.
How do I add a payment gateway in WooCommerce?
Install the gateway’s official plugin from Plugins u003e Add Plugin, activate it, then go to WooCommerce u003e Settings u003e Payments and click Enable next to the new gateway. From there, click Manage to enter API keys or account details before it goes live.
How do I set up WooCommerce Payments?
Install the WooPayments plugin, connect a business account during setup, then confirm it’s enabled under WooCommerce u003e Settings u003e Payments. Card payments, Apple Pay, and Google Pay are switched on automatically once the account connection is complete.
Can I offer free or offline payment methods in WooCommerce?
Yes. WooCommerce includes Cash on Delivery, Direct Bank Transfer, and Check Payments as free, built-in offline methods. They require no plugin or transaction fees, though customers won’t get instant order confirmation the way they would with a card payment.
How do I add a custom payment method in WooCommerce?
A custom payment method requires a small plugin that extends the WC_Payment_Gateway class, with a settings form, a process_payment() function, and webhook handling for the provider. This is developer work; store owners without coding experience should use an existing gateway plugin instead.
Can I charge a fee for a specific payment method in WooCommerce?
Yes, using a fees plugin such as Payment Gateway Based Fees, or a custom snippet hooked into woocommerce_cart_calculate_fees. Native WooCommerce settings don’t include a fee field for individual gateways.
How do I set a default payment method in WooCommerce?
Drag the gateway to the top of the list under WooCommerce u003e Settings u003e Payments. WooCommerce doesn’t have a separate default setting. Whichever enabled gateway sits first in that list is shown first at checkout.
Does WooCommerce support local payment methods like iDEAL or UPI?
Yes. Providers like Mollie, Razorpay, and WooPayments support regional methods including iDEAL, Bancontact, UPI, and SEPA. You’ll need to install the provider’s plugin, verify a merchant account for that region, and enable the specific local methods in the plugin settings.