Ever shipped an order only to realize you’ve lost money on delivery? Or maybe a customer complained because shipping costs seemed unfair?
You’re not alone. Getting shipping charges wrong is a huge headache for WooCommerce store owners.
One small setup mistake, and you might accidentally offer free shipping on everything, bleeding profit. Or worse: slap customers with unexpected fees at checkout, making them abandon their cart.
In fact, a staggering 48% shoppers abandon carts due to excessive shipping fees. That’s $8.64 billion per year lost specifically to shipping-cost–related abandonments.
Good news? Setting up shipping in WooCommerce doesn’t need to be confusing. Whether you ship locally, nationwide, or worldwide, or need special rates for heavy items – this guide will show you exactly how to add shipping charges in WooCommerce the right way.
We’ll walk through flat rates, free shipping rules, location-based fees, and pro tricks to avoid costly mistakes. Let’s jump right into it.
Table of Contents
Understanding WooCommerce Shipping Settings & Zones
WooCommerce’s shipping is built around three key concepts
- Shipping Zones
- Shipping Methods
- Shipping Classes
These work together to deliver accurate rates to your customers.
What Is a Shipping Zone?
A Shipping Zone is simply a geographic region. They are anything from a single postcode up to entire continents, where you offer the same shipping options and rates.
When a shopper enters their address at checkout, WooCommerce checks which zone that address falls into and displays only the methods you’ve assigned to that zone. This avoids confusion (for example, showing U.S.-only rates to a U.K. customer) and lets you easily vary charges from one region to another.
What Are Shipping Methods?
Once WooCommerce knows your customer’s zone, it uses Shipping Methods to calculate the actual cost. Out of the box, there are three:
- Flat Rate – A fixed fee per order, per item, or per product class. WooCommerce supports additional formulas to be implemented within the flat rate field for advanced shipping charges.
- Free Shipping – Sets no cost shipping method. Additionally, there are conditional options where free shipping is only applied when customers meet conditions like a minimum cart total or a specific coupon code.
- Local Pickup – Let’s nearby buyers collect their order in person without carrier fees. Settings are also available to assign a local pickup fee.
These methods cover most basic needs, and you can mix and match them across zones to suit your strategy. When you outgrow these defaults, premium plugins can add weight-based, table-rate, or live carrier–calculated options.
What Are Shipping Classes?
Shipping Classes are labels you give groups of products—like “Heavy,” “Bulky,” or “Fragile”—so you can fine-tune costs for each group. Instead of charging the same rate on every item, you might add an extra fee only for heavy goods or waive it on lightweight accessories. Shipping Classes let you keep your overall rate simple while still covering your real costs.
By understanding these three pillars—Zones to target regions, Methods to set how you charge, and Classes to segment products—you’ll have the conceptual foundation you need before diving into the exact steps of configuring your WooCommerce store.
How to Add Shipping Charges in WooCommerce?
Time to set up WooCommerce shipping and configure WooCommerce shipping costs for your products. Follow these clear steps to make sure every customer sees the right rates at checkout. We’ll start by creating your shipping zones, then add the core shipping methods.
Here’s how to add shipping charges in WooCommerce step by step.
Setting Up Your WooCommerce Shipping Zones
Here’s how to set up shipping zones in WooCommerce.
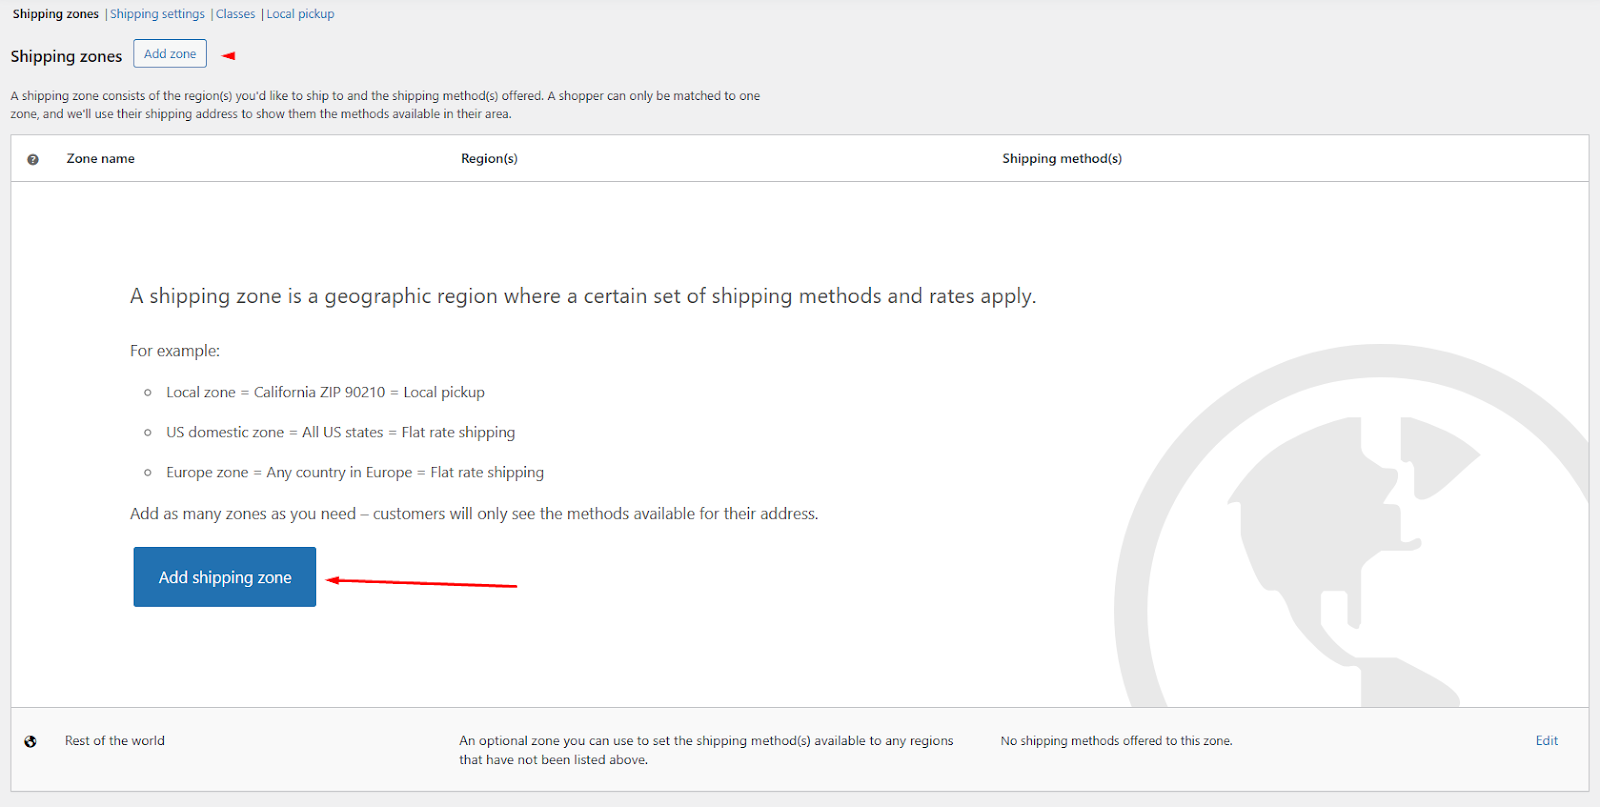
Go to the Shipping Settings
In your WordPress dashboard,
- Navigate to WooCommerce > Settings >Shipping.
Add a New Zone
- Click on Add Zone or Add Shipping Zone.
This opens a panel where you give your zone a name (for example, “Domestic” or “Europe”) and pick the regions it covers—countries, states, or specific postcodes.
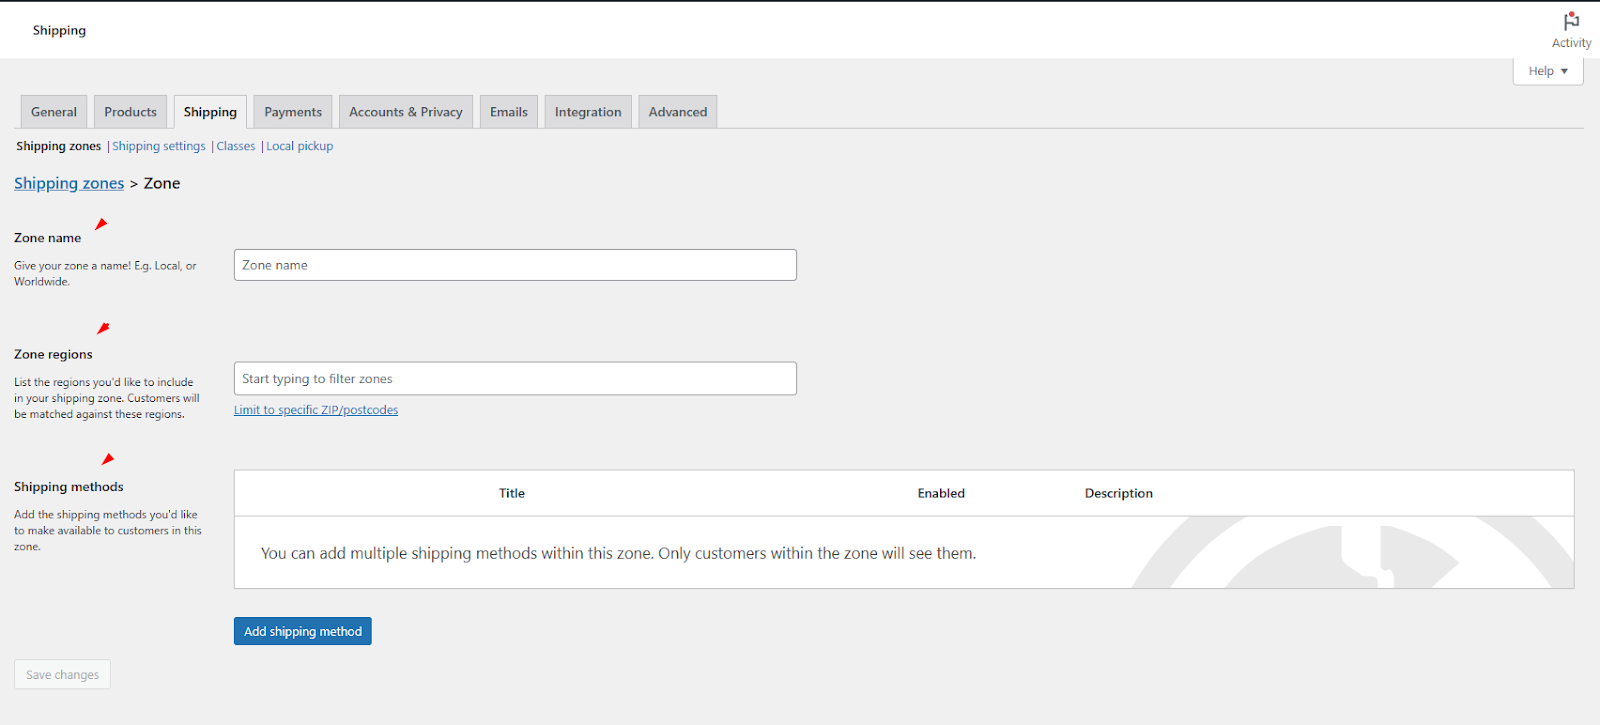
Zones tell WooCommerce which methods to show based on the customer’s address.
Select Regions
Use the multi-select field to choose all areas this zone should include. You can set the location by continent, country, city, or zip code. In terms of postcodes, you can enter individual postcodes (one per line), ranges (e.g., 90210…90220), or use wildcards (e.g., 902*…990*) to cover broad areas.
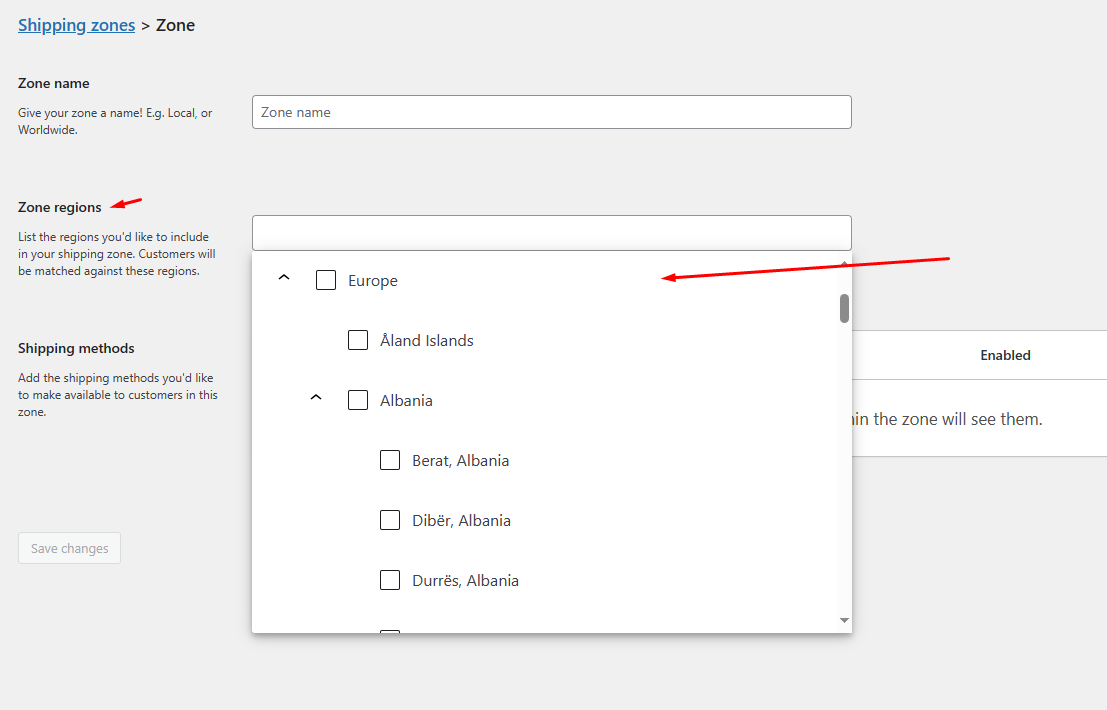
Note: A wildcard is just the little star * you add to the end of a postcode to say “any code that starts like this.” So instead of listing every code one by one, you write:
- 902* and it will catch 90210, 90288-1234, 90299, and any other code beginning with 902.
- CB23* and it will catch CB23 1EX, CB23 4YZ, and so on.
It’s an easy shortcut: type the first part of the code, add *, and you cover every possible ending.
Save Your Zone
Hit Save changes. Your new zone will appear in the list. Remember: WooCommerce matches a customer to the first zone they fit, so order zones from most specific (e.g., a city) to most general (e.g., a whole country).
Customers won’t see any shipping charges yet. You need to assign delivery charges by adding shipping methods.
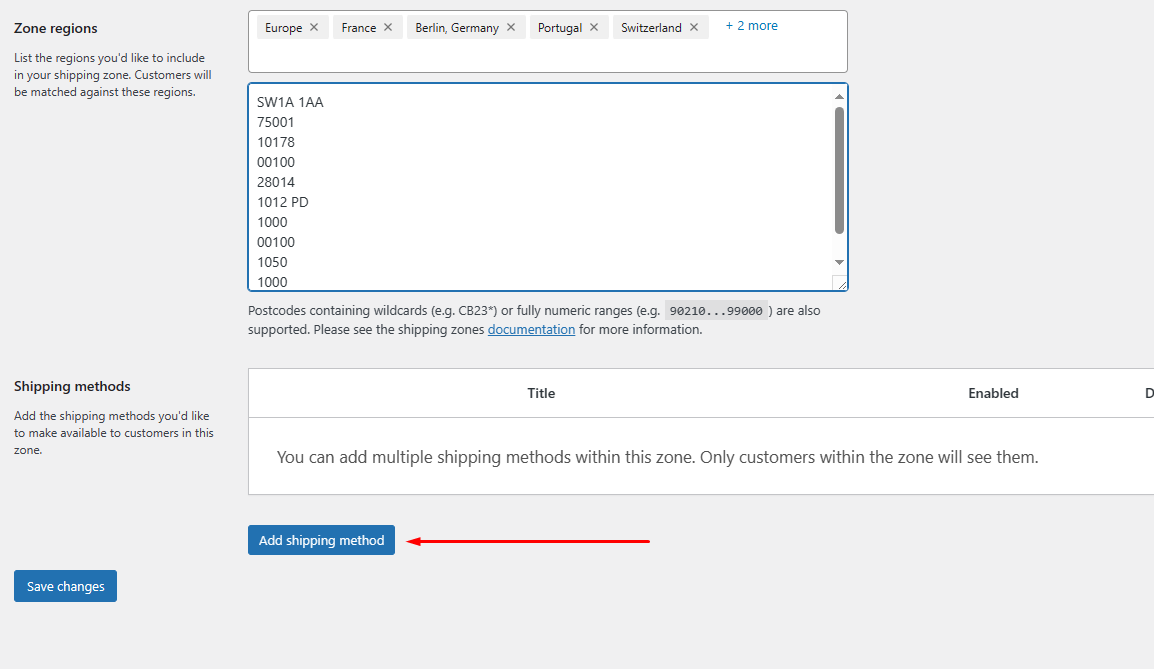
The Add Shipping Method button leads you to the following window, from which you can add shipping fees in WooCommerce.
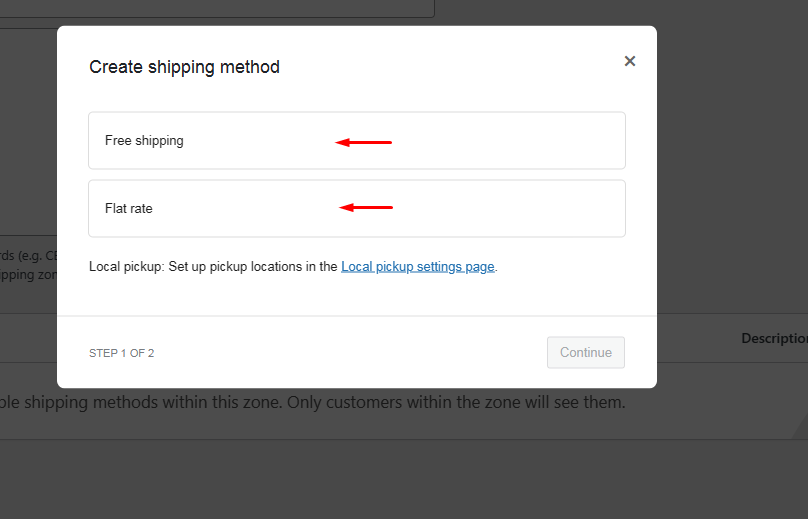
Adding Flat Rate Shipping in WooCommerce
WooCommerce flat rate shipping lets you charge a fixed delivery fee no matter how many items a customer orders. You can keep it simple, a straight flat price, or use built-in formulas to tailor costs per item or as a percentage of the cart total.
Key Fields You’ll See
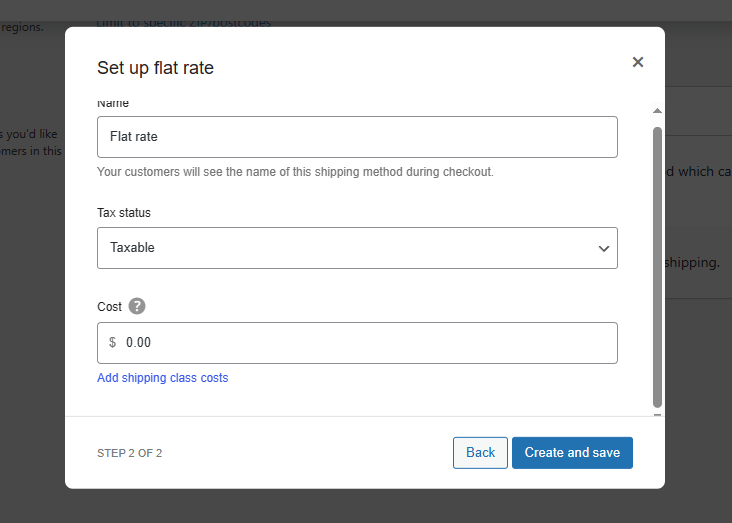
- Method Title
This is the label your customers see at checkout (for example, “Standard Delivery” or “Express Flat Rate”). Choose something clear so buyers know exactly which option they’re picking. - Tax Status
Decide if shipping should be taxed like products. If you include VAT or sales tax on delivery, set this to “Taxable.” Otherwise, select “None.” - Cost
Enter the base shipping fee here. You can type a single number (e.g., 10.00 for a $10 charge) or use simple formulas to make it dynamic:- Per-Item Charges
- Syntax: [qty] * X
- Example: [qty] * 2.00
- If a customer orders 3 items, shipping = 3 × $2 = $6.
- Percentage of Cart Total
- Syntax: [fee percent=”P”]
- Example: 10 + [fee percent=”5″]
- Base fee $10 plus 5% of the cart total. On a $100 order, shipping = $10 + $5 = $15.
- Per-Item Charges
These formulas let you cover handling fees, bulky-item surcharges, or even give discounts on larger orders without extra plugins. Once you’ve chosen your title, tax status, and cost (or formula), save your settings, and your flat-rate option is live!
Example: Setting a Simple Flat Rate and How It Looks on the Front End
Let’s say you want to charge a straight $5 shipping fee on every order, no per-item calculations or weight rules. Here’s how that example breaks down:
- Method Title: Standard Shipping
- Tax Status: Taxable (so it follows your store’s tax rules)
- Cost: 5.00
Here’s how to set this up.
- Click Add Shipping Method.
- Select the Flat option and click Continue.
- Set your values according to your strategy.
- Save changes by clicking Create and Save.
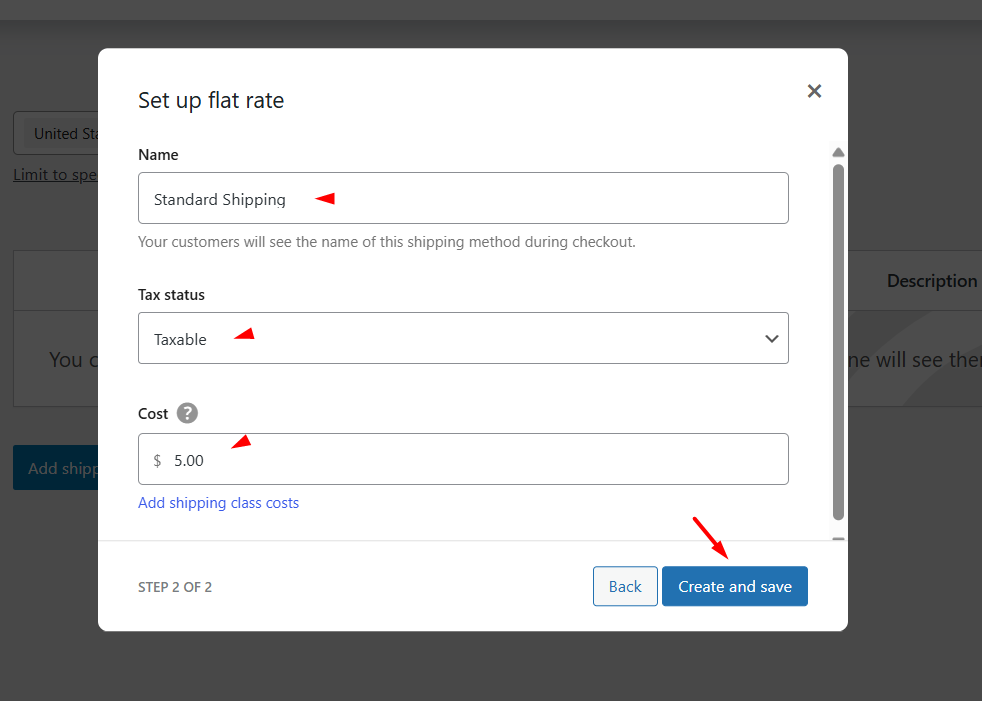
Once you save that Flat Rate method in your zone, here’s what a customer sees on the Cart or Checkout page:

That single line “Standard Shipping $5.00” lets shoppers know exactly what delivery will cost before they complete their purchase. This is pretty much how to add shipping charges in WooCommerce.
Setting Up Free Shipping in WooCommerce
Free Shipping gives customers zero delivery cost when they meet certain conditions. After adding it as a method to your shipping zone, you can choose one of these criteria:
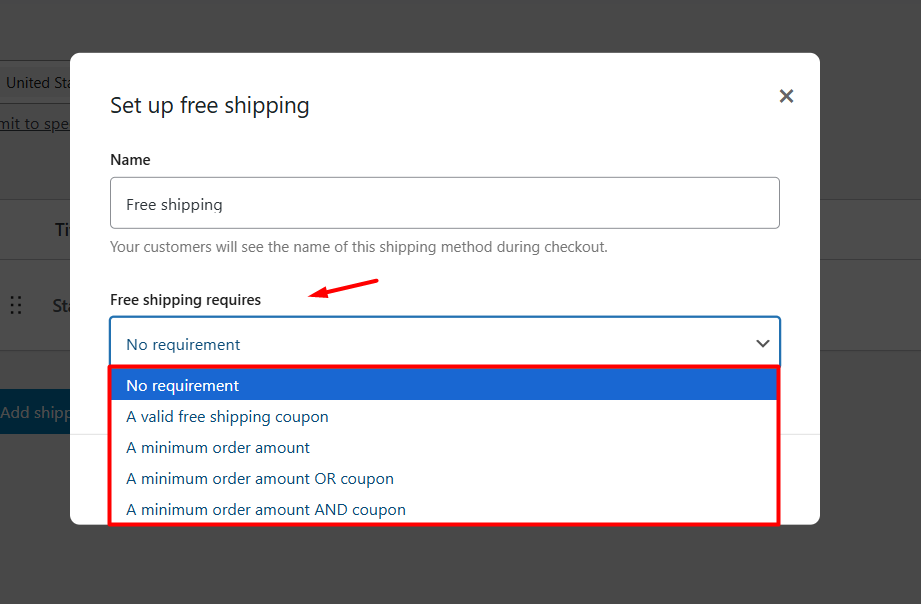
- No requirement
Everyone in this zone gets free shipping automatically. - A valid free-shipping coupon
Shoppers must apply a coupon you’ve created and marked “Allow Free Shipping.” - A minimum order amount
Free shipping appears only when the cart total reaches your set threshold (for example, $50). - A minimum order amount OR a coupon
Either spend the minimum amount or use the coupon to qualify. - A minimum order amount AND a coupon
Customers must both spend the minimum amount and use the coupon.
Once you pick your rule, you’ll see extra fields—like “Minimum Order Amount”—or the option to require the coupon code. Pick the one that fits your goals (for example, encourage bigger orders with a threshold, or run a promotion using a coupon), then save.
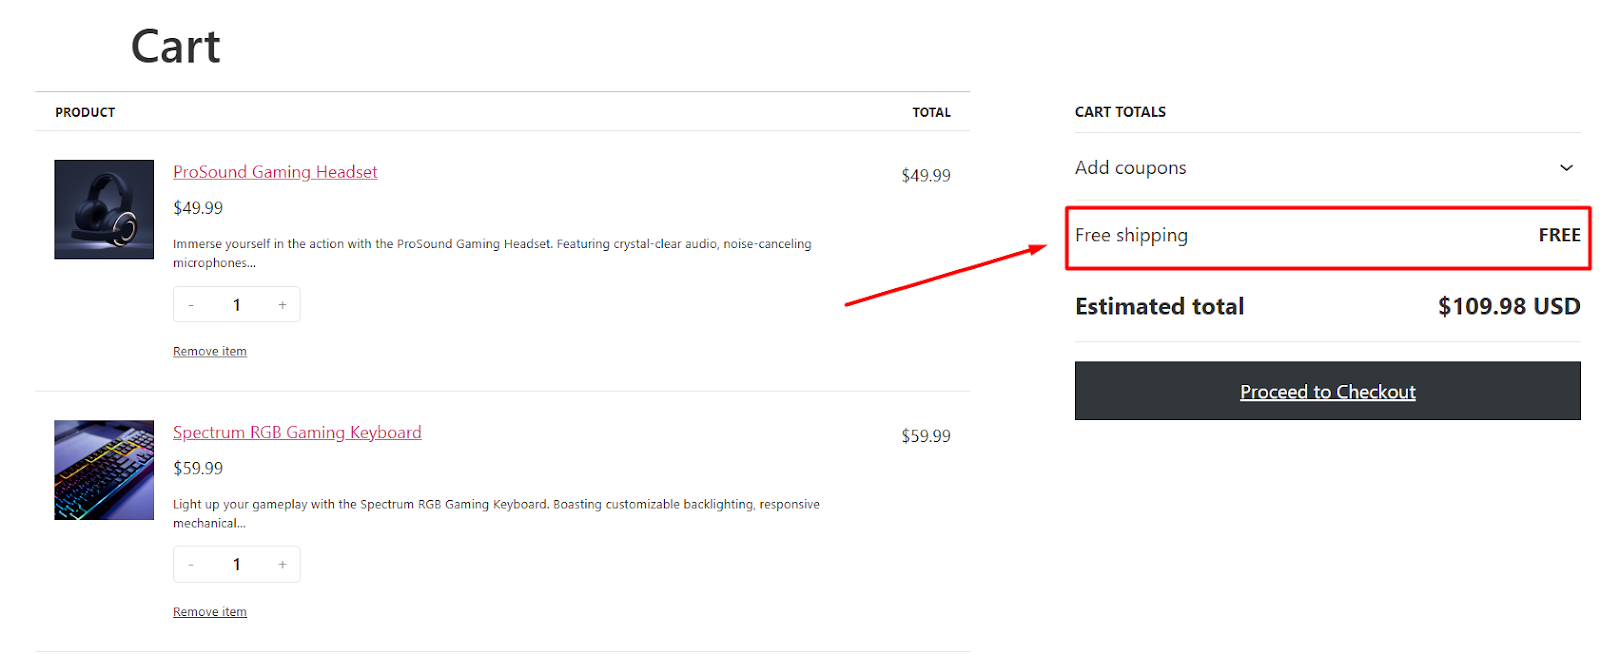
Customers who meet the criteria will see “Free Shipping” at checkout. This helps you reward loyal buyers or boost average order value.
Example: WooCommerce free shipping setup Based on Cart Total
Let’s say you want to offer free shipping when the cart total is $100 or more. Here’s how you can do it.
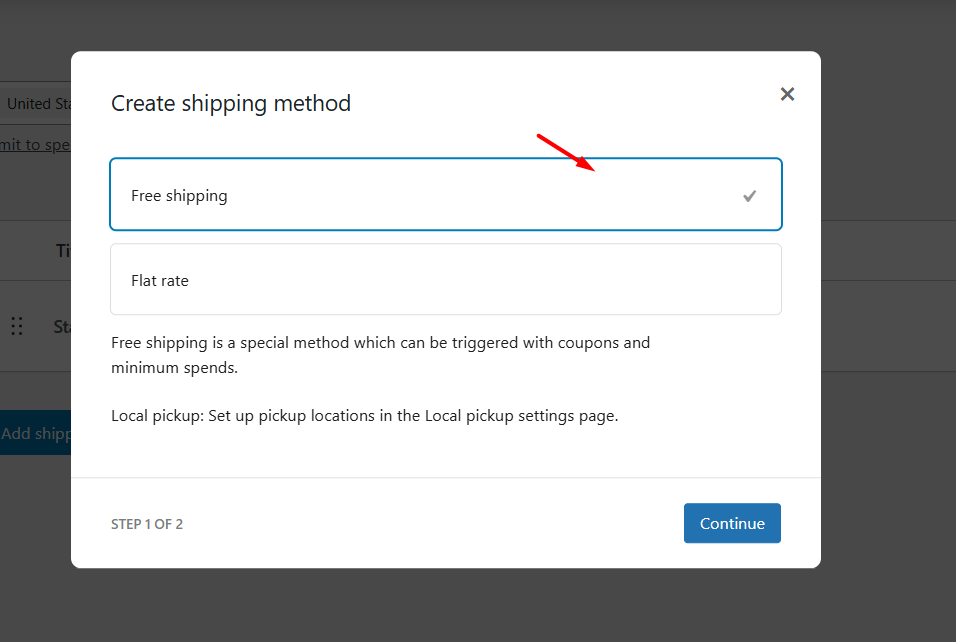
- Click the Add Shipping Method.
- Select the Free Shipping option and continue.
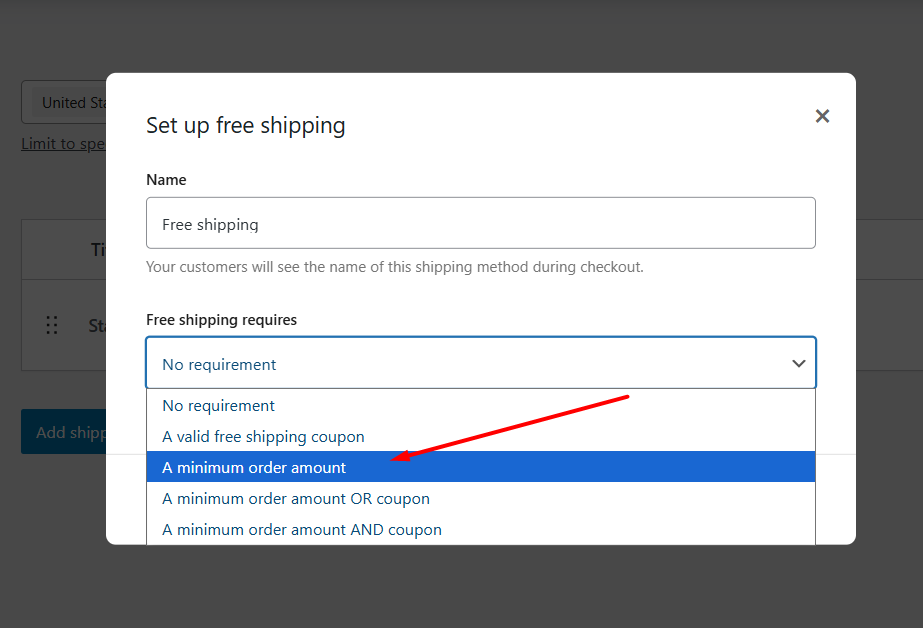
- From the Free Shipping Requires dropdown, select the “A minimum order amount” option.
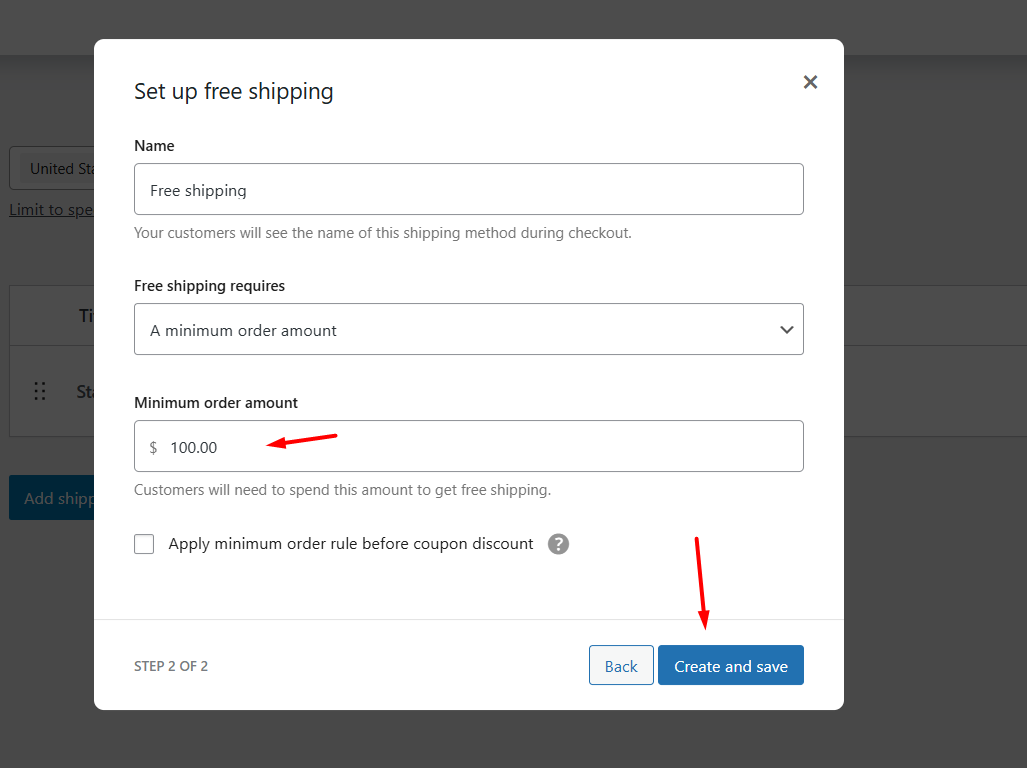
- Set the minimum cart total and save your changes.
- Add $100 worth of products to the cart to test the shipping method from the front.
Note: “Apply minimum order rule before coupon discount” checkmark means WooCommerce checks whether your cart reaches the free-shipping amount using the full price before any coupon is applied. Even if the discount drops the final total below that threshold, you still qualify for free shipping.
Using Local Pickup and Local Delivery
Local pickup lets nearby customers collect orders themselves—no carrier needed. WooCommerce local deliveryworks the same way but usually requires a lightweight plugin (for example, WooCommerce Local Pickup Plus) to appear as its own method.
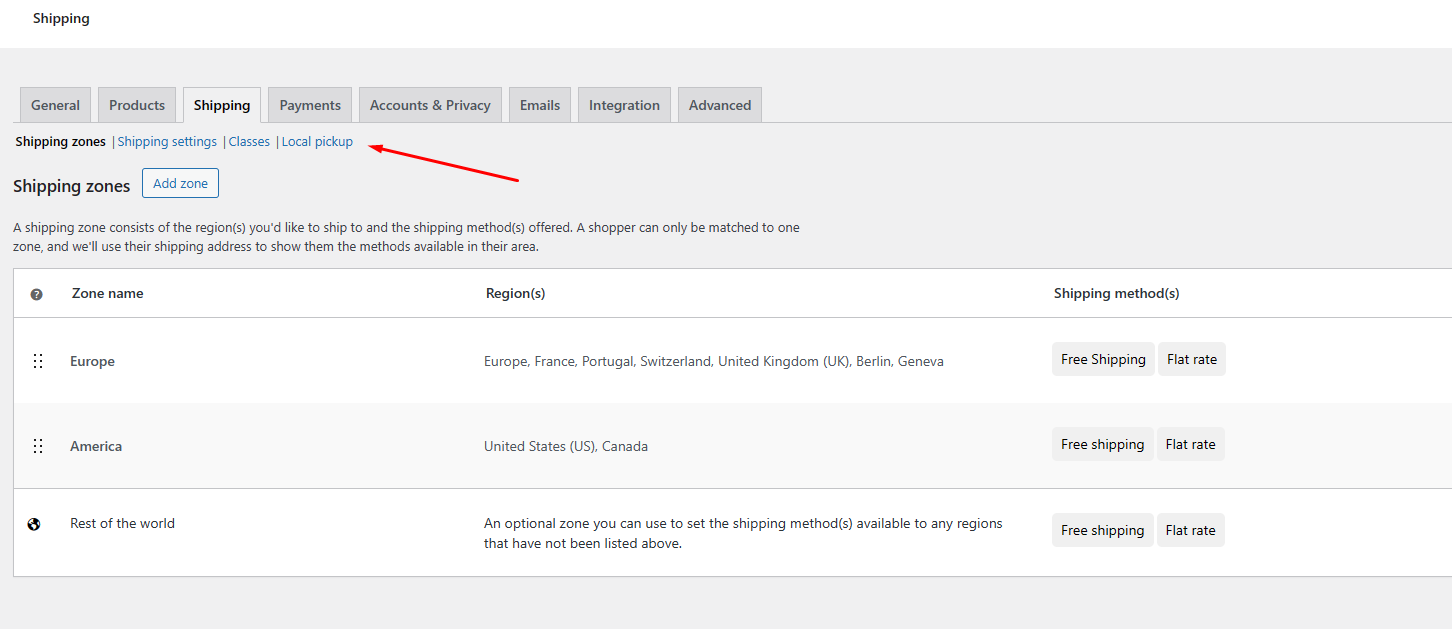
WooCommerce local pickup settingshave been moved to a separate dedicated tab.
- Add the Method to Your Zone
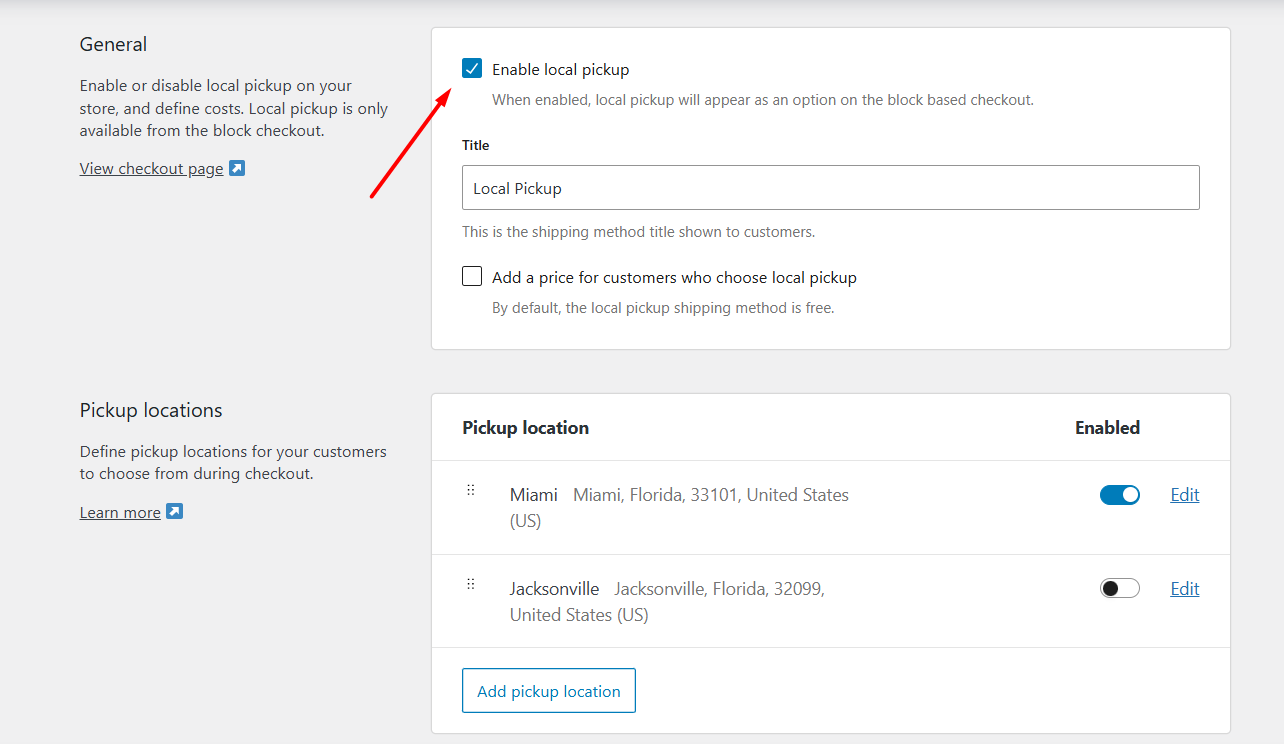
Go to WooCommerce > Settings > Shipping > Local Pickup.
- Enable Local Pickup
Check mark to enable the local pickup method.
- Set the Title
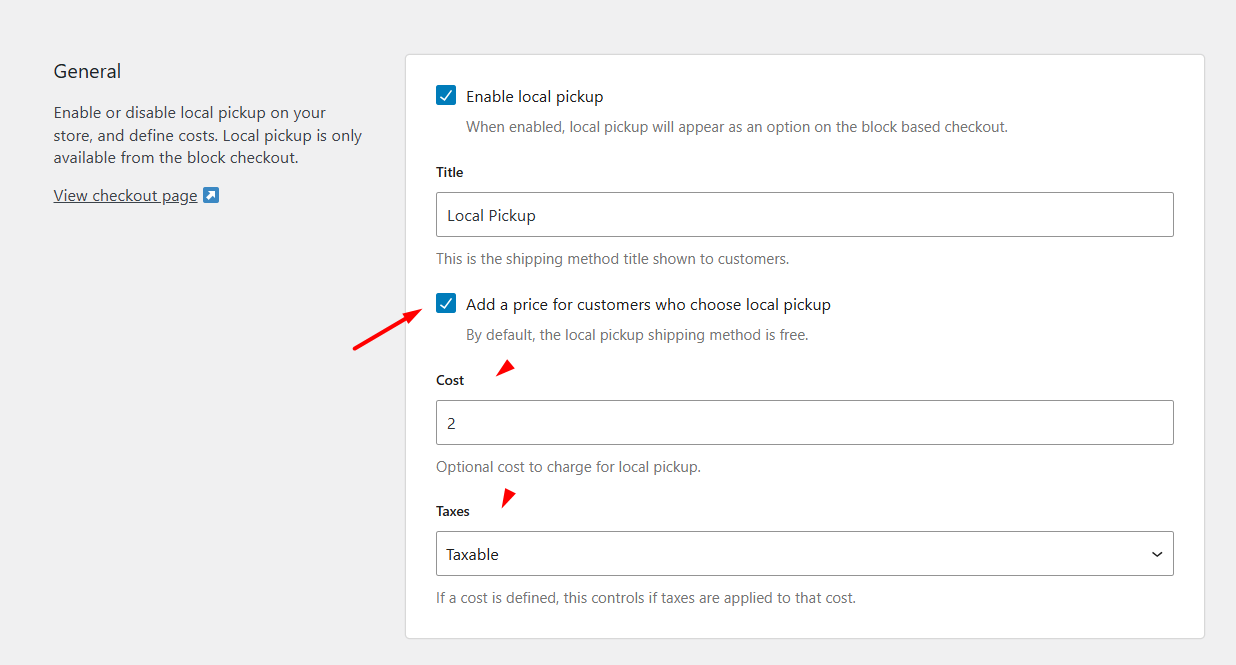
Give it a clear name, like “Pick Up In-Store” or “Local Delivery,” so customers know what to expect. - Enter a Cost (Optional)
Often free by default, but you can charge a small handling fee (e.g., $2.00) if you like.
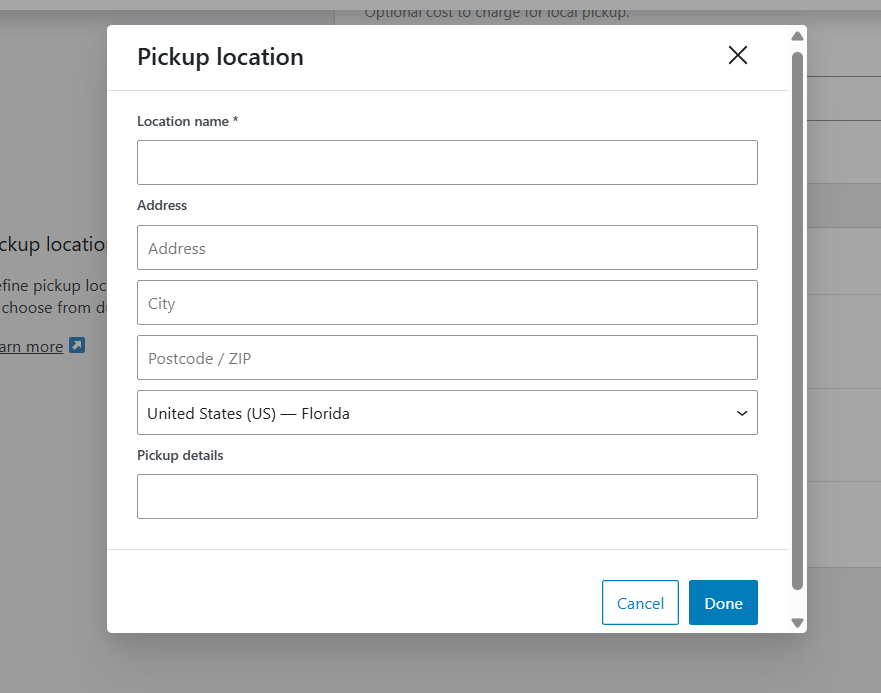
- Set Pickup Locations
Click Add Pickup Location and enter your store or warehouse details from where your customers will receive the packages.
- Save Changes
Click Save changes at the bottom of the screen. On the customer’s checkout page, they’ll now see:
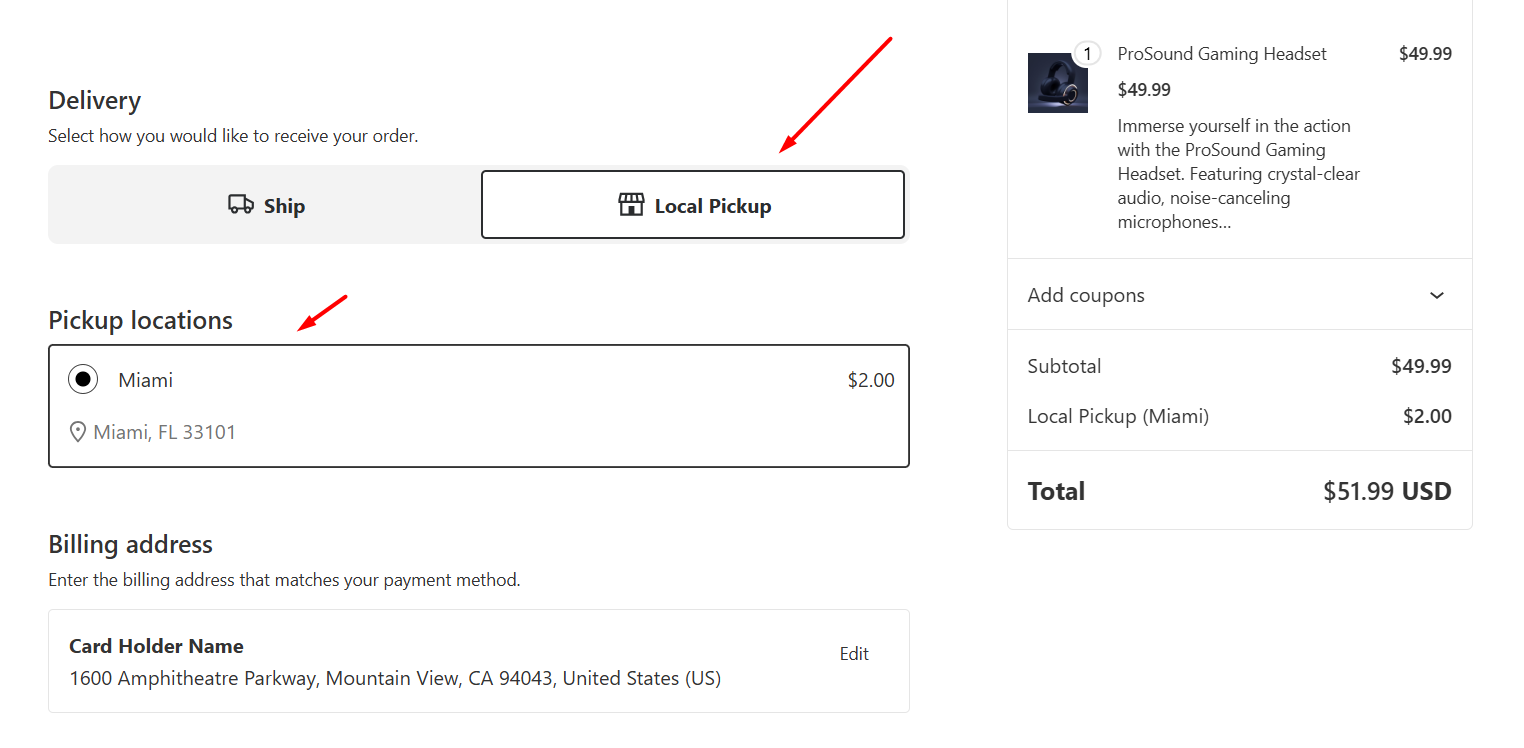
These are the built-in tools that answer your question on how to add shipping charges in WooCommerce in a simple, quick way.
Using WooCommerce Shipping Classes for Specific Products
When you sell very different items, say, small t-shirts alongside large, heavy posters, you need a way to charge different shipping fees without confusing your customers or overcomplicating your setup.
Shipping Classes let you group products by type (for example, “Lightweight,” “Standard,” and “Heavy”) so you can:
- Apply surcharges only where needed: Charge more for bulky or heavy items without penalizing every order.
- Keep your rates clear: A single flat-rate method can add extra per-class fees instead of juggling multiple separate methods.
- Simplify management: New products inherit the right fee automatically when you assign them to a class.
Step 1: Create a Shipping Class
- Go to WooCommerce > Settings > Shipping > Classes.
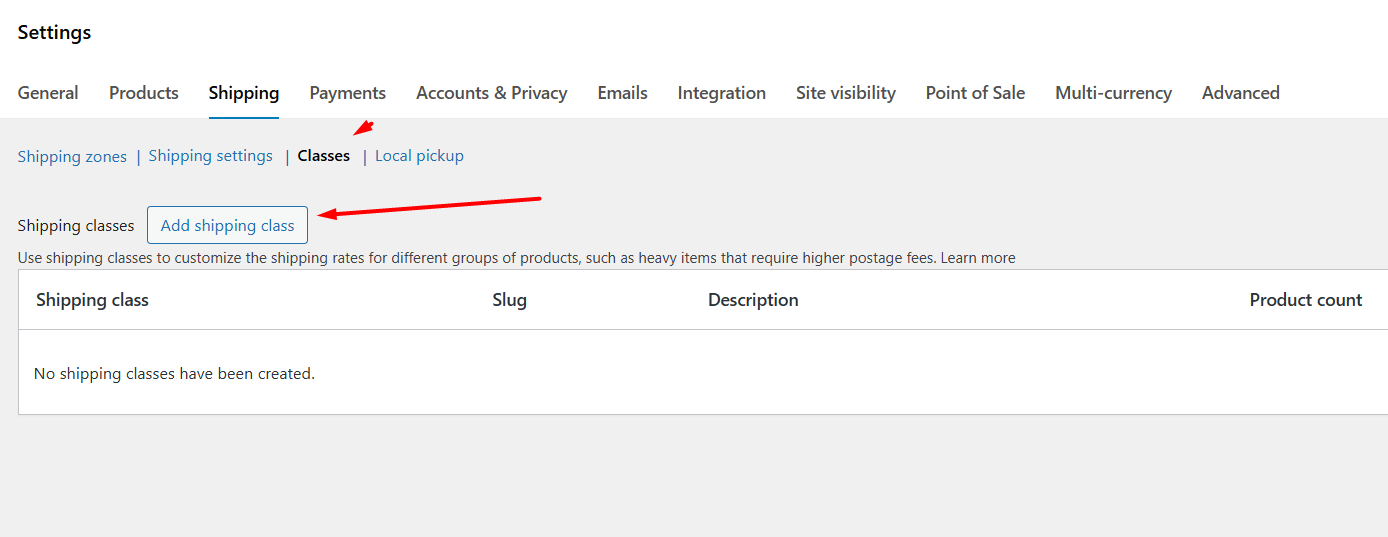
- Click Add shipping class.
- Give it a clear name (e.g., “Heavy Items”) and, optionally, a description.
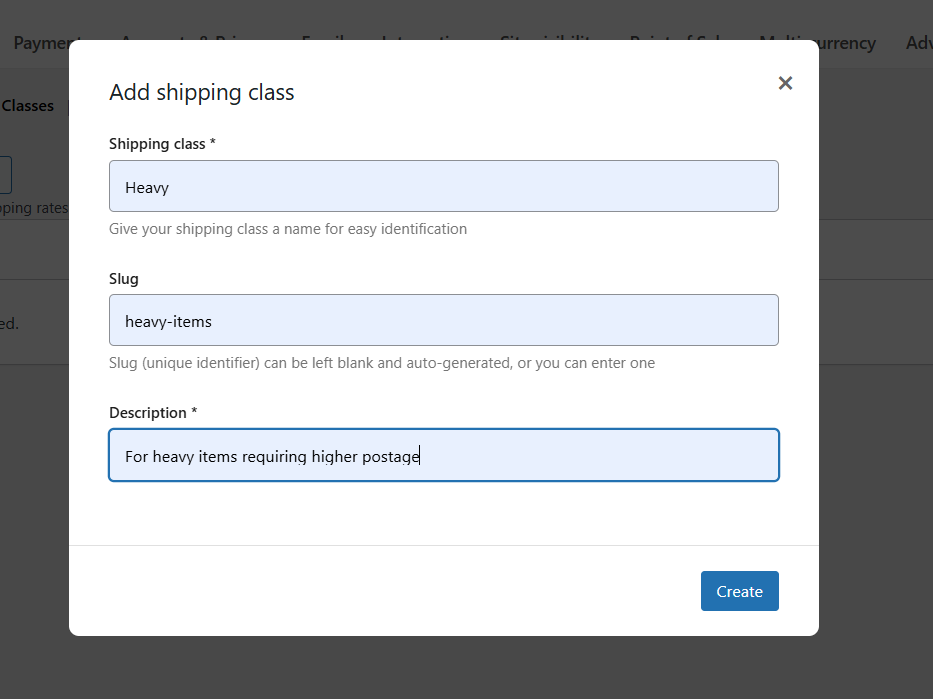
- Save.
These classes don’t charge anything by themselves—they just act as labels you can use in your shipping methods.
Step 2: Assign the Class to Your Products
- Simple products: Inside your product edit window, select your new class from the Product Data > Shipping > Shipping class dropdown.
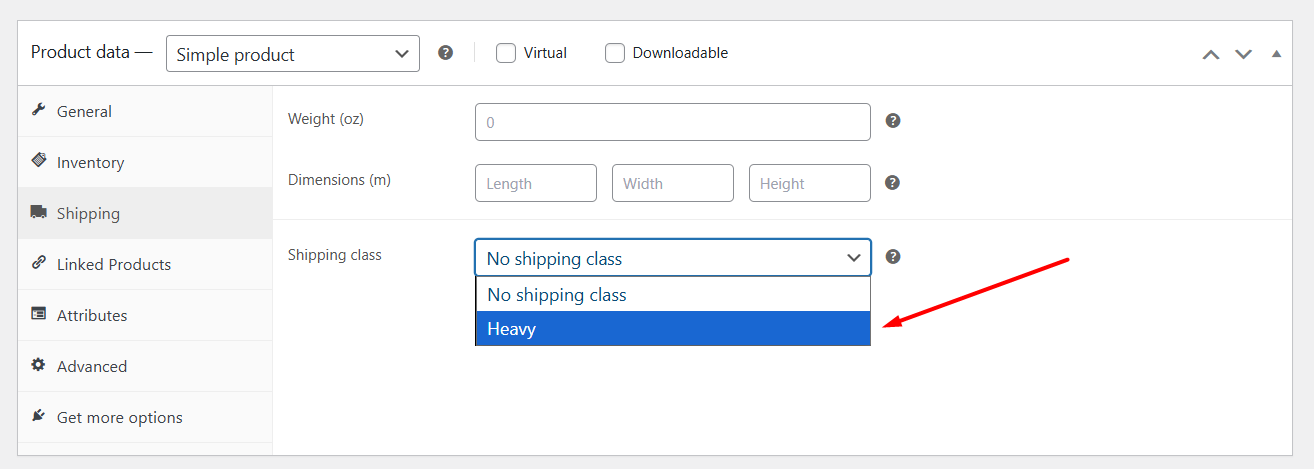
- Variable products: Either assign the class to the parent product or pick different classes for each variation under the Variations tab.
Once saved, each product will be tagged with its class and ready for the next step.
Step 3: Set Class-Specific Costs in Your Shipping Method
- In WooCommerce > Settings > Shipping > Shipping Zones, edit the zone you want (for example, “Domestic”).
- Under Flat Rate, open its settings.
- You’ll see fields for each shipping class you created, plus a “No shipping class cost” field. Enter the extra fee you want for each:
- No shipping class cost: Base fee for products without a class.
- Heavy Items: e.g. 10.00 (adds $10 per heavy item).
- Standard Items: e.g. 2.00 (adds $2 per standard item).
- Choose how costs stack when a cart has mixed classes:
- Per Order: Only the highest class fee applies.
- Per Class: Sum the fees for every class in the cart.
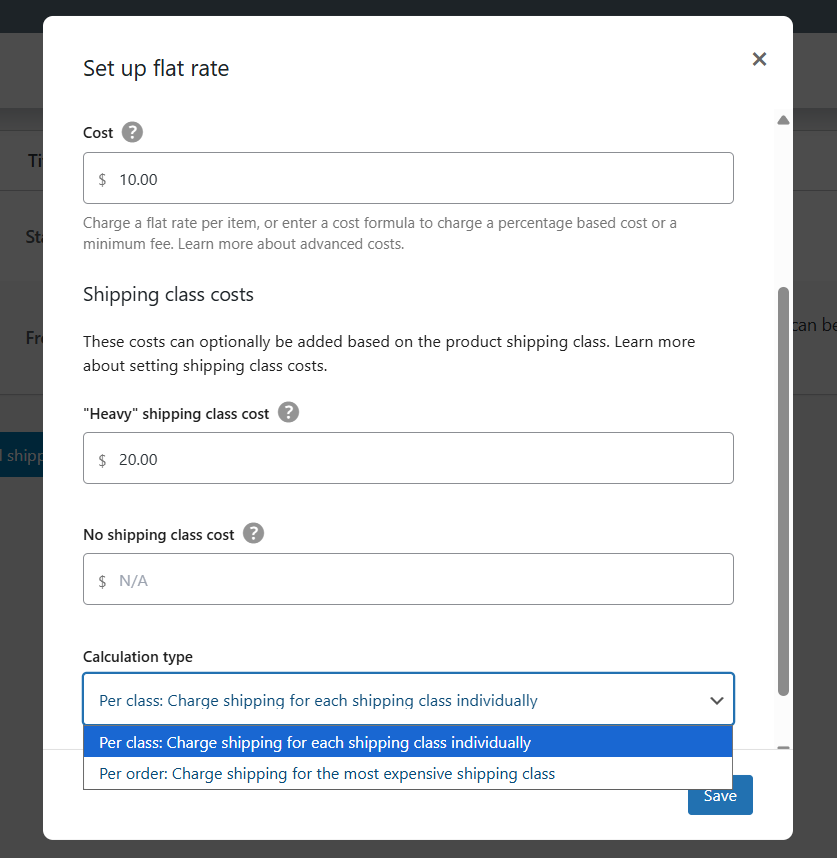
- Save changes.
Now, if a customer orders a heavy item, the flat-rate method we set above will add $10 flat fee + $20 for the heavy item (if you chose Per Class), or just the highest fee if you chose Per Order.

This is the process of how to add shipping charges in WooCommerce using the built-in tools.
Advanced Shipping Options for Complex Scenarios
Out of the box, WooCommerce gives you basic flat-rate, free shipping, and local pickup methods. But when you need rules like “charge more for heavy orders over 20 kg,” or “show UPS, FedEx, and USPS live rates side by side,” you’ll want a dedicated extension.
Here are three categories of plugins that take your shipping setup from simple to studio-grade:
1. Table Rate Shipping
What it does: Table rate shipping lets you define multiple rates in a grid (table) based on combinations of destination, price, weight, item count, or shipping class.
Why it helps: You can create rules like “$5 for orders under $50, $10 for $50–$100, $20 for over $100,” or “$2 per item plus $1 per kg.”
Example plugin:
- WooCommerce Table Rate Shipping (official) – built by WooCommerce, it supports per-zone, per-class, per-weight, and per-item rules with wildcards for regions.
- Other popular picks include Flexible Shipping Pro and PluginHive’s Table Rate Shipping Pro, each adding extra UI and import/export tools.
2. Weight-Based Shipping
What it does: Creates tiered shipping fees strictly according to the weight (and optionally the cart total) of the order.
Why it helps: You can match your carrier’s real costs without guesswork, for example, charging $7.50 up to 3 kg, $10.00 for 3–5 kg, and so on.
Example plugin:
- Weight-Based Shipping for WooCommerce (free on WordPress.org) offers flexible weight-range rules with optional cart-value breakpoints.
- Premium alternatives like the WooCommerce.com weight-based extension add extra conditions and UI polish.
3. Real-Time Carrier Rates
What it does: Connects directly to carriers (UPS, FedEx, DHL, USPS, etc.) via your account credentials to fetch live rates at checkout.
Why it helps: You never overcharge or undercharge—customers see exactly what the courier will bill you, plus any handling fees you configure.
Example options:
- WooCommerce Shipping & Tax provides built-in USPS, UPS, and DHL live rates, label printing, and scheduling pickups.
- PluginHive Multi-Carrier Shipping supports UPS, FedEx, DHL, USPS, Stamps.com, and more, displaying all rates together and letting shoppers pick the best option.
- Third-party bundles (e.g. Octolize Live Rates) let you plug into any carrier API your store needs.
By choosing the right mix of these extensions, you can build virtually any shipping rule your business demands—whether it’s a simple tiered table-rate model, weight-driven fees, or show-your-customer-exact-courier prices. That means fewer surprises at checkout, happier customers, and shipping costs that actually cover your expenses.
Troubleshooting WooCommerce Shipping Charges
Even small misconfigurations can block shipping at checkout or deliver the wrong rates. Here are the most common problems and how to fix them quickly:
Shipping Not Showing at Checkout
Often, WooCommerce simply can’t match a customer’s address to any of your Shipping Zones. If that happens, checkout will display “No shipping options available” instead of rates.
- Check zone coverage: Make sure each zone covers the exact country, state, or postcode pattern your customers live in. If you’re using wildcards, verify they match correctly (e.g., 902* covers 90210–90299).
- Confirm method assignment: Every zone needs at least one active shipping method (Flat Rate, Free Shipping, or Local Pickup). If all methods are removed or disabled, the zone simply has nothing to offer.
Incorrect Rates Being Calculated
You might see shipping fees that are too high, too low, or simply not what you entered. This usually comes down to formulas or class fees within a Flat Rate method.
- Review cost formulas: Double-check any [qty] * X or [fee percent=”P”] code you added. A stray bracket or missing decimal can skew the math. Try simplifying to a single number temporarily to isolate the issue.
- Inspect Shipping Classes settings: If you’ve assigned products to classes like “Heavy” or “Standard,” ensure the class surcharges in your Flat Rate settings match what you expect. Remember that you can choose “Per Class” (adds each surcharge) or “Per Order” (only the highest fee).
Zone and Method Conflicts
When two zones overlap, for example, you have one zone for “Europe” and another for “Germany”, WooCommerce always picks the first match in your list. That means a German customer might see your broad “Europe” methods instead of the special “Germany” rates you intended.
- Reorder Zones: Drag more specific zones above general ones in WooCommerce > Settings > Shipping > Shipping Zones. Place cities before states, states before countries, and you must add “Rest of the World” at the very bottom if you deliver globally.
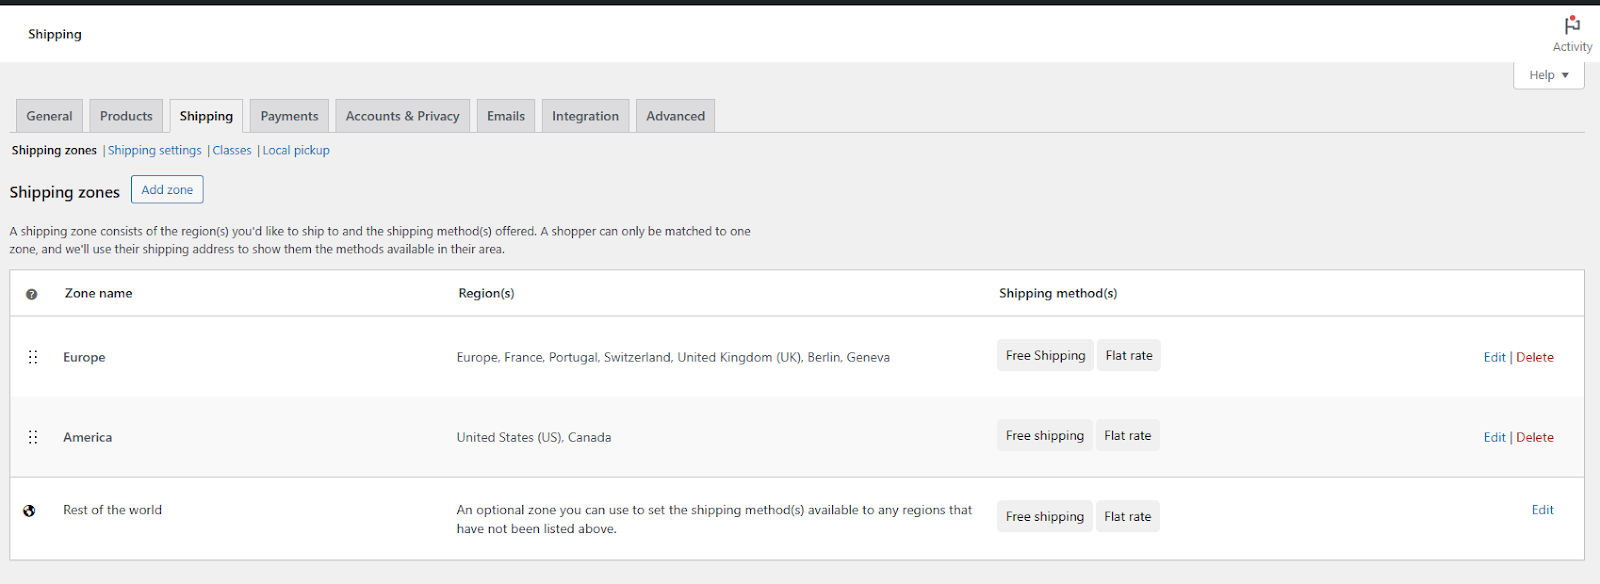
- Conflict Test: Disable all non-shipping plugins and switch to a default theme like Storefront. If rates reappear correctly, reactivate your theme and plugins one at a time to find the culprit (often a poorly coded extension).
Best Practices for Configuring WooCommerce Shipping Costs
Now that you have learned how to add shipping charges in WooCommerce, let’s discuss some essential best practices. Follow these four guiding principles:
1. Be Transparent
Show shipping fees clearly on product and cart pages, not just at checkout. That upfront clarity builds trust and reduces surprises that lead to cart abandonment. Many merchants display a “Shipping Calculator” box on the cart page so buyers can see exact costs before entering payment details.
2. Test Your Setup Thoroughly
Don’t assume a single test is enough. Run orders for different products, classes, and addresses (domestic, international, wildcard postcodes) to confirm every zone and method behaves as expected. Use WooCommerce’s built-in debug mode to log shipping logic and spot where mismatches occur.
3. Factor in Your Margins
Your shipping rates should cover actual carrier costs, packing materials, and handling time, not just look competitive. Regularly compare your flat-rate or table-rate formulas against real invoices to avoid hidden losses. If you’re using weight-based or table-rate plugins, review and adjust brackets as carrier fees change.
4. Review and Adjust Periodically
eCommerce is always changing, fuel surcharges rise, new zones demand new rates, and customer expectations shift. Schedule a quarterly audit of your shipping settings.
Look at your top-selling products and zones to ensure rates remain accurate and profitable. Encourage customer feedback on delivery costs and incorporate that insight into each review cycle.
Wrap Up
With these tools and strategies in place, you now know how to add shipping charges in WooCommerce in a way that’s both accurate and transparent.
From defining zones and choosing core methods to fine-tuning flat‐rate formulas, classes, and advanced plugins, each step helps you cover costs and delight customers. Test your setup, watch your margins, and revisit rates regularly.
And thus, you’ll turn shipping from a headache into a smooth part of your store’s success.
