Fadiyah Sameh
To set up a WooCommerce flash sale by creating time-limited discount rules. Use tools like Disco Plugin to define sale duration, select products or categories, and set discount types (percentage or fixed). Add conditions like user roles or cart total. Once activated, the flash sale automatically applies, creating urgency and boosting sales.
Ever feel like your online store needs a jolt of adrenaline? Something to inject some serious excitement and send those sales figures soaring?
Then you, my friend, need to unleash the power of WooCommerce flash sale! Think of them as a lightning strike of discounts, a whirlwind of limited-time deals that create a frenzy of buying activity.
And let’s be honest, who doesn’t love a good deal? Your customers certainly do.
Flash sales are a secret weapon for smart eCommerce stores. They’re your chance to clear out inventory, re-energize your customers, and attract new shoppers.
The results can be incredible: We’re talking about a potential 35% boost in transactions, and some stores even see sales jump by a mind-blowing 64,000%!
Plus, everyone will be talking about your brand. In this tutorial, we’ll show you exactly how to create a flash sale in WooCommerce in minutes.
Let’s jump right into it.
Table of Contents
WooCommerce Flash Sale Setup in 5 Minutes: A Hands-On Guide
To be honest, the built-in coupon tool of WooCommerce isn’t the perfect choice for offering WooCommerce flash sale pricing and discounts due to its manual approach, and using custom codes for generating automated time-specific discount campaigns is not everyone’s cup of tea.
Solution: a WooCommerce flash sales plugin. Plugins allow you to create advanced discount strategies within a few clicks and give you ample flexibility.
For this article, we will use the free plugin, Disco. This plugin packs all the muscles to run effective flash sale campaigns.
Let us walk you through the steps on how to run a flash sale offer on WooCommerce using Disco.
Example Scenario: 20% discount on all products for a limited time – from 10 AM to 2 PM tomorrow.
Here are the steps –
Step 1: Install a WooCommerce Flash Sale Plugin
You can find Disco in the WordPress repository, as it’s a free plugin.
- Login to your WordPress admin panel and go to Plugins>>Add New.
- Search, install, and activate the plugin.

Step 2: Create a Discount Rule
- From the WordPress dashboard, click on Disco.
- To create a new WooCommerce flash sale rule, click the Create a Discount button.

- Give your campaign a name.

- Select Product from the Discount Intent section.
- Select All Products as we are offering this discount on all products.

Step 3: Configuring the Sale Duration (Start and End Times)
Next, you need to set your flash discount campaign’s start and end date and time. You can set this from the Valid Between fields.
- Select and set the start date from the first field.

- After that, set the end date and time.

Step 4: Setting the Discount Percentage
- In the Products Rule section, select the Percentage Discount option from the Discount Type dropdown.
- Enter your percentage value in the Discount Value box.

Step 5: Save and Test
Finally, save the rule by clicking the Save button.

WooCommerce will automatically activate the discount on the right date and time. It will also end as scheduled.
To test the flash discount rule, you can set a nearby or current starting time and date. This is what the product pages will show when the flash sale is live:

That’s how you can easily launch a limited-time discount campaign using a WooCommerce flash sale plugin.
Effective WooCommerce Flash Sale Strategies for Your Store
Limited-time offers aren’t just about slashing prices—they’re about creating urgency, excitement, and irresistible value. With the right flash sale strategies, you can skyrocket conversions, clear out inventory, and build customer loyalty.
Let’s explore some proven tactics that will help you create flash sales that convert like crazy.
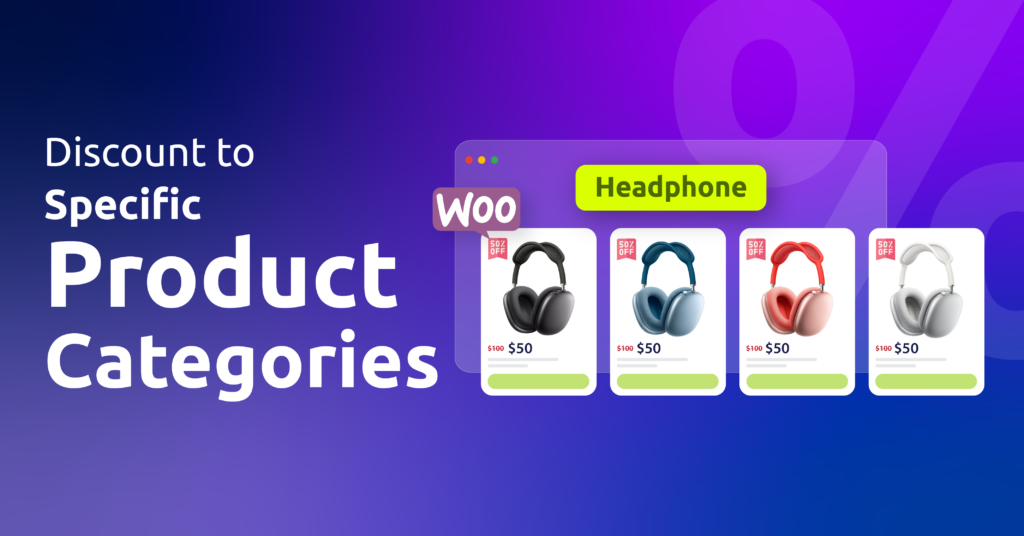
1. Category-Specific Flash Sale: Target Interested Shoppers
- Example: 25% off all ‘Hoodies’ for 24 hours.
Want to target a specific segment of your audience?
A time-limited category-specific discount lets you focus your discount on products that certain customers are most likely to buy. This is a smart way to boost revenue with WooCommerce flash sale plugins.
- Use Cases:
- Promoting a new product line within a category.
- Clearing out excess inventory in a specific category.
- Driving sales of seasonal items in a category.
- Cross-selling related products within a category.
How to Setup Category-Specific WooCommerce Flash Sale?
To create this type of WooCommerce category discounts using Disco, you will need to apply conditions filters.

Disco offers a wide range of conditions for you to customize and personalize your discount rules based on various criteria, such as product type, customer behavior, user roles, etc.
Here’s the example again – 25% off all ‘Hoodies’ for 24 hours.
- Select the Product discount intent and All Products.
- Set the start and end time from the Valid Between fields.

- Input the WooCommerce sale flash percentage value.
- Click the Add Condition button.

- Select the Categories filter from the dropdown.

- Search and select your target category – ‘Hoodies.’

- Save and test the rule.
Here’s how WooCommerce shows product sale flash on the category page.

2. Holiday-Themed WooCommerce Flash Sale: Capitalize on Celebrations (Black Friday, Cyber Monday, Halloween, New Year, etc.)
- Example: 30% off EVERYTHING all weekend long during our Black Friday/Cyber Monday Flash Sale – don’t miss out!
Holidays are prime time for shopping. A holiday-themed flash discount lets you tap into the festive spirit and drive a surge of sales. It’s a fantastic way to increase sales with WooCommerce flash sales during key shopping periods.
- Use Cases:
- Black Friday and Cyber Monday promotions.
- Seasonal and Year-End Sales.
- Singles’ Day (11.11 Sale)
- Other popular and traditional occasions for discount campaigns.
How to Run a Black Friday / Cyber Monday Promotion in WooCommerce?
Let’s say the upcoming 2025 Black Friday and Cyber Monday are between – Friday, November 28, and Cyber Monday will be on Monday, December 1. So you want to set the start and end date as follows,
- Start Date: 12:01 AM, November 28.
- End Date: 11:59 PM, 1st December
Here’s how to set this rule.
- Select the Product and All Products options from the top sections.
- From the calendar tool in Disco, select and set the start month, date, and time.
- Similarly, set the end date and time.

- Input the percentage discount and save the rule. Disco will automatically start and end the campaign as per your set date and times.

3. Member-Only Flash Sale: Reward Your VIPs
- Example: Exclusive 48-hour flash sale for ‘Platinum’ members only with discounts up to 40%.
Make your loyal customers feel extra special with member-only limited-time offers. This exclusive offer rewards their loyalty and incentivizes others to join your membership program.
It’s a powerful way to build customer relationships. User role-based discounts are significantly effective for WooCommerce sites with membership tiers where users can upgrade to higher plans.
You can offer exclusive discounts to higher membership levels and incentivize all your members to spend more and upgrade.
- Use Cases:
- Driving membership sign-ups.
- Increasing customer retention.
- Generating excitement for a larger public sale.
- Showing appreciation to your most valuable customers.
How to Offer User Role-Based Flash Sale Discounts in WooCommerce?
Here are the steps to create this type of WooCommerce limited-time sale campaign.
- Select the Product or Cart intent and specify your products.
- Set start and end time from the Valid Between fields.

- Add the condition User Role.

- Scroll or type in and select your user role.

- Save the rule, and WooCommerce will automatically allocate the discounts to the specific members.
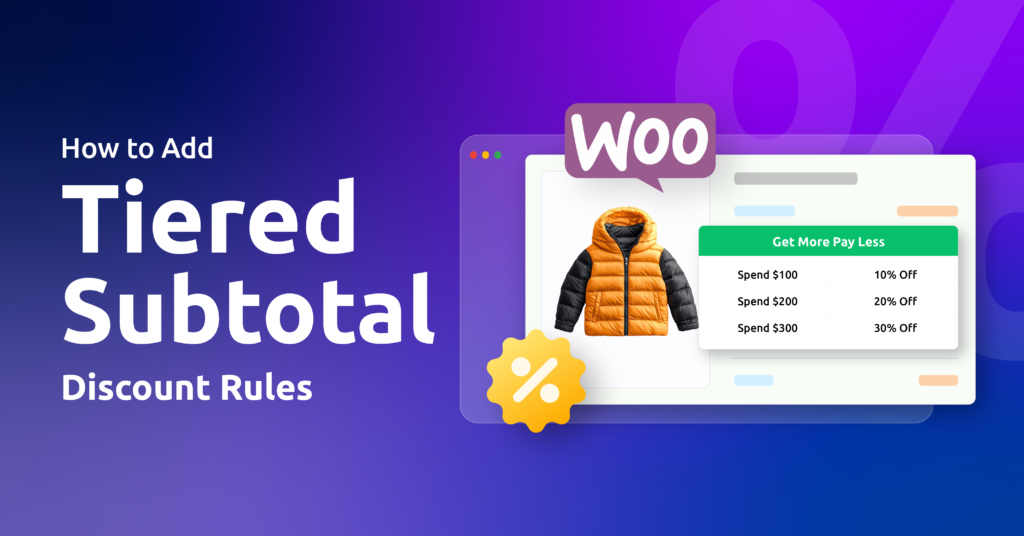
4. Tiered Flash Sale: Incentivize Bigger Spends
- Example: 10% off orders for 2-5 items, 15% off orders between 6-9 items, and 20% off 10+ orders for a limited time.
Want to encourage customers to spend more during your WooCommerce flash sale?
Tiered or bulk discounts offer increasing rewards for larger purchases, motivating customers to add more items to their cart. This is a great way to increase sales and boost revenue.
- Use Cases:
- Clearing out excess inventory.
- Promoting higher-priced items.
- Encouraging bulk purchases.
- Driving sales of related products.
How to Setup Tiered Based WooCommerce Flash Sale?
Let’s retake a look at the example –
For a limited time:
- Buy 2-5 items → 10% off
- Buy 6-9 items → 15% off
- Buy 10+ items → 20% off
Let’s create the rule using the flash sale plugin WooCommerce.
- Select the Bulk discount intent this time and specify your products.
- Set the date and time for starting and ending the discount campaign automatically.

- You need to configure your tiered settings from the Bulk Rules section. To start, input 2 in the Minimum Quantity box and 5 in the Maximum Quantity box.
- Select the Percentage option and enter your value. Next, click the Add More button to add a new row.

- Set your second set of values and add another row.
- Similarly, input your final value set. Keep the Maximum field empty to accept any quantity over 10.

- Save the discount rule.
Here’s how the cart page will apply the discount for 2-5 items.

For 6-9 items –

Finally, if customers add 10 or more items, they will get 20% off on the cart total.

5. Free Shipping Flash Sale: Remove a Barrier to Purchase
- Example: Free shipping on specific products in the next 12 hours.
Free shipping can be a huge motivator for online shoppers. A free shipping discount removes a common barrier to purchase and can significantly boost your conversion rates. This is an effective way to drive traffic with WooCommerce flash sales.
- Use Cases:
- Increasing average order value.
- Encouraging impulse purchases.
- Competing with other retailers offering free shipping.
- Boosting sales during slower periods.
How to Create a Free Shipping Discount for a Limited Period in WooCommerce?
This time, we are creating WooCommerce flash sale discounts for specific products. Here’s how to do it.
- Select Shipping discount intent.
- From the Discount section, select the Few Products option.

- Search and select your target products.

- Set your time limit from the Valid Between fields in Disco.

- Save the campaign. You can test the rule by setting a nearby start time.

6. Cart Condition Flash Sale: Target Specific Behaviors
Example: This weekend only, get 15% off your entire order when your cart total reaches $100 or more.
Want to encourage customers to spend more during their visit?
A cart-based flash sale allows you to offer discounts based on customer cart conditions (e.g., cart subtotal, cart items count, etc.). This is a highly effective way to incentivize larger purchases and boost your average order value.
- Use Cases:
- Driving larger purchases.
- Increasing average order value.
- Promoting specific product categories.
- Clearing out excess inventory.
How to Offer Cart-Based WooCommerce Flash Sale Discounts?
Here’s how you can set up a time-limited WooCommerce cart discount.
- Select the Cart intent, and we will go with All Products.
- Configure start and end times.

- Input your percentage value in the Discount Value box.
- Add the condition Cart Subtotal.
- Select the Greater Than Or Equal operator and enter the minimum cart subtotal value.

- Save the rule. Thus, customers who add items worth $100 or more between the target weekends will get 15% off their cart total.

7. Fixed Price off Flash Sale: Attract Bargain Hunters
- Example: $15 off on all gadgets during our flash sale.
With a fixed-price, time-specific discount, you can attract bargain hunters and create a sense of urgency. This strategy makes it easy for customers to see the amazing value of your deals, driving impulse purchases and boosting sales.
- Use Cases:
- Clearing out low-value items.
- Attracting price-sensitive customers.
- Driving impulse purchases.
- Promoting specific products.
How to Offer Fixed Price Flash Sale Discounts?
Here’s how to set a flat amount short-term sale discount rule.

- Start by selecting the Product intent and select All Products.
- Set up the start and end times of the campaign.
- Select the Fixed Discount option from the Discount Type dropdown and enter your target value.
- Add the Categories condition and select the category you are targeting – Gadgets.

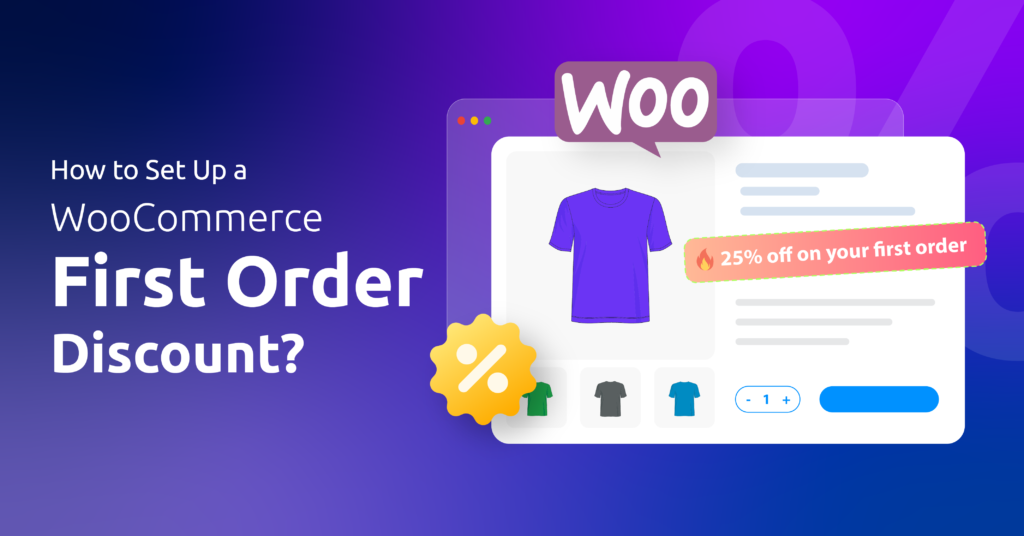
How to Setup WooCommerce Flash Sale Coupons?
While a dedicated time-specific discount plugin is often the most efficient way to run flash sale campaigns, you can also use the platform’s built-in coupon functionality. This method is suitable for simpler time-limited campaigns, but it’s important to be aware of its limitations.
Step-by-Step Guide to Create Flash Sale Coupons in WooCommerce
Let’s say you want to offer 15% off all “Summer Collection” items for the next 2 days.
Here are the steps:
Step 1: Head to Coupons
In your WordPress dashboard, go to Marketing and then click on Coupons.

Step 2: Add a New Coupon
Click the “Add coupon” button. It’s time to create some savings magic!
Step 3: Name Your Coupon
Give your coupon a code. For our Summer Collection sale, let’s use 15FLASH. Make it something memorable and easy for your customers to use.
Step 4: Set the Discount
Choose “Percentage discount” from the dropdown menu. Since we’re giving 15% off, enter 15 in the “Coupon amount” field.

Step 5: Set the Expiry Date
This is crucial for a flash sale! Select a “Coupon expiry date” two days after your publish date when you want the sale to end. Remember, coupons don’t have a start time, so you’ll activate them manually when the sale begins.

Step 6: Set the Target Category – Summer Collection
Jump to the “Usage restrictions” section. In the “Product categories” field, select the “Summer Collection” category. This ensures the discount only applies to those items.

- (Optional) Limit Usage: In the “Usage limits” section, you can set limits on how many times the coupon can be used (e.g., only the first 100 customers get the discount).

Step 7: Publish Your Coupon
Once you’ve double-checked everything, hit the “Publish” button.

Your coupon is now created. Test it from the front by applying the coupon in the appropriate box on the cart page.

Limitations of Coupons for Flash Campaigns:
While coupons work for very basic flash sales, they have key limitations compared to a dedicated flash sale plugin. Here are some limitations you must be aware of:
- No Start Date/Time: Coupons lack a start date and time. You must manually activate them. This makes scheduling and automation difficult for your WooCommerce limited-time sale.
- Limited Automation: Changing the discount percentage value or showing which products are on sale requires manual work.
Therefore, a dedicated plugin is the best choice for flexibility and complex flash sale campaigns. As you know by now, Disco is one of the best WooCommerce flash sale plugin for scheduled discounts.
Setting up a WooCommerce Flash Sale without a Plugin (Using Custom Codes)
If you don’t want to use a plugin, you can manually set up a flash sale with a bit of custom coding. This method lets you control discounts, start and end times, and display sale messages without adding extra plugins.
Example campaign:
✔ Applies a 30% discount to all products for the next 24 hours
✔ Displays a countdown timer on product pages
✔ Adds a flash sale badge to sale products
✔ Ends the sale automatically after 24 hours
Follow these steps to set it up:
Add a 30% Discount to All Products for 24 Hours
- Go to Appearance >> Theme File Editor, open functions.php, and add the following code and save:

function apply_flash_sale_discount($cart) {

if (is_admin() && !defined('DOING_AJAX')) return;

// Get the sale start time (24 hours from the moment this runs)

$flash_sale_start = strtotime("now");

$flash_sale_end = $flash_sale_start + (24 * 60 * 60); // 24 hours from now

if (time() > $flash_sale_end) return; // Stop discount after 24 hours

foreach ($cart->get_cart() as $cart_item) {

     $product = $cart_item['data'];

     $original_price = $product->get_regular_price();

     $discounted_price = $original_price * 0.7; // 30% off

     $product->set_price($discounted_price);

}

}

add_action('woocommerce_before_calculate_totals', 'apply_flash_sale_discount', 10, 1);
What This Does:
- Applies a 30% discount to all products in the cart.
- The sale starts when the first customer visits the store.
- Ends exactly 24 hours after the sale starts.

💡 If you want to set a fixed sale time (instead of 24 hours from now), replace strtotime(“now”) with a specific time, e.g., strtotime(“Feb 10, 2025 00:00:00”).
2. Modify Product Price Display (Show Strikethrough Original Price & Discounted Price)
- This code displays both the original and discounted prices on product pages.
function show_flash_sale_price($price, $product) {

$flash_sale_start = strtotime("now");

$flash_sale_end = $flash_sale_start + (24 * 60 * 60); // 24 hours from now

if (time() < $flash_sale_end) {

     $original_price = wc_get_price_to_display($product, array('price' => $product->get_regular_price()));

     $discounted_price = wc_get_price_to_display($product, array('price' => $product->get_regular_price() * 0.7));

    return '<span style="text-decoration: line-through; color: red; font-size: 16px;">' . wc_price($original_price) . '</span> ' .

            '<span style="color: green; font-size: 18px; font-weight: bold;">' . wc_price($discounted_price) . '</span>';

}

return $price;

}

add_filter('woocommerce_get_price_html', 'show_flash_sale_price', 10, 2);
What This Does:
- Shows original price in red with a strikethrough.
- Displays WooCommerce flash sale new discounted price in bold green.
- Automatically reverts to normal when the sale ends.
3. Add a Countdown Timer to Product Pages
This timer shows the remaining time for the sale on product pages.
- Add This Code to Your Functions.php:
function flash_sale_countdown() {

if (is_product()) {

     echo '<div id="flash-sale-timer" style="font-size:18px; font-weight:bold; color:red; margin-top:10px; margin-left:10px;"></div>';

     echo '<script>

         function startCountdown(endTime) {

             function updateTimer() {

                 let now = new Date().getTime();

                 let timeLeft = endTime - now;

                 if (timeLeft <= 0) {

                     document.getElementById("flash-sale-timer").innerHTML = "Flash Sale Ended!";

                     return;

                 }

                 let hours = Math.floor((timeLeft / (1000 * 60 * 60)) % 24);

                 let minutes = Math.floor((timeLeft / (1000 * 60)) % 60);

                 let seconds = Math.floor((timeLeft / 1000) % 60);

                 document.getElementById("flash-sale-timer").innerHTML = "Hurry! Sale ends in: " + hours + "h " + minutes + "m " + seconds + "s";

             }

             setInterval(updateTimer, 1000);

         }

         let saleEndTime = new Date(new Date().getTime() + (24 * 60 * 60 * 1000)).getTime(); // 24 hours from now

         startCountdown(saleEndTime);

     </script>';

}

}

add_action('woocommerce_single_product_summary', 'flash_sale_countdown', 15);
What This Does:

- As you can see on the above gif, it shows a live countdown timer on product pages.
- Updates in real-time, creating urgency.
- Displays “Flash Sale Ended!” once time runs out.
4. Add a Flash Sale Badge to All Products
This ensures all products get the “Flash Sale!” badge.
function add_flash_sale_badge_to_all_products() {

$flash_sale_start = strtotime("now");

$flash_sale_end = $flash_sale_start + (24 * 60 * 60); // 24 hours from now

if (time() < $flash_sale_end) {

     echo '<span class="onsale" style="background:red; color:white; padding:5px; font-size:12px; position:absolute; top:10px; left:10px;">Flash Sale!</span>';

}

}

add_action('woocommerce_before_shop_loop_item_title', 'add_flash_sale_badge_to_all_products', 10);

add_action('woocommerce_before_single_product_summary', 'add_flash_sale_badge_to_all_products', 10);
What This Does:
- Places a red “Flash Sale!” badge on all product images.
- Works on category pages and product pages.
- Automatically removes itself when the sale ends.
5. Save and Test
Update the function.php file. You now have a fully automated 24-hour Sale running in WooCommerce—without any plugins!
Here’s how a product page displays the WooCommerce flash sale information now.

The discount, timer, and sale badge start and stop on their own, making the process seamless.
Flash Sales vs. Regular Discounts: A Strategic Comparison
So, you’re offering discounts. Great! But should you run a time-limited flash sale or just put items on regular sale?
Knowing the difference between these two promotional powerhouses is key to maximizing your sales and reaching your business goals. Let’s break it down:
Key Differences: Urgency vs. Consistency
The biggest difference between a WooCommerce flash sale and a regular discount boils down to urgency.
- Flash sales are all about creating a sense of “act now or miss out!” They’re short, impactful bursts of discounts designed to drive immediate action.
- Regular discounts, on the other hand, are more about consistent value. They offer ongoing savings but lack the same level of urgency.
When to Use Each: Short Bursts vs. Ongoing Promotions
So, when you should run a flash sale for WooCommerce store?
Flash sales as your short-term, high-impact promotional strategy. They’re perfect for:
- Clearing out excess inventory quickly.
- Generating a surge in sales during a specific period.
- Creating excitement and buzz around your brand.
- Driving traffic to your website.
Regular discounts are your long-term, steady-value strategy. They’re better suited for:
- Attracting price-sensitive customers.
- Building customer loyalty over time.
- Promoting specific product categories consistently.
- Maintaining a steady flow of sales.
The Psychology of Limited-Time Offers: FOMO and Scarcity
The magic of flash sales lies in their ability to tap into two powerful psychological triggers:
- FOMO (Fear of Missing Out)
- Scarcity
FOMO (Fear of Missing Out)
Nobody wants to miss out on a great deal. The limited-time nature of a flash sale creates a sense of urgency.
Customers worry that if they don’t act quickly, they’ll lose out on the savings. Think about it: When you see a countdown timer ticking down on a product you’ve been eyeing, you’re much more likely to make the purchase now rather than later.
Scarcity
When something is in limited supply, it becomes more desirable. Flash sales often combine FOMO with scarcity (limited-time and limited quantities) to create an incredibly powerful incentive to buy.
For example, a “24-hour flash sale on only 100 units of this popular item” combines both FOMO and scarcity to drive rapid sales.
Examples of FOMO in Action:
- “Only 2 hours left to save 20%!”
- “Don’t miss out! This flash sale ends at midnight!”
- “Limited quantities available – shop now before they’re gone!”
By understanding the psychology behind short-term sales, you can craft promotions that are not only effective but also ethically persuasive. A good flash sale plugin can help you implement these strategies effectively.
Remember,flash discountsare more impactful when combined with a sense of urgency. If you’re asking how do I set up a flash sale in WooCommerce that really converts, understanding FOMO is key.
Best Practices for Running Time-Limited Promotions in WooCommerce
Ready to launch a WooCommerce flash sale that’ll have your customers buzzing? Here’s the inside scoop on making your flash sale a roaring success:
Promotion: Shout it from the Rooftops!
- Email Marketing: Craft a compelling email announcing the sale and teasing the incredible deals.
- Social Media: Share eye-catching graphics and videos. Use relevant hashtags. Run contests or giveaways.
- On-Site Banners: Make sure your visible and enticing.
- Influencer Marketing (if relevant): Partner with influencers to reach a wider audience.
Inventory Management: Don’t Run Out of the Good Stuff!
- Check Inventory: Double-check your stock before the sale.
- Anticipate Demand: Consider increasing inventory beforehand if you expect a surge in orders.
Timing: When to Strike
- Know Your Audience: When are they most likely to be online?
- Experiment: Test different days and times.
- Schedule (with a Plugin): A flash sale plugincan help you schedule sales.
Mobile Optimization: Shop on the Go!
- Mobile-Friendly Website: Ensure your site is mobile-friendly.
- Fast Loading Pages: Optimize product pages for mobile.
- Smooth Checkout: Make the checkout process easy on mobile.
- Test on Devices: Check for glitches on different devices.
Measuring the Success of Your Flash Sales: Data-Driven Insights
So, you’ve run your WooCommerce flash sale – congratulations! But how do you know if it was a home run or just a base hit?
That’s where data comes in. Let’s dive into the key metrics you need to track to measure your flash sale success:
Key Metrics: The Numbers That Matter
- Sales: The most obvious metric! Did your sales increase during the flash sale? By how much? Compare sales during the Sales campaign period to a similar period before or after.
- Conversion Rates: What percentage of visitors actually made a purchase? A successful WooCommerce flash sale should see a significant jump in conversion rates.
- Website Traffic: Did your quick sale campaign drive more traffic to your site? Look at your website analytics to see if there was a spike in visitors during the sale.
- Average Order Value: Did customers spend more per order during the limited-time Sale campaign? A good flash sale can encourage larger purchases.
- Customer Engagement: Were customers interacting with your website and social media more during the flash sale? Track social media mentions shares, and comments.
WooCommerce Analytics: Your Built-In Dashboard

WooCommerce has some built-in reporting tools that can give you a basic overview of your sales data. Explore the reports section in your WooCommerce dashboard to see information on sales by date, product performance, and more.
Google Analytics: Deep Dive into Data
For more in-depth analysis, Google Analytics is your go-to tool. You can track website traffic, conversion rates, and other key metrics related to your WooCommerce flash sale.
Set up goals and track your progress to see how your flash sale performed. By analyzing this data, you can understand what worked well and what you can improve for future flash sales.
Knowing how to analyze this data is a key part of knowing how to run a flash sale offer on WooCommerce. This data will also help you determine the benefits of running time-specific Sales in WooCommerce.
Wrap up
That’s it! Now you know how to run a WooCommerce flash sale campaign like a pro.
And remember, there’s no one-size-fits-all approach to flash sales. Experiment, have fun, and find what works best for your store. Track your results, learn from your successes (and your not-so-successes), and keep tweaking your strategies. You got this!