Quick Takeaway:
WooCommerce automatically displays a price range for any variable product once its variations have different prices; no setup required. Where most stores get stuck is customizing that range (“From $10” instead of “$10 – $20”), hiding it in favor of a single price, or fixing a range that will not update.
This guide covers all three fixes: the built-in default method, four ready-to-use PHP snippets, and a no-code plugin, plus a decision table to help you pick the right one, a troubleshooting section for the most common display bugs, and an FAQ covering what shoppers and store owners actually search for.
If your store also needs tiered pricing, role-based pricing, or bulk discounts on top of a clean price range display, Disco’s dynamic pricing rules handle that without extra code — see the plugin’s Pricing page for details.
Ever clicked on a product that says “From $10” only to realize the actual price is $10,000? Yeah, we’ve all rage-closed that tab. Price ranges aren’t just about numbers. They’re about saving your customers from accidental heart attacks (and your store from becoming a meme).
If your variable products, like hoodies, coffee grinders, or literal rocket ships, have options with wild price swings, a clear range keeps shoppers sane.
Why bother? Chaotic pricing equals cart abandonment, period. A $50 to $150 range tells customers upfront, “Hey, pick your fighter,” without making them play detective. It’s like putting up a “Beware of Dog” sign, but for your pricing.
Now comes the question: how do you add a price range in WooCommerce, and just as often, how do you hide, format, or troubleshoot one that is already there?
In short:
To add a price range in WooCommerce, set different prices for product variations under Product Data > Variations. WooCommerce auto-displays the range (e.g., $10-$20). For custom formats or to hide the price range entirely, use PHP hooks like woocommerce_get_price_html, or a plugin such as Variation Price Display Range for WooCommerce to tweak min/max displays, add labels like “From: $10,” or show only one price.
In this guide, we’ll break down exactly how to set up, customize, hide, and troubleshoot WooCommerce variation price display, whether you’re a coding newbie or a plugin pro. Let’s turn those chaotic variable prices into a shopper-friendly win.
Which Method Should You Use? (Decision Table)
Not everyone needs to touch code. Use this table to pick the fastest path for your situation.
| Method | Coding Needed | Customization | Can Hide Range | Best For |
| Default WooCommerce | None | Low (fixed dash format) | No (unless prices match) | Stores that are fine with the standard $10-$20 format |
| Custom PHP snippets | Basic PHP | High (any wording, e.g. “From”, “Up to”, “Between”) | Yes, with one extra snippet | Developers or stores with a child theme who want full control |
| Plugin (Variation Price Display) | None | High (point-and-click options) | Yes, built-in setting | Non-developers who want plugin-level control without editing files |
How to Add Price Range in WooCommerce: Default Method?
The good news is you don’t need any extra tools to display price ranges in WooCommerce. The core plugin supports adding multiple prices per product through variable products.
WooCommerce simplifies pricing for products with multiple variations, such as T-shirts (sizes S to XL) or phone cases (different colors). When you assign different prices to these variations, the platform automatically calculates and displays a price range on the product page.
For example, if a T-shirt costs $10 (Small) and $20 (XXL), customers will see $10–$20 before selecting options.
Here’s how to enable price range for WooCommerce variations:
Step 1: Create a Variable Product
First, you need to create a new product or edit an existing simple product and add variation prices. Here’s how to add a product on WooCommerce.
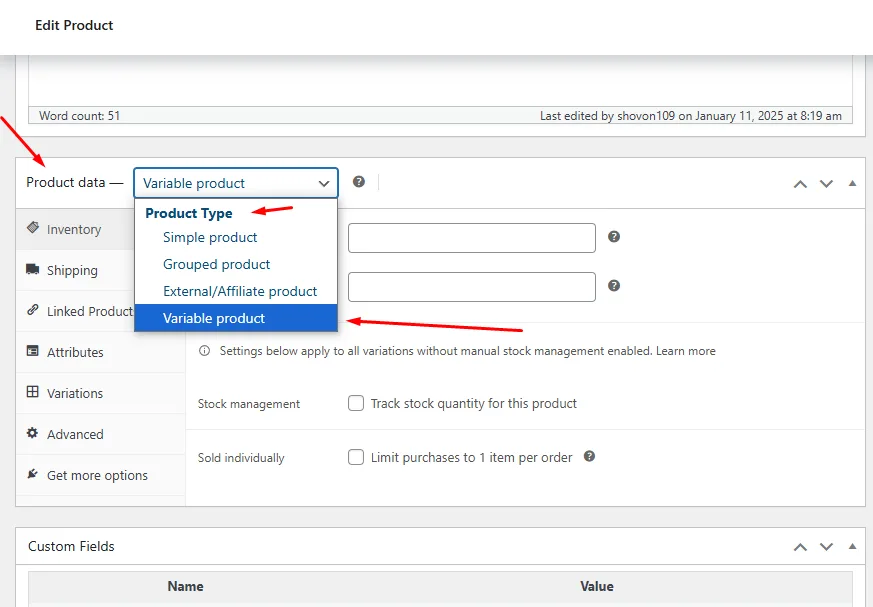
- Go to your WordPress dashboard >> Products >> Add New Product.
- Under Product Data, select Variable Product from the dropdown.
Step 2: Create Product Attributes
- Go to Product Data >> Attributes.
- Click the Add New button to create attributes like Size or Color.
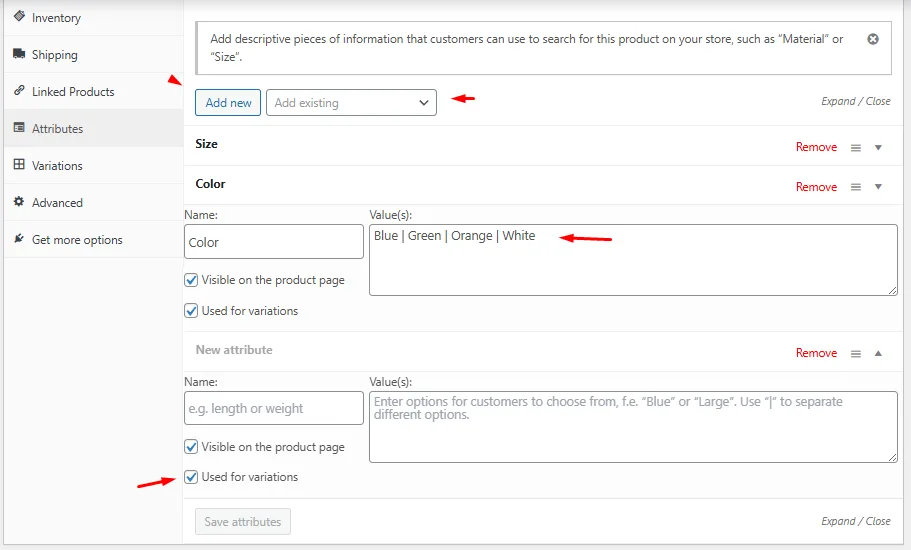
- Input the values separated by a vertical bar (|). For example: Small | Medium | Large.
- Checkmark the Used For Variations box and hit the Save Attributes button.
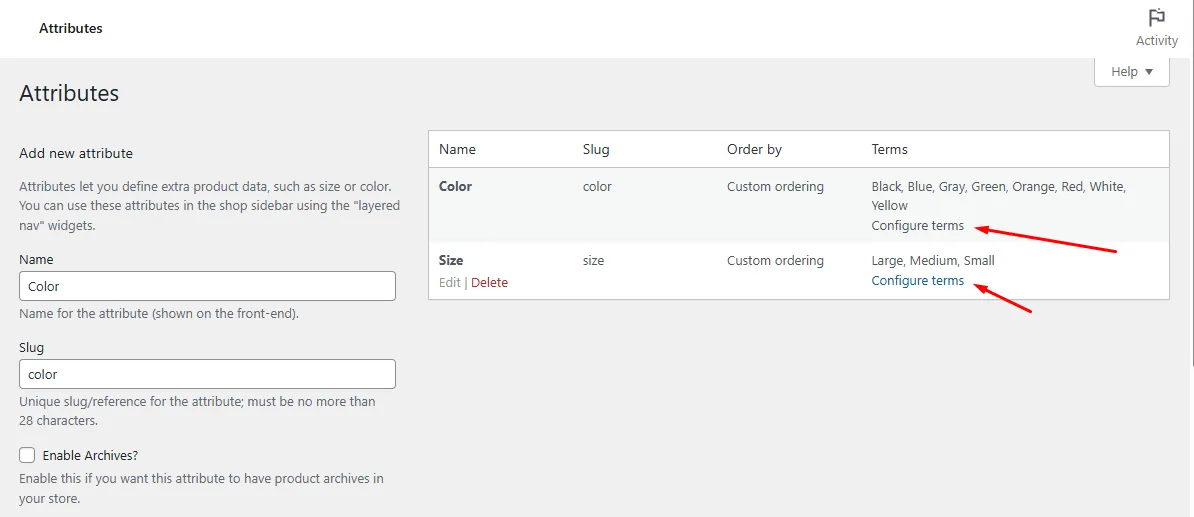
Alternatively, you can create global attributes from the WordPress admin panel >> Products >> Attributes.
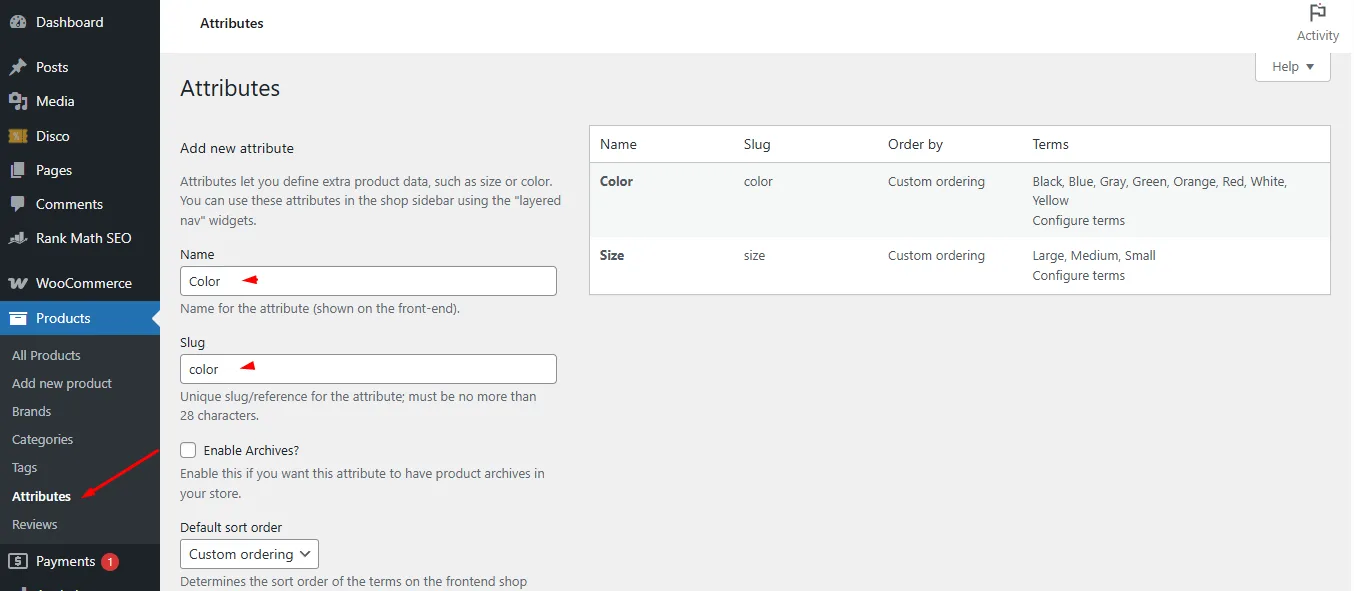
And then set the values by clicking the Configure terms link.
Step 3: Add Variations with Different Prices
Here’s how to edit product variation prices in WooCommerce.
- Navigate to the Variations tab.
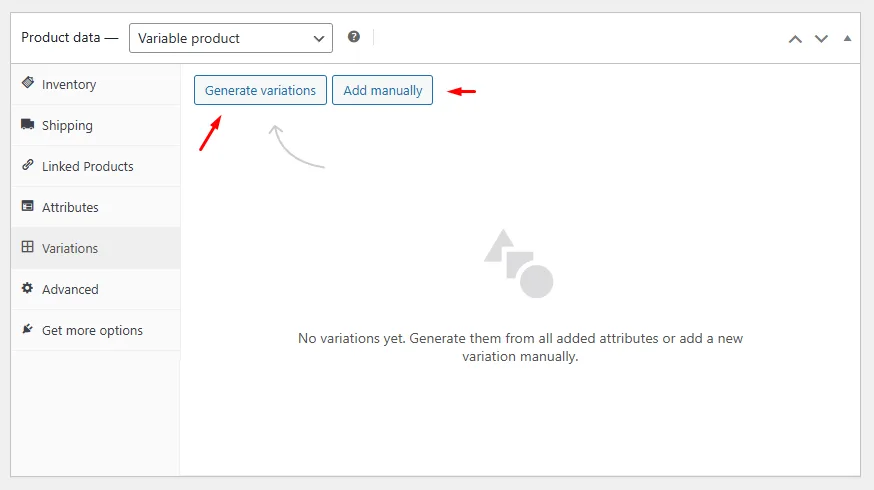
- Click Generate Variations to generate all possible variations automatically.
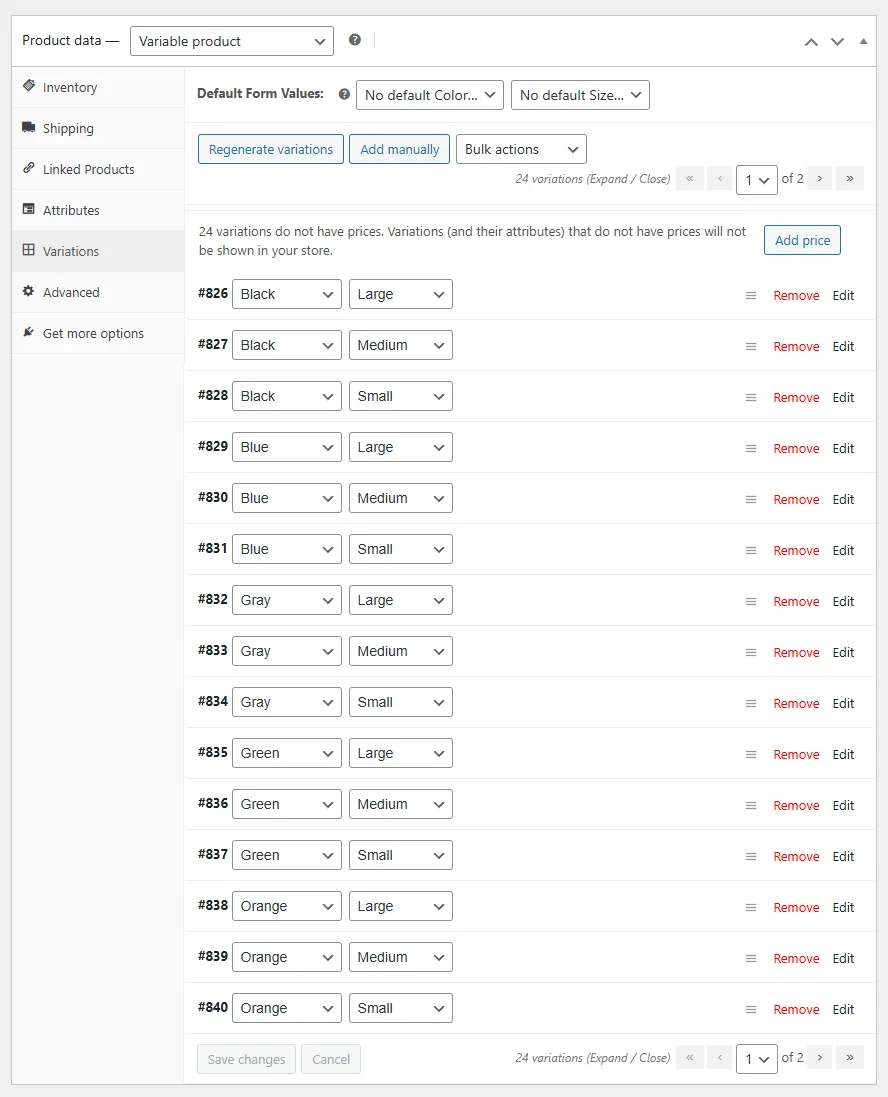
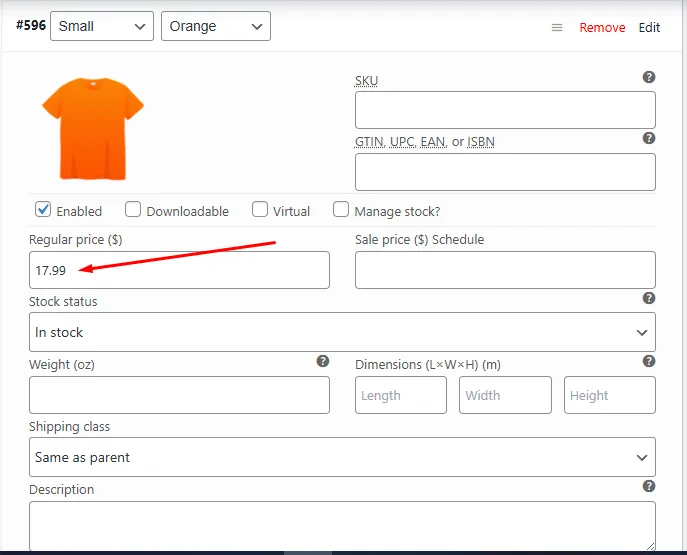
- For each variation:
- Set a Regular Price (e.g., S: $10, M: $10, L: $20) to set WooCommerce variation prices.
- Leave variations with the same price blank if you want to hide the range for those.
- Click Save changes.
Step 4: Preview the Price Range
After saving, visit the product page on your store. WooCommerce will display the lowest and highest prices automatically. For instance, here’s a WooCommerce variable product price display.
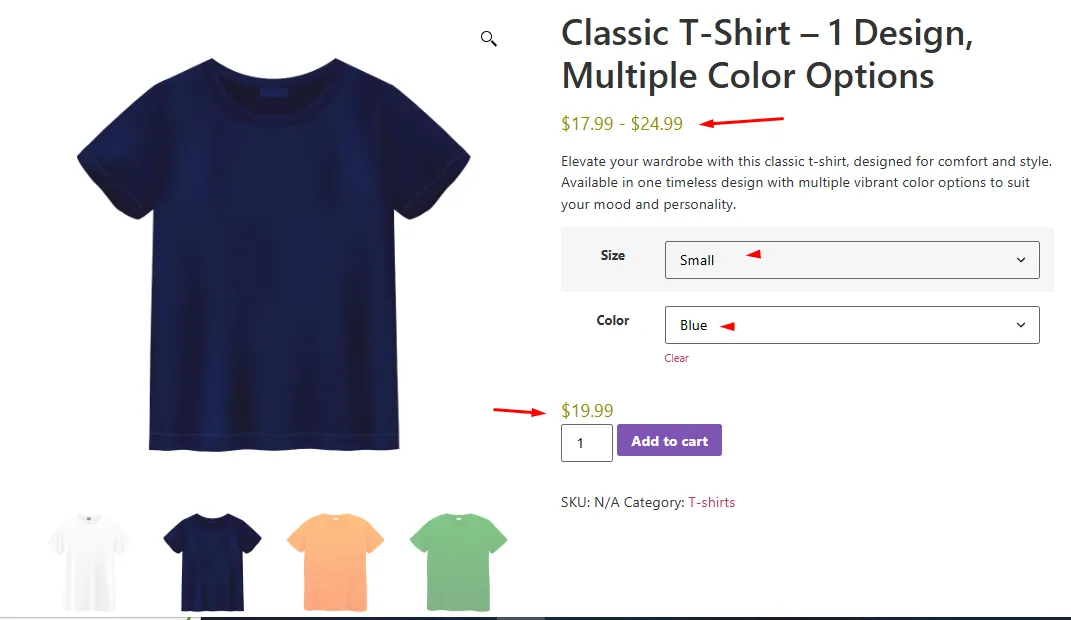
This range updates dynamically if you edit variation prices later. This is how to add multiple prices per product in WooCommerce and display price ranges in the front.
Important Notes
- Same Prices? If all variations share the same price (e.g., all sizes cost 15), WooCommerce will show a single price($15) instead of a range.
- Custom Labels: The default format uses a dash (–) between prices. To change this (e.g., “From $10”), plugins or custom code are required.
- Theme Conflicts: Some themes may override WooCommerce’s default styling. Test with a default theme like Storefront if the range doesn’t appear.
By following these steps, you ensure customers see transparent pricing upfront, reducing confusion and abandoned carts. For advanced customization (like changing the price format), explore plugins or code tweaks covered later in this guide.
How to Add Price Range in WooCommerce using Custom Codes?
If the default way to show a price range for WooCommerce variable products doesn’t fit your store’s needs, PHP code snippets allow advanced customization.
Below, we’ll walk through five ways to add or adjust a price range in WooCommerce with custom code.
1. Show Min/Max Prices with Code Snippets
Woo uses the woocommerce_get_price_html filter (paired with the woocommerce_variable_price_html WooCommerce variation price hook) to generate price ranges. You can override this to force a custom format, like “From: $10” or “$10 – $20”.
1. Full Range: Show “$min – $max”
Here are the steps to enable this WooCommerce variable product price format:
- Open your child theme’s functions.php file or directly access Appearance >> Theme File Editor >> Functions.php.
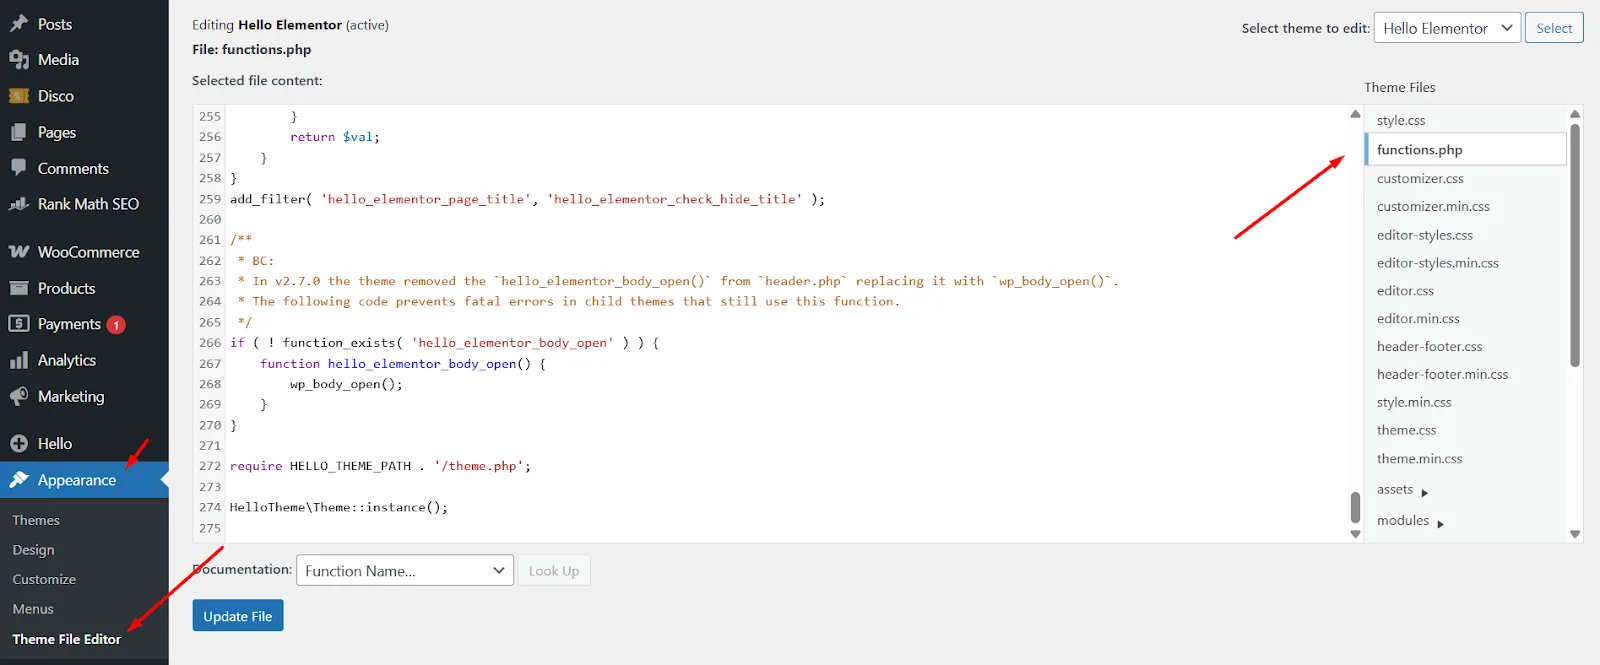
- Paste the code below at the end of the file.
- Save and clear any cache.
add_filter('woocommerce_get_price_html', 'custom_full_price_range', 100, 2);

function custom_full_price_range($price, $product) {

if ($product->is_type('variable')) {

     $min = wc_price($product->get_variation_price('min', true));

     $max = wc_price($product->get_variation_price('max', true));

    if ($min !== $max) {

         return $min . ' – ' . $max;

     }

     return $min;

}

return $price;

}Here’s how WooCommerce display min max price range.

Explanation
This snippet taps into the main price display filter. It first checks if the product is variable. It then finds the lowest variation price and the highest variation price. If they differ, it returns a string with both prices joined by a dash. If all variations share the same price, it returns just the single price.
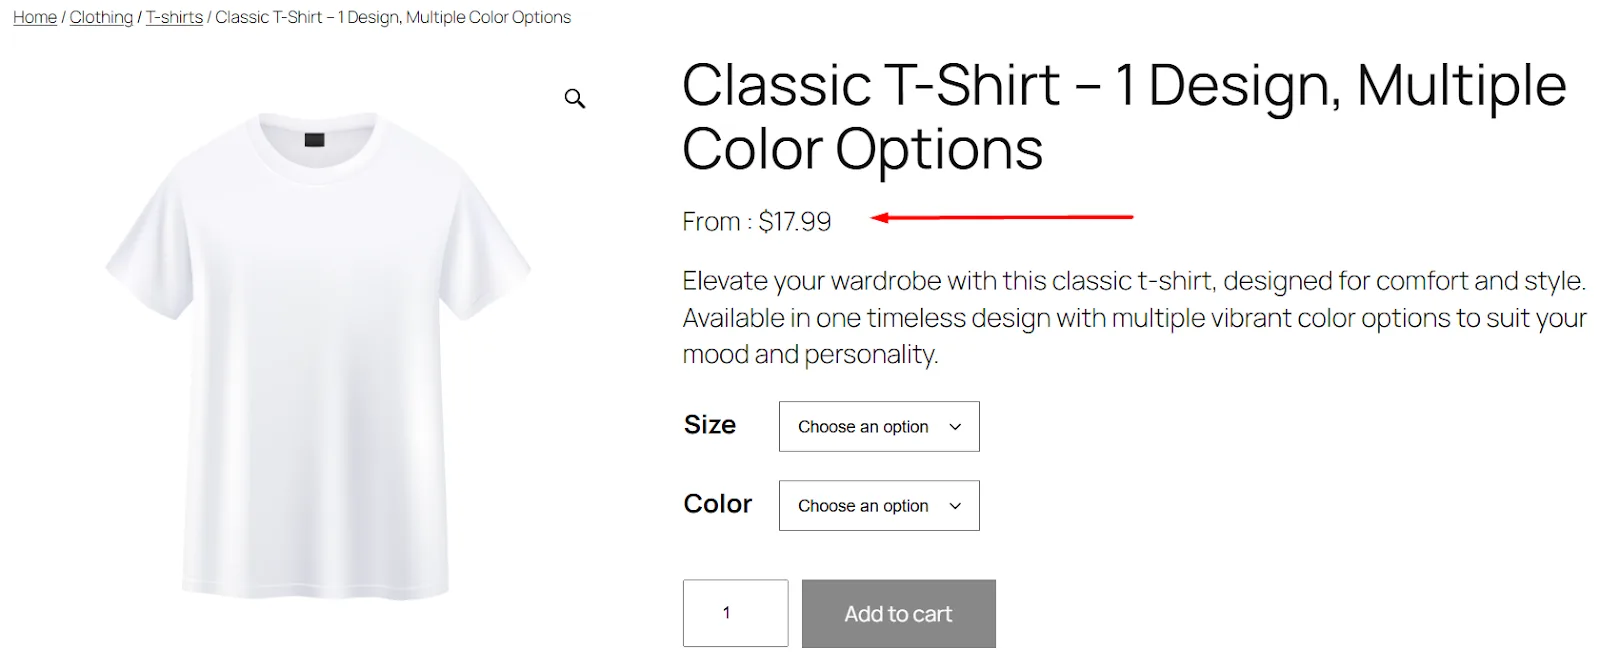
2. “From” Display: Show “From $min”
Here are the steps
- In the same functions.php file paste the code below.
- Save and clear any cache.
add_filter('woocommerce_get_price_html', 'custom_price_from', 100, 2);

function custom_price_from($price, $product) {

if ($product->is_type('variable')) {

     $min = wc_price($product->get_variation_price('min', true));

     return sprintf(__('From %s', 'woocommerce'), $min);

}

return $price;

}This is how WooCommerce shows only the lowest prices in variable products.
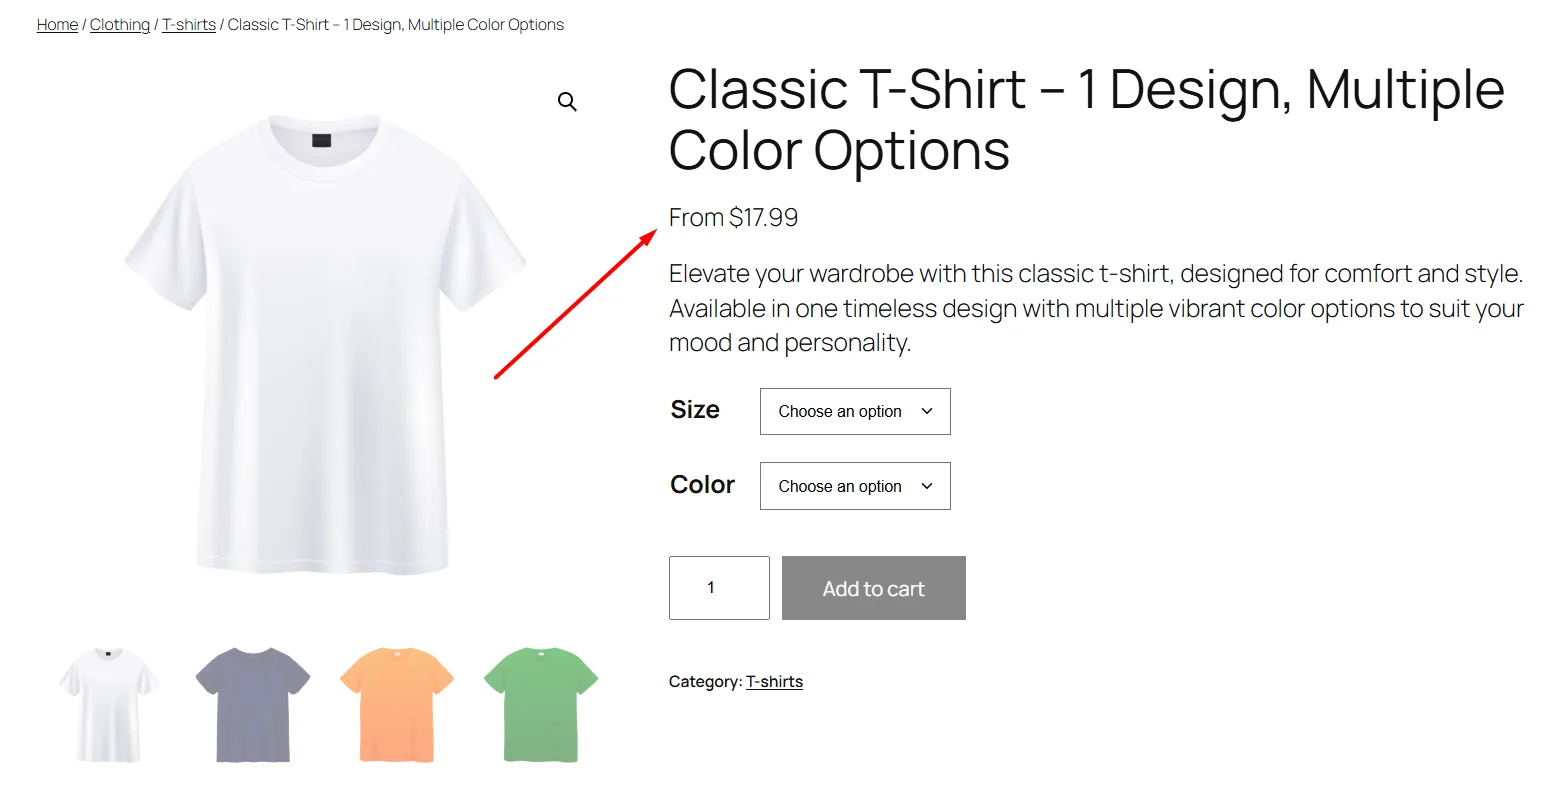
Explanation
This snippet also checks for a variable product. It finds the minimum variation price. It then prepends the word “From” before the price. This makes it clear to customers where pricing starts.
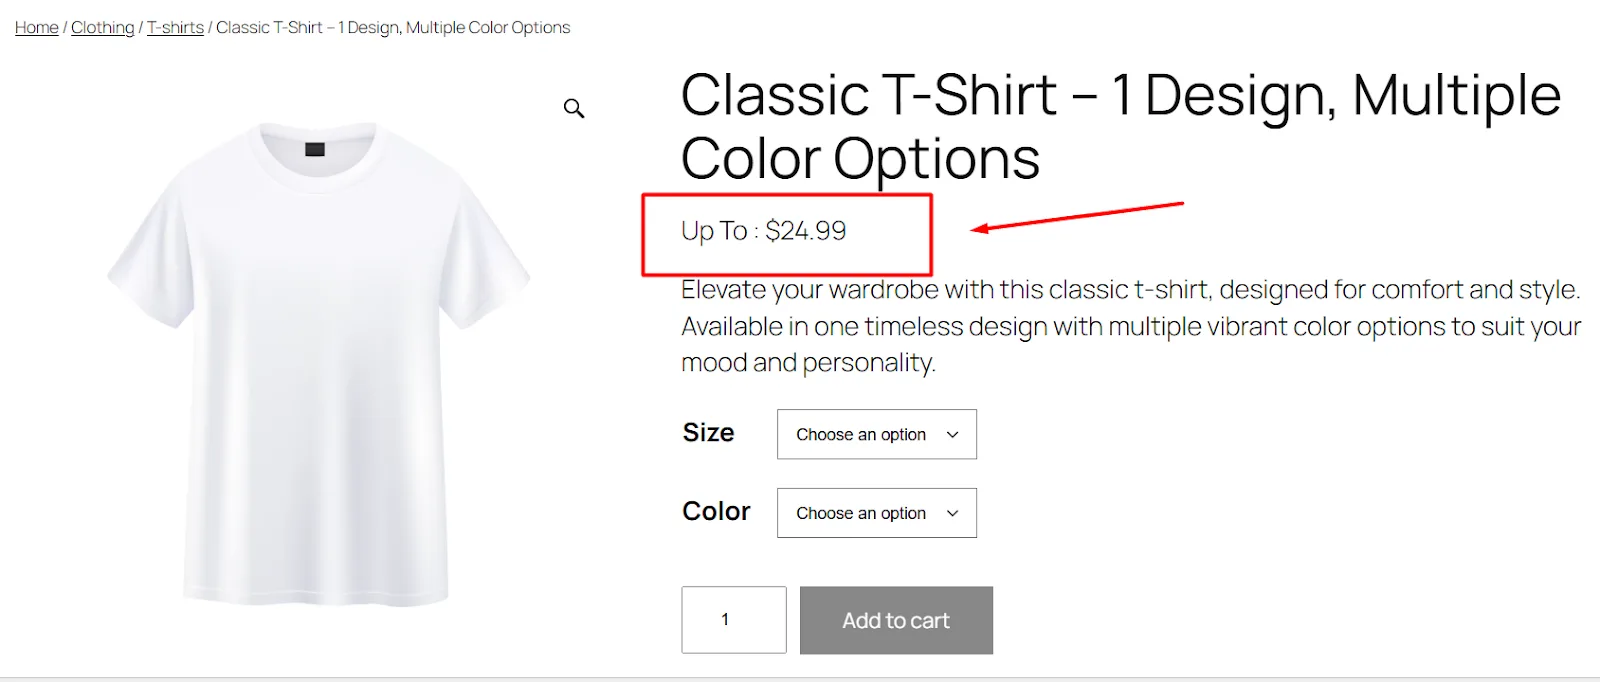
3. “Up to” Display: Show “Up to $max”
Here are the steps
- Paste the following snippet into functions.php.
- Save and clear cache.
add_filter('woocommerce_get_price_html', 'custom_price_upto', 100, 2);

function custom_price_upto($price, $product) {

if ($product->is_type('variable')) {

     $max = wc_price($product->get_variation_price('max', true));

     return sprintf(__('Up to %s', 'woocommerce'), $max);

}

return $price;

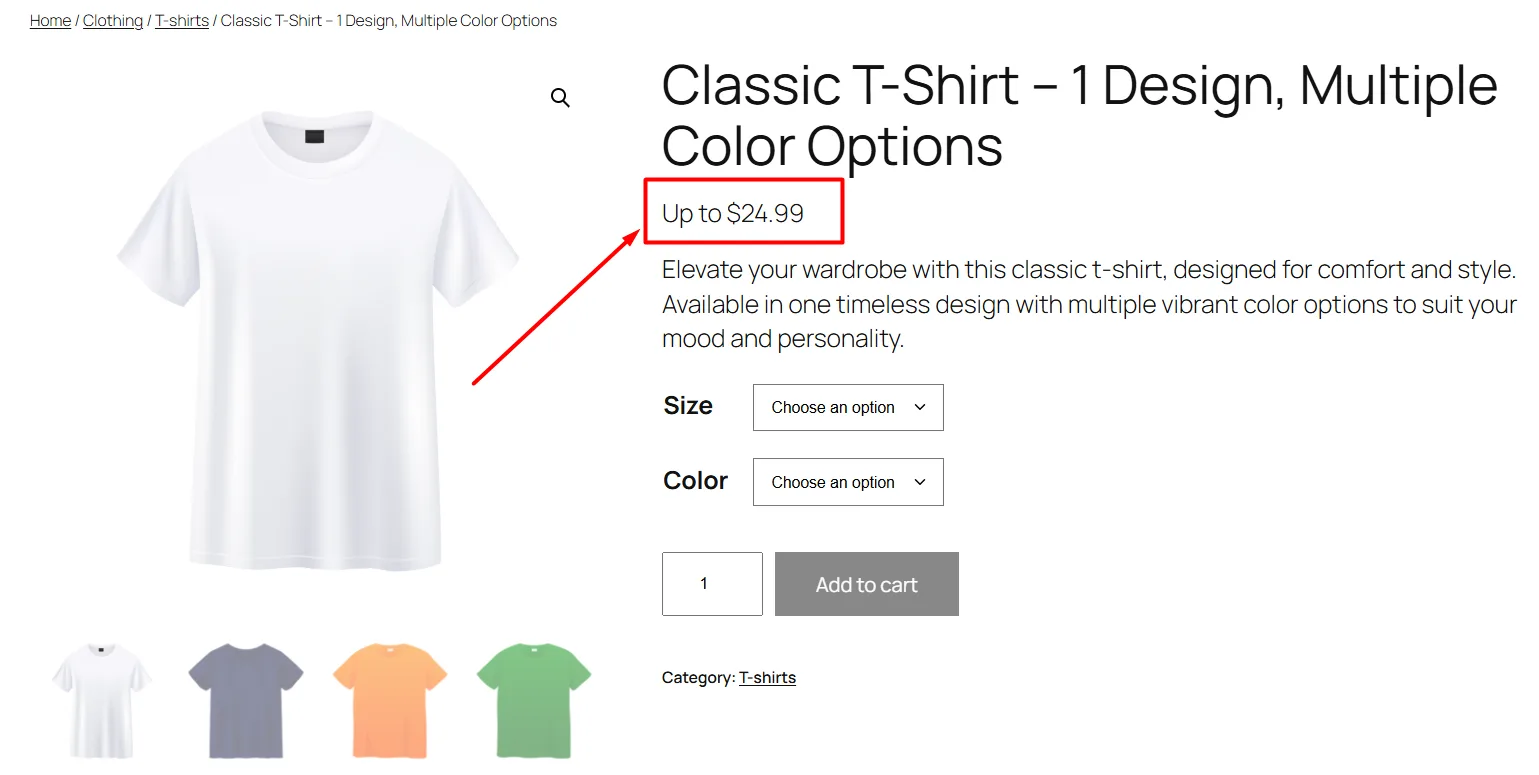
}
Explanation
This code finds the maximum variation price. It then adds the phrase “Up to” in front of it. Use this when you want to highlight the top end of your price range.
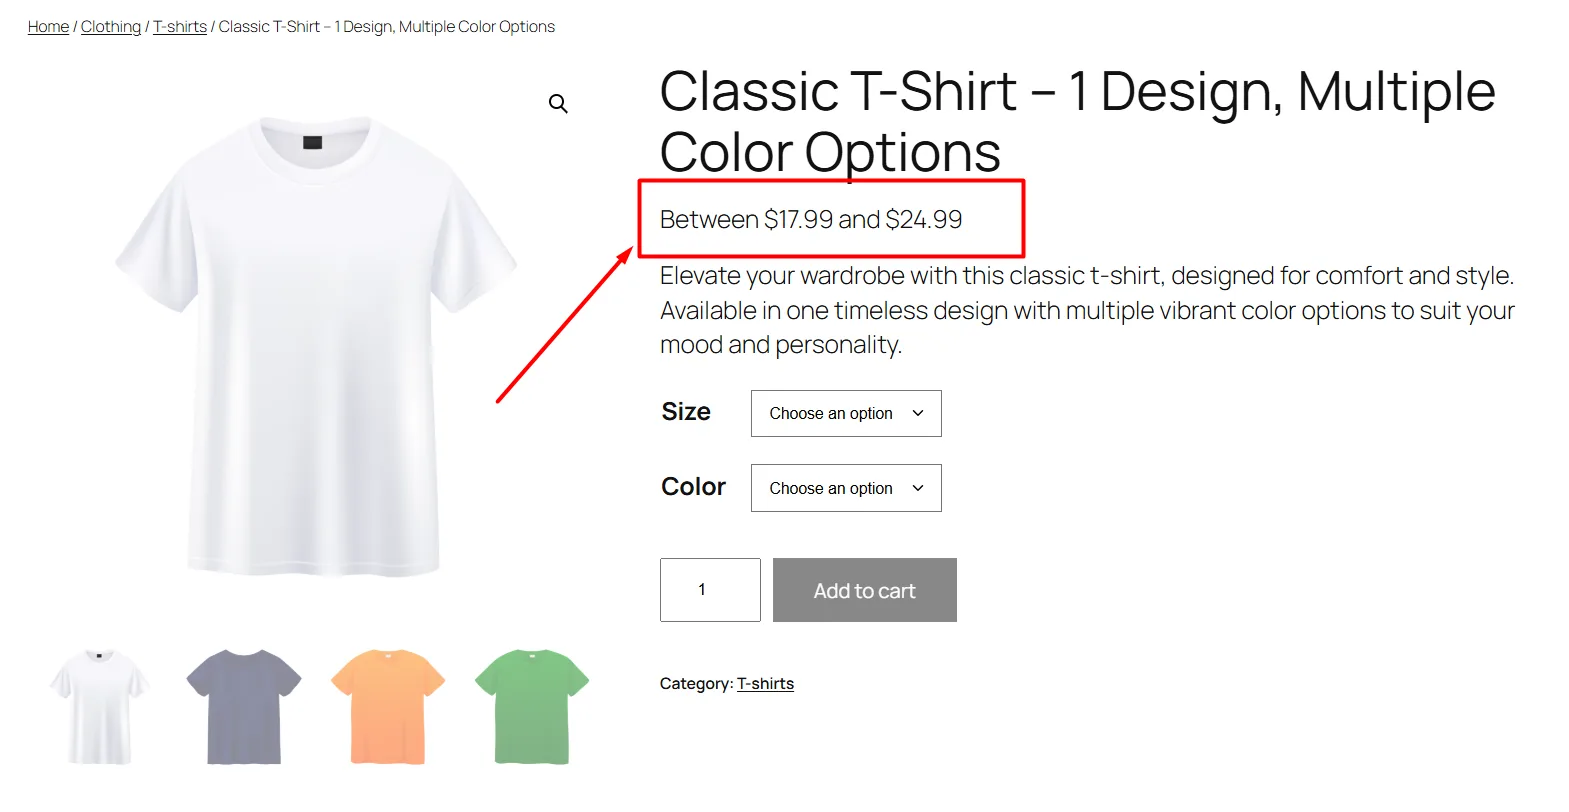
4. Between Format: Show “Between $min and $max”
Here are the steps to display the lowest and highest price in WooCommerce with a ‘Between’ range.
- Add this snippet to your functions.php file.
- Save and flush the cache.
add_filter('woocommerce_get_price_html', 'custom_price_between', 100, 2);

function custom_price_between($price, $product) {

if ($product->is_type('variable')) {

     $min = wc_price($product->get_variation_price('min', true));

        $max = wc_price($product->get_variation_price('max', true));

     if ($min !== $max) {

         return sprintf(__('Between %1$s and %2$s', 'woocommerce'), $min, $max);

     }

     return $min;

}

return $price;

}
Explanation
This snippet shows both ends of the price range with clear wording. If prices differ, it returns “Between $10 and $20.” If all variations share a price, it shows only that single value.
Important Considerations
- Backup First: Test code snippets on a staging site to avoid breaking your live store.
- Theme Conflicts: Some themes override WooCommerce hooks. If the code doesn’t work, temporarily switch to the Storefront theme to test.
- Performance: Excessive code can slow your site. Use plugins like Code Snippets to manage snippets cleanly.
By using these better variation price for WooCommerce methods, you gain full control over how prices appear, ensuring clarity and alignment with your brand’s messaging.
How to Hide the Price Range in WooCommerce
Not every store wants to show a range at all. Some prefer a single “from” price for a cleaner shop page, some want to hide pricing until a customer logs in, and some sell custom or quote-based products where a range would be misleading. This is one of the most searched WooCommerce pricing questions, so let’s cover it directly.
Option 1: Hide the Range With the Plugin (No Code)
The fastest way to disable the variable product price range and show only the lowest price is the same plugin covered in the next section. Under Price Types, choose Show Only Minimum (Lowest) Price or Show Only Maximum (Highest) Price instead of Minimum to Maximum Price. This single setting change is what most people mean when they search for how to hide a price range for WooCommerce variable products.
Option 2: Hide the Range With Code
If you’d rather not add a plugin, this snippet forces WooCommerce to always show the lowest variation price instead of a range:
add_filter('woocommerce_get_price_html', 'hide_price_range_show_lowest', 100, 2);

function hide_price_range_show_lowest($price, $product) {

    if ($product->is_type('variable')) {

        $min = wc_price($product->get_variation_price('min', true));

        return $min;

    }

    return $price;

}Explanation: Instead of comparing min and max, this snippet always returns the minimum variation price, so the dash and second number never appear. Swap get_variation_price(‘min’, true) for ‘max’ if you want to hide the range in favor of the highest price instead.
Option 3: Hide Pricing Completely (“Call for Price”)
For quote-based or B2B stores, sometimes the goal isn’t a different format, it’s no visible price at all until checkout or contact. That’s a separate customization from formatting a range, and it usually needs a dedicated call-for-price or price-on-request plugin rather than a single filter, since you also need to remove the Add to Cart button and adjust checkout logic.
If your real goal is more about pricing strategy than pricing display, for example, showing different prices to wholesale customers, or running tiered and quantity-based pricing alongside your range, that’s usually a better fit for a dedicated pricing plugin like Disco’s dynamic pricing rules than for a single code snippet.
See Disco’s Pricing page for tiered, bulk, and user-role pricing options.
How to Add Price Range in WooCommerce using a Plugin?
As we all WordPress Woo users know, plugins save us from all manual work and provide immense flexibility to run our store smoothly. Understandably, a price range WooCommerce plugin makes our job of displaying price ranges in different ways a breeze.
For example, if we want to avoid injecting custom code in our theme file yet want the same features, plugins are our best friend. For this article, we will use a free plugin called Variation Price Display For WooCommerce.
Let us walk you through step by step how to add price range in WooCommerce using this plugin.
Step 1: Install The Variation Price Display For WooCommerce Plugin
- Navigate to Plugins >> Add Plugin.
- Search for the plugin.
- Install and then activate.

Step 2: Configure Price Range Display
- Go to WooCommerce >> Settings >> Variation Price Display.
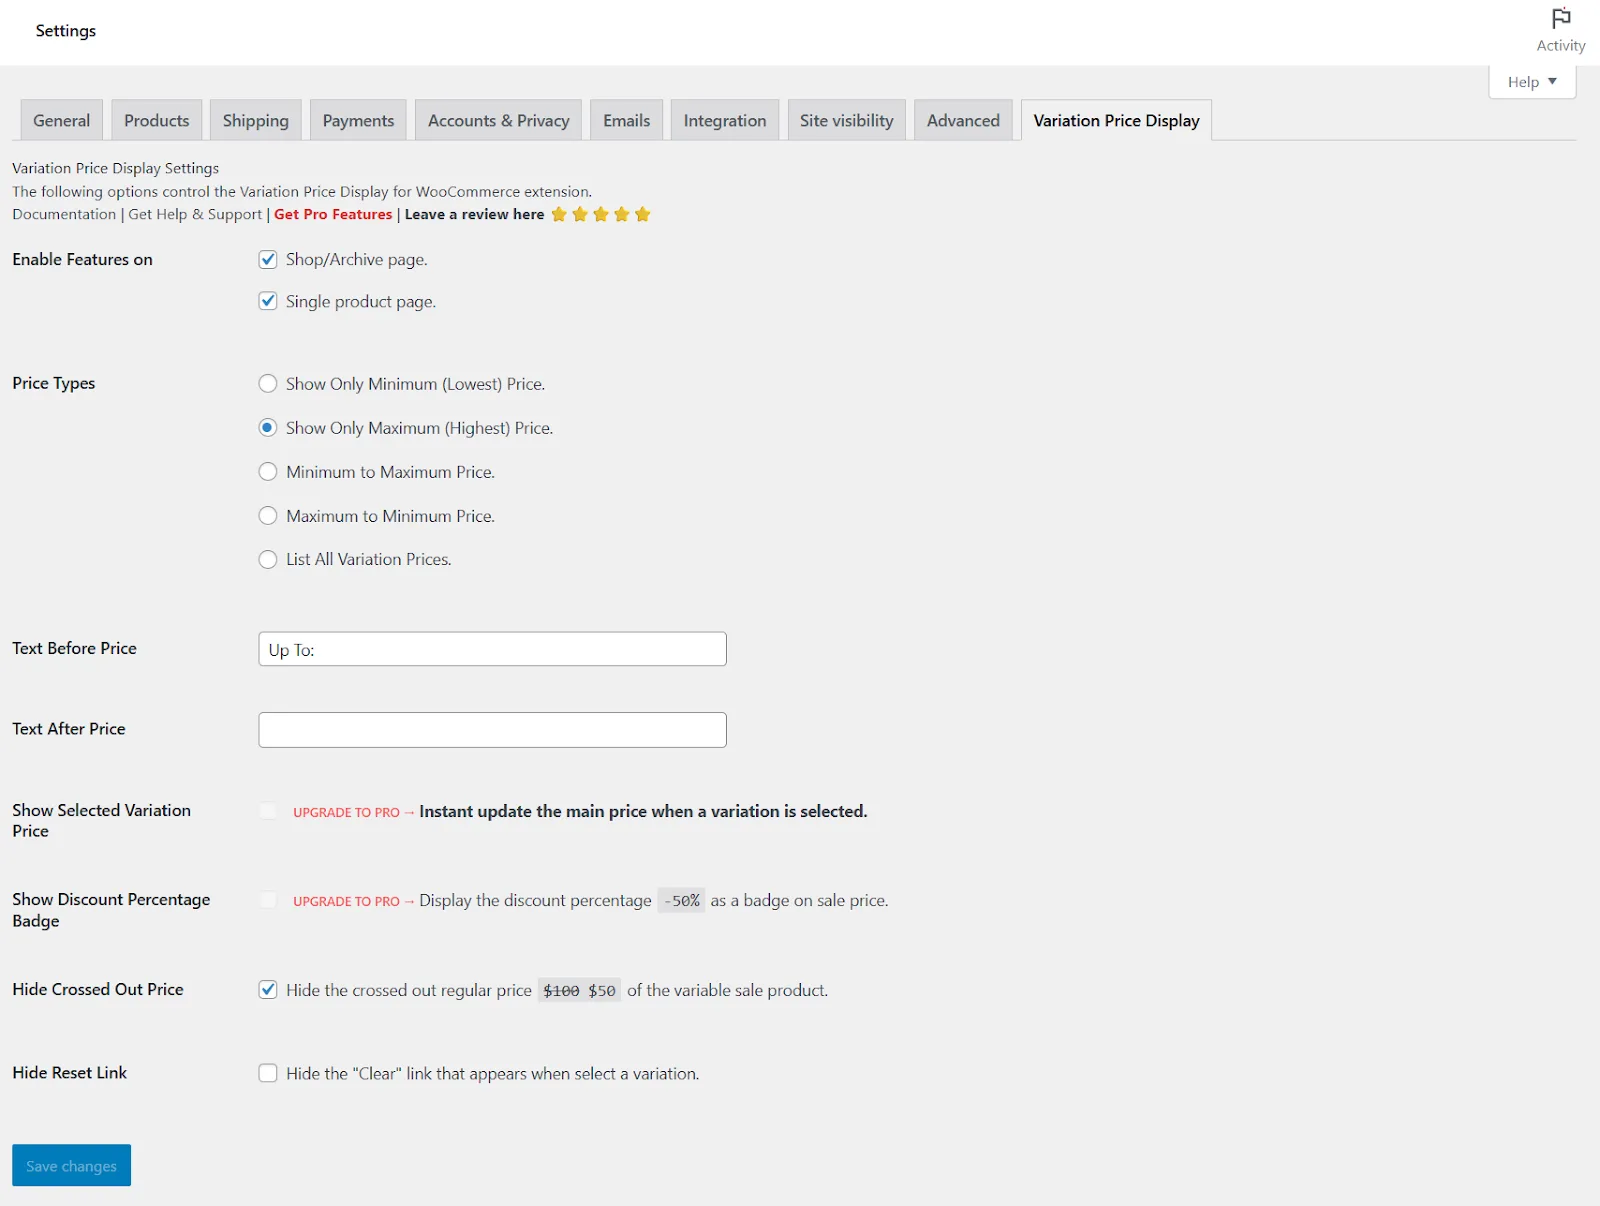
- Tick Shop/Archive page to show range on product lists.
- Check mark Single product page to show the range on each product page.
- Leave any boxes you do not need unticked.
Step 3: Select Your Price Type
Under Price Types, pick one display style
- Show Only Minimum (Lowest) Price to highlight the starting price.
- Show Only Maximum (Highest) Price to highlight the top price.
- Minimum to Maximum Price to display a range from low to high.

- Maximum to Minimum Price to display a range from high to low.
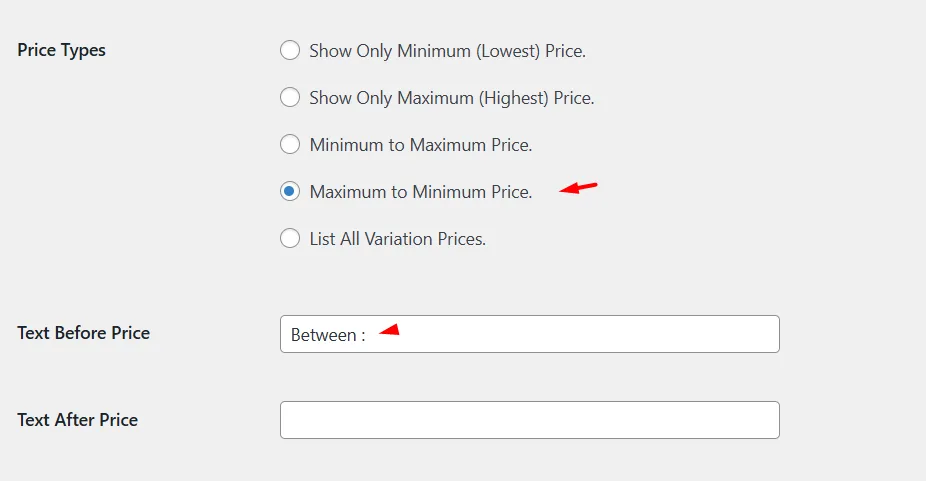
- List All Variation Prices to show every variation price.
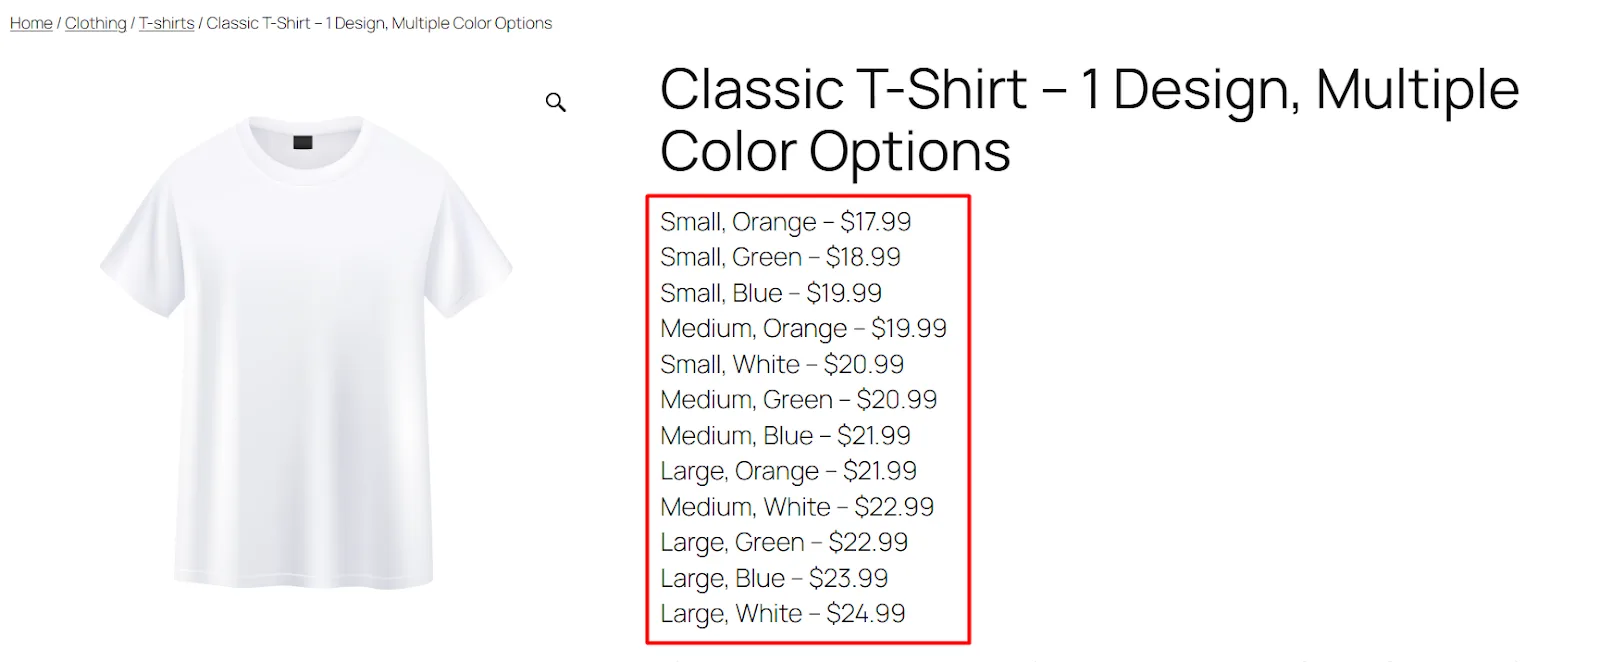
Step 5: Add Text Before or After the Price
- In Text Before Price, enter any label you want to use before the price. For example, type Up To: to make “Up To: $50”
- In Text After Price, enter any label to follow the price.
Step 6: Optional Extras
- Tick Show Selected Variation Price to update the price when a user picks an option
- Tick Show Discount Percentage Badge to add a sale badge showing the percentage off
- Tick Hide Crossed Out Price to remove the original price when a variation is on sale
- Tick Hide Reset Link to keep the selection link hidden after a user picks a variation
Step 7: Save and Review
- Scroll down and click Save changes.
- Visit your shop page or a single product page.
- Confirm the price range appears as you chose.
That is all. You now have full control over how WooCommerce shows your variation prices without writing any code.
Default vs Custom Code vs Plugin: Full Comparison
Here’s a deeper side-by-side if the decision table above wasn’t enough detail.
| Feature | Default | Custom Code | Plugin |
| Setup time | Minutes (already built in) | 10-20 minutes per snippet | 5-10 minutes |
| Requires a developer | No | Basic PHP helpful | No |
| Custom wording (“From”, “Up to”, “Between”) | No | Yes | Yes |
| Hide range / show one price | Only if prices match | Yes, with a snippet | Yes, built-in toggle |
| Show/hide by page (shop vs single product) | No | Yes, with extra conditionals | Yes, built-in |
| Sale badge/discount percentage | No | Manual coding required | Yes, built-in |
| Ongoing maintenance | None | You maintain the snippet through updates | Plugin author maintains it |
| Performance impact | None | Minimal if kept lightweight | Minimal |
| Best for | Simple stores happy with $10-$20 format | Developers wanting full control | Non-developers wanting flexibility fast |
Best Practices for Price Range Display & Management
Managing price ranges in WooCommerce requires attention to detail. Below are practical strategies to ensure your pricing works smoothly and builds trust with customers.
A. Consistency is Key
Your store should show prices the same way everywhere. For example, if you use “From $10” for T−shirts, do not switch to “Starting at $10” for pants. Mixed formats confuse shoppers.
Check all product pages regularly. Use tools like Screaming Frog to scan your site for price display errors.
If you use plugins or custom code, ensure they apply to all variable products. Avoid letting some products show ranges while others show only the lowest price. Uniformity helps customers focus on buying rather than decoding your pricing.
B. Test on Multiple Devices & Browsers
Customers shop on phones, tablets and desktops. Prices might look perfect on your laptop but break on mobile. Test your site on:
- Phones: iPhone, Android devices.
- Tablets: iPad, Samsung Galaxy Tab.
- Browsers: Chrome, Firefox, Safari Edge.
Use free tools like BrowserStack to simulate different devices. Pay special attention to how WooCommerce shows variation price in dropdowns or pop-ups. If the range overlaps or gets cut off, fix it immediately. Mobile users leave fast if they see broken layouts.
C. Consider Performance Implications
Complex code or too many plugins can slow your site. For example, a heavy plugin that recalculates prices in real-time might delay page loading.
Use tools like GTmetrix to measure speed. If your site takes longer than 3 seconds to load, optimize code or replace bloated plugins.
If you use custom PHP snippets, ensure they are lightweight. Avoid stacking multiple price-related plugins. Choose one that does everything you need. Slow sites hurt SEO and sales.
D. Keep Everything Updated
WooCommerce WordPress themes and plugins get updates often. These updates fix bugs, improve security, and add features. An outdated plugin might conflict with new WooCommerce versions and break your price display.
Enable auto-updates for minor releases. For major updates, test them on a staging site first. Check the changelog to see if updates affect pricing functionality. A broken price range during holiday sales can cost thousands in lost revenue.
E. Use Clear Variation Names
Vague variation names like “Option 1” or “Model A” frustrate customers. Instead, use names that explain the price difference. For example:
- Good: “Size: S (+0) ∣ Size: XL(+2) ∣ Size: XL(+5)”
- Bad: “Variant 1 | Variant 2”
If a red T-shirt costs more than a blue one, name the variations “Red (Premium Color)” and “Blue (Standard)”. Clear names reduce support questions and returns.
Final Tips
- Run monthly audits to check price displays.
- Train your team to spot inconsistencies.
- Ask customers for feedback on pricing clarity.
By following these steps, you create a seamless shopping experience that turns visitors into buyers.
Troubleshooting: Common Price Range Problems (and Fixes)
Here are the display issues store owners run into most often, and how to fix each one.
Price range isn’t showing at all (only one price appears)
- Check that at least two variations actually have different regular prices. If every variation is priced the same, WooCommerce is working correctly and intentionally shows one price instead of a range.
- Clear page cache and any object cache (common with WP Rocket, W3 Total Cache, or server-level caching) after changing variation prices.
- Confirm the product type is still set to Variable Product and not Simple Product.
The range shows on the shop page but not the single product page (or vice versa)
- If you’re using a plugin, revisit the Shop/Archive and Single product page toggles under WooCommerce > Settings > Variation Price Display and make sure both are checked if you want the range everywhere.
- If you’re using custom code, confirm the woocommerce_get_price_html filter isn’t being overridden elsewhere by a theme or another plugin. Deactivate other pricing plugins one at a time to isolate the conflict.
Custom code snippet isn’t applying
- Double-check the snippet is saved in the active child theme’s functions.php, not the parent theme (parent theme edits get wiped on update).
- Look for a PHP error by checking your site’s error log. A missing semicolon or stray brace will silently break the whole file.
- If you’re using a snippets plugin like Code Snippets, confirm the snippet is set to Active, not just saved as a draft.
Price range doesn’t update after editing variation prices
- Save changes from the Variations tab specifically, then also click Update on the main product editor.
- Purge any caching plugin and your host’s server cache, plus your browser cache, since price HTML is frequently cached for performance.
- If you use a page builder, rebuild or clear that builder’s own cache as well.
A price filter widget shows products outside the selected range (e.g., a $10 to $12 filter still shows higher-priced items)
- This is a layered navigation/price filter issue, separate from how the range displays on the product page, and it usually comes down to the filter reading from the wrong price meta. Confirm the filter widget is set to use the active (sale) price, not just the regular price, if any of the affected products are on sale.
- Re-index or resave the affected products so WooCommerce recalculates their min/max variation price meta, which is what most price filter widgets query against.
- If you’re on a custom theme or a price filter plugin, verify it queries _price (WooCommerce’s indexed price field) rather than a stale custom field.
The plugin’s settings page won’t save
- Deactivate other WooCommerce settings-related plugins temporarily to rule out a conflict, then reactivate one at a time.
- Confirm your user role has permission to save WooCommerce settings, and that no security plugin is blocking the form submission.
Wrap Up
So, this was our complete guide on how to add, customize, hide, and troubleshoot a price range in WooCommerce.
Adding a price range in WooCommerce ensures transparency for variable products like apparel or customizable items. Use the default method (set varied prices in product variations), apply custom PHP snippets to tweak labels (e.g., “From $10”) or hide the range entirely, or install a plugin for quick, no-code control.
Test your setup to avoid conflicts and keep prices user-friendly. Clear ranges build trust; no more guessing games for shoppers. Implement the method that fits your store’s needs and watch abandoned carts drop. And if your pricing strategy goes beyond formatting, into tiered pricing, bulk discounts, or role-based pricing,
Check Disco’s Pricing page to see how it layers on top of the variation setup covered here.
FAQs
What is a price range in WooCommerce?
A price range is what WooCommerce automatically displays on a variable product, such as $10-$20, when its variations are priced differently. It tells shoppers the lowest and highest price before they pick specific options like size or color.
How do I add a price range to a WooCommerce product?
Set your product type to Variable Product, add attributes like size or color, generate variations, and give at least two variations different regular prices. WooCommerce calculates and displays the range automatically; no extra setup needed.
How do I hide the price range and show only one price?
Use the Variation Price Display plugin and set Price Types to Show Only Minimum or Show Only Maximum, or add the hide-price-range code snippet from this guide to your functions.php file.
Can I show “From $X” instead of a dash between two prices?
Yes. Either use the plugin’s Text Before Price field with the Minimum price type, or add the “From” display code snippet covered above.
Does the price range include the sale price or only the regular price?
WooCommerce’s default range reflects whichever price is currently active per variation, so a variation on sale contributes its sale price to the calculation, not its crossed-out regular price.
Can I set different prices for different variations of a product in WooCommerce?
Yes, that’s the default behavior for variable products. Each variation (like a size or color combination) gets its own Regular Price and, optionally, its own Sale Price under the Variations tab.
Can WooCommerce show different prices to different customers or user roles?
Not out of the box. Standard WooCommerce variation pricing is the same for every visitor. Role-based or customer-specific pricing needs a dynamic pricing plugin, such as Disco, which supports user-role pricing rules on top of your existing variations.
Does WooCommerce support tiered pricing or a price matrix?
Not by default. Tiered pricing (where the unit price drops as quantity increases) and price matrix layouts are add-on features handled by dynamic pricing plugins rather than core WooCommerce or a price-range display plugin.
Can I add a price range to a simple (non-variable) product?
No, a simple product has one fixed price by definition. To get a range, convert the product to Variable Product type and add at least two variations with different prices.
Will a price range hurt or help my SEO and click-through rate?
A clear, accurate range tends to help. It sets correct expectations before a shopper clicks through from search results, which reduces bounce rate. A vague or broken range (or one that undersells the true starting price) tends to increase abandoned sessions and returns.