Running an online store without a smart discount strategy? You’re leaving money on the table.
WooCommerce’s built-in coupon system is basic.
It works but it won’t help you run percentage discounts, buy one get one free (BOGO) deals, cart-level price rules, or role-based pricing out of the box.
That’s where a dedicated WooCommerce discount plugin comes in.
In this step-by-step guide, you’ll learn how to install and configure Disco – Discount Rules for WooCommerce, a free and powerful plugin available on the WordPress repository.
Whether you’re setting up your first automatic discount or building complex conditional pricing rules, this guide walks you through every step.
What Is the Disco – Discount Rules for WooCommerce Plugin?
Disco is a free WooCommerce discount rules plugin that lets you create automatic discounts without relying solely on coupon codes.
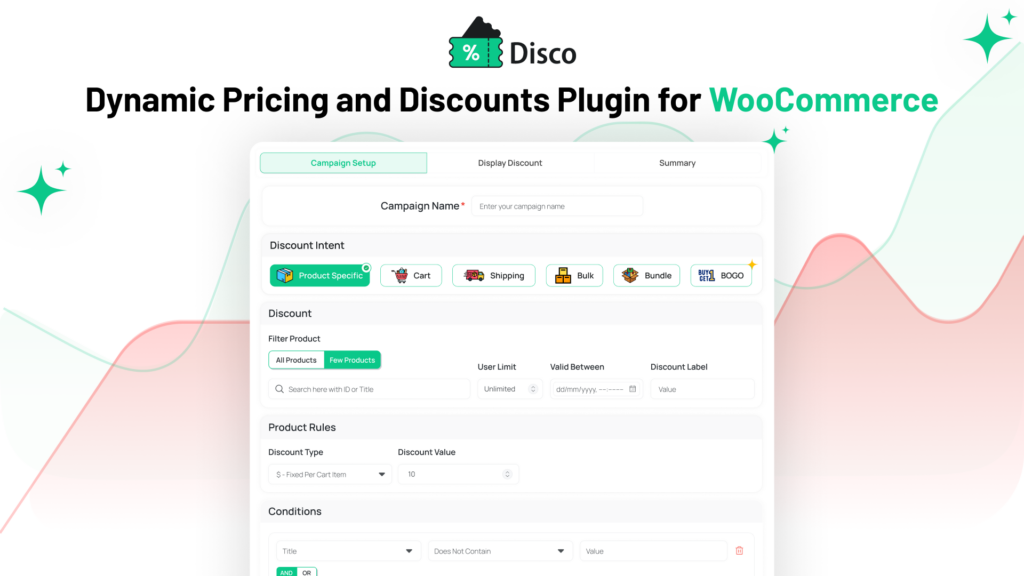
It’s built for store owners who want more flexibility than the default WooCommerce pricing offers.
Key features include:
- Percentage and flat-rate product discounts
- Cart subtotal-based discount rules
- Buy X Get Y (BOGO) offers
- Quantity-based tiered pricing
- User role-based pricing rules
- Conditional discount logic (by category, product, user, cart value)
- Automatic discounts — no coupon code required
🔗 Plugin URL: Disco Plugin Discount Rules for WooCommerce
Requirements Before You Begin
Make sure your store meets these basics before installing:
- WordPress 5.8 or higher
- WooCommerce 6.0 or higher (latest recommended)
- PHP 7.4 or higher
- Admin access to your WordPress dashboard
Step 1: Install the Disco Plugin
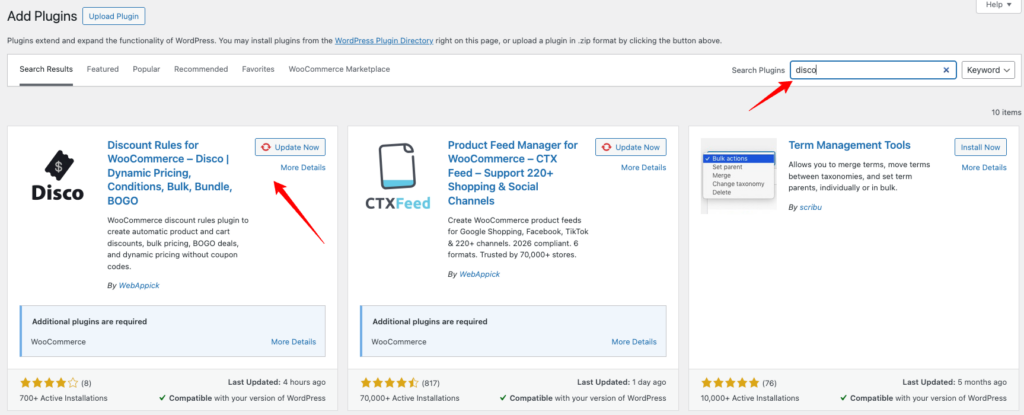
Option A: Install from the WordPress Dashboard
- Log in to your WordPress admin panel.
- Go to Plugins → Add New.
- In the search bar, type “Disco Discount Rules WooCommerce”.
- Find the plugin by WebAppick (or the verified publisher on WordPress.org).
- Click Install Now.
- Once installed, click Activate.
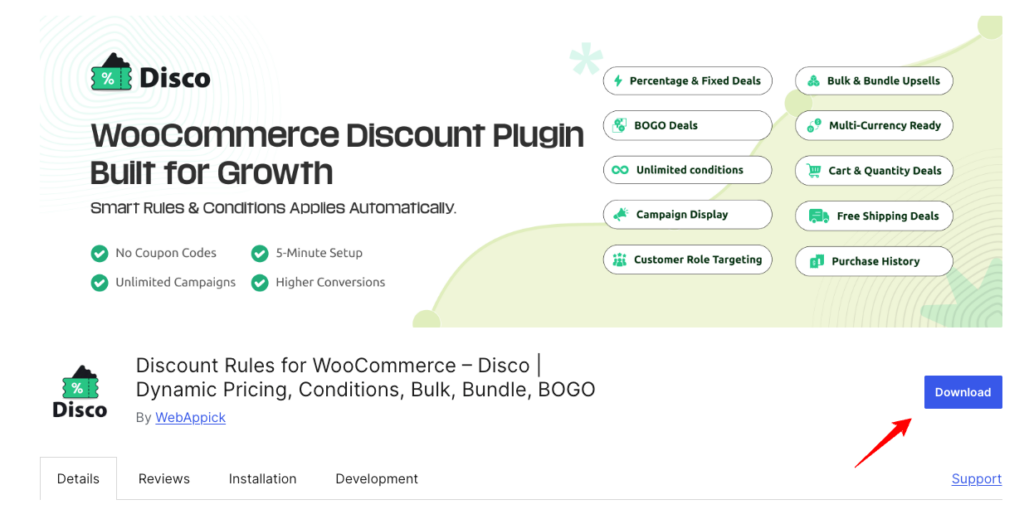
Option B: Install via Direct Upload
- Go to https://wordpress.org/plugins/disco/ and click Download.
- In your WordPress admin, go to Plugins → Add New → Upload Plugin.
- Choose the downloaded
.zipfile and click Install Now. - Click Activate Plugin.
✅ After activation, you’ll see a Disco menu item in your WordPress sidebar under WooCommerce or as a standalone menu.
Step 2: Navigate to the Disco Discount Rules Dashboard
Once activated:
- Go to WooCommerce → Disco (or look for Disco in the left sidebar menu).
- You’ll land on the Discount Rules dashboard.
- This is where you create, manage, enable, and delete all discount rules.
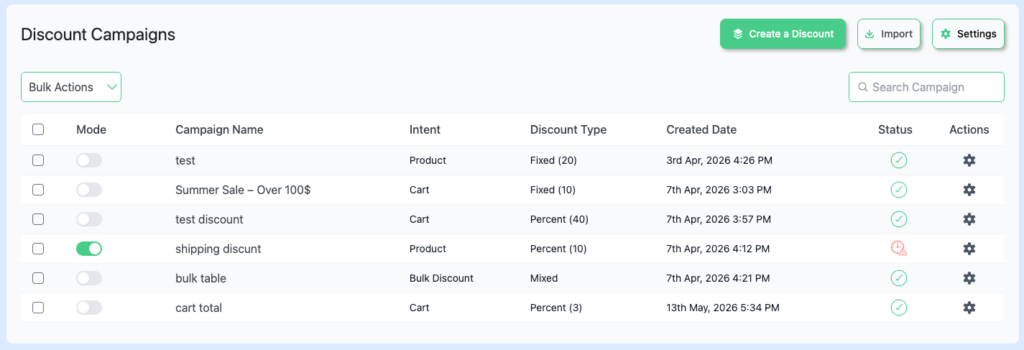
The dashboard shows:
- Rule Name
- Discount Type
- Status (Active / Inactive)
- Priority order
- Actions (Edit / Delete / Duplicate)
Step 3: Create Your First WooCommerce Discount Rule
Click “Add New Rule” to open the rule creation screen. Follow these steps:
3.1 – Name Your Discount Rule
Give the rule a clear, descriptive internal name.
Example: Summer Sale – 20% Off All Hoodies
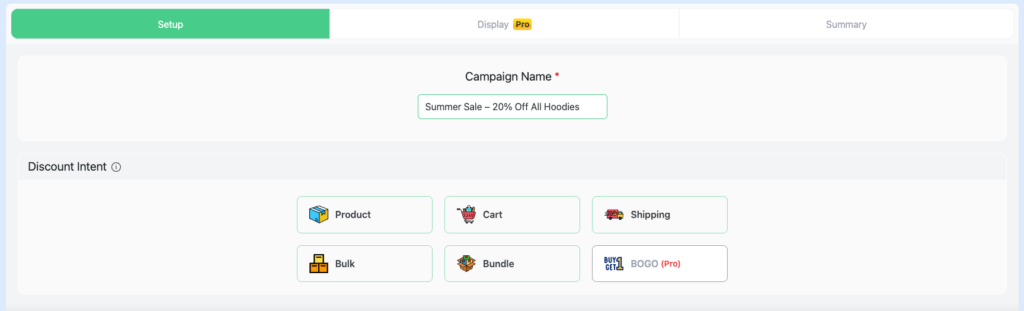
This name is for admin reference only. Customers won’t see it.
3.2 – Choose the Discount Type
Disco supports several WooCommerce pricing rule types:
- Product Intent Discount
- Cart Intent Discount
- Shipping Intent Discount
- Bulk Intent Discount
- Bundle Intent Discount
- BOGO (Buy One, Get One Deals)

Select the discount type that matches your promotion goal.
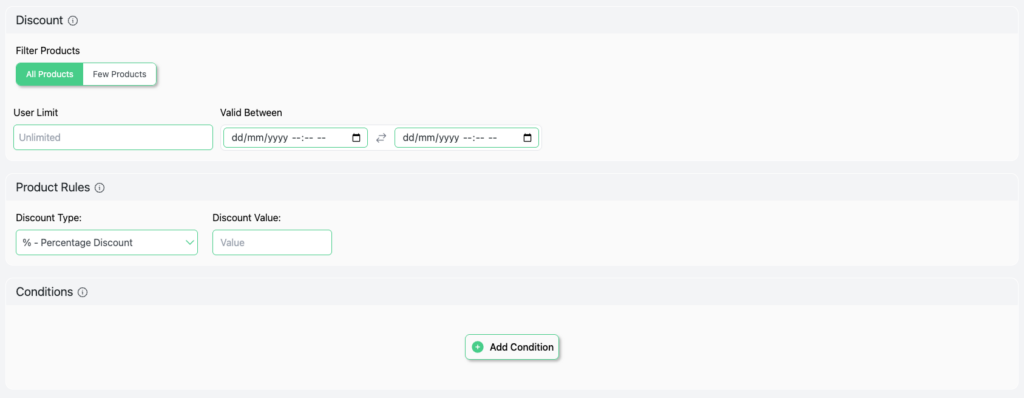
3.3 – Set the Discount Value
Enter the discount amount based on your chosen type:
- For Percentage: Enter
20for 20% off - For Fixed Amount: Enter
10for $10 off - For Fixed Price: Enter the target price (e.g.,
29.99)
3.4 – Define the Applicable Products or Categories
This section controls where the discount applies.
Options include:
- All products (store-wide discount)
- Specific products (select individual items)
- Product categories (e.g., all items in “Jackets”)
- Product tags
- SKU-based targeting
To apply to specific products:
- Select “Specific Products” from the dropdown.
- Start typing the product name in the search field.
- Select from the auto-suggest list.
Pro Tip: Use category-level targeting for bulk promotions. It saves time and automatically includes new products added to that category.
3.5 – Set Discount Conditions (Optional but Powerful)
Conditions let you control when the discount activates. This is where Disco becomes more advanced than basic WooCommerce discount plugins.
Available condition types:
- Cart Subtotal – Trigger discounts only when cart total exceeds a threshold (e.g., spend $100, get 15% off)
- Quantity in Cart – Apply discount when customer adds X or more items
- User Role – Offer exclusive pricing for wholesalers, VIP members, or subscribers
- Specific User – Target individual customer accounts
- Date Range – Schedule discounts for flash sales or seasonal campaigns
- Shipping Country – Geo-targeted promotions
Example condition setup:
Apply 15% discount → When cart subtotal is greater than $75 → For all logged-in users
This creates an automatic cart discount for WooCommerce — no coupon code required.
3.6 – Configure Bulk Quantity-Based (Tiered) Pricing
Want to reward bulk buyers? Set up tiered pricing rules in this section.
Example tiered pricing table:
| Quantity | Discount |
|---|---|
| 1–4 items | Regular price |
| 5–9 items | 10% off |
| 10–19 items | 15% off |
| 20+ items | 20% off |
To configure:
- Select “Bulk” Discount.
- Click “Add Tier” to define each range.
- Set the minimum quantity and corresponding discount per tier.
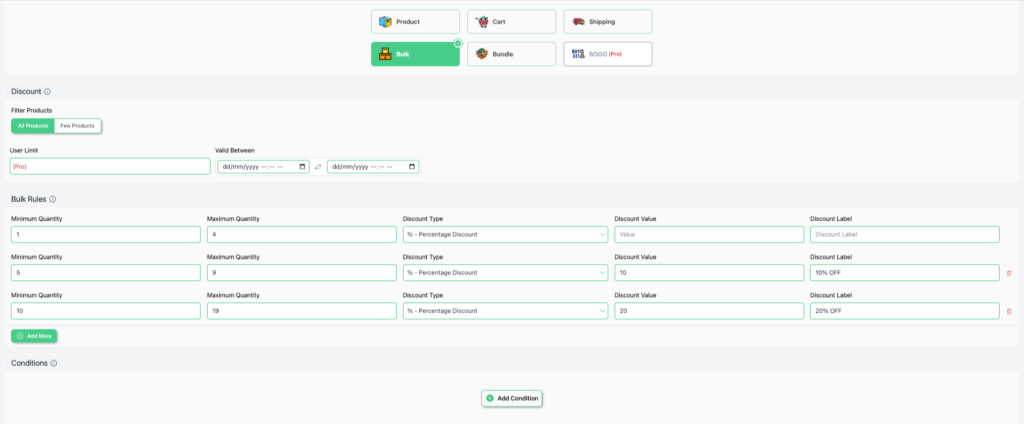
This is ideal for WooCommerce wholesale pricing and bulk discount strategies.
3.7 – Set Rule Priority
If you have multiple discount rules, set the priority number for each rule.
- Lower number = Higher priority (runs first)
- Priority 1 overrides Priority 2 if both apply to the same product
Use this to avoid discount stacking conflicts and ensure the right rule fires first.
3.8 – Schedule the Discount (Date Range)
Running a time-limited promotion? Set a start and end date:
- Toggle “Set Date Range” to on.
- Set the Start Date and End Date.
- The rule auto-activates and deactivates based on the schedule.
This is perfect for Black Friday WooCommerce discounts, holiday sales, and flash promotions.
Step 4: Save and Activate the Rule
Once all settings are configured:
- Click “Save Rule” (top or bottom of the page).
- Make sure the rule status is set to Active.
- Return to the Discount Rules dashboard to verify the rule appears with correct settings.
Step 5: Test the Discount on Your Store Front
Before going live, always test:
- Open your store in an Incognito/Private browser window.
- Add qualifying products to the cart.
- Proceed to the Cart or Checkout page.
- Confirm the discount appears correctly in the order summary.
Test the following scenarios:
- Does the discount show on the cart page?
- Does it apply to the correct products/categories?
- Does conditional logic work (e.g., does it only activate after cart hits $75)?
- Does BOGO trigger after adding the qualifying item?
- Does the discount expire after the scheduled end date?
If anything looks off, revisit the rule conditions and priority settings.
Step 6: Display Your Discount to Customers
Creating a discount rule is only half the job. The other half? Making sure shoppers actually see it.
Disco gives you five built-in display tools to communicate your offer clearly — on product pages, in the cart, and at checkout. Each one targets a different moment in the buyer journey.
Navigate to Disco → Display Settings to configure these options.
6.1 – Product Badge
A product badge is a visual label that appears directly on product images in shop listings and on the product detail page.
It tells shoppers at a glance that a discount is active — before they even click.
How to configure:
- Go to Disco → Display Settings → Product Badge.
- Toggle “Show Discount Badge” to On.
- Choose the badge style: percentage label, custom text, or sale tag.
- Set the badge text (e.g.,
20% OFF,SALE,Limited Offer). - Pick badge position: top-left, top-right, or custom.
- Save settings.
Why it works: Badges trigger a visual pattern interrupt. Shoppers scanning product grids stop on items marked with a discount label. It increases product click-through rate and reduces time-to-decision.
Pro Tip: Use high-contrast colors (red, orange, or green) for the badge background to maximize visibility in product grids.
6.2 – Bulk Pricing Table
If you’ve set up tiered or quantity-based pricing, the bulk pricing table displays that structure directly on the product page — so customers know exactly how much they save by ordering more.
How to configure:
- Go to Disco → Display Settings → Bulk Pricing Table.
- Toggle “Show Pricing Table on Product Page” to On.
- Set the table header label (e.g.,
Buy More, Save More). - Choose table position: above or below the Add to Cart button.
- Customize column headers (e.g., Quantity / Price / You Save).
- Save settings.
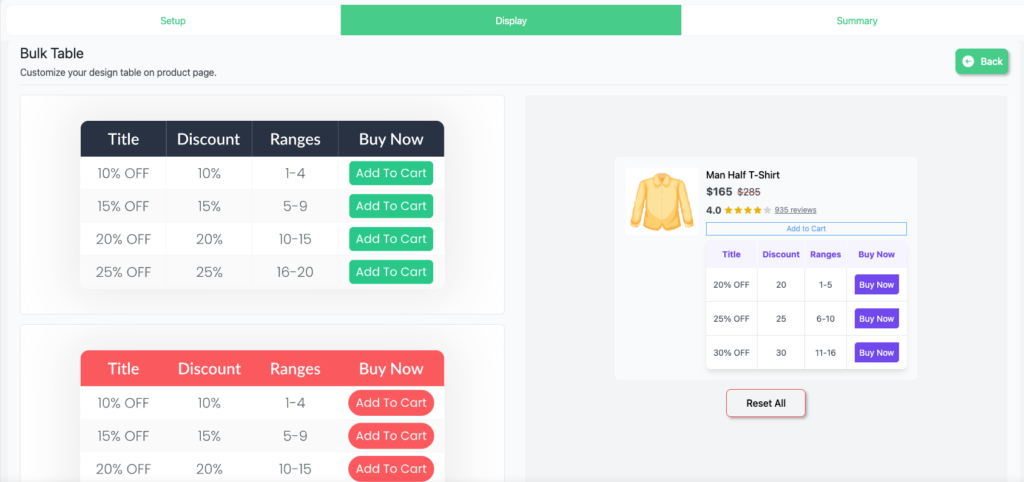
Example table shoppers will see:
| Quantity | Price Per Item | You Save |
|---|---|---|
| 1–4 | $25.00 | — |
| 5–9 | $22.50 | 10% |
| 10–19 | $21.25 | 15% |
| 20+ | $20.00 | 20% |
Why it works: The pricing table removes guesswork. Customers see clear incentives to increase their order quantity. It’s one of the most effective tools for boosting average order value (AOV) in WooCommerce stores.
6.3 – Text Highlight (Discount Message)
A text highlight displays a short promotional message near the product price or Add to Cart button. It draws attention to the active discount with a customizable line of text.
How to configure:
- Go to Disco → Display Settings → Text Highlight.
- Toggle “Show Discount Message” to On.
- Write your custom message text.
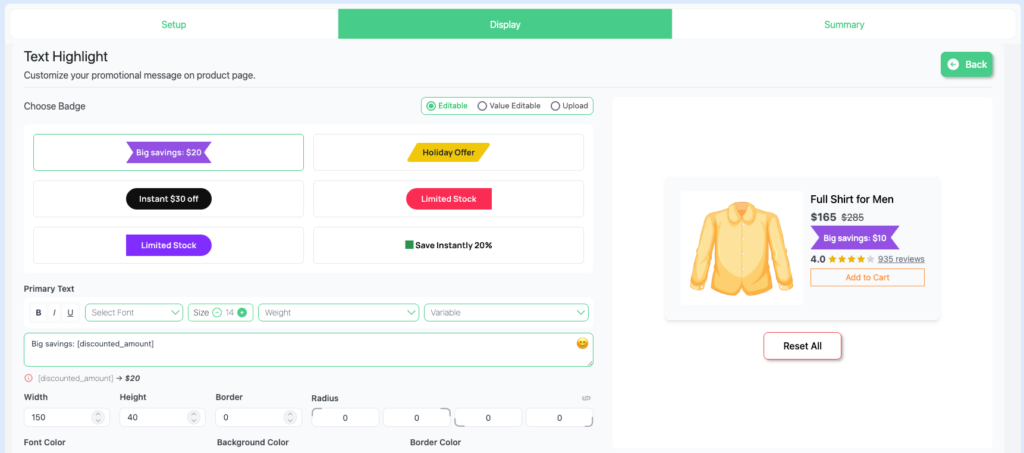
Example messages:
- 🎉 You’re saving $12.00 on this item!
- ✅ 15% off applied automatically — no code needed
- 🔥 Special price active for logged-in members
- Set display location: product page, cart page, or both.
- Optionally apply custom CSS class for styling.
- Save settings.
Why it works: Text highlights reduce cart abandonment by confirming the discount is active. Shoppers gain confidence that the price they see already reflects the saving — removing friction at checkout.
6.4 – Countdown Timer
A countdown timer displays a live ticking clock on product pages or in the cart. It shows shoppers exactly how much time is left before a discount expires.
This is one of the most powerful urgency and scarcity tools available in WooCommerce.
How to configure:
- Go to Disco → Display Settings → Countdown Timer.
- Toggle “Enable Countdown Timer” to On.
- The timer automatically syncs with the end date set in your discount rule (Step 3.8).
- Customize the timer label (e.g.,
⏰ Offer ends in:orSale expires in:). - Choose display style: inline text, block timer, or banner.
- Set display location: product page, cart page, or both.
- Save settings.
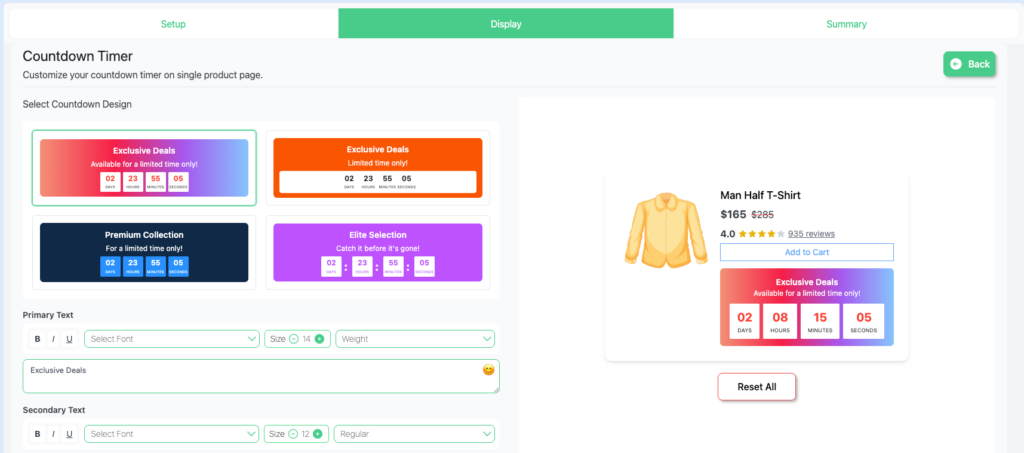
Why it works: Countdown timers create FOMO (fear of missing out).
Research consistently shows that time-limited offers increase conversion rates. Shoppers who might have browsed and left are more likely to complete a purchase when they see a ticking clock.
The timer only appears when a discount rule has an active end date configured. Make sure Step 3.8 is set up correctly for this to display.
6.5 – Cart Notice
A cart notice is a message that appears on the Cart page or Checkout page. It can inform shoppers about:
- An active discount already applied to their order
- A threshold they’re close to reaching (e.g., “Spend $20 more to unlock 15% off!”)
- A time-sensitive offer expiring soon
How to configure:
- Go to Disco → Display Settings → Cart Notice.
- Toggle “Show Cart Notice” to On.
- Choose notice type:
- Discount Applied Notice — confirms a saving is already active
- Threshold Notice — nudges shoppers to spend more to unlock a discount
- Write the notice message.
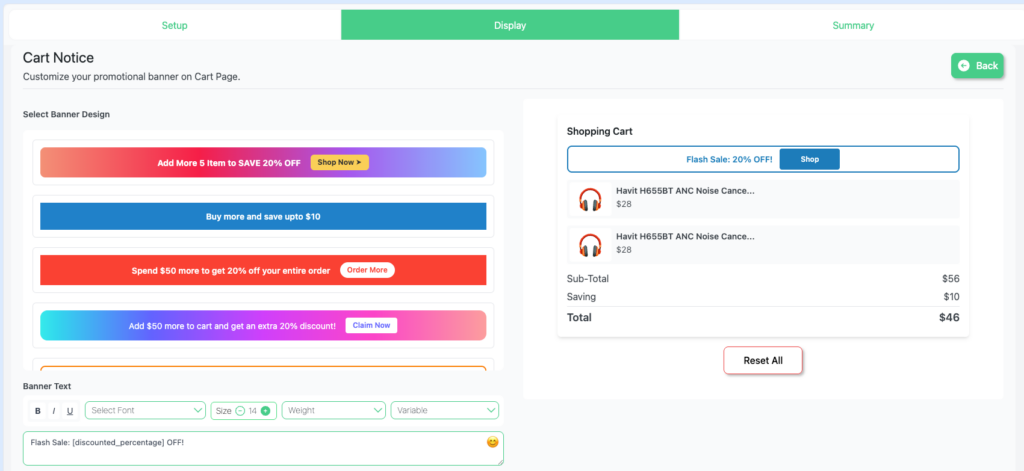
Example cart notice messages:
- ✅ Your 10% discount has been applied automatically.
- 🛒 Add $18 more to your cart to unlock FREE shipping + 15% off!
- ⚡ Flash sale price active — offer ends today!
- Set notice style: info bar, inline message, or pop-up style.
- Save settings.
Why it works: Cart notices serve double duty. They reassure shoppers that their discount is confirmed (reducing drop-off), and they nudge shoppers who are close to a discount threshold to add one more item.
This directly increases cart conversion rate and average order value.
Display Features – Quick Reference
| Feature | Where It Shows | Primary Goal |
|---|---|---|
| Product Badge | Product listings & product page | Attract attention, signal discount |
| Bulk Pricing Table | Product page | Increase order quantity / AOV |
| Text Highlight | Product page & cart | Confirm discount, reduce friction |
| Countdown Timer | Product page & cart | Create urgency, reduce abandonment |
| Cart Notice | Cart & checkout page | Confirm saving, nudge threshold spend |
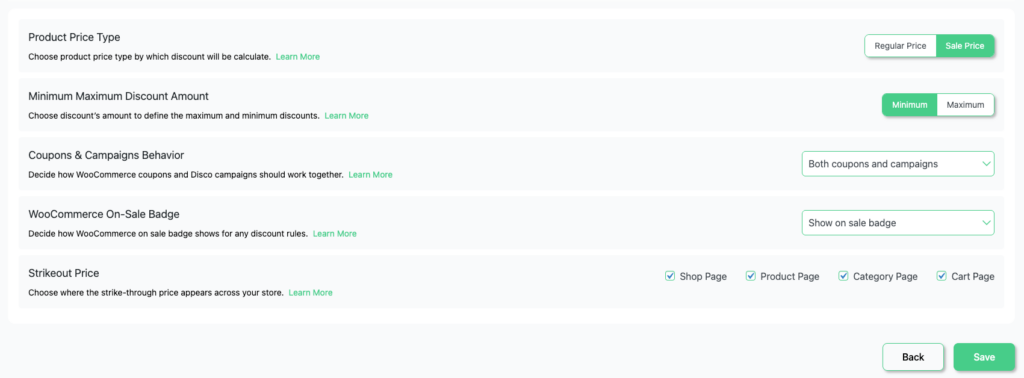
Step 7: Configure Global Plugin Settings
Beyond individual rules, Disco has global settings worth configuring.
Discount Display Settings
- Show discount badge on product listings highlights sale items visually
- Show “You Save” text on product and cart pages reinforces value to shoppers
- Discount label customization edit the text shown (e.g., “Special Offer”, “Flash Sale”)
Stacking Rules
- Allow multiple discounts to stack, or limit to one discount per cart
- Configure whether coupons and automatic discounts can combine
Pricing Table Display
- Enable a quantity pricing table to show on product pages
- This displays the tier structure so customers know they save more by buying more
What are Common WooCommerce Discount Use Cases?
Here are practical examples you can set up with Disco:
Sitewide Sale Discount
Goal: 10% off everything for 3 days
- Type: Percentage
- Apply to: All products
- Condition: Date range (set start/end dates)
Cart Value Discount (Spend & Save)
Goal: $15 off when cart total exceeds $100
- Type: Fixed amount
- Condition: Cart subtotal ≥ $100
BOGO – Buy One Get One Free
Goal: Buy 2 T-Shirts, get 1 free
- Type: Buy X Get Y
- Trigger: Add 2 of Product X
- Reward: 1 of Product X at 100% discount
Wholesale / Role-Based Pricing
Goal: 20% off for users with the “Wholesale” role
- Type: Percentage
- Condition: User role = Wholesale Customer
Bulk / Tiered Quantity Pricing
Goal: Bigger discounts for larger orders
- Type: Percentage with tiered ranges
- Tiers: 5+ items = 10%, 10+ items = 15%, 20+ = 20%
Troubleshooting Common Issues
Discount Not Showing at Checkout
- Confirm rule status is Active
- Check that the product/category in the cart matches the rule’s targeting
- Verify no conflicting higher-priority rule is overriding it
- Test with the correct user role if using role-based conditions
Multiple Discounts Conflicting
- Review the priority settings on all active rules
- Check the stacking settings in Disco’s global settings
- Disable one rule temporarily to isolate the conflict
BOGO Not Triggering
- Confirm the qualifying product is added to the cart in the right quantity
- Double-check the Get Y product is configured correctly
- Ensure the rule is active and within its date range
FAQs About WooCommerce Discount Plugins
Does Disco work with WooCommerce coupons?
Yes. Disco automatic discounts can work alongside WooCommerce coupon codes. You can configure whether they stack or not in the global settings.
Can I create a discount for specific customers?
Yes. Use the “Specific User” condition to target individual customer accounts with a personalized discount.
Does this plugin support percentage and flat discounts?
Yes. Disco supports percentage discounts, fixed amount discounts, and fixed price overrides.
Is Disco free?
Yes. The core plugin is free on WordPress.org. A premium version may offer additional advanced features.
Will automatic discounts work without coupon codes?
Yes. That’s Disco’s core strength rules apply automatically at cart and checkout without any code required.
Conclusion
Adding a WooCommerce discount plugin to your store opens up a range of pricing strategies that the default WooCommerce system simply can’t handle.
With Disco – Discount Rules for WooCommerce, you can:
- Set up automatic discounts that apply without coupon codes
- Build tiered pricing for bulk and wholesale buyers
- Run BOGO offers and cart-level promotions
- Schedule time-limited flash sales
- Create role-based and user-specific pricing
Follow the steps in this guide to install, configure, and test your first WooCommerce discount rule. Once you see how easy it is to set up, you’ll wonder how you managed without it.
Related Post:
WooCommerce Sale Badge: Complete Guide to Adding, Customizing & Removing It
How to Set Up a Fixed Cart Discount in WooCommerce (Step-by-Step)
Quantity Discounts & Pricing for WooCommerce: Complete Guide (2026)
How to Set Up 10% Discount on a Specific Product Variant in WooCommerce
How to Apply Discount to Selected Product Category in WooCommerce?