You’ve set up a sale in your WooCommerce store. But shoppers are scrolling right past it.
The default WooCommerce sale badge appears on every store. It’s basically the Comic Sans of eCommerce.
Everyone has it. Nobody’s proud of it. And it stopped converting long after its prime.
That matters more than most store owners realize.
Nearly 70% of shoppers abandon their carts before purchasing. This often happens because of unclear or weak discount signals.
Research from Nielsen Norman Group confirms that strong visual cues like clear discount labels are among the most powerful triggers for attention and conversions.
The good news? You don’t need a developer. You can fix your WooCommerce on sale badge without touching a single line of code.
This guide covers how to add, customize, or completely remove your WooCommerce sale badge.
You will learn how to change the sale badge text, switch it to a percentage discount like “20% OFF“, update colors, move its position, and fix common issues.
All setup is managed through Disco Plugin, a no-code WooCommerce discount plugin.
Quick Summary :
What is a WooCommerce sale badge? –
The small “sale” label is displayed on product images when a discount is active.
Why customize it? – The default badge is generic, says nothing about the actual discount, and is identical across stores, which leads to fewer clicks and lost conversions.
What can you change? – Fine-tune every aspect — text, color, shape, placement, and visibility across products, categories, and variable products.
Do I need code? No – Disco handles everything inside your WordPress dashboard, no code required.
What’s the fastest win?- Upgrade “ sale” to a dynamic “ 20% off Badge.” — powered by Disco.
Jump to what you need: Customize the badge, remove it, or fix common issues.
What Is a WooCommerce Sale Badge?
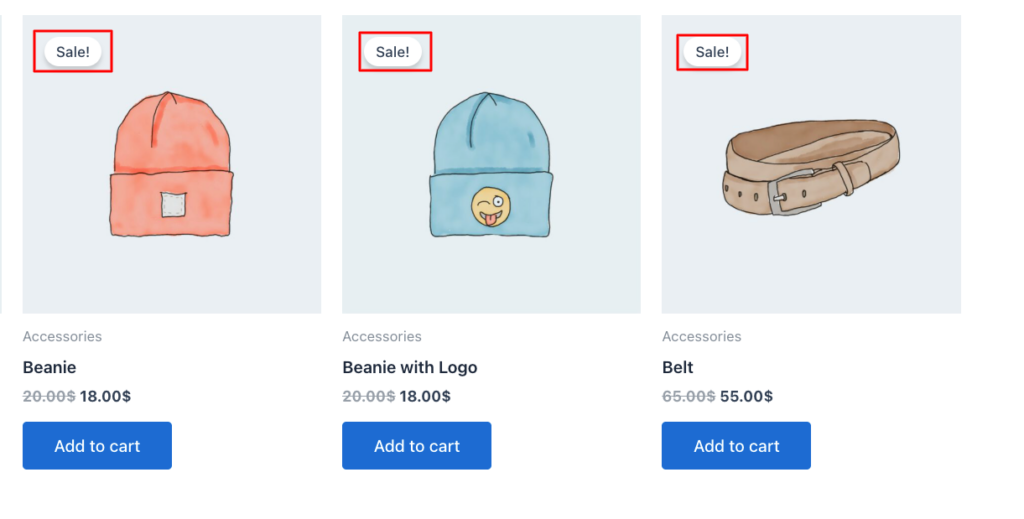
A WooCommerce sale badge (also called a WooCommerce on sale badge or product sale flash) is the “Sale!” label that appears on product images when an item is discounted.
By default, it shows “Sale!” and appears automatically.
Where it appears:
- Shop page
- Category page
- Individual product page
What triggers it: Setting a lower sale price below the regular price. Once that is done, WooCommerce handles the rest automatically.
Note: This is an example of a default WooCommerce sale badge on the shop page.
Why the Sale Badge Works: The Psychology
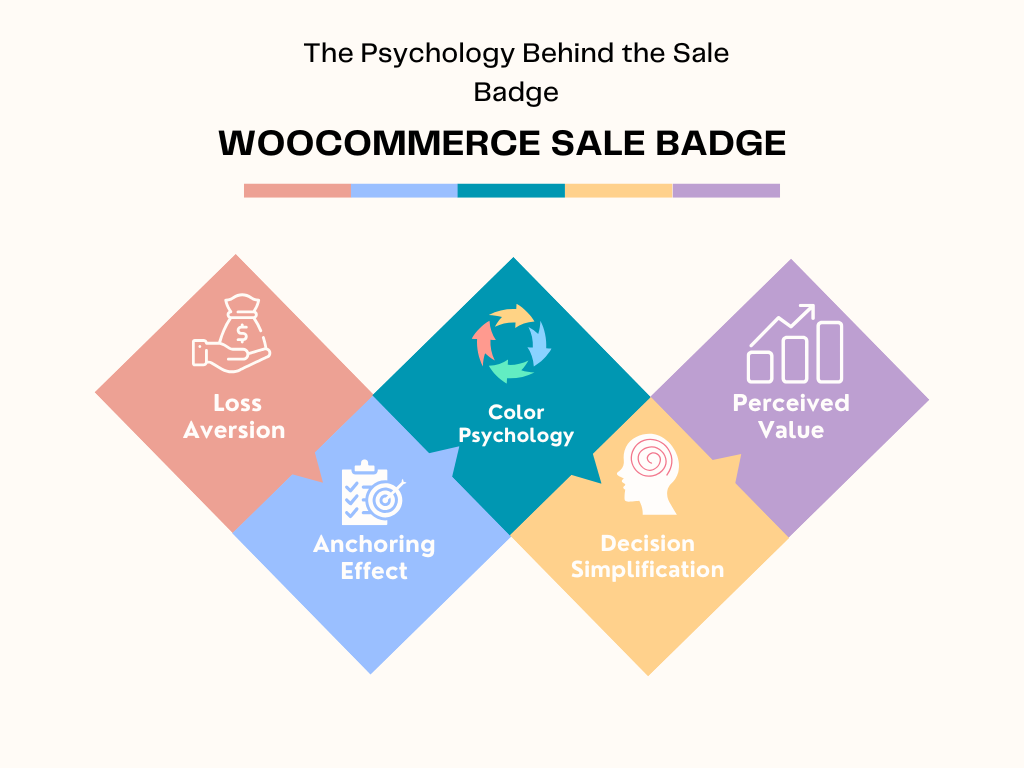
Loss Aversion: According to Nobel Prize-winning economist Daniel Kahneman, people are more motivated by fear of losing than by the value of gaining. A sale badge triggers that urgency. It tells shoppers: “If I don’t act now, I’ll miss this price.”
Anchoring Effect: Displaying a crossed-out original price next to the sale price creates what behavioral economists call an anchor. Shoppers perceive the discounted price as a better deal, even if the savings are minimal.
Color Psychology: Studies from the University of Rochester show that red drives urgency, green represents savings and approval, and orange signals scarcity.
Decision Simplification: Too many choices overwhelm shoppers. Psychologists call this the paradox of choice. A sales badge cuts through analysis paralysis and highlights what matters. It reduces mental effort.
Perceived Value: Research on consumer behavior shows that even small discounts feel more valuable with the right visual triggers. A sale badge does not just reinforce the offer. It amplifies perceived value.
The Problems With the Default WooCommerce Sale Badge
Most store owners do not realize the limitations of WooCommerce’s default sale badge until it is too late:
- Fixed text: it always shows “Sale” with no customization options
- Theme-dependent design: no flexibility over color, size, or shape
- Inconsistent behavior: not fully compatible with variable products
- No targeting control: cannot customize per product or category without code
- No differentiation: shows no visual difference between a 5% and a 30% discount
- No percentage display: shoppers cannot immediately see how much they save
Want to go deeper? Refer to how discounts reduce cart abandonment in WooCommerce.
Which Method Is Right for You: CSS vs Plugin vs Code?
Before diving into customization, understand these three approaches and what they will cost:
| Method | What You Can Change | Skill Required | Risk Level | Time to Implement |
| CSS / Child Theme | Basic text, font, color, size | Intermediate to Advanced | Moderate. Theme updates can undo your changes. | 30 to 120 min per adjustment |
| PHP Hooks | Text, logic, and visibility rules | Developer level | High. A syntax error can crash your store. | Several hours per feature |
| Plugin (Disco) | Everything: color, text, %, shape, variable products | None | Very low. No code, no files. Managed from the dashboard. | Under 5 minutes |
Honest Recommendations:
1. CSS works best for minor stylistic changes. Use it only if you are comfortable managing a child theme.
2. PHP hooks offer maximum flexibility but require continuous maintenance.
3. Disco plugin simplifies the entire process by eliminating both complexity and risk.
If you have already tried the CSS route and ended up searching “WooCommerce sale badge not showing after update,” you have already experienced how difficult manual changes can be.
This guide takes the plugin-based approach for exactly that reason.
How to Customize Your WooCommerce Sale Badge?
Most tutorials at this point will say, “Open your CSS file.” That is code for “good luck.” We will not do that here.
Disco Plugin handles everything for you.
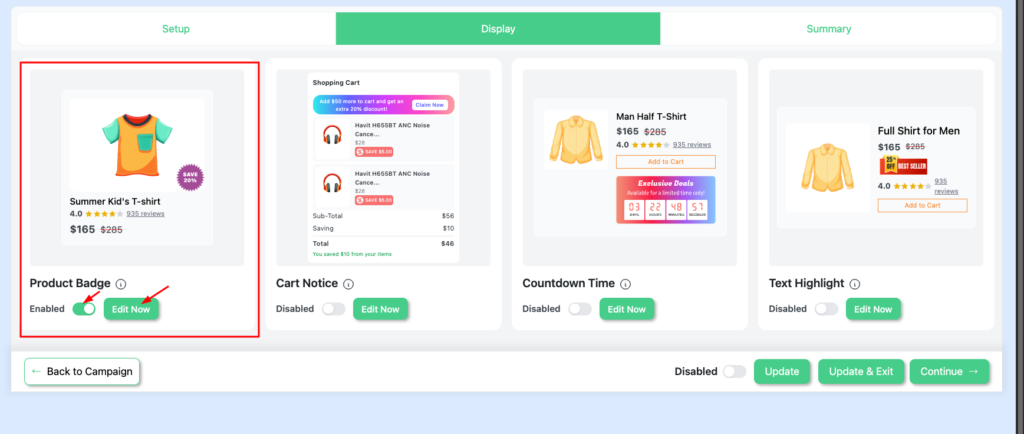
Get Your Sale Badge Live in 3 Steps
- Create your Campaign, click Continue, then go to Product Badge and select Edit Now
- Upgrade if needed, then publish to make your badge live
- Select your badge style and customize it
For a more detailed explanation, check out: Display Product Badge in WooCommerce
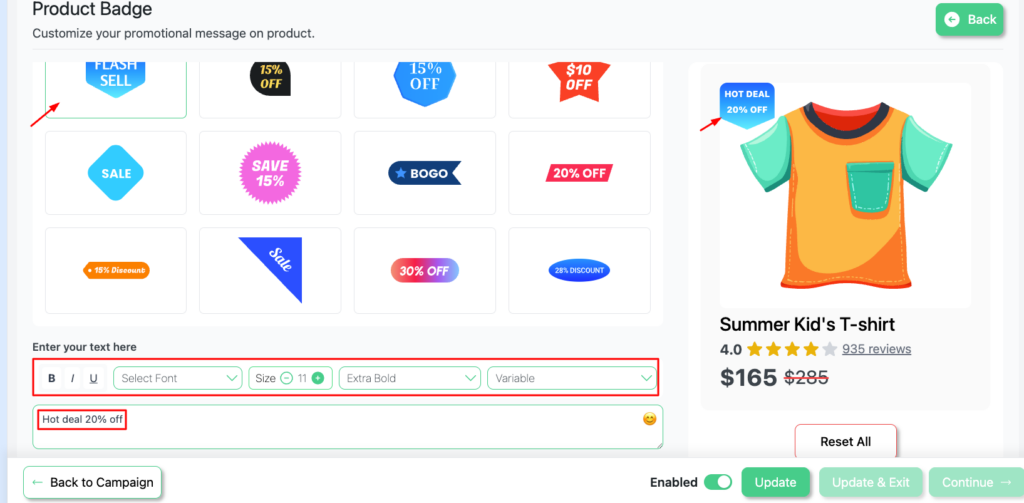
How to Change the WooCommerce Sale Badge Text?
“Sale” is the weakest message you can show a shopper. Replace it with something that actually communicates value.
Two options:
- Custom text: match your campaign with messages like “Hot Deal“, “Limited Offer”, or “Members Only.”
- Dynamic percentage: display the exact discount automatically. Disco calculates and updates the percentage for you. Example: “30% OFF“, “20% OFF“
According to research from CXL Institute, % OFF” labels outperform generic sale badges because they clearly communicate value.
To change your WooCommerce sale badge text without code: go to Disco, open your campaign, go to Product Badge, and enter your custom text or select the dynamic variable.
See also: How to change sale badge text in WooCommerce and How to apply a WooCommerce percentage discount.
How to Change WooCommerce Sale Badge to Percentage Discount
Showing the exact percentage discount is the most conversion-friendly upgrade you can make to your sale badge.
WooCommerce’s default badge does not support this natively. But Disco Plugin makes it simple:
- Open your Disco campaign
- Go to Product Badge and select Edit
- Select the dynamic variable: [discounted_percentage]
- Save and publish. Every product now shows its own accurate percentage discount.
This approach works across all product types, including variable products. It also auto-updates whenever you change pricing.
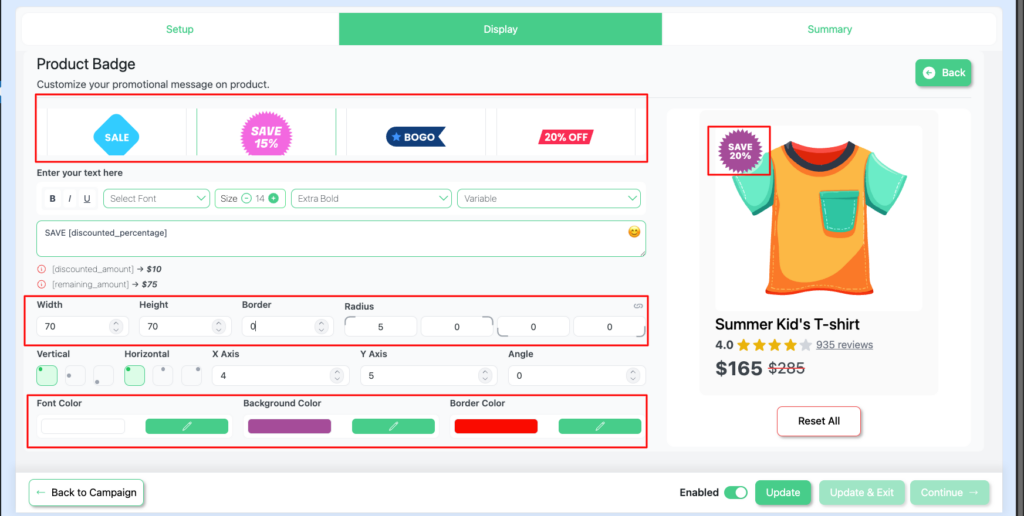
How to Change WooCommerce Sale Badge Color
WooCommerce sets your default badge color based on your active theme. It is usually red, green, or a bold contrasting color. There is no easy way to customize it without code.
Disco gives you full control from your dashboard:
- Color: set any badge background color that fits your brand or psychology goals
- Font color: choose contrasting text for better readability
- Border color: add definition or match your store palette
No CSS file. No child theme. No risk of breaking your store.
WooCommerce Sale Badge Color Psychology Quick Guide
- Red: drives urgency. Ideal for flash sales and limited-time offers.
- Green: signals savings and approval. Good for eco or wellness brands.
- Orange: suggests scarcity. Works well for seasonal promotions.
- Brand color: builds consistency and recognition across your store.
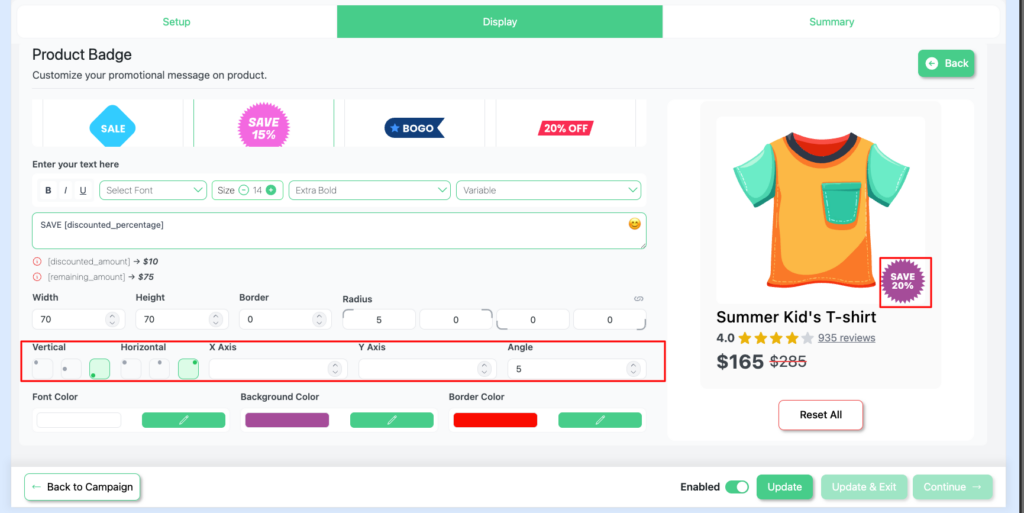
WooCommerce Sale Badge Position: Default and How to Move It
By default, the WooCommerce sale badge position is top left on the product image. Most themes follow this standard, but some themes, like Flatsome, modify it.
Many store owners search for how to move the badge to the top right or position it differently based on their theme layout.
With Disco, you control:
- Vertical position: top or bottom placement
- Horizontal position: left, center, or right
- X and Y axis offset: fine-tune exact pixel positioning
- Angle: rotate the badge for ribbon or diagonal styles
This means you can achieve a WooCommerce sale badge in the top-right position, or any position you want, without editing theme files.
Change WooCommerce Sale Badge Size and Shape
Beyond color and text, Disco lets you control:
- Shape: circle, square, ribbon, or custom
- Width and height: scale for your product image and layout
- Border radius: rounded corners or sharp edges
This level of WooCommerce sale badge customization was previously only possible with CSS in a child theme. And even then, it was risky.
Control Where the WooCommerce Sale Badge Appears
WooCommerce displays the sale badge everywhere by default. There is no precise control unless you run code.
Disco lets you choose exactly where badges appear:
- Only on the shop page
- Only on the individual product page
- On both
- On specific categories only
- On selected products only
Why it matters: On the shop page, badges drive clicks. But on product pages, they can sometimes distract from the final purchase decision. It depends on the product.
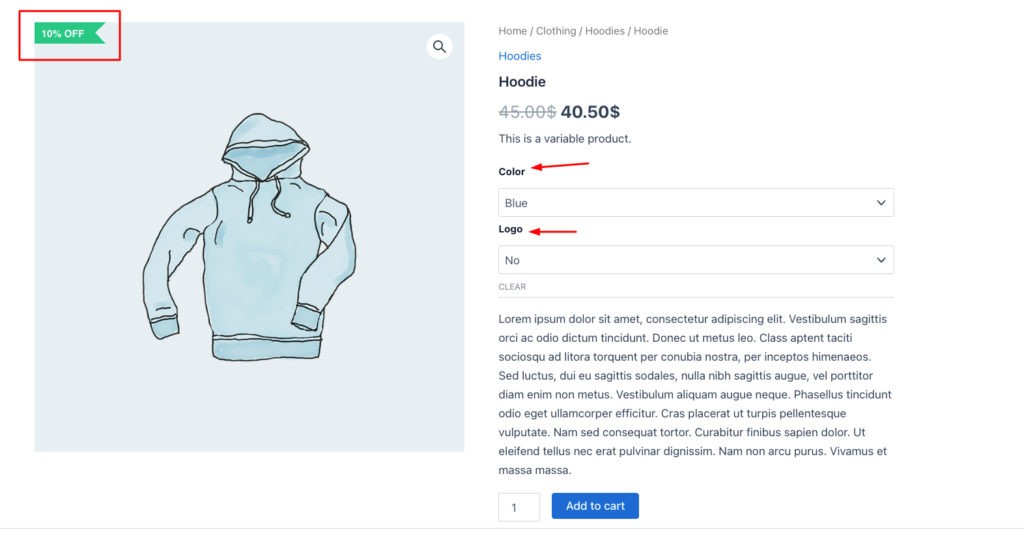
WooCommerce Sale Badge for Variable Products
Variable products are items with multiple options, like size or color. They have a hidden problem that most tutorials ignore.
WooCommerce’s default behavior only shows the sale badge if the discount applies to all variations of a product. If you set a sale on just one specific variant, the badge will not appear at all.
This is a documented WooCommerce limitation and a serious conversion killer for clothing, accessories, and any store with variable product types.
Disco fixes this by:
- Ensuring the badge appears when any variation is on sale
- Calculating and automatically displaying the correct percentage discount per variation
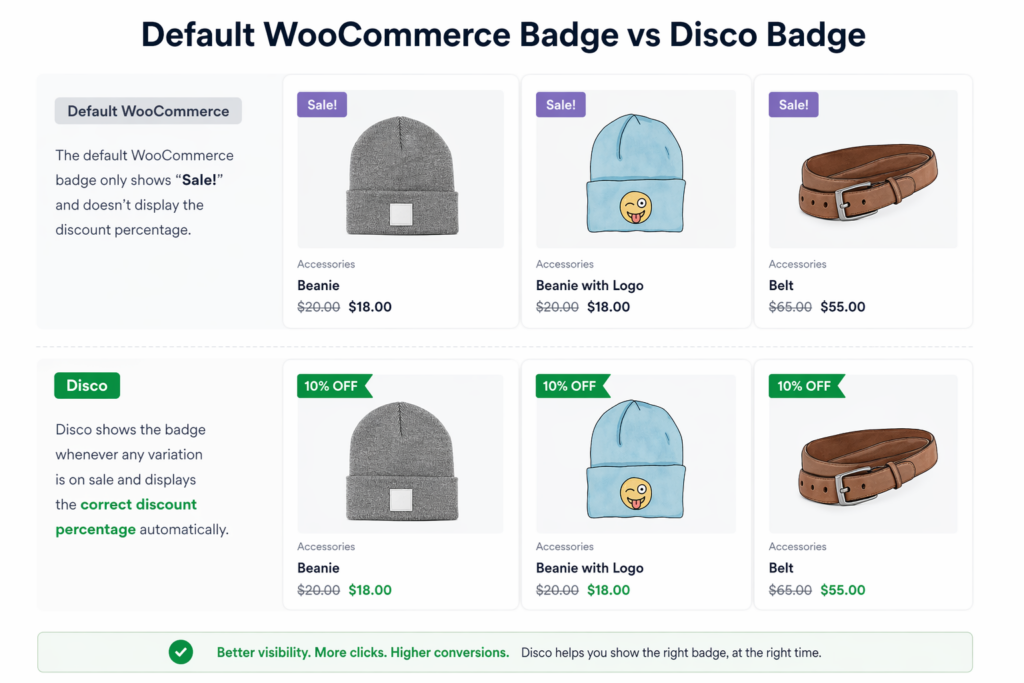
Default WooCommerce Badge vs Disco: At a Glance
| Feature | Default WooCommerce | With Disco |
| Badge text | Fixed “Sale” | Custom text or dynamic “% OFF.” |
| Badge color | Theme-controlled | Fully customizable |
| Badge position | Fixed (top left) | Flexible (top right, custom) |
| Variable products | Inconsistent display | Fully supported |
| Percentage discount | Not shown | Auto-calculated and displayed |
| Code needed | Sometimes | Never |
| Scheduled badges | Not available | Start and end dates built in |
Elementor and WooCommerce Sale Badge
Elementor and Elementor Pro users frequently encounter badge display issues in WooCommerce product widgets.
Common problems include:
- The badge appears in the wrong position when using Elementor Pro WooCommerce product widgets
- Elementor WooCommerce sale badge position (top right) is not applying correctly
- Elementor’s stylesheet is overriding your custom CSS.
Disco resolves this issue by using WooCommerce’s standard hook system. This works independently of Elementor’s template engine. The badge renders correctly regardless of which Elementor widget or layout you use.
How to Remove the WooCommerce Sale Badge
In some cases, displaying a sale badge everywhere can actually hurt performance. Here is when to consider removing it:
- Overuse makes badges feel repetitive and easy to ignore
- Constant discounts reduce urgency over time
- On product pages, they can distract from the final purchase decision
With Disco, you manage every aspect of badge visibility. No code required.
Remove Sale Badge Sitewide
From your WordPress dashboard, go to Disco. Then open your current campaign, go to Display, and turn off the product badge. Save your changes. This disables badges for all products in your store.
This is ideal for full-site promotions where too many discount signals reduce individual impact.
Remove Sale Badge From Specific Products
Go to your Disco dashboard. Select the campaign assigned to specific products. Open the Display tab and turn off the product badge. All other products will continue displaying badges.
Remove Sale Badge From Specific Categories
Use the same steps for specific categories. Disable the badge for that category. This works best for clearance or seasonal categories where discounts are already expected, and the badge adds no new information.
Explore how WooCommerce dynamic pricing and discounts work with visibility.
WooCommerce Sale Badge Not Showing: Causes and Fixes
If your WooCommerce sale badge is not showing, it is almost always one of these causes:
| Problem | Likely Cause | Fix |
| The sale badge is not showing | No sale price set on the product | Set a sale price in product settings and save |
| WooCommerce sale badge not showing after update | Theme update overwrote CSS customizations | Switch to Disco. It has no CSS dependency. |
| Badge showing on the wrong products | The sale price was applied incorrectly | Audit product pricing and remove unintended sales |
| Badge not updating after changes | Page cache serving old version | Clear your cache and hard-refresh the page |
| Theme conflict | Theme styling overrides badge display | Use Disco to control badge output independently of the theme |
| Variable product badge missing | WooCommerce limitation with partial variant sales | Disco shows the badge when any variation is on sale |
The most common cause is a missing sale price on the product. Check your product settings first before troubleshooting CSS or plugin conflicts.
WooCommerce Sale Badge CSS: Quick Reference
If you prefer to style the badge with CSS and accept the maintenance tradeoffs, here are the most commonly needed selectors:
/* Change badge background color */.woocommerce span.onsale { background-color: #e74c3c; color: #ffffff;}/* Change badge size */.woocommerce span.onsale { min-width: 60px; min-height: 60px; line-height: 60px;}/* Move badge to top right */.woocommerce ul.products li.product .onsale { left: auto; right: 0; margin: 0.5em 0.5em 0 0;}Important: These CSS rules must be added to a child theme to survive theme updates. Using Disco avoids this entirely. Changes are stored in the database, not in theme files.
Scheduled Sale Badges: Black Friday, Flash Sales, and Auto-Expiry
Temporary sale badges are the most effective ones. A time-limited badge creates urgency and disappears once it has served its purpose.
The psychology is well established. Dr. Robert Cialdini, in Influence: The Psychology of Persuasion (1984), identified scarcity as one of the core principles of human persuasion. People pursue time-bound things more aggressively.
As the Nielsen Norman Group explains, scarcity works best for loss aversion. People are more driven by fear of missing out than by the potential to gain it.
Black Friday and Seasonal Campaigns
Timing is your most important asset. You either catch the wave or watch it pass.
Manual badge activation during peak hours introduces unnecessary risk. A small delay during Black Friday or Cyber Monday can cost thousands in lost conversions.
Context: Shopify merchants generated $11.5 billion in sales over BFCM 2024. Stores that used urgency signals saw conversions increase by 14%.
Disco handles scheduled badges by letting you set start and end dates directly from your dashboard.
Flash Sales
Flash sales operate within tight windows, usually 4 to 24 hours. Manual badge management at that scale is impractical.
Use countdown text like “Ends Tonight” or “24-Hour Deal” paired with a scheduled end time. This creates urgency without requiring real-time updates.
To maximize impact:
- Use high-contrast bold colors (red or amber)
- Keep the message short. Three words or fewer work best.
- Pair the badge with a site-wide announcement banner
Auto-Expiry and Legal Compliance
One of the easiest ways to lose customer trust? Leaving a sale badge active after the deal has ended.
According to the FTC’s Guides Against Deceptive Pricing (16 CFR Part 233), a sale price is legally valid only when it has a genuine original price and is time-bound. Not only are “constantly available” sales sloppy, but without a limited time frame, you’ll be in deceptive-pricing territory in California.
This isn’t theoretical. Multiple major retailers- such as Best Buy, JCPenney, and Amazon have faced California class actions over this.
Setting the Disco campaign’s end date automatically resolves this problem. The badge automatically expires once the promotion ends.
Sale Badge for Popular Themes: Astra, Flatsome, Divi, and Storefront
Woocommerce themes don’t handle the default sale badge the same way. Each theme applies its own styling and logic. The reason why changing themes can alter their design, color, position, or remove them entirely.
Astra
Astra powers over 1 million WordPress installations. It relies on WooCommerce’s core styling, but in some configurations, the badge appears with a transparent background. This makes it hard to notice on lighter product images.
Astra Pro offers limited customization through the Customizer. It mainly covers basic colors. There is no support for shape changes, dynamic text, or position control. Advanced customization requires CSS in a child theme.
Disco removes these limitations without code.
Flatsome
Flatsome is one of the best-selling WooCommerce themes on ThemeForest. It is popular with fashion and lifestyle brands. It layers its own badge styling over WooCommerce, which can cause CSS conflicts or fail silently.
Flatsome modifies badge positioning, which sets it apart from standard WooCommerce behavior. Result? Badges styled with generic CSS often end up misaligned or cut off.
Disco solves this issue by displaying badges independently of the theme’s styling.
Divi WooCommerce Sale Badge
Divi by Elegant Themes introduces a visual builder that can interfere with WooCommerce sale badges in product modules. Store owners often see duplicate badges or find badges disappear after clearing the builder cache.
Even Divi’s official documentation acknowledges these conflicts. Using a plugin ensures that the badges are displayed correctly through WooCommerce’s standard output, preventing conflicts with Visual Builder.
Elementor Pro users building product archive pages or single product pages often find that sale badge positioning breaks inside Elementor’s WooCommerce widgets.
Disco bypasses Elementor’s template layer by outputting the badge through WooCommerce core hooks. This keeps position, color, and text consistent regardless of your Elementor layout.
Storefront
Storefront is WooCommerce’s default theme; it is considered simple, reliable, and predictable for its straightforward implementations. It displays badges according to WooCommerce’s core behavior, with no surprises.
But it is bound to its limitations, and the badge remains the same across all Storefront stores. If you want your brand to stand out, customization should no longer be an afterthought. It’s essential.
Best WooCommerce Sale Badge Plugins
Disco: Recommended WooCommerce Sale Badge Plugin
Most badge plugins add complexity by treating badges and prices as separate systems. Disco approaches it differently.
Once you set a discount rule, it automatically updates the badge with the correct price. No extra tools, duplicated setup, or mismatched discounts.
Disco stands out as the only WooCommerce solution that offers a unified system.
How to set up your WooCommerce sale badge with Disco:
- Install and activate Disco plugin from the WordPress plugin directory
- Go to Disco and create a new campaign. Name it and define your discount type (percentage, fixed, BOGO, etc.)
- Click Continue and customize your badge in the Display tab
- Click Save and Publish. Badges appear automatically.
Note: Disco Free lets you preview available features. Using them requires an upgrade to Pro.
For step-by-step instructions, refer to Disco’s badge documentation and the WooCommerce sale badge guide.
Other WooCommerce Sale Badge Plugins
YITH WooCommerce Badge Management: A dedicated badge plugin with extensive customization. However, it handles discount logic and badges independently. This can lead to duplicate setup and incorrect discount information.
WooCustomizer: A simple tool for basic text changes. Works for straightforward cases. Lacks flexibility for complex or campaign-driven discounts.
ACO Product Labels: Not recommended. Recent reports indicate it is unsupported and broken on current WooCommerce versions.
Conclusion
Small things often punch above their weight. Take your WooCommerce sale badge, for example, the smallest elements on your store, yet it’s able to turn heads in a flicker when it’s effective.
The default badge is generic. It says “Sale” to every shopper, in every store, with no information about the actual discount. Disco changes that.
With the right WooCommerce sale badge plugin, you can:
- Change badge text to show the exact percentage discount
- Customize color, shape, and size to match your brand
- Control where badges appear by product, category, or page type
- Fix variable product badge issues automatically
- Schedule badges for Black Friday, flash sales, and seasonal campaigns
Start customizing your WooCommerce sale badge today. Try Disco free, no coding required.Done in minutes.
Frequently Asked Questions
How do I show “20% OFF” instead of “Sale!” on the badge?
Disco automatically calculates the percentage from the product’s original price. Every product displays its own accurate discount across your entire store. No code required.
Why is my WooCommerce sale badge not showing?
Nine out of ten times, either no sale price is set on the product, your site cache is displaying an older page version, or there is a theme conflict. Disco’s troubleshooting guide covers a step-by-step fix for each scenario.
Can I change the color and shape of the sale badge without code?
Yes, if you have the right tool. Disco lets you customize badge color, shape, size, and position from your WordPress dashboard. No CSS or coding needed.
Does the WooCommerce sale badge work on variable products?
WooCommerce’s native system is inconsistent with variable products. Disco ensures the badge appears automatically for each variation on sale and displays the correct discount percentage.
Where is the default position of the WooCommerce sale badge?
By default, the WooCommerce sale badge position is top left on the product image. With Disco, you can move it to the top right, bottom, center, or any custom position without touching your theme files.
Can I disable the sale badge on specific products or categories?
Yes. Disco lets you disable the badge sitewide, per product, or per category. Everything is managed from your dashboard. No code needed.