Selling beyond your borders lets you reach far more shoppers and quickly grow revenue; it turns a local shop into a global store.
But the idea of “international shipping” often feels like a tangle of zones, carrier rules, taxes, and paperwork. That’s normal.
WooCommerce has the building blocks you need, but you must set them up correctly so customers see accurate options and costs at checkout.
This guide breaks down the process of how to add international shipping to WooCommerce into simple, practical steps.
First, we’ll show how to create shipping zones so WooCommerce displays the right methods for each country. Then you’ll learn which shipping methods to use: flat rate, table/weight-based rules, or live carrier rates, and when to use each.
We’ll explain duties (DDP vs DDU), taxes, and the paperwork customs require so you avoid surprises. Finally, you’ll get testing and troubleshooting checks to verify everything works before you go live.
Ready? Let’s set up international shipping the right way — step by step.
Don’t forget to check out our practical international shipping setup example at the end of the article.
Table of Contents
Prerequisites Before You Start
Before we get to know how to add international shipping to WooCommerce, get a few basics right. These prep steps make rates accurate, reduce delays at customs, and save you time once orders start coming in.
1. Accurate Product Data
Figure out and enter the correct weight and dimensions for every shippable product. Live carrier rates and weight-based methods need those numbers to calculate cost and packaging automatically.
If you skip them, you will get wrong quotes or no live rates at all. Also, keep product descriptions simple and clear for customs forms.
2. Know Rules and Prohibited Items
Different countries or regions prohibit different types of items. Check which items are restricted or banned for your target countries you plan to sell to.
For example, many carriers forbid lithium batteries, aerosols, sleeping pills, or certain chemicals without special handling. Mark any restricted items in your catalog so they never reach checkout for those destinations.
3. Decide Which Countries to Serve First
As an eCommerce consultant, I always say to adopt a concentric growth strategy. In simple words, grow in a circle where you start small and grow outwards.
Pick 1–3 countries or regions where you expect demand and shipping is simple. Think about delivery times, customs duties, return costs, and whether carriers can reliably deliver.
Use these first markets to learn and fix any issues, then add more zones once everything runs smoothly. Keeping rates and policies simple at launch makes life a lot easier.
4. Packaging and Your Shipping Policy
Choose packaging that protects goods but keeps size and weight down. Write a short shipping policy that explains shipping times, who pays duties (DDP vs DDU), and return rules. Put this on product pages and in checkout messages to avoid confusion.
5. Carrier Accounts or A Shipping Plugin
Decide whether you will use carrier accounts (DHL, UPS, FedEx, USPS) or a single plugin/service (Easyship, ShipStation) that aggregates carriers and can show live rates and duties.
Carrier accounts usually give better control or discounts. However, you have to be in the know how to configure them at your Woo store properly.
Aggregator plugins, on the other hand, offer a simple setup and handle customs paperwork for you.
6. Test Safely on A Staging Site
Make changes on a staging or test site first. Run test orders for several countries, check rate accuracy, verify emails and labels, and confirm customs documents are generated correctly. Testing in a staging site is always the best practice and also keeps your live store working while you test.
How to Add International Shipping to WooCommerce?
Let us walk you through how to charge international shipping in WooCommerce.
Step 1: Configuring WooCommerce General Shipping Settings
You need to adjust some WooCommerce general settings to make sure your store allows worldwide shipping.
- Navigate to WooCommerce > Settings > General. This page controls where you sell and ship your products.
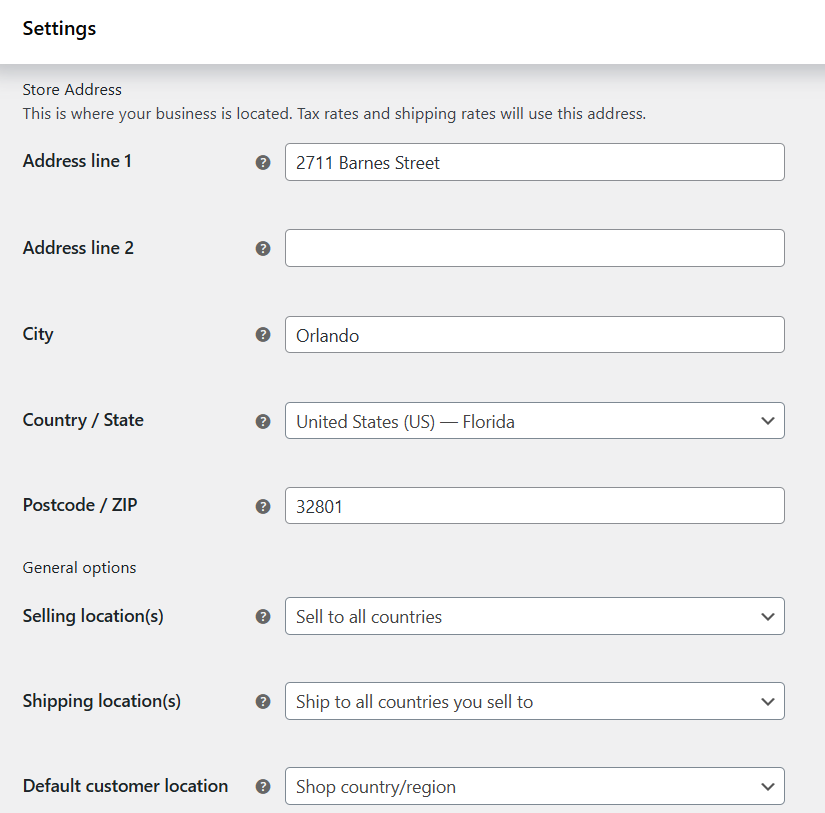
- Input your store’s correct address.
- Look for the option “Selling Location(s)”. Here, you decide from which country customers are allowed to place orders.
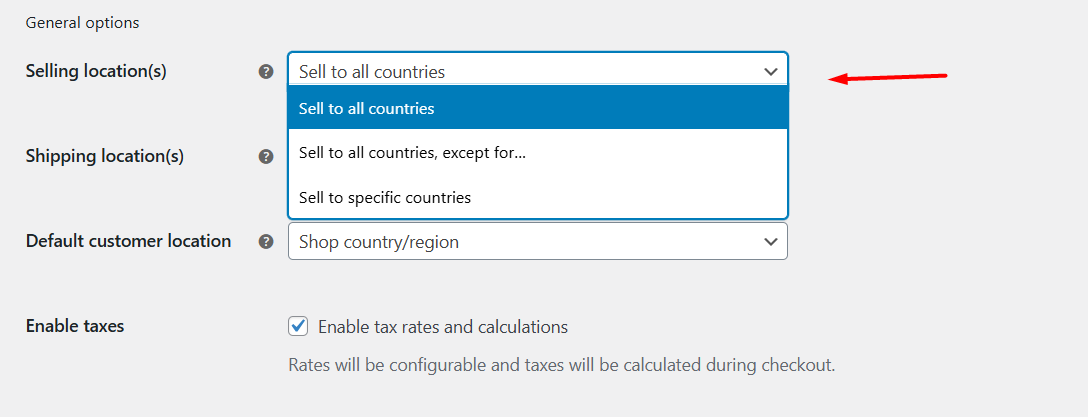
- Select “Sell to specific countries” when you sell to specific locations.
- If you want to open your store worldwide, select “Sell to all countries”.
- Next, find “Shipping Location(s)”. This is just as important. Even if you allow people worldwide to buy, you need to tell WooCommerce where you’re actually willing to ship orders.
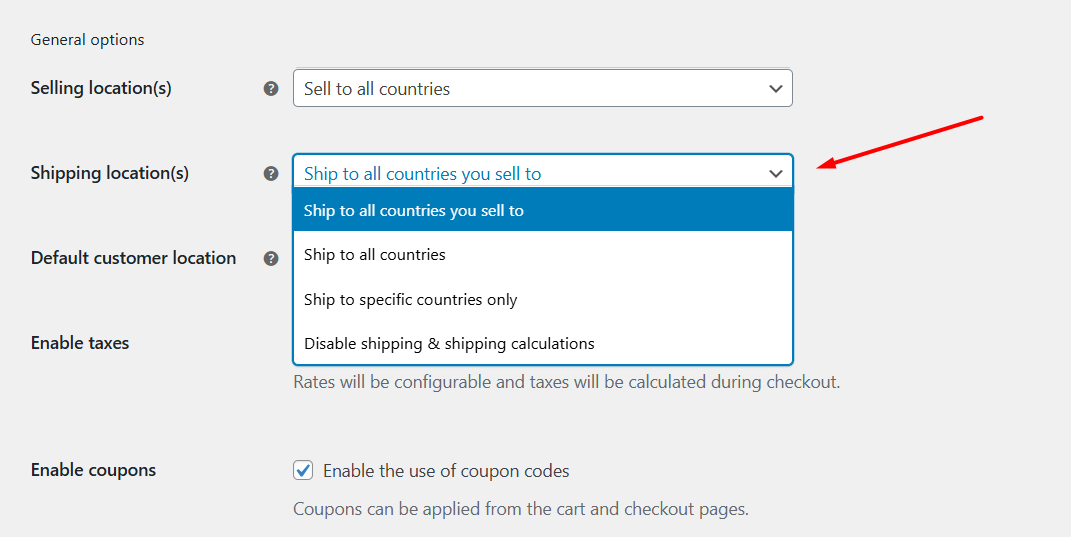
- Select “Ship to all countries you sell to” if your shipping zones cover the same countries you’re selling to.
- Or select “Ship to specific countries only” if you plan to limit delivery to certain regions.
- Save your changes.
💡 Tip: Many store owners accidentally enable “Sell to all countries” but forget to set shipping locations. This leads to checkout errors or customers from countries you don’t serve being able to place orders. Always match your selling and shipping settings.
Step 2: Creating and Managing International Shipping Zones
The first thing you will find in the WooCommerce > Settings > Shipping tab is the term called Shipping Zones. This is where you select and set your locations and how shipping works for different regions.
A shipping zone is basically a group of countries, states, or even postal codes where you want to apply specific shipping rules. Each zone can have its own shipping methods and rates.
For example, you may want to offer flat-rate shipping to Europe, free shipping to the US over a certain order amount, and real-time carrier rates for Asia. Shipping zones make this possible.
Now let’s find out how to set up shipping zones for different countries
- Navigate to WooCommerce > Settings > Shipping > Shipping Zones.
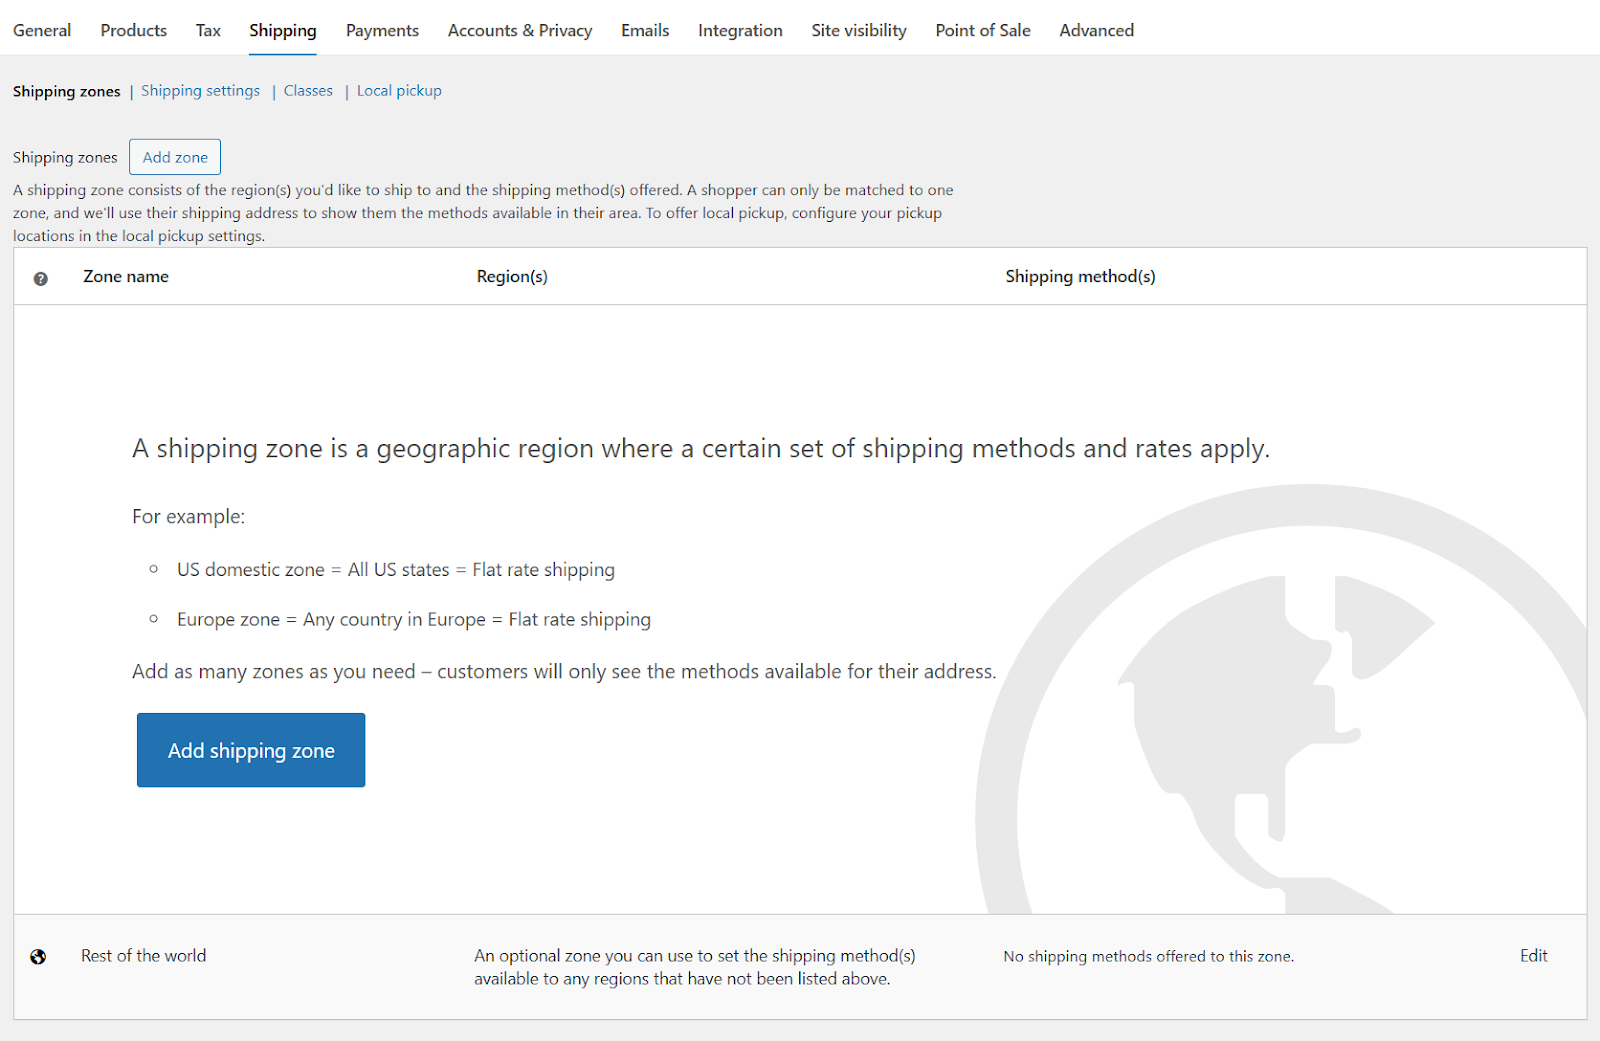
- Click the Add Zone or Add Shipping Zone button.
- Give your zone a clear name (for example, “North America,” “Europe,” or “Asia”).
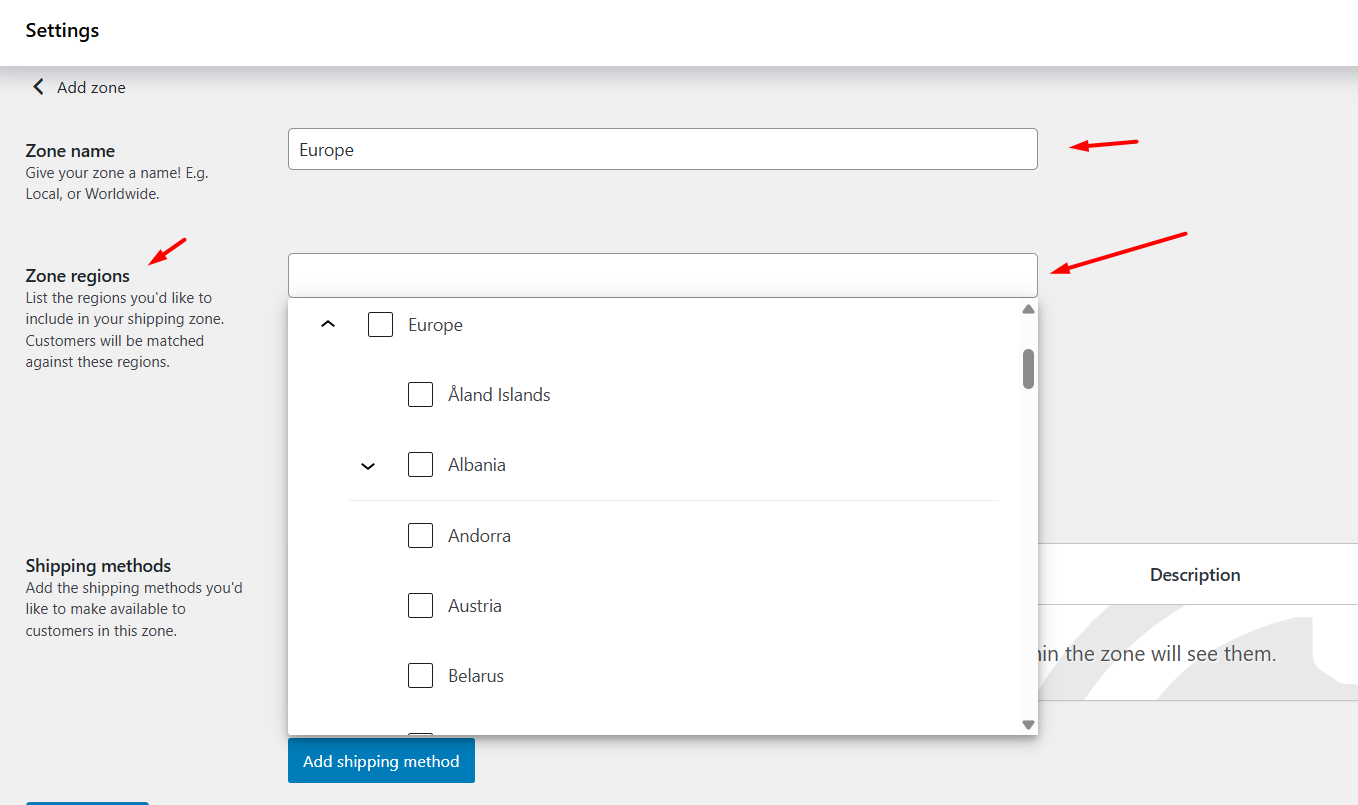
- Select the Region: Under the Zone regions dropdown, select your target country, state, or continent you want this zone to cover.
- You can add an entire continent (e.g., Europe).
- Or select individual countries (e.g., Germany, France, Italy).
- For more detail, you can even drill down to states or provinces within a country. You can laser target locations by zip codes as well.
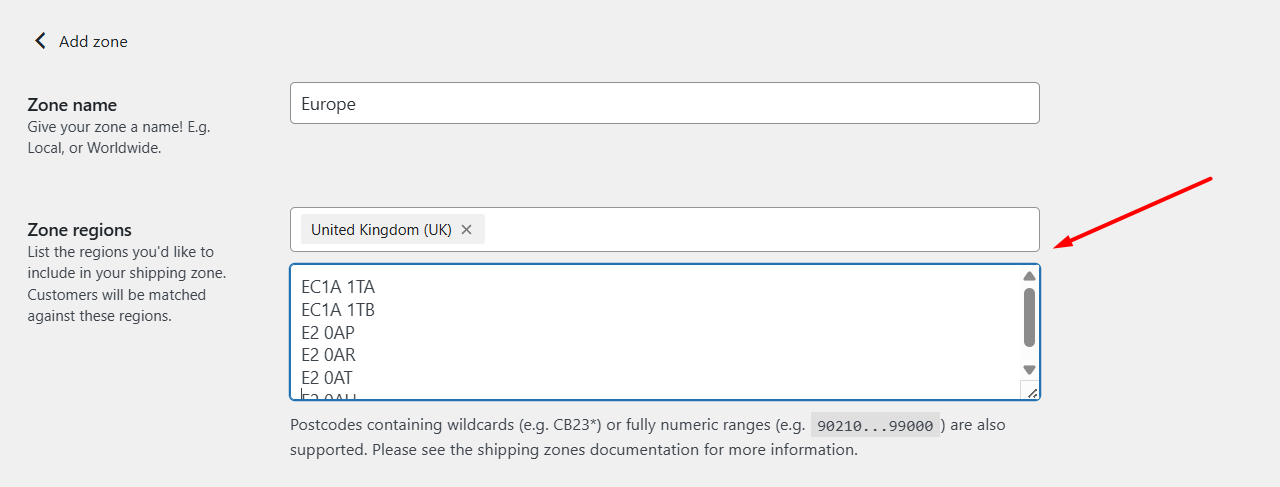
- Pay Attention to Zone Order
WooCommerce applies shipping zones from the most specific to the broadest. That means if you create a zone for “United States – California” and another for “United States,” WooCommerce will first check the California zone when someone from that state checks out. If no match is found, it moves to the broader zone.
💡 Tip: Always set your zones carefully. Start with detailed zones (like specific countries or states) and then create a “Rest of the World” zone to handle all other orders.
Step 3: Defining Shipping Methods for Each Zone
After you create a shipping zone, you must give customers one or more shipping methods for that zone. WooCommerce has three built-in methods: Flat rate, Free shipping, and Local pickup. You can also add carrier plugins (DHL, UPS, FedEx) or table-rate plugins for more complex rules.
Add a shipping method (quick steps)
- Go to WooCommerce > Settings > Shipping > Shipping Zones.
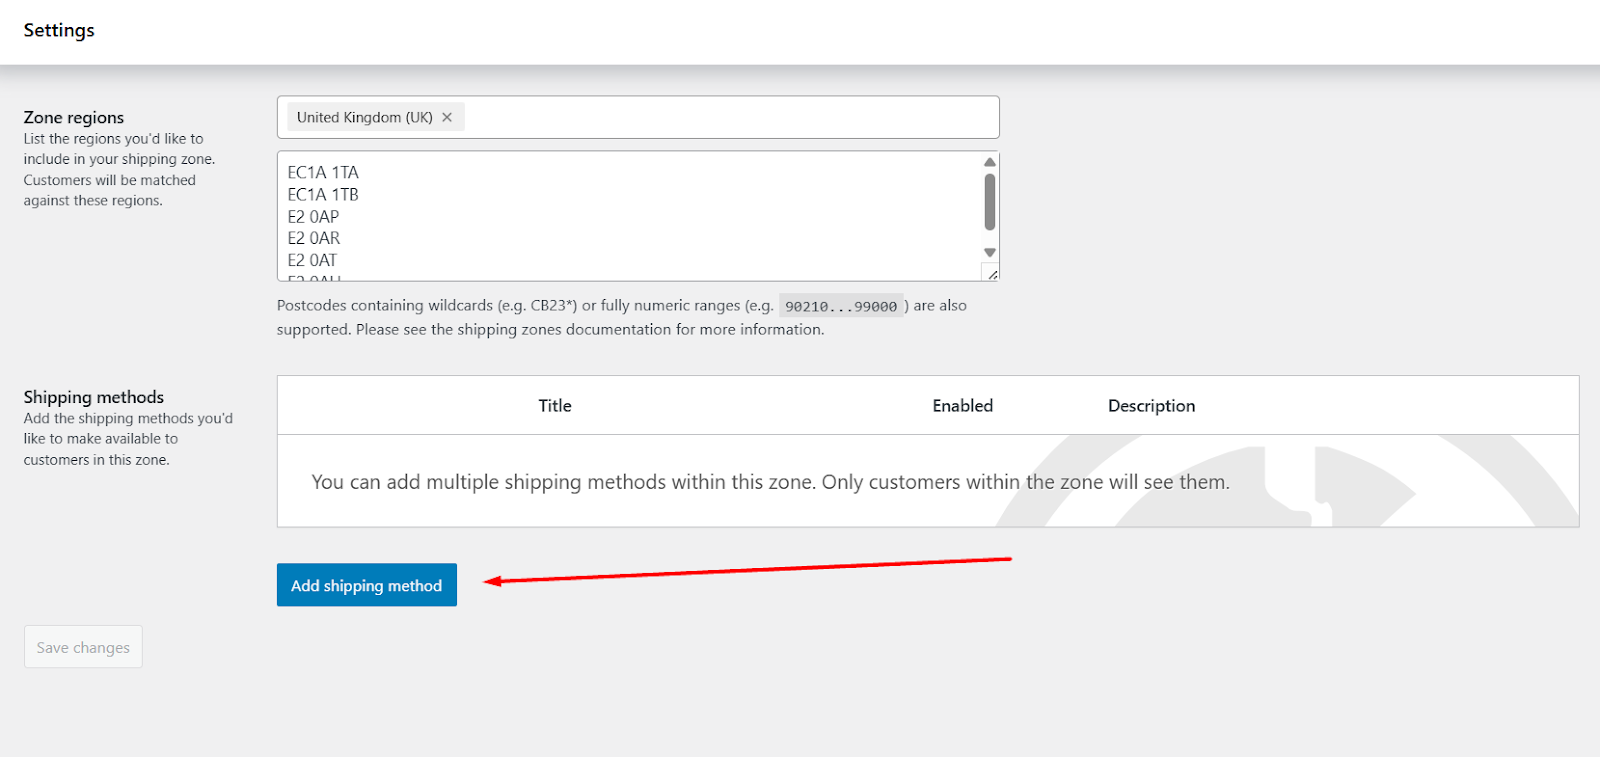
- Click Edit on the zone you want to configure.
- Click Add Shipping Method.
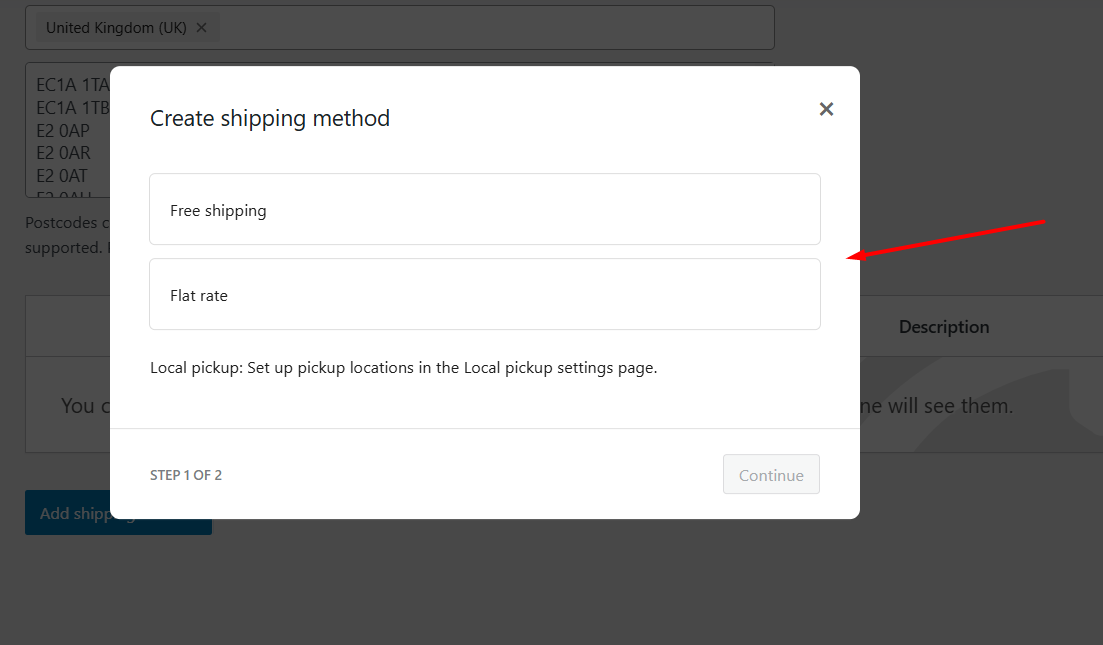
- Select a method (Flat rate, Free shipping, Local pickup).
- Set the price or conditions from the selected method settings.
Flat Rate — simple fixed fees or formulas
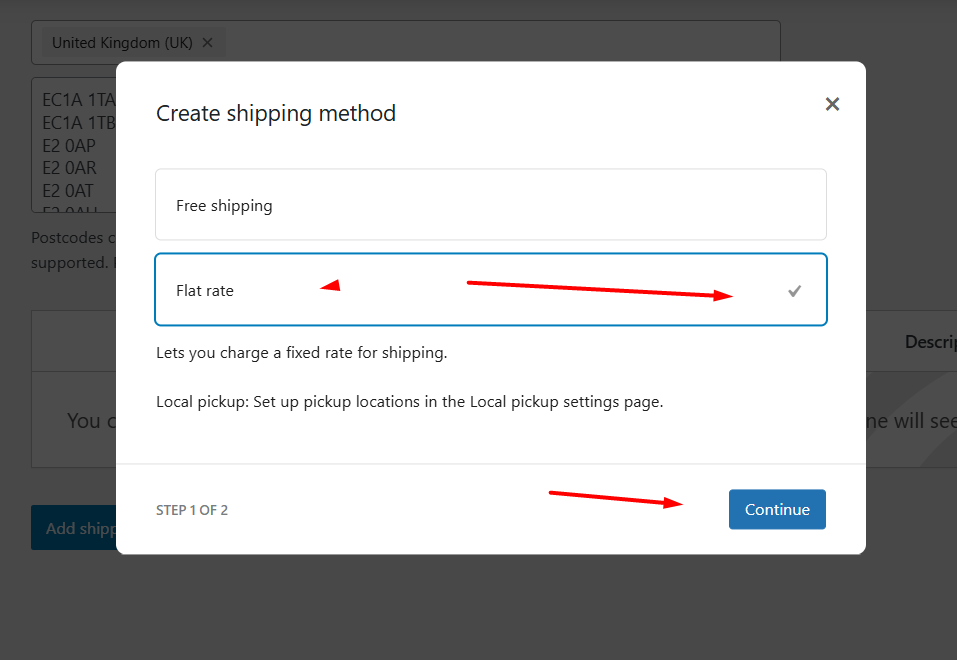
- What it does: Charge a fixed amount either per order, per item, or per shipping class. This method also supports dynamic formulas with placeholders.
- Where to set it: Edit the Flat Rate instance inside a shipping zone and enter the Cost.
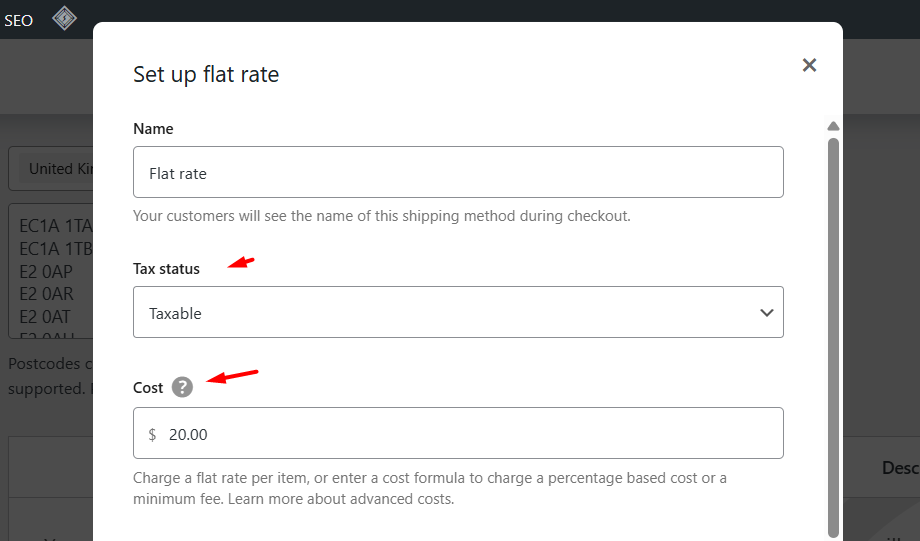
- Placeholders you can use:
- [qty] — number of items in the cart.
- [cost] — subtotal cost of items (before tax).
- Advanced: [fee percent=”10″ min_fee=”5″] to add a percentage fee with a minimum.
Examples
- Charge $10 per order: enter 10 in Cost.
- Charge $3 per item: enter [qty] * 3 in Cost — if a customer buys 4 items, the shipping will be 4 * 3 = $12.
When to use Flat Rate
- When your shipping cost is predictable (same box size) or you want a simple per-item charge. For complex needs (multiple weight tiers, zones, or dimensional pricing) consider a table-rate plugin.
For a detailed walkthrough on flat rate shipping, read – How to Setup Flat Rate Shipping in WooCommerce.
Free Shipping — controlled by rules
- What it does: Shows a free shipping option only when the chosen requirement is met. WooCommerce supports several requirement types, such as a minimum order amount or the use of a free shipping coupon.
- How to set it: Add Free Shipping as a method for the zone. Edit it and choose the requirement (e.g., “A minimum order amount”), then set the value.
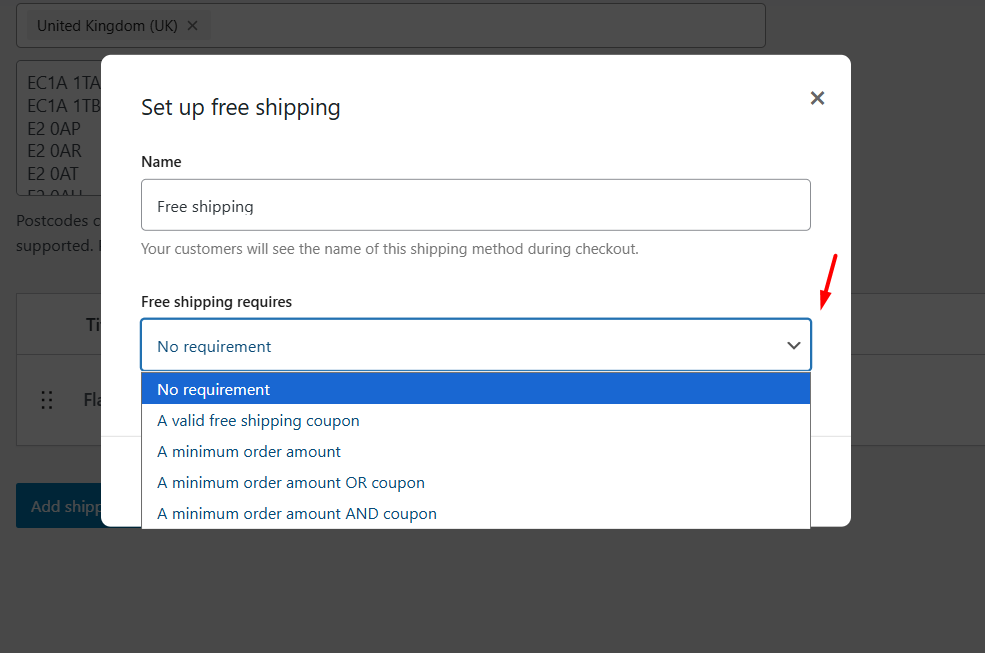
- Tip: There is an option to consider coupon discounts before or after applying the minimum amount; be careful which you choose so customers see the expected behavior.
Examples
- Free shipping for orders above $100: choose “Minimum order amount” and set 100.
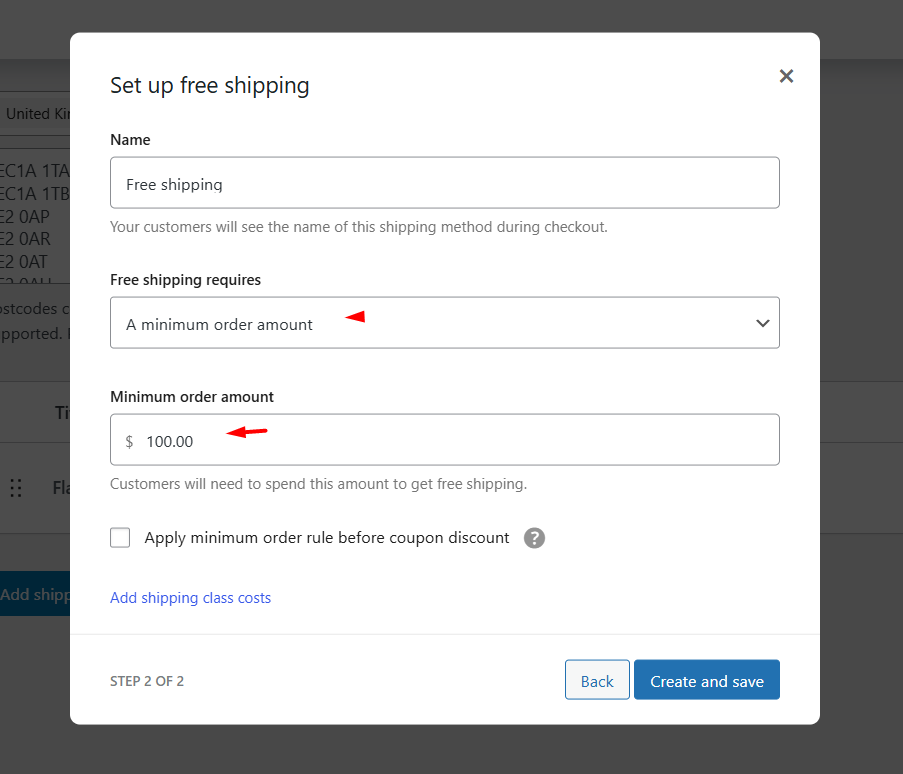
- Free shipping only if user applies a coupon: choose the coupon requirement and create a matching coupon in WooCommerce.
UX note
- You can hide other shipping methods when Free Shipping is available from WooCommerce > Settings > Shipping > Shipping Settings and enable the “Hide shipping rates when free shipping is available” checkbox. This keeps checkout simple and avoids confusing customers.
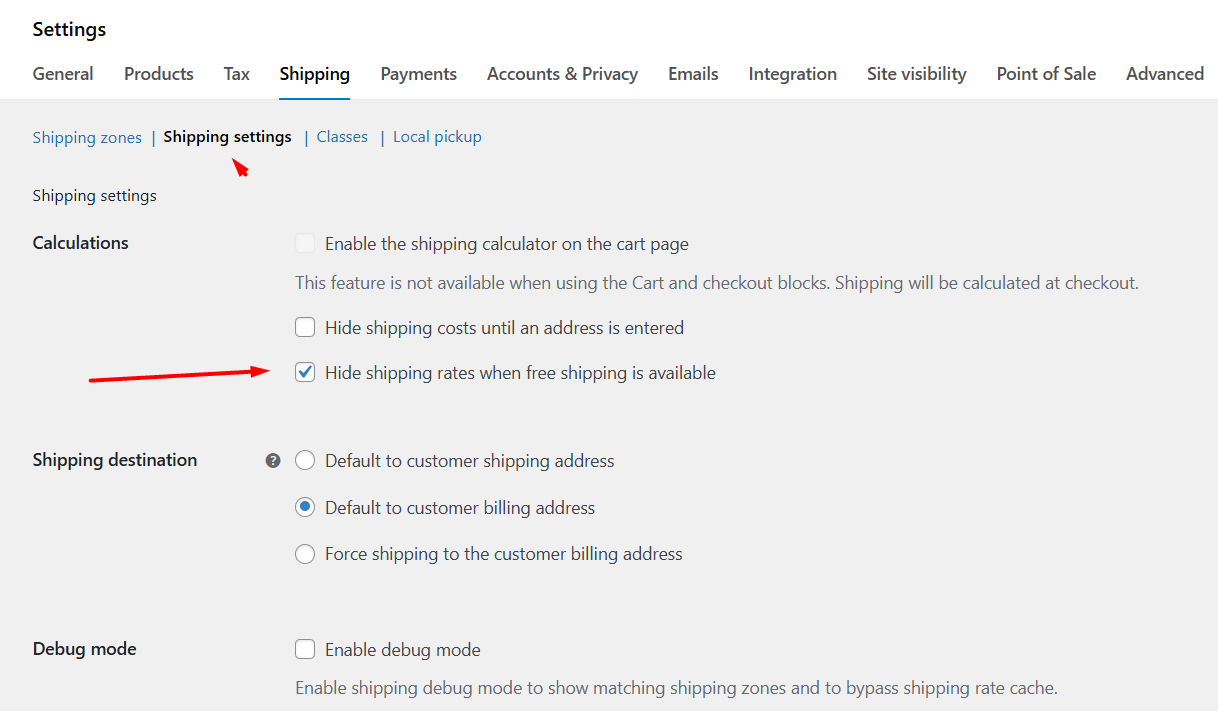
Local Pickup — for local customers
WooCommerce local pick settings have been moved to a dedicated tab under WooCommerce > Settings > Shipping > Local Pickup.
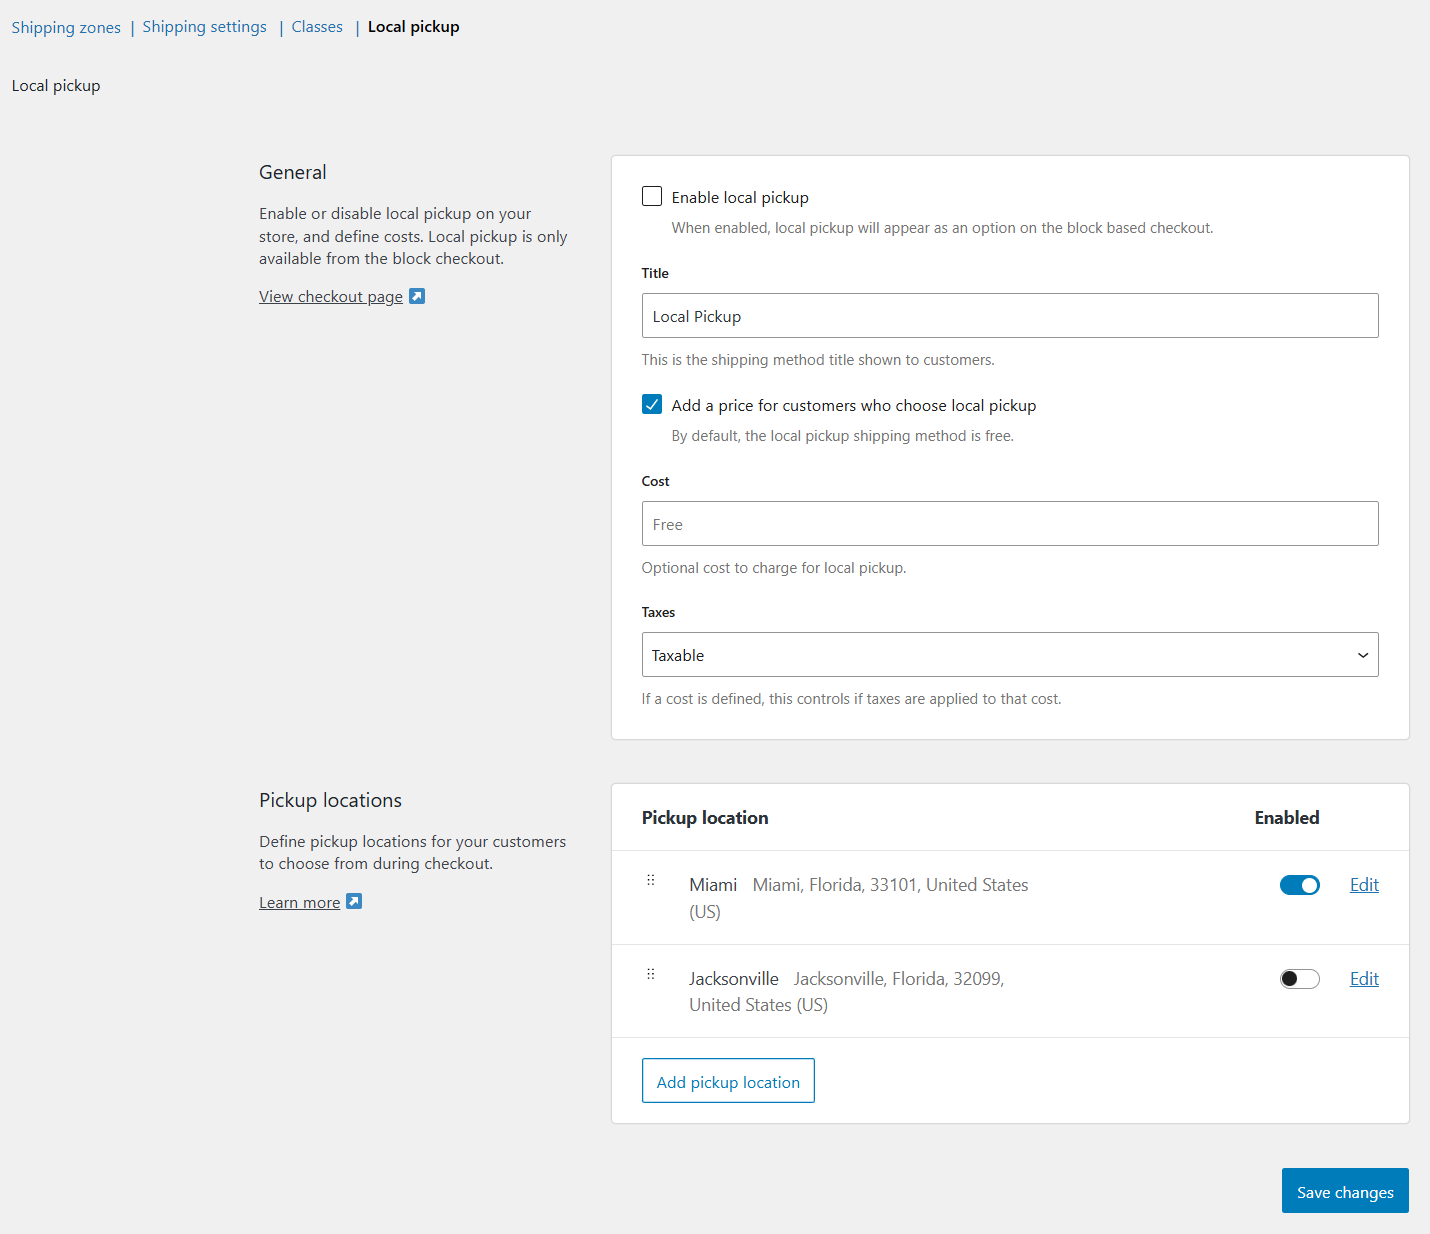
- What it does: Lets customers pick up orders instead of shipping them. It’s useful when you sell in a region and want to offer pickup as a shipping option.
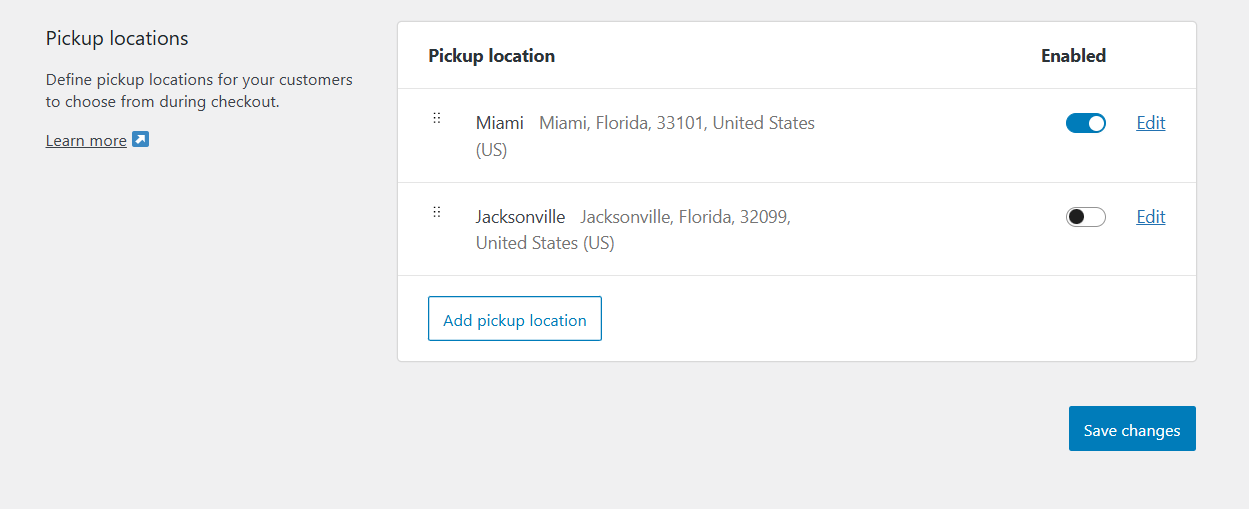
- Where to use it: From the dedicated tab, select your pick up locations under the “Pickup locations” section.
How The Method Choice Affects Costs Shown To Customers
- Flat Rate: Transparent but can under/overcharge if product weights or dimensional costs vary. Use placeholders to make flat rates more flexible.
- Free Shipping: Good for conversions but increases your fulfillment cost. You can use free shipping as a marketing tool (minimum order value) to raise average order value.
- Carrier / Live Rates (plugins): Shows real carrier prices at checkout. Best for accuracy but requires carrier accounts and sometimes extra setup (API keys, account numbers). Use these if your shipping costs vary a lot by weight, dimension, or destination.
Quick Best Practices
- Start simple: offer 1–2 methods per zone (example: Flat rate + Live carrier). Add more only if needed.
- Use [qty] and [cost] placeholders to make flat rates behave more intelligently. Test several cart scenarios.
- If you offer free shipping rules, enable the “hide other methods” option to avoid confusion.
Step 4: Implementing Shipping Classes for Varied Products
One important part you need to know when learning how to add international shipping to WooCommerce is shipping classes.
What are shipping classes?
Not all products come in the same weight and sizes. Therefore, you can’t set the same price for all of their shipping. I mean, a set of dumbbells can’t have the same shipping rate as the protein shake jar, right?
Shipping a heavy set of dumbbells will cost you a lot more than shipping a small, light jar of protein powder. That’s where shipping classes come into play.
Shipping classes let you group products that share similar shipping needs. For example, heavy, fragile, or oversized items.
Think of them as labels you attach to products so you can charge different shipping rates or apply specific rules for those groups. Shipping classes work with your shipping methods (most commonly Flat Rate) to give different costs for each group.
How to create shipping classes in WooCommerce (quick steps)
- In WordPress, go to WooCommerce > Settings > Shipping > Classes.
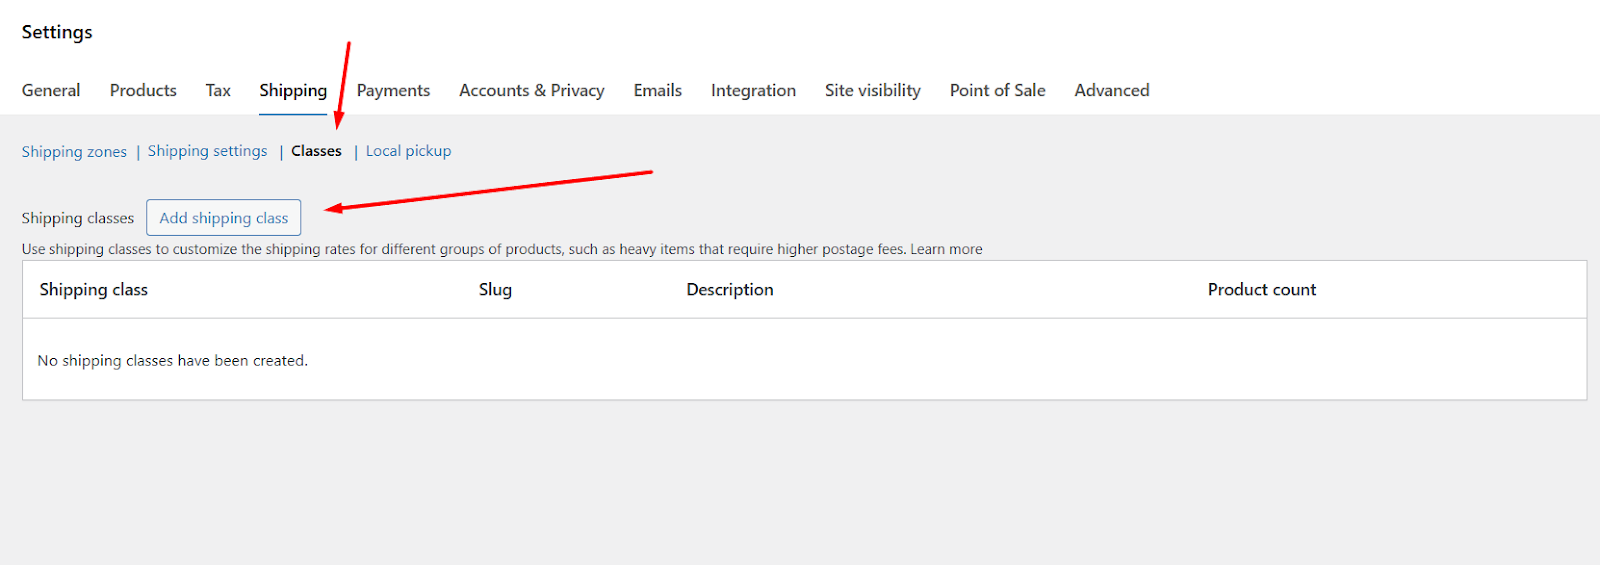
- Click the Add Shipping Class button.
- Give your class a name (for example, Heavy or Fragile), add an optional slug and description, then Save.
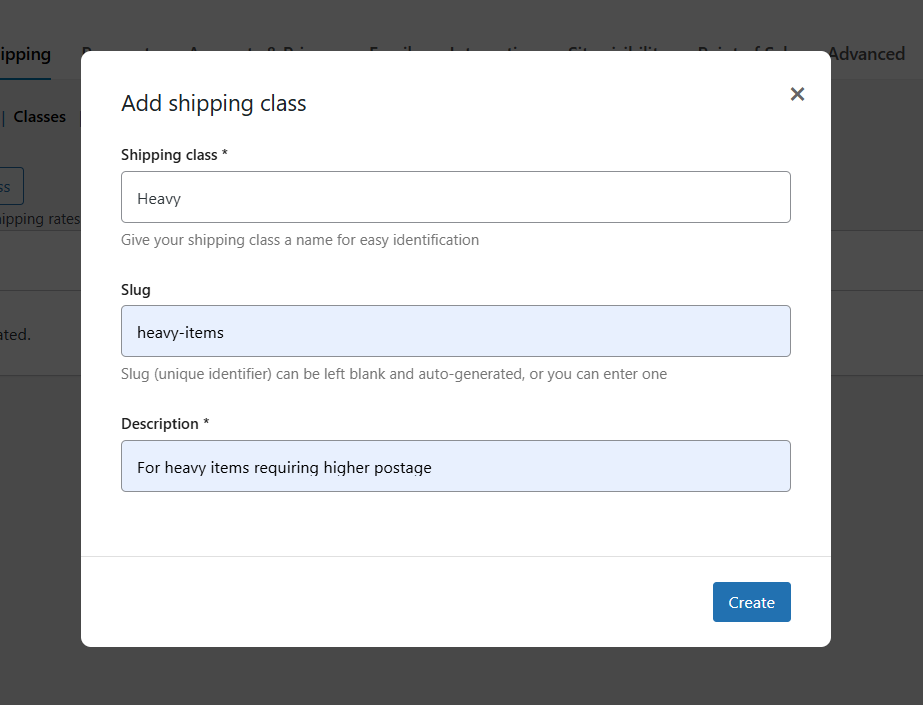
- Repeat for each group you need (for example: Oversized, Extra heavy, Light small).
Assign products to shipping classes
- Open a product for editing.
- Scroll to the Product data box and click the Shipping tab.
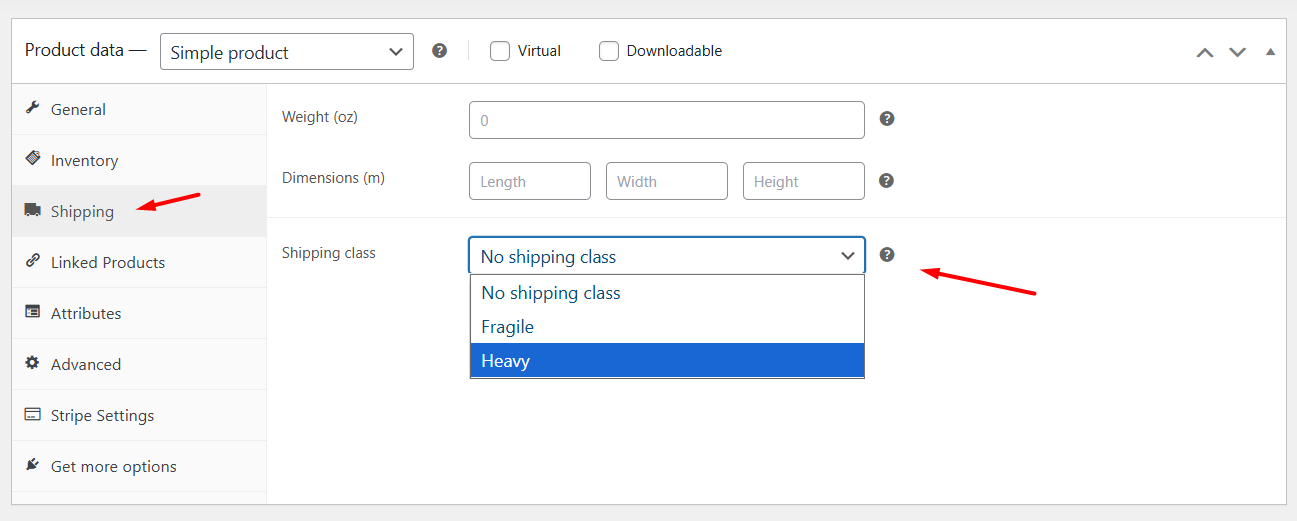
- Select your target class from the Shipping class dropdown. Save the product.
- You can also assign shipping classes in bulk by selecting the products from the All Products page. Then select Edit from the Bulk Actions dropdown, assign the class, and save.
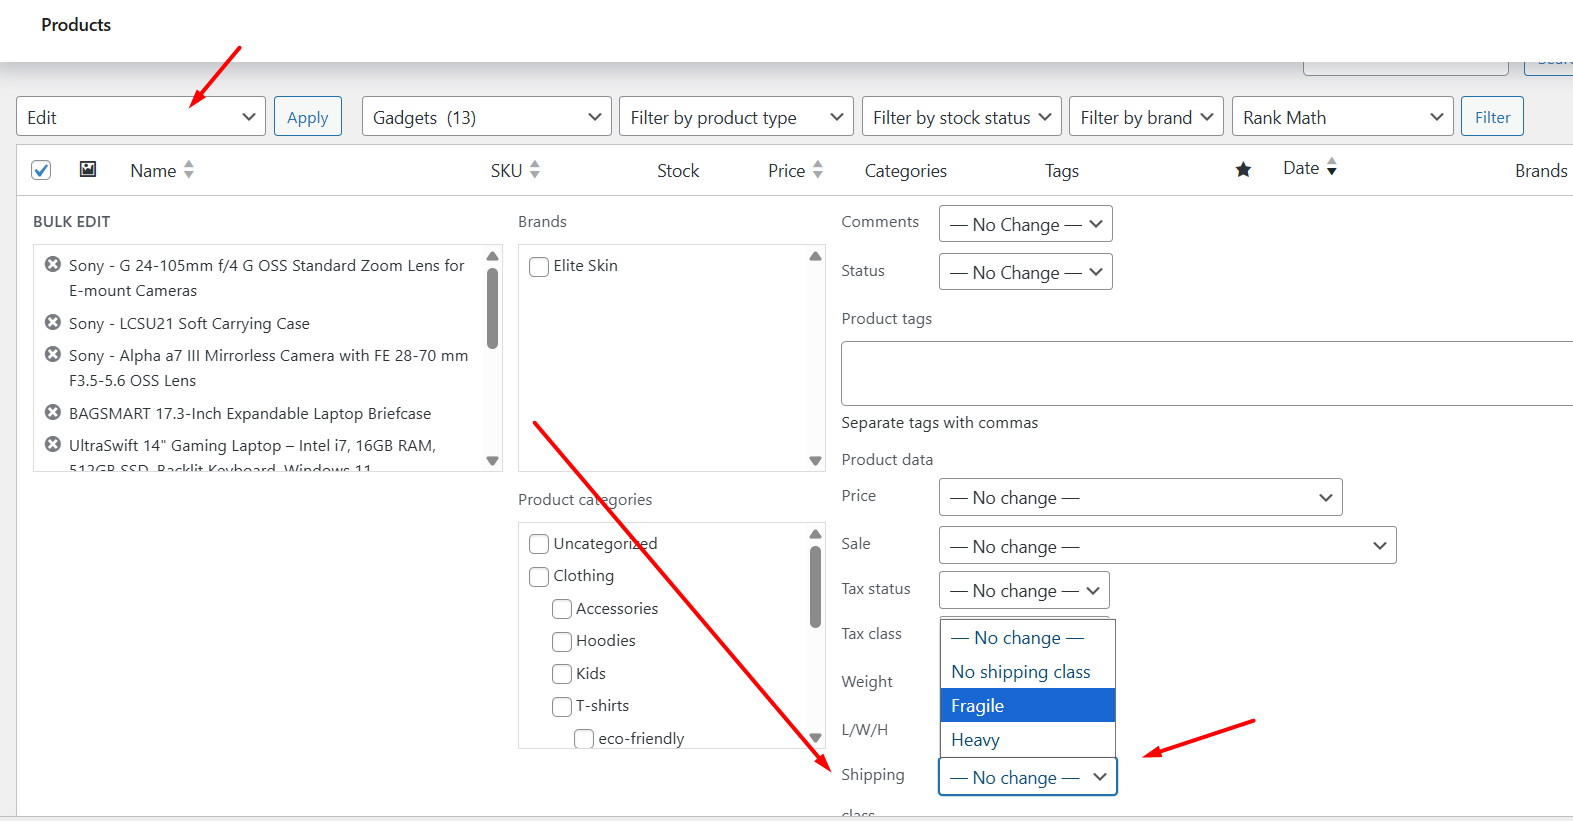
Each product can have one WooCommerce international shipping class assigned. If a product needs more complex rules (like multiple size tiers), consider using dimensions, shipping classes plus package rules, or a table-rate plugin.
How shipping classes work with Flat Rate (and examples)
Flat Rate shipping can apply different costs by shipping class.
- Edit your target zone.
- Add the flat rate method.
- Now, you will see dedicated fields to set costs for each shipping class you created.
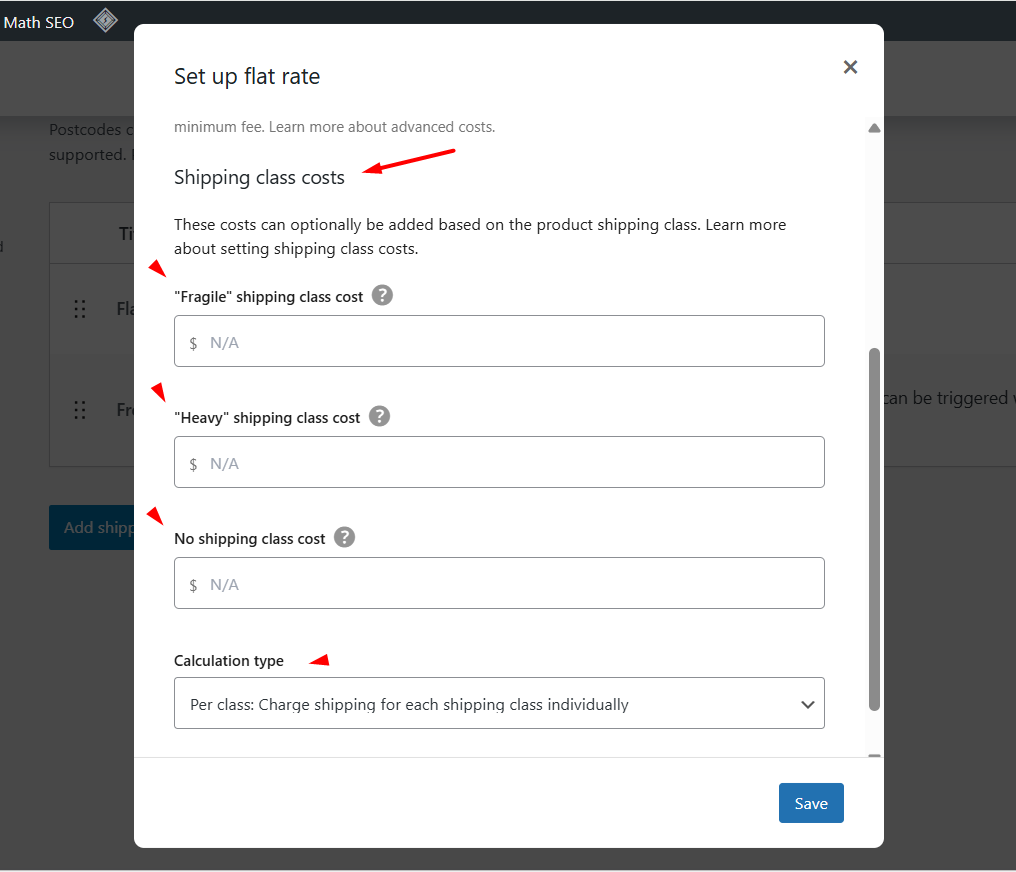
Simple examples you can copy
- Default cost (no class): 10 > charges $10 for orders with only default-class products.
- Heavy class cost: 25 > adds $25 shipping when a product in the Heavy class is in the cart.
- For per-item rules, you can combine placeholders with class costs (see next section).
Using placeholders and formulas with shipping classes
WooCommerce supports placeholders in Flat Rate costs such as [qty] (number of items) and [cost] (order subtotal). You can use these to build simple formulas that scale with quantity or value. For example:
- Charge $5 per heavy item: in the Heavy class cost field put [qty] * 5.
- Charge a base fee plus a percent: 10 + [fee percent=”5″ min_fee=”2″] (this adds a 5% fee with a minimum of $2).
Best practices and tips
- Name classes clearly. Use short, clear names that make sense to anyone managing the store (e.g., Bulky, Fragile, Small-Light).
- Keep it simple at first. Start with 2–3 classes (normal, heavy, oversized). Add more only if you need finer control.
- Test combinations. Put mixed carts into a staging site and check how the final shipping price is built when multiple classes appear in the same order. Some setups add class costs together, others override — verify for your settings.
- Use dimensions for accuracy. When shipping cost depends on size (volumetric weight), combine shipping classes with accurate product dimensions and a carrier or table-rate solution that supports dimensional pricing.
Overall, this is how to add international shipping to WooCommerce using built-in options. For advanced or complex ways to set up international shipping for WooCommerce, you need to opt for plugins.
Leveraging Plugins for Advanced International Shipping
When your store grows beyond a few simple routes, WooCommerce’s built-in options may not cover everything you need.
Plugins, on the other hand, add real-time carrier rates, complex rule engines, label printing, and duty/tax calculation. Use them when you need accuracy, automation, or when shipping rules vary by weight, dimensions, product type, or destination.
Let’s explore how to add international shipping to WooCommerce using plugins.
When to Use a Plugin (Common Scenarios)
- You need real-time carrier rates at checkout so customers see exact shipping costs.
- Shipping cost depends on dimensional (volumetric) weight, not only product weight.
- You must support many destination zones with different tiered or conditional rates.
- You want to print labels, schedule pickups, and automate fulfillment from your dashboard.
- You need accurate duties and taxes calculated and shown at checkout to avoid surprise fees.
Types of Plugins and When To Pick Them
1) Table-rate / conditional shipping plugins — for complex price rules
Use these when you charge by weight ranges, cart totals, shipping classes, or want many conditional rules (for example, weight + destination + product type). They let you build rules like “$10 for orders under 2kg to Europe, $25 for 2–5kg” or “different rates for fragile vs non-fragile items.”
Popular options include Flexible Shipping and other table-rate extensions.
2) Carrier-specific / multi-carrier plugins (live rates + labels) — for accurate checkout pricing and fulfillment
If you want live FedEx, UPS, DHL, USPS, or other carrier prices at checkout and the ability to print labels from your dashboard, use a carrier plugin or a multi-carrier connector.
These plugins fetch rates using carrier APIs and often support label printing and tracking. Examples include ReachShip/ELEX multi-carrier plugins and the official WooCommerce Shipping tools. They help keep checkout costs accurate and make fulfillment faster.
3) Shipping aggregators & label platforms — for fulfillment scale and discounted rates
Tools like ShipStation or Shippo sync orders, let you compare carrier rates, print bulk labels, and offer discounted carrier pricing. These are useful if you ship many orders, want automation rules, or need multi-channel support (marketplaces + WooCommerce).
4) Duties & taxes / landed cost plugins — to show the final landed price at checkout
To avoid surprise fees for customers, use a landed-cost or duty/tax plugin. These calculate import taxes, VAT, tariffs, and customs fees and can show or prepay them at checkout (DDP), or estimate them for the buyer (DDU).
Services like Easyship and Zonos integrate with WooCommerce to provide this. Showing landed cost tends to reduce abandonment and returns.
Short Recommended Plugin List (What They Do, Quick Pros)
- Flexible Shipping / Flexible Shipping PRO — Table-rate rules based on weight, cart total, shipping class. Good when you need conditional rules without carrier APIs.
- ReachShip / ELEX Multi-Carrier — Multi-carrier live rates, labels, pickups, and customs docs. Useful if you want one plugin that talks to many carriers.
- WooCommerce Shipping (Automattic) — Built into WooCommerce for label printing and discounted rates (US-centric carriers like USPS and DHL). Good, simple choice if supported in your country.
- ShipStation / Shippo — Aggregator platforms for bulk labels, automation, and discounted rates across many carriers. Best for growing stores with many orders.
- Easyship — Rates at checkout plus built-in duties and taxes, customs docs, and many carrier options. Great when you want a single solution for rates, duty estimates, and fulfillment.
- Zonos (Landed Cost) — Accurate landed cost and duty/tax guarantees for cross-border shoppers. Use when you need the exact landed cost and a smoother customs experience.
Best Tips for Choosing And Using Plugins
- Start with your main pain point. If cost accuracy at checkout is most important, start with carrier live-rates or an aggregator. If your pricing rules are complex, start with a table-rate plugin. If surprise duties hurt conversions, add a landed-cost tool.
- Test on staging. Always test plugin combinations on a staging site. Some plugins add shipping methods or modify checkout behavior. Verify rates, labels, and customs docs before you go live.
- Watch for double fees. When combining plugins (for example, a table-rate plus live carrier), make sure you don’t accidentally add overlapping charges. Use clear names for methods so customers and staff know which is which.
- Consider UX. Let customers compare options (cheaper, slower vs faster, premium). If you offer DDP (deliver duty paid), make that option obvious to reduce surprise fees.
Practical Example of International Shipping Set Up in WooCommerce
**Let’s say your store is in Florida, USA, and you want to ship to the United Kingdom (UK). Here’s the quick overview of the steps you need to follow.
WooCommerce Settings Checklist (Quick Overview)
- WooCommerce > Settings > General > Set Store address = Florida, USA (leave).
- WooCommerce > Settings > Tax > configure Standard rates (you may create a tax class called UK VAT and set 20% for GB if you will collect VAT).
- WooCommerce > Shipping > Add a zone: United Kingdom > Add methods (Flat rate / Table rate plugin recommended).
- Install plugins:
- Payment: Stripe (multi-currency), PayPal.
- Shipping extensions: Table Rate Shipping or ShipStation / Easyship integrations.
- Multi-currency: Aelia or similar.
- Tax/help: Install WooCommerce Tax (or an accountant) to automate tax calculations.
Let’s now break down the process of how to charge international shipping in WooCommerce.
1) Big picture — what must work
- Customers must be able to buy in GBP (or pay in their card currency).
- You must ship items to the UK and fill customs paperwork.
- You must handle VAT / import tax correctly (charge or account for it).
- You must offer tracking, returns rules, and clear shipping costs.
2) First tiny actions
- Set a UK shipping zone in WooCommerce
- WooCommerce > Settings > Shipping > Add shipping zone.
- Name: United Kingdom. Region: select United Kingdom.
- Add at least one shipping method: Flat rate (e.g. $15) and Local pickup (if you want).
- Enable taxes in WooCommerce
- WooCommerce > Settings > General > check Enable tax rates and calculations.
- Save.
- Install a payment gateway that accepts UK cards
- Install Stripe plugin OR PayPal (both are common).
- Connect your Stripe/PayPal account (they accept payments from UK cards).
- In Stripe, enable multi-currency or let Stripe convert for you.
- Show prices clearly
- Option A (simple): show USD prices and display a note: “Total shown in USD — your bank may convert.”
- Option B (better): install a multi-currency plugin (e.g., WooCommerce Multi-Currency / Aelia) so your site shows GBP prices to UK visitors.
3) Shipping: make it reliable
- Decide carrier(s): USPS (international), UPS, FedEx, DHL.
- Add realistic shipping costs in your UK shipping zone (use weight or price-based rules).
- For small items: example flat $12–20; for heavy items, calculate the real carrier cost.
- Add tracking and insurance if valuable. Customers expect tracking.
- Pack & paperwork: every parcel to the UK needs a commercial invoice (what’s inside + value + HS code). Learn how to fill it.
4) Taxes & customs — the important part (read this carefully)
- UK VAT and imports: goods entering the UK are treated as imports — you’ll need to understand import VAT and when you must register for UK VAT. If you sell to UK consumers, you may have VAT obligations. Official HMRC guidance explains what overseas businesses must do.
- EORI number: You (or your importer/parcel agent) will usually need an EORI number for customs. Non-UK businesses often need one to move goods.
- EU vs UK: EU has OSS/IOSS for simplifying VAT across EU countries; UK has its own rules after Brexit — treat UK separately from EU. If you later sell to other EU countries, look into OSS/IOSS.
Practical choices (pick one):
- You handle import & VAT:
- You register for UK VAT (if required) and pay import VAT/duties at customs or via a customs broker. This gives smoother delivery but more admin.
- Let courier handle import (DDP) and charge customer:
- Use Delivered Duty Paid (DDP) with a courier or 3PL — courier pays duties and VAT and bills you or the customer. Cheaper for you to pass cost to customer at checkout.
- Customer pays on delivery (DAP/DDU):
- You ship and customer pays import taxes on delivery — BUT this causes abandonment and returns. Not recommended for consumer goods.
5) How to set prices so you don’t lose money (easy math)
- Base cost (your product) + US shipping to UK + carrier import fees estimate + VAT (20% in UK typical) + profit = sale price.
- If you use DDP, show all-in price at checkout (best UX). If not, clearly warn “customs fees may apply on delivery.”
7) Orders & fulfillment workflow (what happens when an order arrives)
- Customer in UK orders > you get email order in WooCommerce.
- Print packing slip + commercial invoice (include HS codes and value).
- Choose carrier label (USPS/UPS/FedEx/DHL) and attach customs paperwork.
- Send tracking number to customer.
- If duties were unpaid, customer may be contacted by carrier to pay import VAT/duties.
8) Extra ideas to make sales easier
- Local returns address in UK (use a returns service or 3PL) — customers buy more if returns are easy.
- Use a UK fulfillment partner (store stock in UK) — speeds delivery and avoids import on each order.
- Show estimated delivery times clearly and “Delivered in X–Y days by [carrier]”.
- Add live chat and GBP pricing—these help conversion.
Wrap Up
This was our complete guide on how to add international shipping to WooCommerce. It is significantly important for you to learn and be in the know how to set up the accurate shipping rates so you don’t drain money on the process.
Start with accurate product data and a small set of well-tested shipping zones. Choose simple methods first — flat rate or a single carrier — then add shipping classes and plugins only when you need finer control. Always test on a staging site, check live orders for unexpected fees, and make your shipping policy clear about who pays duties (DDP vs DDU), delivery times, and returns.
Keep monitoring and refining as you learn. Shipping rules that worked for your first 50 orders may need changes at 500 orders. Best of luck.
