A WooCommerce countdown timer for sales is a plugin-based feature that adds a live countdown clock to your product page for limited-time offers. This timer taps into psychological triggers like urgency, FOMO, and loss aversion to encourage faster purchase decisions before the date expires. Since WooCommerce doesn’t support this feature natively, a plugin is required.
In plugin terms, this is what people usually mean by a WooCommerce flash sale plugin: a tool that pairs a visible countdown with an active discount so the urgency and the offer expire together.
Too Busy? Here's the short version:
WooCommerce does not include a built-in countdown sales timer. Avoid fake evergreen countdowns; use a fixed-deadline timer to create authentic urgency. Disco is the best all-in-one plugin for countdown timers + automatic discounts. Keep your Disco campaign deadline perfectly synced with the WooCommerce sale schedule for accuracy. Beginner-friendly interface, fast setup with zero coding.→ Get Disco Free on WordPress.org
I’ve watched WooCommerce stores lose their entire flash-sale weekends over one crucial element: a countdown timer. Skipping it leads to missing conversions. The traffic showed up, the visitors came, but without urgency, they lost momentum; they lost conversions.
Imagine this: Your Black Friday sale launches in one hour. Then you realize your product page looks exactly like yesterday. No deadline, no timer, no pressure, and absolutely zero urgency for your shoppers to act fast and make purchase decisions. Nothing tells them that the deal disappears at midnight.
The panic is avoidable. And so are the conversion leaks behind it. Both have the same fix.
Haven’t picked a plugin yet? See our comparison of the 7 best WooCommerce countdown timer plugins before starting the walkthrough below. This guide assumes Disco and focuses specifically on syncing the timer to your actual sale end date.
Before You Start — What You Need
A quick check before getting started can save you from a frustrating half-finished setup later.
| Requirements | Why it matters |
| Keep WooCommerce and WordPress updated | Running the latest version ensures the best performance and compatibility |
| Install the Disco plugin | Disco lets you add both automatic discounts and countdown timers to your WooCommerce store. Download the free version from WordPress.org |
| Activate Disco Pro | Countdown timers are exclusive features of Disco Pro. Disco’s free version only supports basic discount campaigns. |
| Product Price Type confirmed | Set your discount base to Regular Price or Sale Price from the Disco settings. |
| Sale dates decided | Finalize the exact dates and times for your campaign, then enter them inside Disco during setup. |
| Select campaign products | Before setting up your campaign, select your desired products or categories. |
Why Customers Leave Your Sale Without Buying
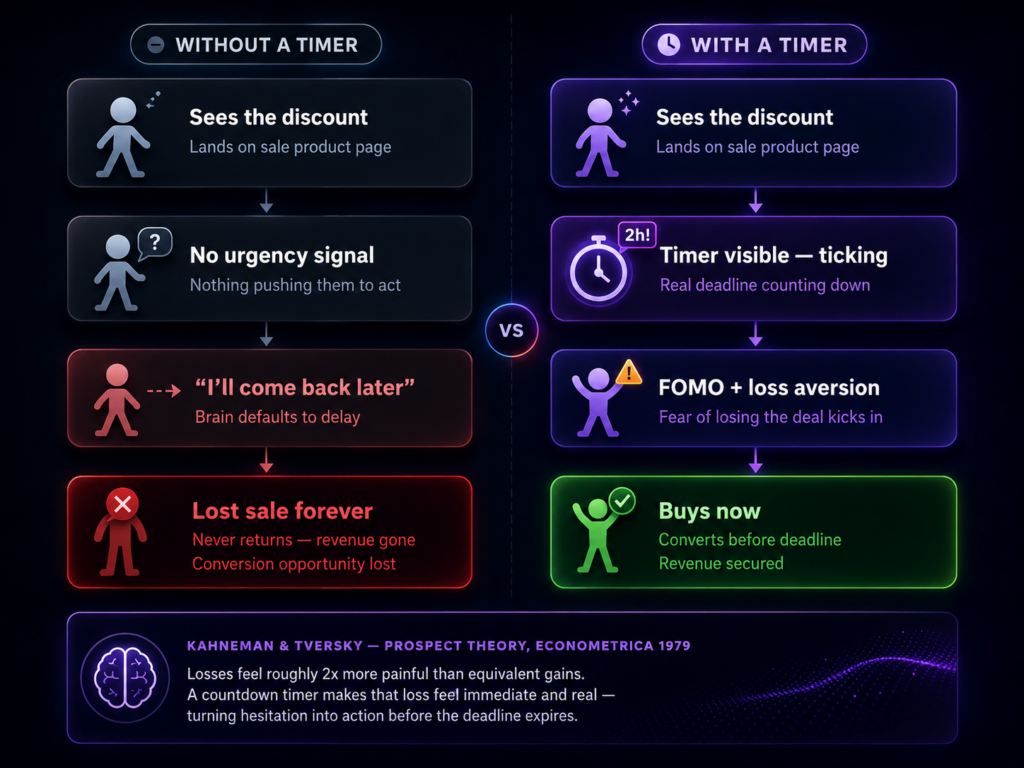
Without a visible deadline, shoppers instinctively delay their purchase decision. “ I’ll come back later” feels harmless, but in e-commerce, it is one of the biggest conversion killers.
That’s why countdown timers are considered so effective; they remove this hesitation, replacing it with urgency through FOMO and loss aversion. Research from behavioral economists Daniel Kahneman and Amos Tversky’s prospect theory found that people react much more strongly to potential losses than gains, making the limited offers irresistible. According to VWO, countdown timers can improve conversion rates upto 27%.
As Talia Wolf, Founder of GetUplift and one of the world’s leading CRO specialists, puts it:

A ticking timer transforms a regular sale into a time-sensitive opportunity. But only if you implement it correctly.
Sales Countdown vs Product Countdown — What’s the Difference?
Before setting up anything, take your time to pick the correct one. Product countdown timers and sales countdown timers may look familiar, but they serve different purposes. Choosing the wrong one creates unnecessary setup issues.
A product countdown operates on its own schedule, independent of any WooCommerce sale dates. It’s typically used for product launches, restocks, or upcoming releases.
A sales countdown timer, on the other hand, is specifically linked to your discount schedule; it ends the moment your sale expires. This makes it ideal for flash sales, seasonal discounts, and limited offers.
| Feature | Sales Countdown Timer | Product Countdown Timer |
| Linked directly to the WooCommerce sale end date | Yes | No |
| Works on category-wide campaigns | Yes | No |
| Syncs with scheduled timing | Yes | No |
| Best option for limited-time promotions and flash sales | Yes | No |
Fixed Deadline vs Evergreen — Choose the Right Timer Type
Sales countdown timers come in two types, and choosing the wrong one will cost your customers’ trust.
| Timer type | How it Works | Best For | Credibility |
| Fixed deadline | Counts down the specific deadline shared by all shoppers | Flash Sales, Black Friday campaigns. | High |
| Evergreen | Restarts a new timer for each visitor session | Personalized marketing funnels | Risky |
For flash sales and public campaigns, a fixed deadline timer works best. It counts down to one consistent deadline for every customer, creating urgency that makes the offer feel legitimate.
Evergreen timers, however, reset for every session, and repeat customers notice that quickly. When urgency feels fake, both trust and conversion decline.
How to Set Up a Sale-End Countdown Timer in WooCommerce with Disco
Here’s how to launch a live sale-end countdown timer on your product page with a completely code-free setup.
Step 1 — Create a Disco Campaign with a Matching End Date
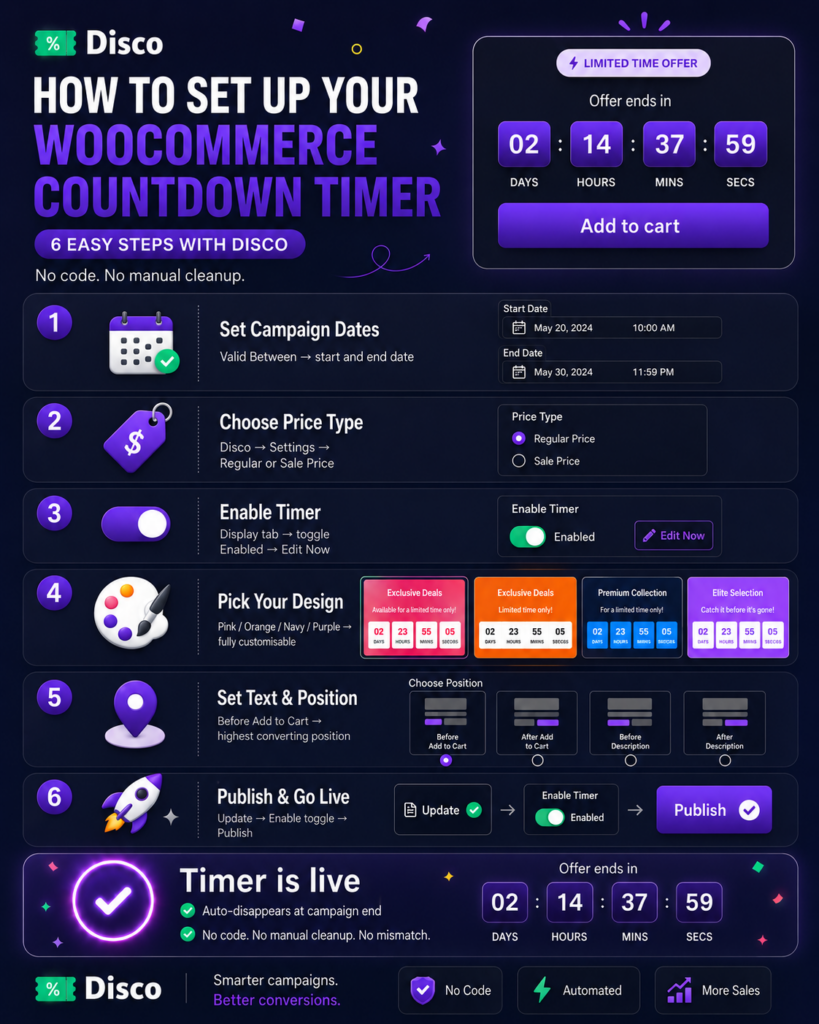
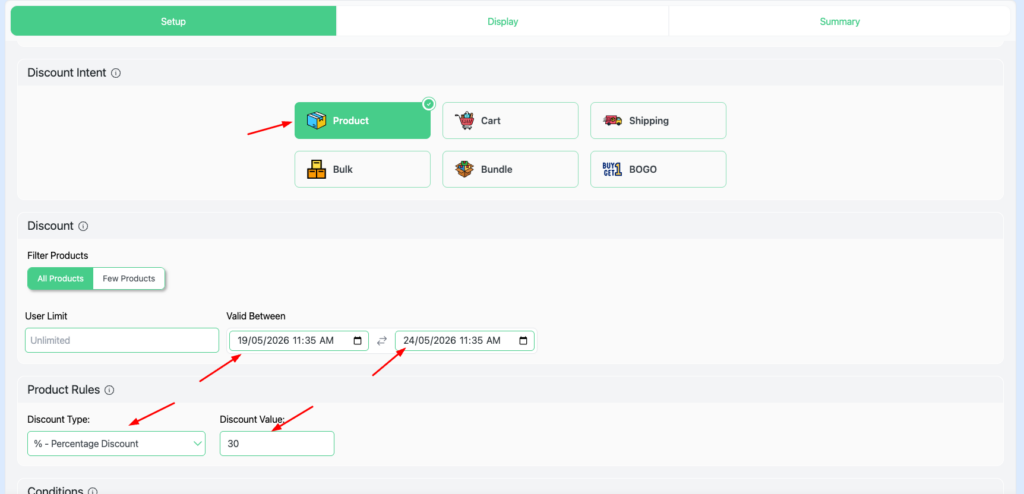
Open Disco from your WordPress dashboard and add a new discount campaign. Select your preferred discount type: percentage, fixed discount, BOGO, bulk pricing, or free shipping. Finalize the exact dates and times for your campaign, then apply these directly within Disco.
If you need a more detailed explanation on how to set up a discount rule, select your preferred intent and explore the following documentation.
Step 2 — Verify Your Product Price Type Setting
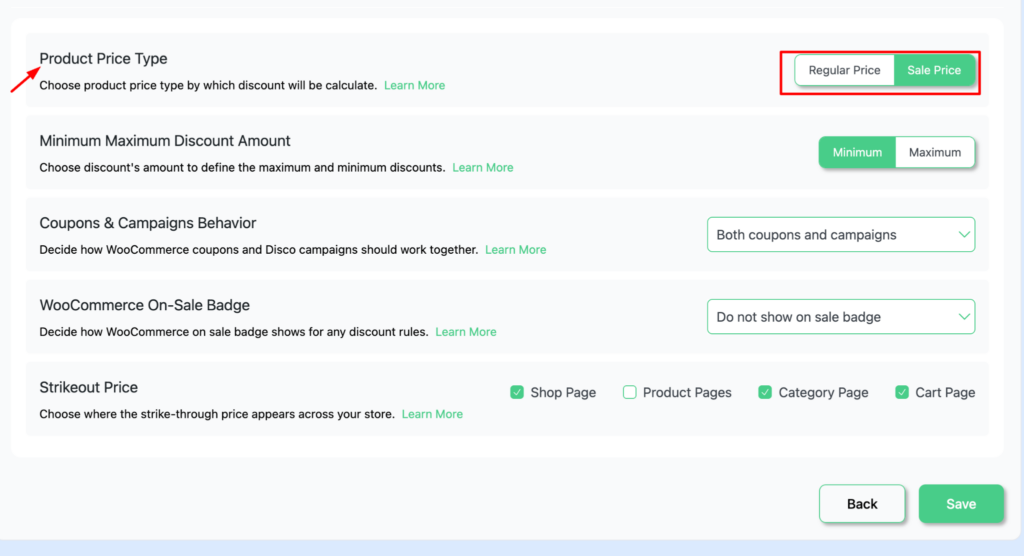
Before setting up your campaign, confirm that Disco’s Product Price Type setting is aligned with your product setup. You’ll find it in Disco → Settings → Product Price Type. This option determines whether discounts are applied to the Regular Price or the Sale Price.
This configuration affects your entire store and applies to all campaigns, including future ones. Here’s a breakdown of each option:
| Product Price Type | How it Works | Best for |
| Regular price | Disco applies discounts to the original listed price | Ideal for products without existing sales |
| Sale price | Discount is applied to the reduced WooCommerce sale price | Running deeper promotions for products on sale. |
| The sale price was selected, but the product has no sale price. | Disco automatically switches to regular price calculation | Ensure discounts with no pricing conflicts |
One thing I always do: Double-check the Product Price type settings. That’s a quick step to avoid the most frustrating problems, discovering pricing issues once shoppers are already viewing the promotion.
Step 3 — Enable the Countdown Timer Block
Press Continue to access the Display Tab. From there, enable the countdown timer block and click Edit now to launch the customizer. For a more detailed walkthrough with visuals, refer to Disco’s countdown timer documentation.
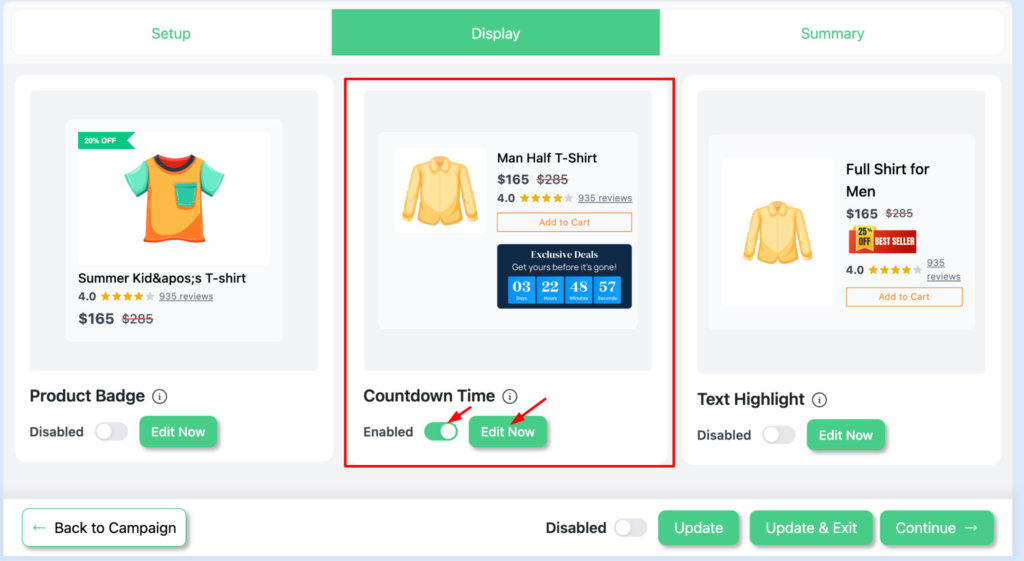
Step 4 — Choose Your Timer Design
Select your preferred layout from built-in designs: pink gradient, orange solid, dark navy, or purple gradient. Every design remains fully customizable, so you can tailor it to match your store’s branding and color schema.
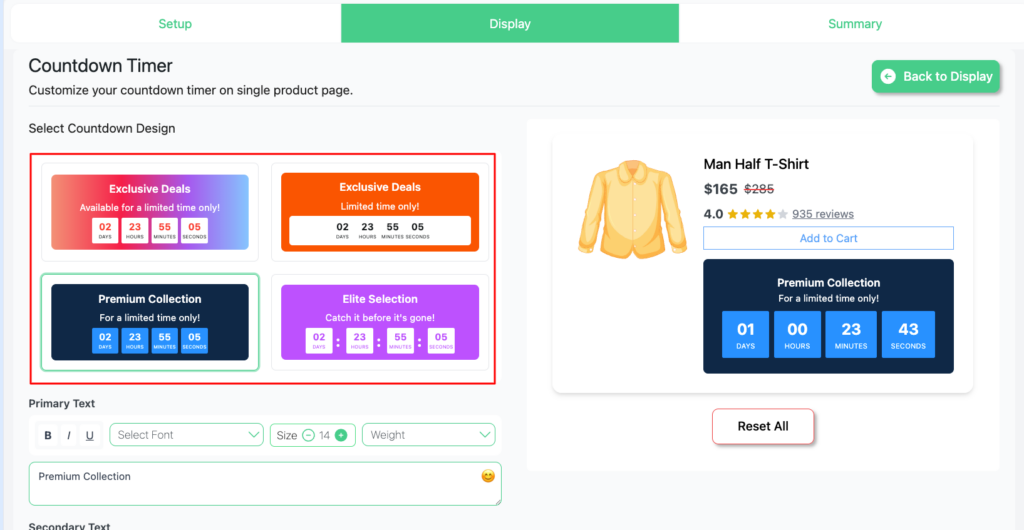
Step 5 — Add Text and Set Position
Set a primary heading such as “ Flash Sale Ends Soon” and a supporting message such as “ Limited time only. Grab it before it’s gone.” After that, select your preferred timer placement to decide where the timer displays on the product page.
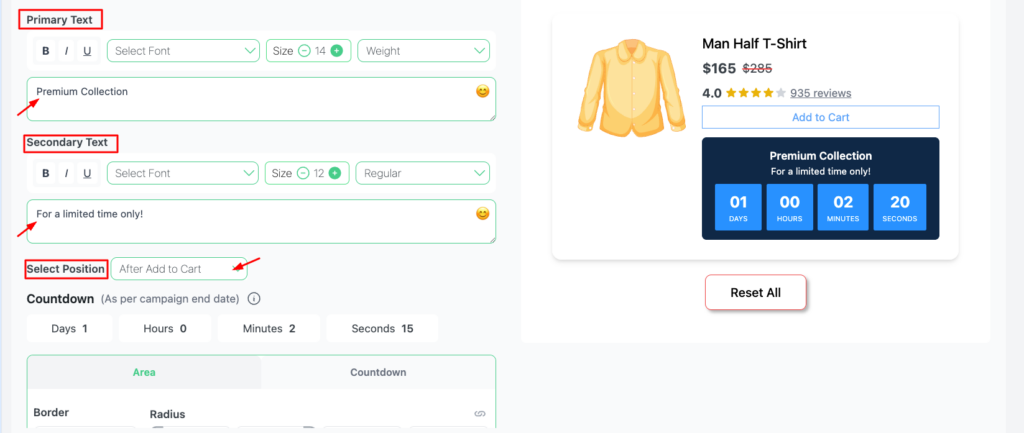
The placement of your timer matters more than your visual styling. Always place it before Add to Cart, not after. The purpose is to create urgency before the purchase decision happens. After that, it serves no conversion purpose.
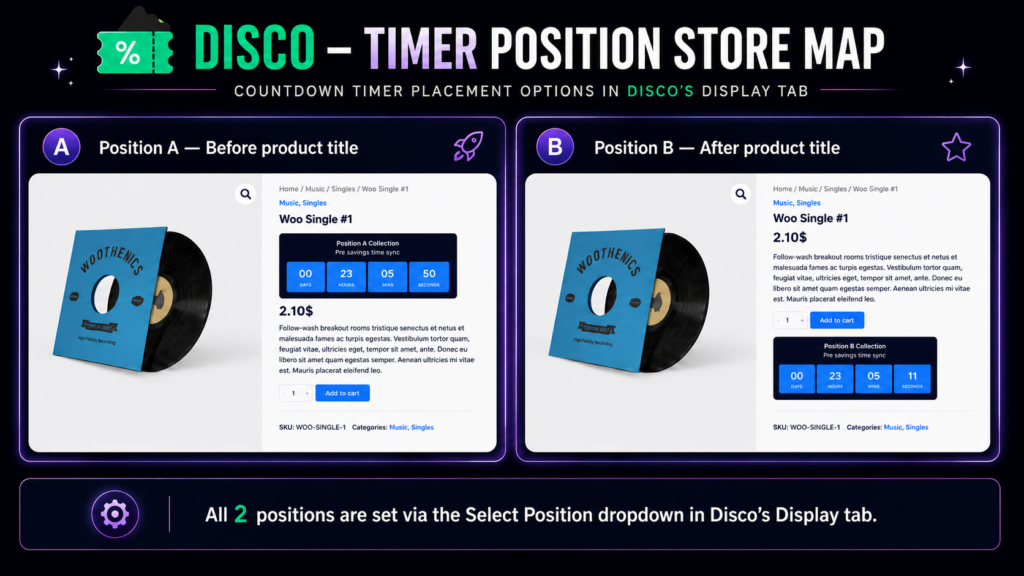
Step 6 — Style, Save, and Publish
Personalize the timer by editing the digit colors, label styling, background, and border to match your store branding. Then click Update, ensure the campaign is enabled, and then hit Publish. The countdown timer displays on all campaign products and automatically disappears once the countdown ends.
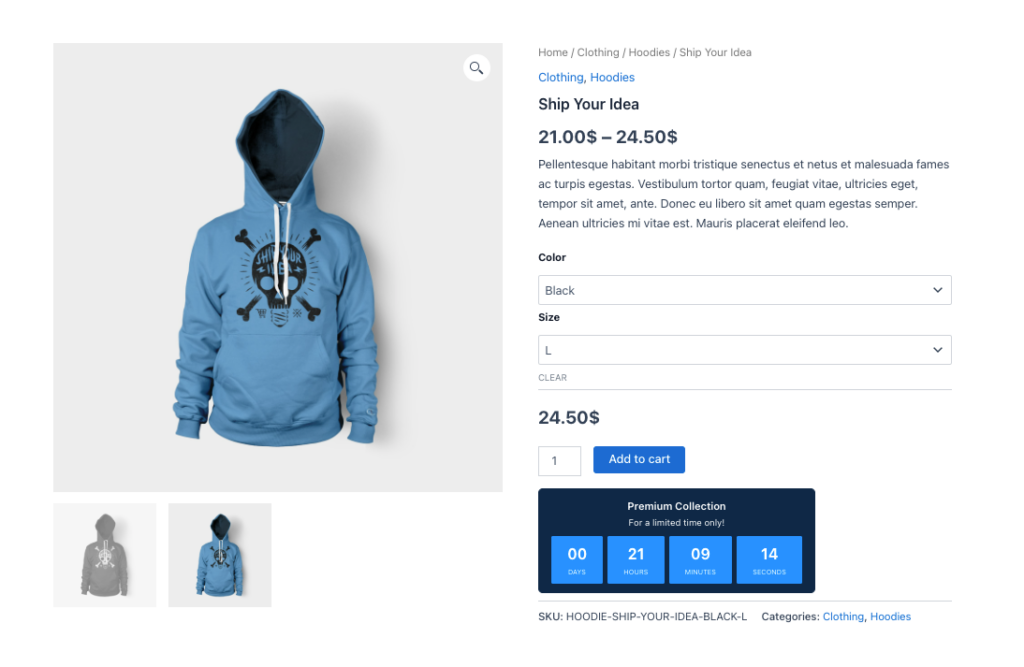
Real Examples — When to Use a Sales Countdown Timer
Black Friday: Launch your campaign from November 28 at midnight to November 29 at 11;57 PM. The countdown timer is displayed all day publicly and disappears the moment it hits zero. The sale closed. No mismatch. No manual setup.
Flash Sale (24-48 hours): Products that have stayed untouched for weeks start moving within 48 hours with a visible deadline. Compared to a standalone sale badge, a countdown timer pushes customers to make faster purchase decisions. Hesitant shoppers are often motivated to purchase before the deadline passes.
Limited-time offer: A 72-hour introductory discount is more compelling when customers can see the remaining time. The deadline gives customers a reason to act immediately instead of later. The “ Later” that never comes.
Every timer works for the same principle that discounts alone cannot. They make waiting feel more expensive than taking an action now.
The One Mistake That Kills Flash Sale Trust
I’ve seen store owners lose their customers over fake evergreen timers. Once the customer realizes the countdown, keep resting, and they always do. The credibility is gone forever.
Disco eliminates this problem at the source. Unlike fake evergreen timers, Disco’s timer is directly synced with your campaign’s real end date. Therefore, every visitor sees a real deadline. When the promotion ends, the timer disappears automatically.
Your countdown timer is now officially live and synced with the exact end time of your sale campaign. Every flash sale I’ve ever seen with a visible countdown timer outperforms those that don’t use one.
Looking for the complete guide on creating high-converting WooCommerce countdown timer campaigns? Read our complete guide to adding countdown timers for WooCommerce sales before your next campaign.
Frequently Asked Questions
Does WooCommerce have a built-in countdown timer?
No, WooCommerce has no built-in countdown timer. A plugin such as Disco is required that lets you manage both the countdown timer and automatic discounts from one place, with no coupon codes.
What happens when the timer reaches zero?
With Disco, the countdown timer automatically disappears once the campaign reaches its end date. No need to stress over manual cleanup.
Can I use a countdown timer without coupon codes?
Yes, Disco automatically applies discounts at checkout without requiring any coupon codes. The timer creates urgency while the discount runs seamlessly behind the scenes.
Will the timer show on mobile?
Yes. Disco’s countdown timer is mobile-friendly by default.
What is the difference between a fixed deadline and an evergreen timer?
With a fixed deadline timer, every visitor sees the same expiration time. On the other hand, the evergreen timer generates a new countdown on each user session. For most WooCommerce flash sales, fixed deadlines work best for maintaining credibility. Since the evergreen timer keeps resetting, it can be misleading for customers.
Is Disco a flash sale plugin?
Yes, functionally. Disco pairs an automatic discount rule with a synced countdown timer, so the sale and the deadline start and end together. If you’re comparing dedicated flash-sale-specific plugins against Disco, the difference is that Disco handles the discount and the timer in one rule instead of two separate tools.