So let us face reality: Making tax errors on your WooCommerce store is not all about the numbers. They can translate to legal penalties, unhappy customers, and profit draining from your business.
That’s why you must be in the know how to add tax rate in WooCommerce properly, to avoid the tax pitfall.
In this guide, I’ll walk you through:
- Enabling tax in WooCommerce (it’s not automatic!)
- Setting up rates manually or importing them via CSV
- Using tax classes for different products (like 5% for books, 20% for electronics)
- When to use automation tools (and when manual works fine)
By the end of this article, you’ll confidently set up taxes for any region, whether you’re charging VAT, GST, or sales tax. Let’s get started.
Table of Contents
How to Enable Taxes in WooCommerce?
Before we can walk through how to add tax rate in WooCommerce, you first need to enable taxes in WooCommerce. Woo doesn’t enable taxes by default; you have to set up taxes for WooCommerce manually.
- Go to WooCommerce > Settings > General.
- Enter your correct store address details.
- Locate the “Enable tax rates and calculations” check mark.
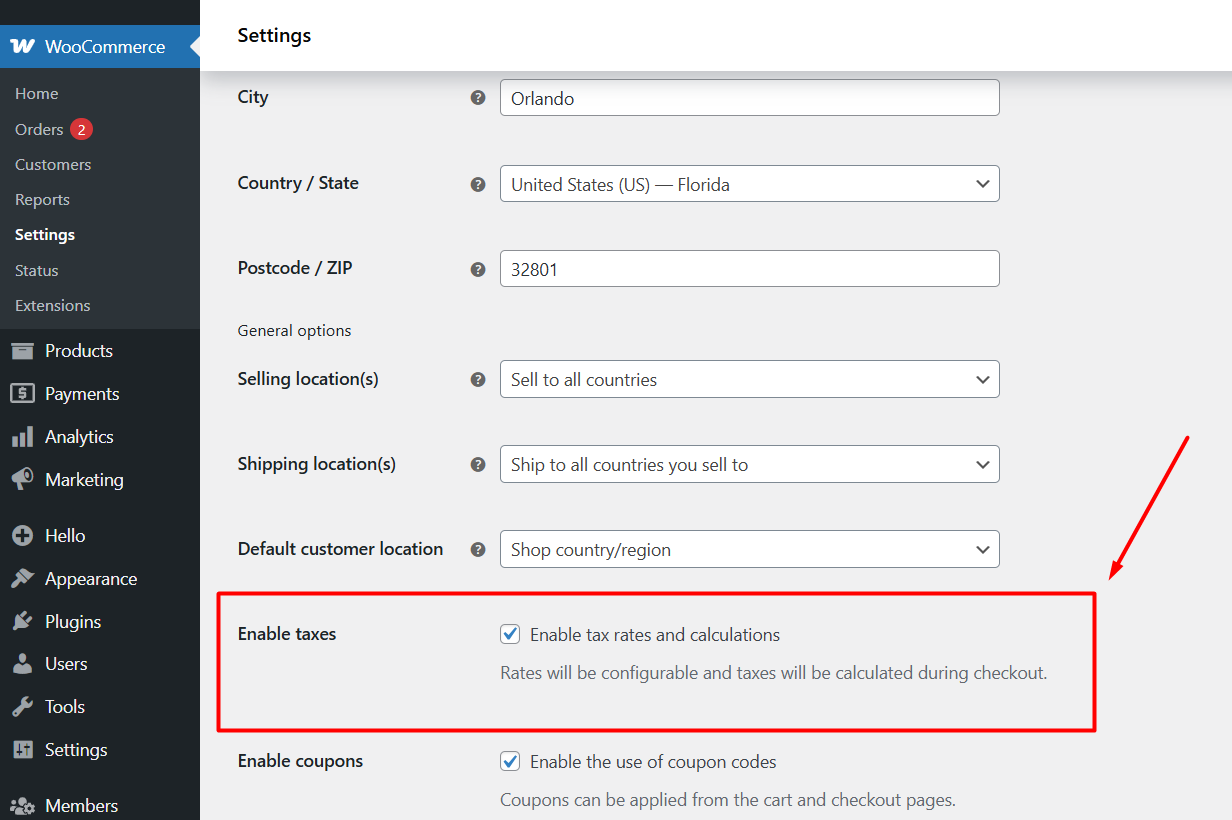
- Click the checkmark box and save your changes from the bottom button.
Now, you will see a new tab in the settings panel called Tax.
How to Add Tax Rate in WooCommerce?
Before explaining the core settings in the Tax Options tab, we want to jump directly to the manual WooCommerce tax rate setup. You will notice these tabs in the Tax page,
- Standard rates
- Reduced rate rates
- Zero rate rates
These tabs are where you add and assign tax rates in WooCommerce. Let’s set up a tax rate under the Standard Rates tab.
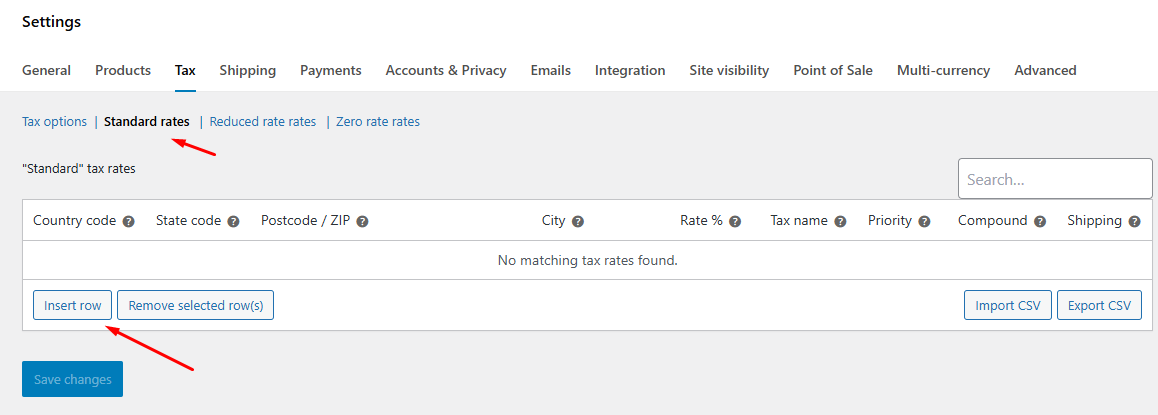
Step 1: Navigate to the Target Tax Class Tab
Go to WooCommerce > Settings > Tax > Standard rates.
Step 2: Insert a Row
- Click the Insert Row button.
- This will add a new row for you to input values.
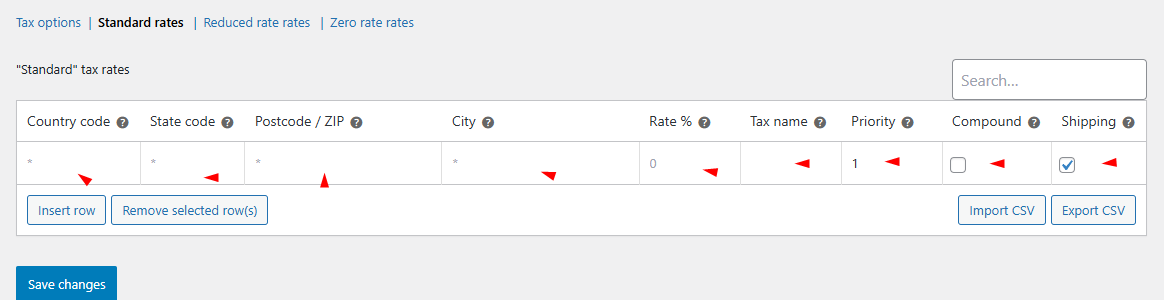
Step 3: Configure The Fields
Fill in each field with care:
- Country Code: Enter a two-letter ISO code (for example, US for the United States or GB for the United Kingdom). You can find the full country code list here.
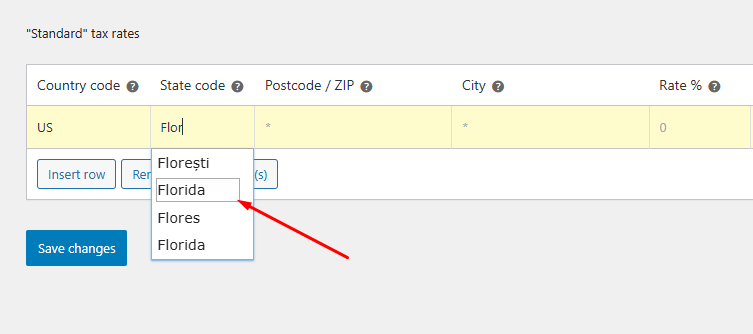
- State Code: If you need to target a specific state or province, use its two-letter code (for example, CA for California). Leave blank if the rule applies to the whole country.
Note: WooCommerce will show and set the appropriate Country and State code if you start typing the names in the fields.
- Postcode / ZIP: Type one or more postal codes. You can use wildcards (90210* applies to any code starting with 90210) or ranges (1000…3000) to cover multiple areas.
- City: List city names separated by semicolons (for example, London; Manchester) if you need city-specific taxes.
- Rate %: Enter the tax rate with four decimal places (for example, 20.0000 for 20%).
- Tax Name: choose a label customers will see (for example, “VAT” in the UK or “Sales Tax” in the US).
- Priority: set to 1 if this should apply before other rules. Higher numbers run later.
- Compound: check this if the tax itself should get taxed on top of other rates.
- Shipping: check this box to apply the same rate to shipping charges.
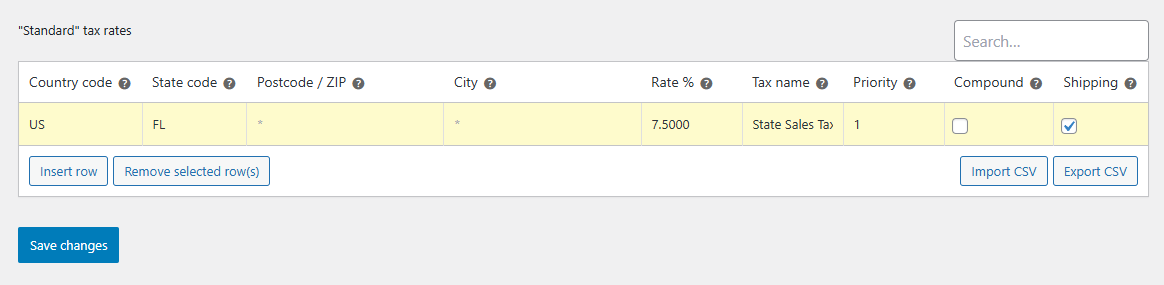
- Click Save changes once you’ve entered all fields.
Examples of Common Scenarios
- US state tax: Country = US, State = CA, Rate = 7.5000, Name = “Sales Tax”, Priority = 1.
- UK VAT: Country = GB, Rate = 20.0000, Name = “VAT”, leave State blank. As you know by now, the WooCommerce VAT setup process for the UK is the same as for tax setup for the US.
- City-specific tax: Country = US, City = New York; Brooklyn, Rate = 8.8750, Name = “NYC Tax”.
Step 4: Applying Tax Classes to Your Products
- Go to Products > All Products and click Edit on the product you want to update.
- Scroll to the Product data section, select the General tab.
- Find Tax status and choose:
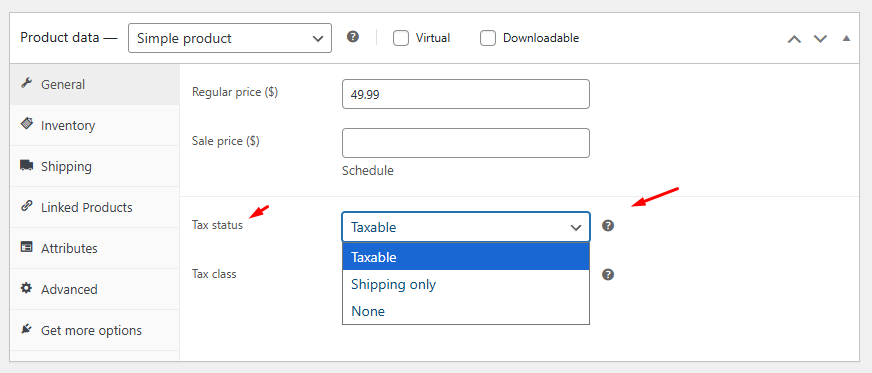
- Taxable (tax applies to product price)
- Shipping only (only shipping cost is taxed)
- None (no tax applies)
- Next, open the Tax class dropdown. You will see:
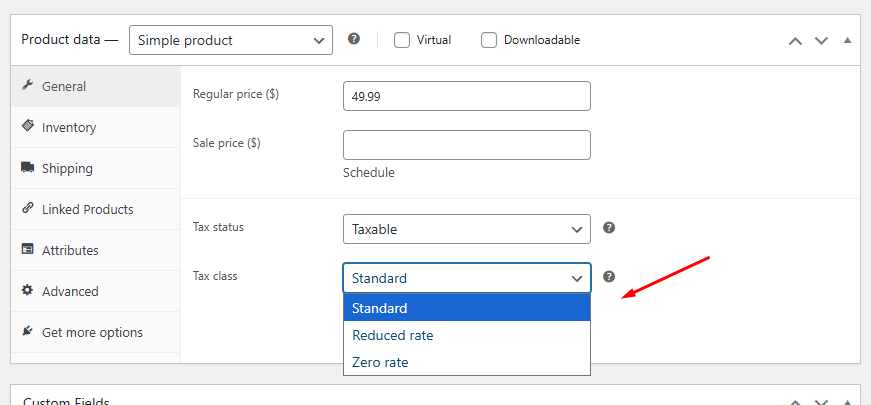
- Standard
- Reduced Rate
- Zero Rate
- Any custom classes you created earlier
Pick the class that matches this product’s tax rule.
- Click Update to save your changes.
Step 5: Test from The Front
- Go to your storefront and add a product that has a tax class assigned.
- Enter a shipping address, and the Checkout page will automatically calculate and display the tax rate according to your setup.
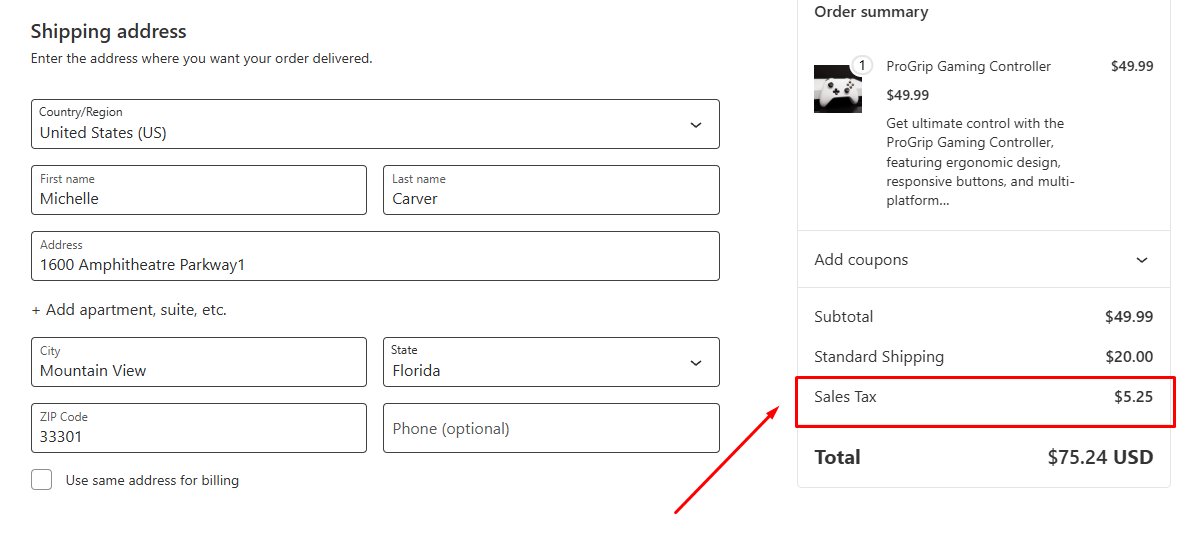
Now your product will charge the correct tax at checkout, based on the class you assigned. If you ever need to change rates or add new classes, return to WooCommerce tax settings and then reassign products as needed.
These are the steps on how to add tax rate in WooCommerce manually. For adding multiple location rates, use the insert row to add new rows and set rates.
This method is useful if you have a limited number of tax rules. For automatic tax rate setup, make use of plugins.
Import/Export
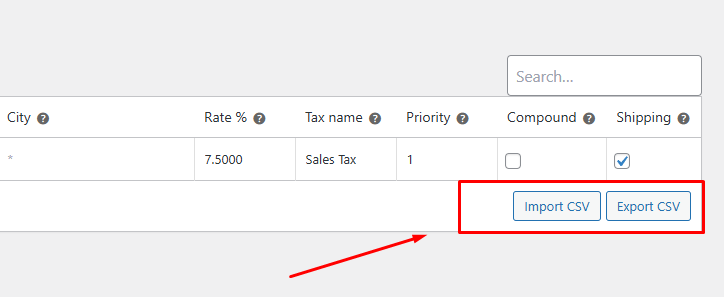
If you have many rates to add, click Export CSV to download your existing rules, edit them in a spreadsheet, and then use Import CSV to upload them in bulk. This can save you lots of time when setting up tax rates for multiple countries, states, or cities.
Reduced Rate & Zero Rate
Besides the Standard rates tab, you’ll also see Reduced rate rates and Zero rate rates. These work exactly like Standard rates.
You click Insert row, fill in the same fields (Country Code, State Code, Postcode/ZIP, City, Rate %, Tax Name, Priority, Compound, Shipping), and save. The difference lies in the rate you enter:
- Reduced rate is for products that get a lower tax percentage than your standard rate. For example, you might charge 5% on children’s clothing or basic food items instead of the full 20% VAT.
- Zero rate applies to tax-exempt goods, like exported items or certain medical supplies. You simply set Rate % to 0.0000, give it a name such as “Zero-Rated,” and customers won’t pay any tax on those products.
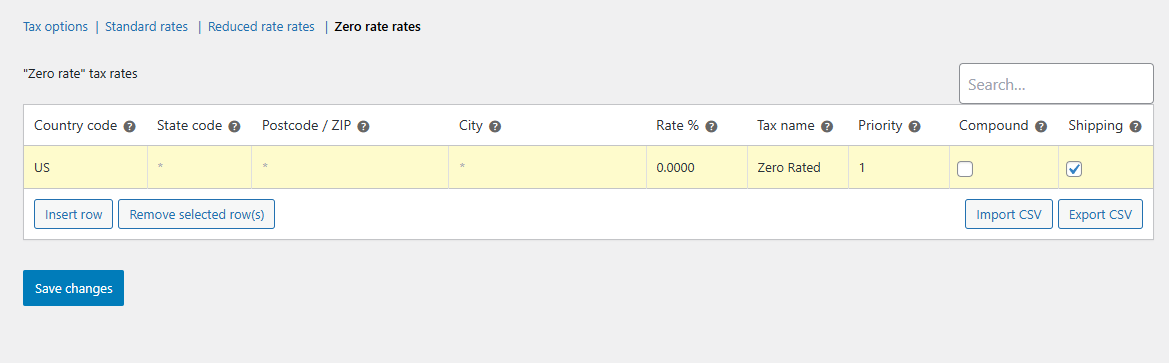
Use these tabs whenever your region’s tax rules call for special lower or zero rates. After setting these tax rates, assign them under Product Data > General > Tax Class, as we did for the standard rate class.
WooCommerce Tax Settings Guide: Core Configuration
Now that we have checked how to add tax rate in WooCommerce, you must also be aware and set up WooCommerce Tax Options properly to display accurate taxes to your customers.
WooCommerce provides a number of settings for you to manage how taxes are calculated and displayed in your store. These various settings are crucial to ensuring that products and orders receive the correct taxes based on your location and business type.
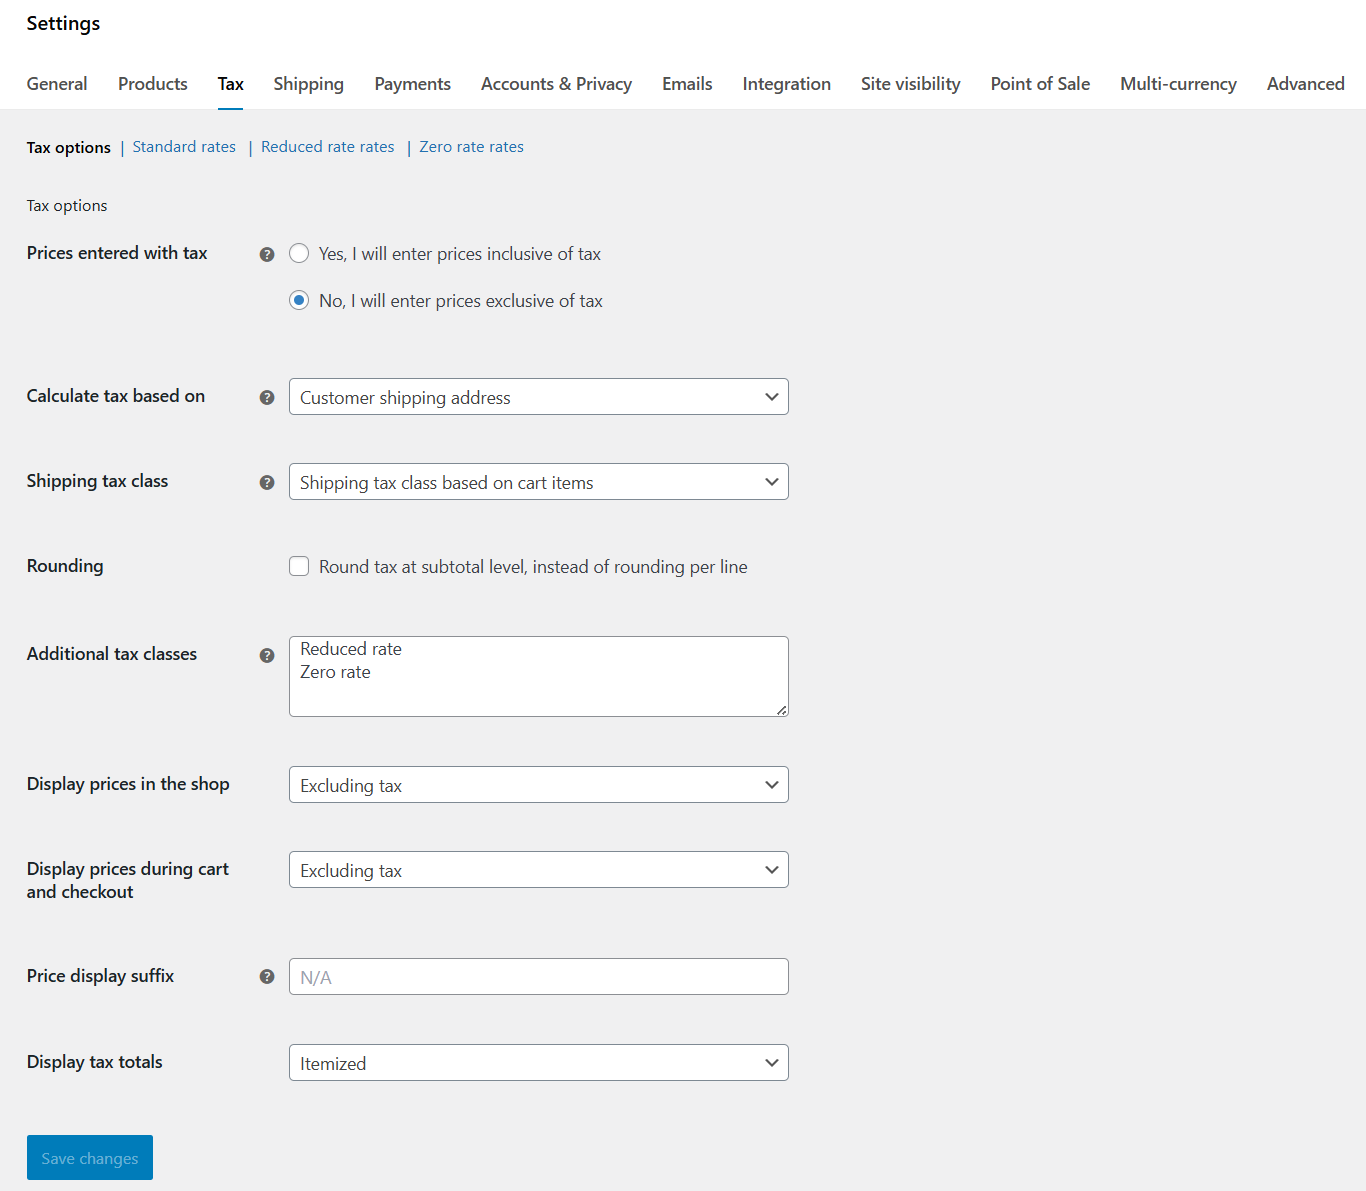
You can find them under WooCommerce > Settings > Tax > Tax options. Here’s a breakdown of each core configuration setting:
Prices entered with tax
Here you choose whether your product prices include tax or not:
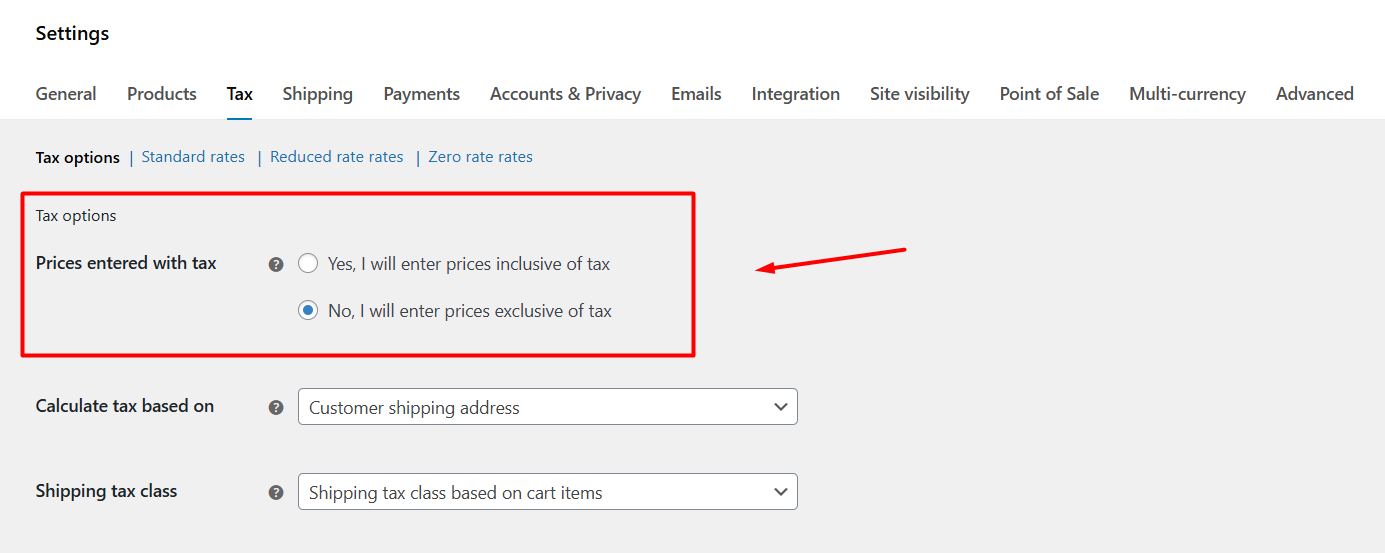
- Inclusive (“Yes, I will enter prices inclusive of tax”) signifies that the Regular product price includes tax. For instance, if you set the price of a product at $120, it includes tax. WooCommerce will do the math automatically and display tax-included prices. (Usual in places with VAT or GST, such as the EU or Australia)
- Exclusive (“No, I will enter prices exclusive of tax”) means that the Regular price does not include tax, and it will be shown separately on the cart and checkout pages. For example, a $120 purchase will have tax added on top at checkout. (Common for US sales tax)
This choice must align with how you source and display prices, especially in regions where price tags must show tax-inclusive amounts.
Calculate tax based on
This dropdown lets you choose the address WooCommerce uses to find the right rate:
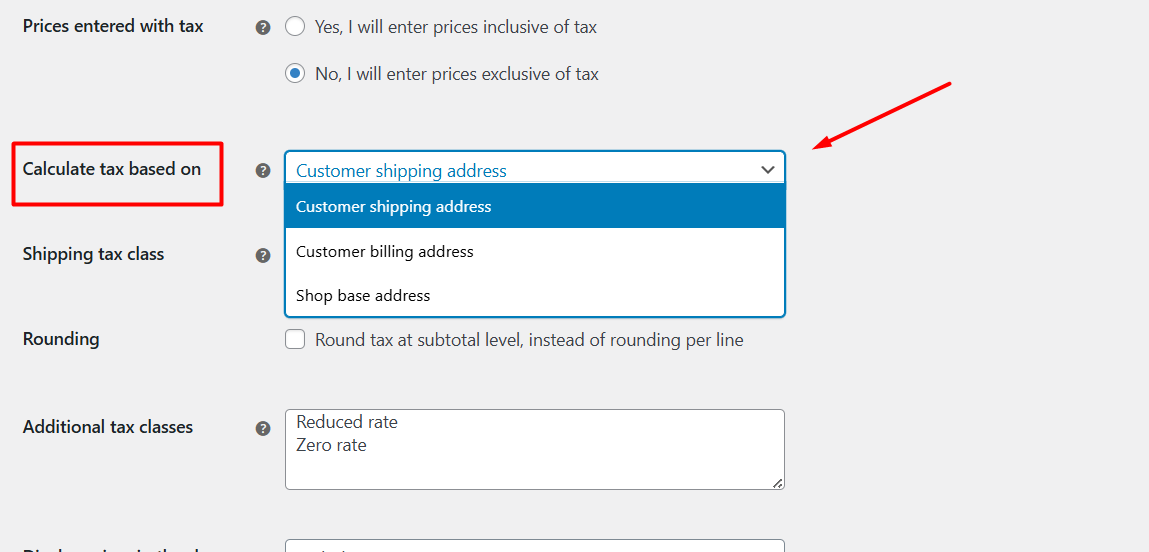
- Customer shipping address (default): Tax will be calculated based on the location where you deliver. This is the most common option, especially for physical goods. WooCommerce will use the customer’s entered shipping address to apply the correct local tax.
- Customer billing address: Tax will be calculated based on your customer’s input billing address. Useful for digital products or services where billing location matters.
- Shop base address: Use this if you have a single, flat tax rate that applies to every customer, no matter where they are located.
Choose the option that works with your local tax rules. For example, a shipping address is generally used for physical goods, while a billing address is often used for digital downloads.
Bonus tip:
You can also add customers to your WooCommerce store who are exempt from paying taxes using extensions such as Tax Exempt for WooCommerce. You need to make certificates for the consumers who don’t have to pay taxes in this scenario.
The certification must have the names of the seller and buyer, the type of exemption, the state tax ID number, and the customer’s signature and date.
Shipping tax class
You can define how shipping tax is applied from the following settings.
As you know by now, in WooCommerce, you can have multiple tax classes, each with its own set of tax rates. For example, you might have a “Standard” tax class for most products, and a “Zero Rate” tax class for products like food, which are exempt from tax.
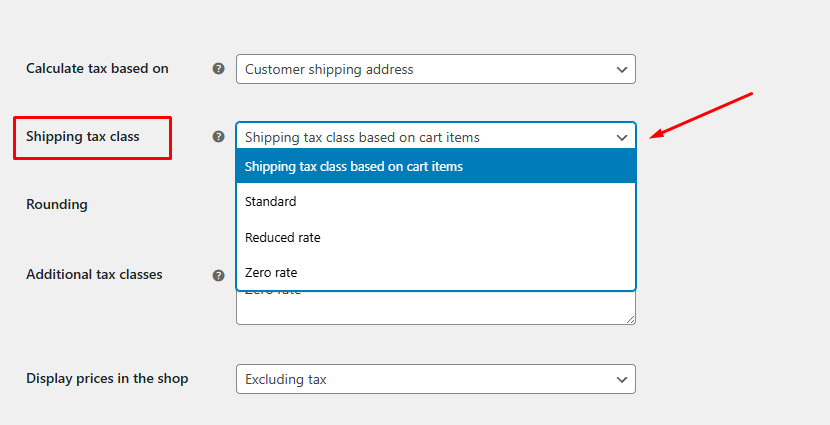
The “Shipping tax class” setting allows you to specify which of these tax classes should be used to calculate the tax on the shipping fee.:
- Based on cart items (default): Inherits the highest-priority tax class from the products in the cart (so reduced-rate goods keep their lower shipping rate).
- A specific tax class (e.g., “Standard”, “Reduced Rate,” etc.): You can choose to always apply a specific tax class to the shipping cost, regardless of what’s in the cart. This is useful if you want to ensure that shipping is always taxed at a consistent rate.
- Custom tax class: You can create a custom tax class by simply inputting a name in the Additional tax classes field and then configuring it from the newly generated dedicated tab. This new class will appear in the Shipping tax class dropdown as well, from where you can assign it for shipping costs.
Rounding
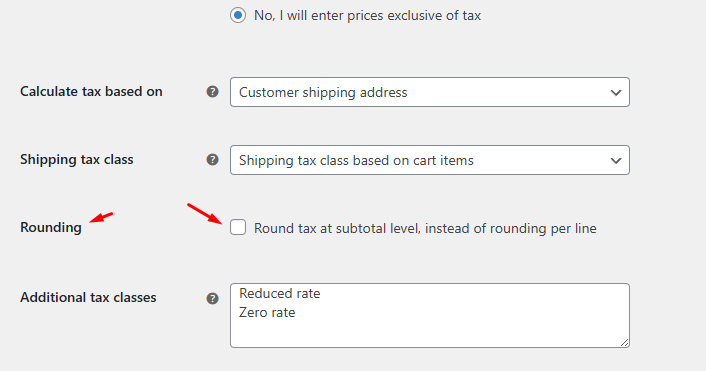
WooCommerce always rounds up the figure after calculating taxes. For example, if the tax amount is $0.4995, it will be rounded to $0.50.
- Per line: If you don’t enable that checkbox, WooCommerce will calculate and round up tax for each item separately and then find the total tax.
- Subtotal level: First, it will get the subtotal of all items added to the cart and then calculate and round up the tax amount.
Subtotal rounding can avoid small discrepancies but may differ slightly from per-line totals; WooCommerce warns you if your rounding display settings conflict.
Additional tax classes
We have already mentioned how to add additional tax classes. Beyond Standard, WooCommerce includes Reduced rate and Zero rate by default.

In addition to those, you can add custom classes (e.g. “Digital Goods” or “Eco products”) to assign different rates per product. After creating a class here, it appears when editing each product under the Tax class.
Display prices in the shop
Choose whether catalog pages (product listings, archives) show prices Including tax or Excluding tax. This should match your “Prices entered with tax” setting at the top of the page to avoid confusion or rounding errors.
Display prices during cart and checkout
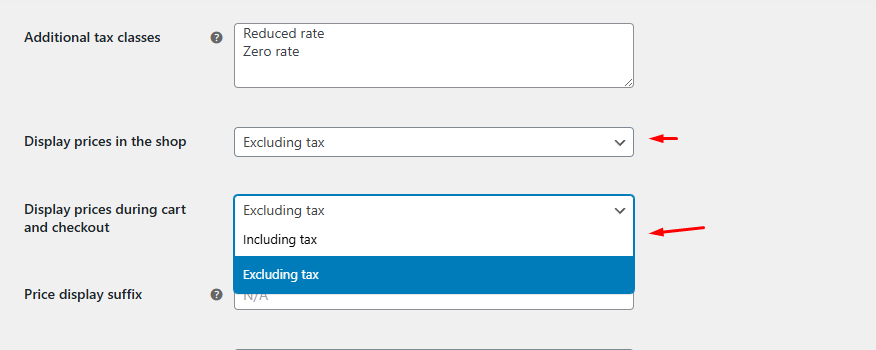
Separately control how prices appear to customers in the cart and checkout pages. Again, consistency with your entered price setting is key to prevent “reverse-calculation” rounding warnings.
Price display suffix
(Optional) Add a suffix—like “(inc. VAT)” or “(ex. Tax)” – to clarify what your listed prices include. This small label can reduce customer questions and improve trust.
Display tax totals
Decide between:
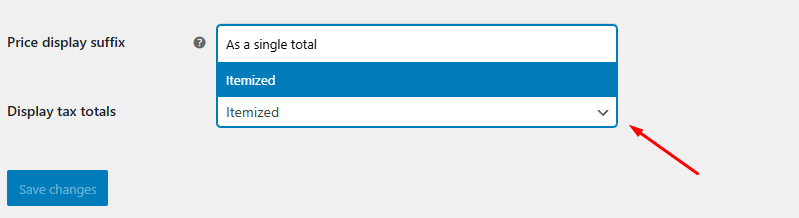
- As a single total: it combines all taxes into one line.
- Itemized: shows each tax rate separately (e.g. “Standard rate (10%): $5.00; Reduced rate (5%): $2.00”).
Itemized totals give transparency when multiple rates apply; a single total keeps the order summary cleaner.
Overall, these WooCommerce tax options settings help you how prices clearly and charge the right tax every time.
Automated Tax Solutions (Optional but Recommended)
When your store sells across many regions, keeping tax tables up to date can become a full-time job. Automated tax plugins save you time and reduce errors by fetching the right rates for each sale in real time. Here’s how they help:
- Real-Time Rate Calculation
Instead of manually updating tax percentages, these plugins use your customer’s address to look up the correct rate the moment they check out. That means no more hunting down new local or regional rates, your store always has the latest data. - Compliance and Nexus Management
Complex rules like economic nexus thresholds in different states or changing VAT laws in the EU are baked into the service. The plugin tracks where you’ve met those thresholds and applies the right rules so you don’t accidentally under- or over-charge tax. - Built-In Reporting and Filing
Beyond calculation, most solutions generate detailed tax reports ready for your accountant or to upload directly into filing software. You’ll see summaries by region, product type, and date range, all in one dashboard.
Popular Plugins to Consider
- WooCommerce Tax (powered by Woo)
This official plugin from WooCommerce gives you location-based, real-time sales tax for the US and many other countries with zero manual setup. This is a free extension, available both in the WooCommerce extension library and the WordPress repository. - TaxJar for WooCommerce
With a one-click connection, TaxJar imports every transaction and calculates tax automatically. It also offers advanced features like exemption handling, threshold tracking, and easy-to-use tax reports. - Avalara AvaTax
Avalara plugs into your WooCommerce workflow to deliver enterprise-grade accuracy. It updates rates based on geolocation, product taxability, and current legislation. You can even map your products to Avalara tax codes for precise results, plus get built-in returns preparation and exemption certificate management.
How to Add Tax Rate in WooCommerce Using a Plugin?
Let’s set up automated tax rates using the official WooCommerce tax plugin. Here are the steps:
- Log in to the WordPress admin panel.
- Go to Plugins > Add Plugin.
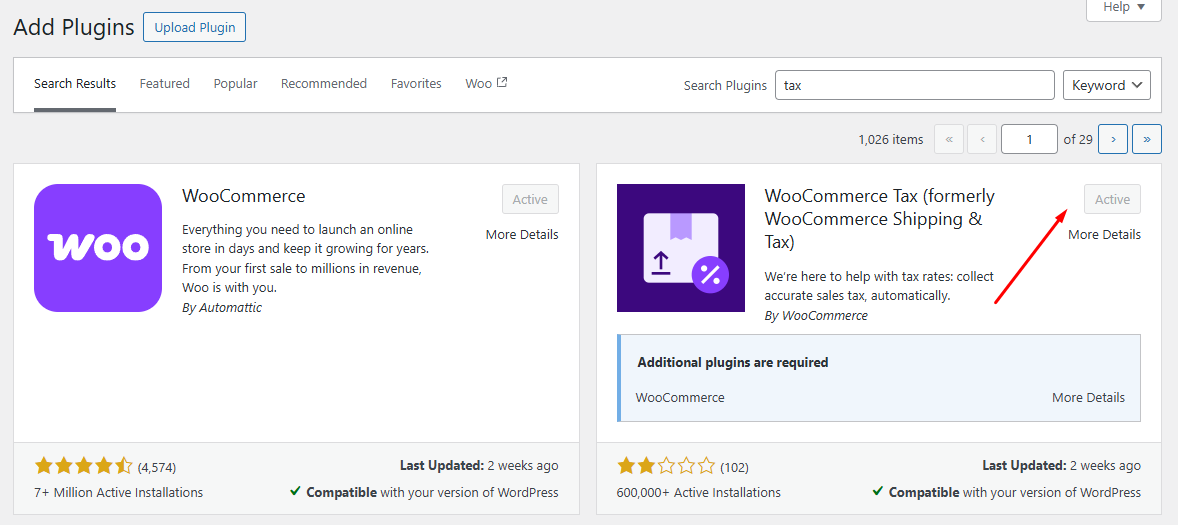
- Search for the tax extension, install, and activate.
- Navigate to WooCommerce > Settings > Tax > Tax Options.
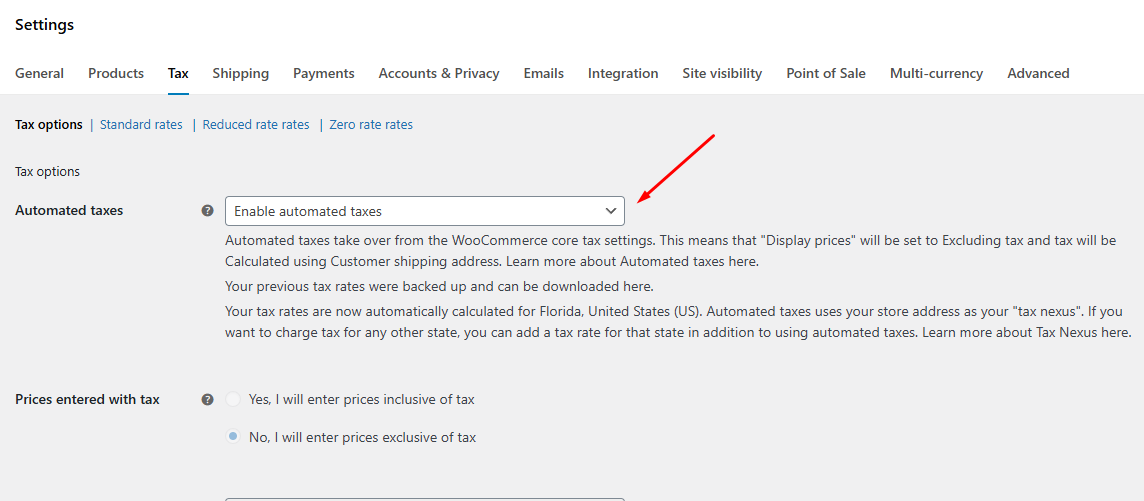
- Enable Automated Taxes from the top.
- Save changes and test from the front by adding any product to the cart.
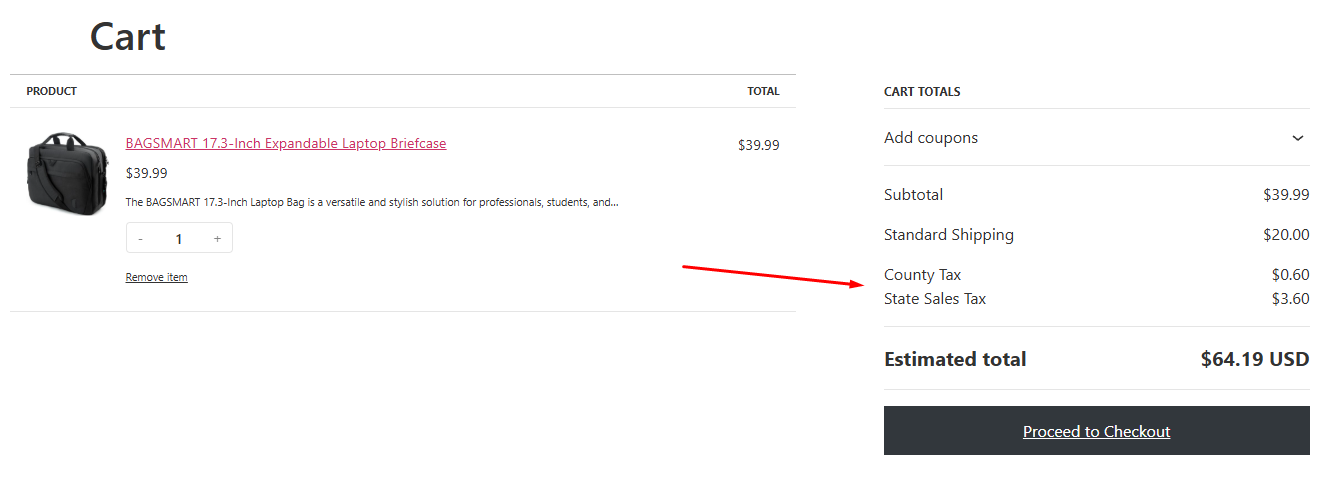
The biggest advantage of this method is that you don’t even have to assign any tax classes to any products individually. The extension will calculate taxes based on the customer’s location or entered address automatically.
This is how to add tax rate in WooCommerce using an extension.
Is Automation Right for You?
Automated solutions shine when:
- You sell in many states or countries with different rules.
- You need to track economic nexus thresholds automatically.
- You want built-in reporting or integration with filing services.
If your store only ships locally or you prefer full manual control, WooCommerce’s built-in tax settings may be enough. But once you begin selling into multiple jurisdictions, an automated plugin can pay for itself in saved time and audit peace of mind.
Wrap Up
That was our guide on how to add tax rate in WooCommerce.
Setting up taxes in WooCommerce may seem tricky at first, but once you know the steps, like enabling taxes, choosing how prices are entered, configuring where tax is calculated, and adding your standard or custom rates, it becomes a straightforward part of launching your store.
Remember, WooCommerce does the math, but it can’t give you legal advice. Tax laws vary by country, state, and even city, and they change often.
For the most reliable guidance, talk with a qualified tax professional in your region. That way, you’ll be sure your store stays compliant while you focus on growing your business.